Copyright © 2026 Balmoral Software (http://www.balmoralsoftware.com). Portions copyright © 2025 by Vertigo Games. All rights reserved.
Completing many of the rooms in the Stauf mansion now involves solving one or two preliminary logic puzzles, which then activate a final puzzle. Puzzles are always solved using only the materials in the current room. A few of the puzzles from the original game were retained in terms of general concept or subject matter. There is one difficult timed sequence well into the game, and a weird and complex random game at the end. It's like the game designers didn't want to recreate the difficult Infection puzzle but didn't want to altogether abandon the idea of it.
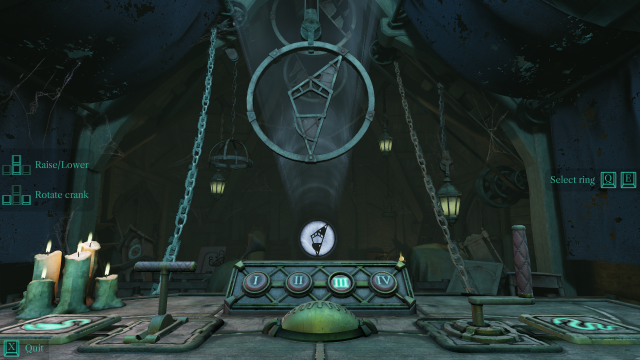
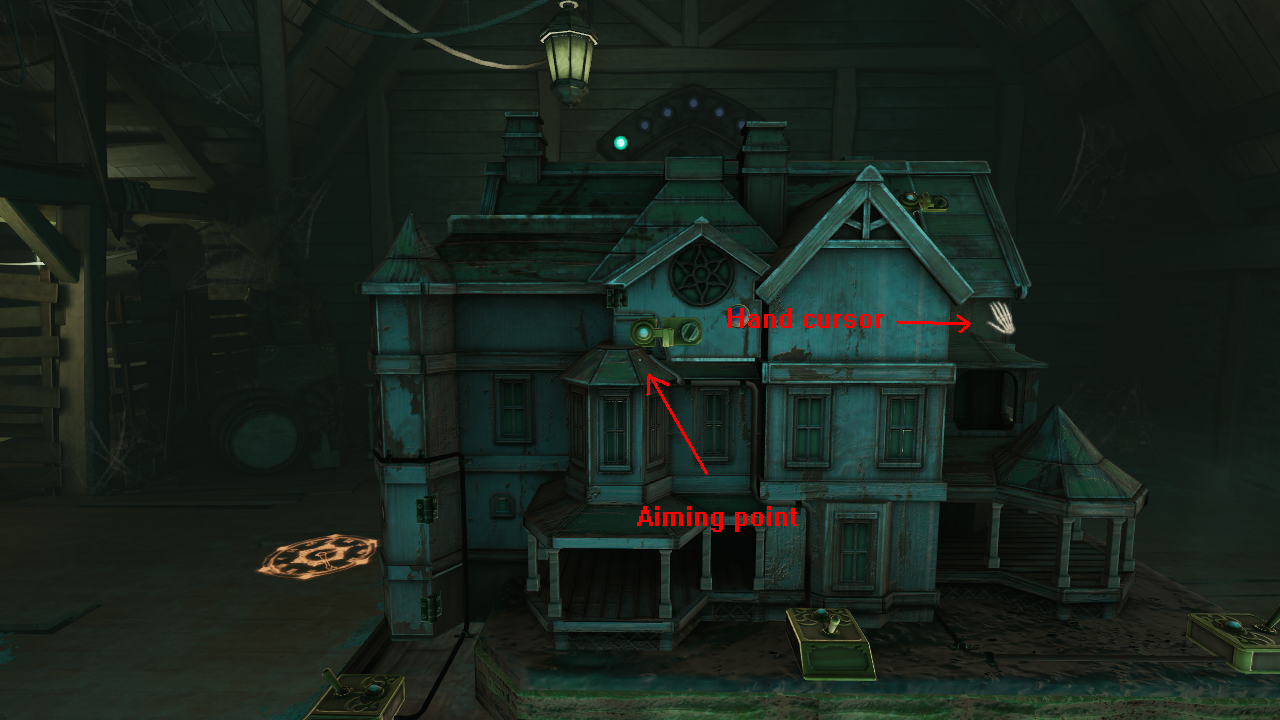
The interface takes a bit of getting used to, particularly if you're accustomed to point-and-click games that have a clearly-visible cursor. In this game, there's a tiny white pixel aiming point that can be used when moving the mouse around (it's more visible against a dark background). This often is not where the action takes place when you click the mouse if there's a skeletal hand icon that has appeared somewhere else, which can make it a bit too easy to click on the wrong spot or lose the location of the viewpoint.
The vast majority of objects in the game have no purpose, although you would think they might. For example, all of the many pieces of luggage, scrolls and notebooks are static objects that cannot be opened or read. There's an unnecessary two-step process to release an object in close-up. Most items examined and released will initially fall to some random location in the room, but after about 5 seconds will thankfully materialize back in their original location.
Character acting is much improved over the original game and subsequent sequels. Details of the backgrounds of Stauf's visitors have been substantially increased, which adds a lot more emotion to playing what is fundamentally a puzzle game.
The graphics are very impressive, with a great amount of detail provided in all of the rooms. A new and particularly satisfying change is that each room in the deteriorating mansion is restored to its former splendor when its puzzles are solved. Music is pretty good, if a bit repetitive. There are recognizable themes from the original game music as composed by The Fat Man, although there are newer compositions from him in the related game The 13th Doll.
If you're into that sort of thing, you can keep score for two collectibles: gold coins and Stauf chronicles. Other than making you "rich", the coins can be used to skip puzzles and continue the game so that getting stuck doesn't hold you up. Most of them are fairly easy to find, and you'll probably have many more than you need to cover the two or three difficult puzzles you may want to skip. Many of the gold coins pulse in brightness to make them easier to find in the dark rooms. Another achievement which is scored in the game is collecting "Stauf chronicles" describing an extensive backstory of how the mansion came to be. The chronicles are postcard-like verbal snippets that give you Stauf's history, some of which is consistent with the original Trilobyte games, but not necessarily with the later ones. There are 50 coins and 12 chronicles scattered throughout the house, and their locations are documented in this walkthrough.
All in all, The 7th Guest Remake is an excellent and immersive game that is a pleasure to spend time with. For related games in the 7th Guest setting, see the aforementioned 25th Anniversary version and the sequels The 11th Hour (1995) and the fan-made The 13th Doll (2019).
Uncrouch and move close to the lantern hanging from the front of the boat. There's a tiny white pixel aiming point that you can use when moving the mouse around (it's more visible against a dark background). Use it to cause the skeletal hand to appear over the lantern so that you can right-click to pick it up and carry it with you for the rest of the game. Move to the boathouse exit and look down. Press and hold the right mouse button to shine the lantern on the broken planks to cause them to be repaired. Repeat those repairs as you move along the path to the gate ahead.
Use the lantern to restore the broken dragon head lying at the left side of the gate. Take the green gemstone that is the dragon's eye -- the tutorial prompt about picking up objects will be to the upper left of the eye. Left-click to retrieve the gemstone, then rotate right and approach the dragon head on the other side of the gate. Put the gemstone into the dragon's empty eye socket and pick up a key from its mouth. While wielding this key, move back to the center of the gate and cause the skeleton hand to appear in the lock. Click to insert the key and unlock the gate. Push the gate open and slowly climb the path to the front entrance. When you get close, you'll be automatically transported inside the dreary and crumbling old house, starting in the familiar foyer at the foot of the main staircase.
Puzzle resets. A few of the puzzles in the game have a reset function, but most don't. Many of the solutions presented in this walkthrough rely on the puzzle starting in its initial state. If you've made any change to an unsolved puzzle, you can reset it by leaving the room and moving far enough away for the door to close, then re-entering.
Edward & Elinor KnoxWe'll learn a lot more about these characters as the game progresses, particularly as we visit each of their bedrooms in the mansion. When a cutscene finishes, a clock image appears on the floor where it took place, indicating the game time that it occurred, 4:59 in this case. If you need to replay the cutscene later, you can click on its clock image.
Brian Dutton & Martine Burden
Julia Heine & Hamilton Temple
Tad the boy
The Voices
Gold coin locations:
- In the right-hand drawer of a low table next to the first door along the wall
to the left of the gramophone.
- Behind the plant on a table in the window.
- In a glass cabinet on the other side of the room from the gramophone.
- On a corner of a table to the left of the glass cabinet.
Chronicle location:
- On the table in front of a sofa.
It's now 5:00 and time for dinner! Each chapter in the game corresponds to an hour experienced by the guests in the mansion. Follow the purple butterfly to the double doors of the dining room, to the left of the staircase. Before going in, note the ghostly, smoky aura around the doors, which always indicates an open room that you haven't yet visited.
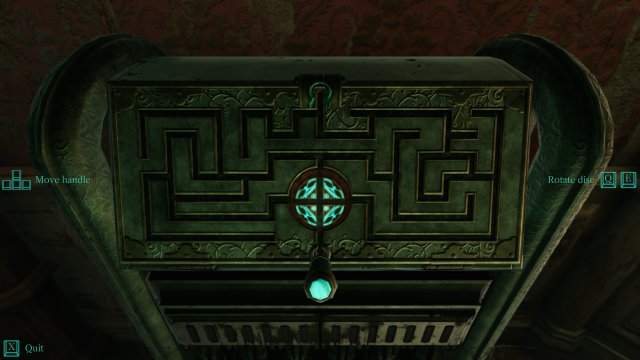
This is an easy puzzle to get you started. There's only one basic path through the maze, and you can use the Q and E keys to rotate the center disc when needed. The angled perspective of the handle sticking out from the path behind it means that you may have to move the top of the handle farther to the sides to put its post into the correct position in the slot. This is a consideration when having to traverse T-intersections, but not for the corners. Here's a solution path:
When the device opens, pick up a decorated dinner plate and deposit it into its receptacle in the opposite rear corner. Click on the music box on the windowsill to hear Stauf's message to Edward Knox. At the end of the dining table, shine the lantern for a few seconds on the place setting to obtain another plate. Deposit the plate into its receptacle in the corner to the right. The cabinet above opens and you can pick up a decorated rectangular plate with a boy's profile on it. Take the plate to the opposite long side of the table and put it into the spherical puzzle.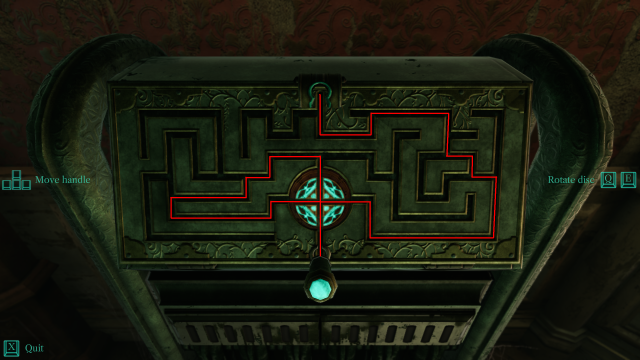
This is the "home" position of the puzzle since it can be rotated with the arrow keys. Before starting the puzzle, pan down and use the lantern on the white scratches on the table to reveal a hint that shows a combination of four different symbols: bird, donkey, fish and the boy. Examining the puzzle, you can see that the lit faces correspond to these four symbols, so it's evident that we'll need to group other quads of faces in a similar connected manner, analogous to the Cake Puzzle in the original game. However, this puzzle is a bit more challenging because the faces are in continuous rows, so there are no left and right boundaries to the puzzle.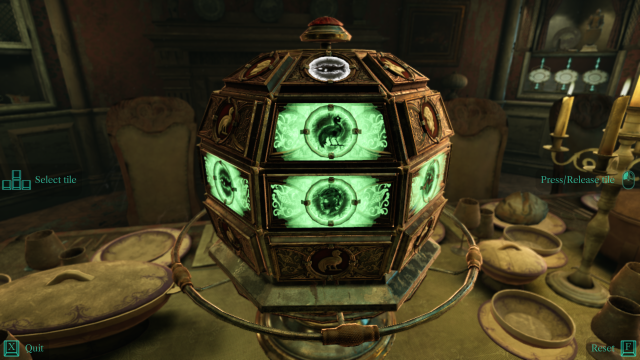
The diagram below represents the faces on the sphere, using the following abbreviations:
B: Birdwhere position 15 is where you added the plate. To skip the derivation and jump to the solution, click here.
H: Horse
D: Donkey
Y: boY
One thing we can immediately determine is that two adjacent symbols that are the same must be separated by a quad boundary. These are shown by the double-line barriers in the diagram above.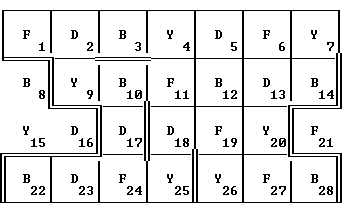
Quad 2: Positions 22-24 are in a cul-de-sac, so they must be part of a quad with Y25 since they cannot join with D17.
Quad 3: Positions 27-28 are in a cul-de-sac, so they must be joined with either Y20 or Y26. In the latter case, the fourth face can only be F19, a contradiction. Therefore, 27-28, 20 and 13 are a quad. The puzzle so far looks like this:
Quad 4: Y26 is now in a cul-de-sac, so it's joined with F19. The other face connected to F19 must be either B12 or D18. If it's B12, then the final face in the quad is either D5, F11 (a contradiction), or D18. In the first case, the only quad containing Y7 would have two F's, a contradiction. Therefore, D18 is joined to F19, leaving B12 as the last face in the quad. The puzzle so far looks like this: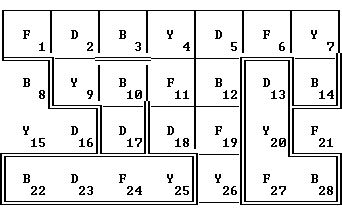
At this point, there are three possible ways to complete the puzzle: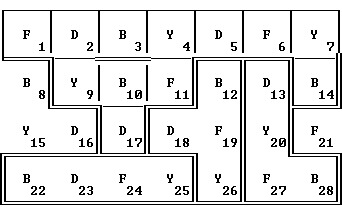
The first of these has no quads that extend across the border to the left of the home position (other than the initial one you are given):
Quad 5 Quad 6 Quad 7 9,10,11,17 1,2,3,4 5,6,7,14 9,10,11,17 1,2,7,14 3,4,5,6 4,10,11,17 1,2,3,9 5,6,7,14
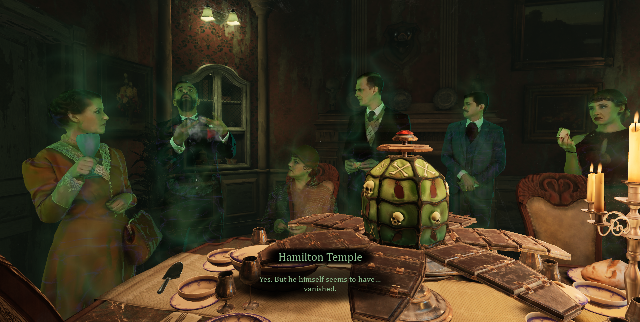
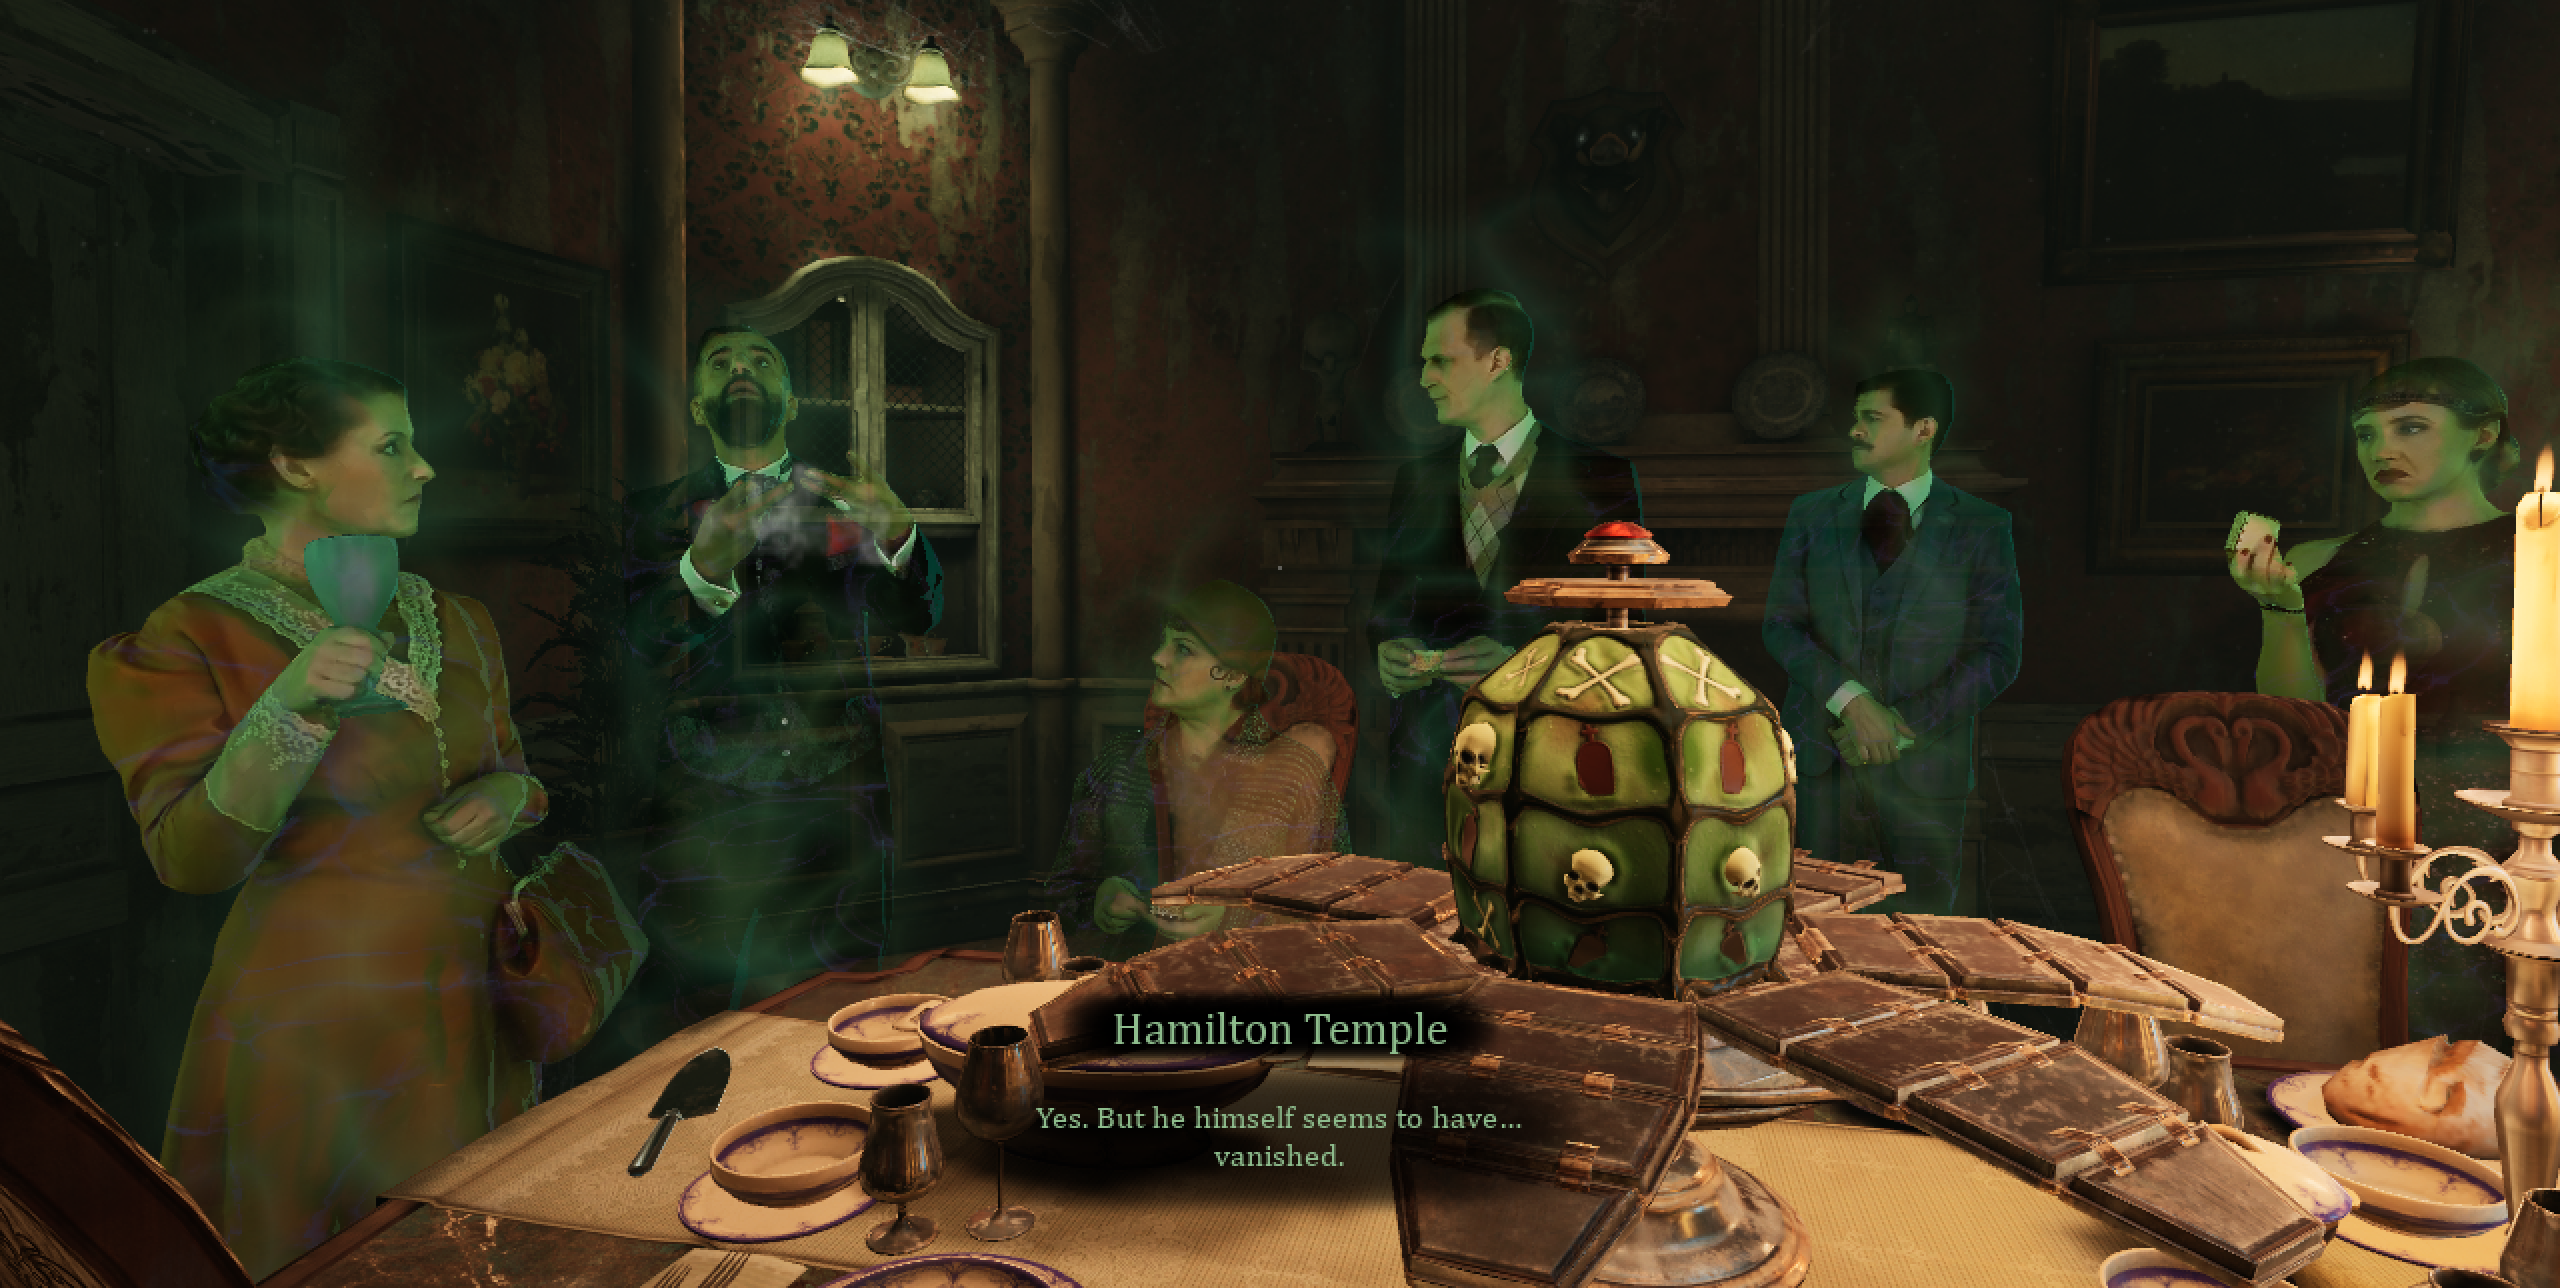
A cutscene plays with the six ghosts inhabiting the house appearing together. Left to right, they are: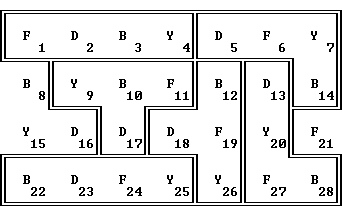
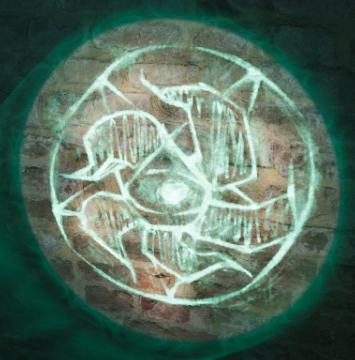
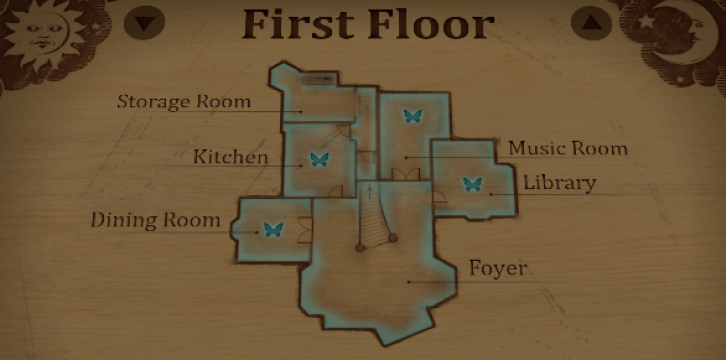
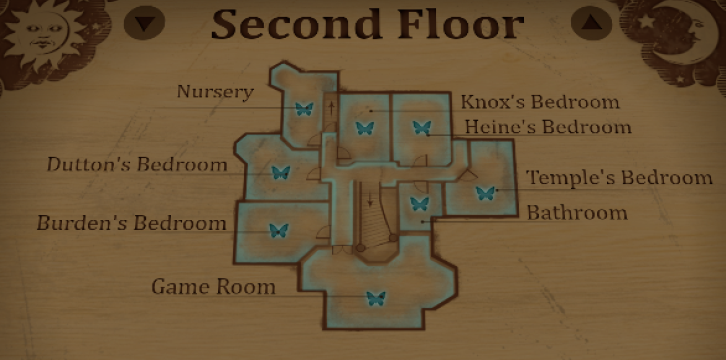
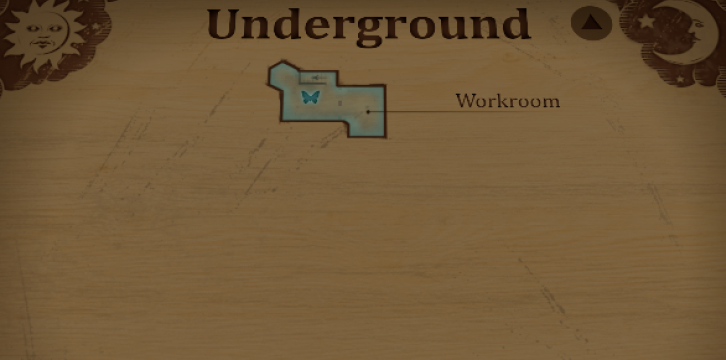
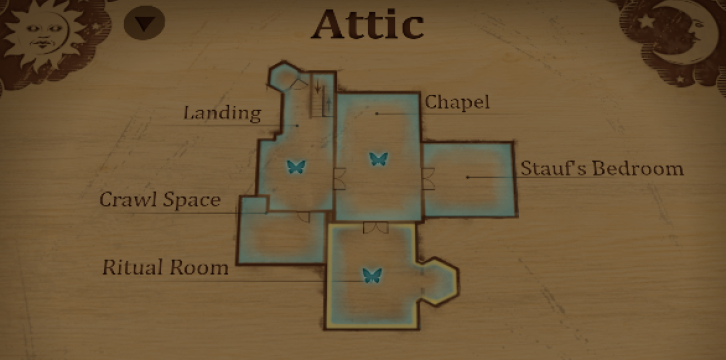
The room is then restored to its former glory. Before you're able to leave, approach the side table to the left of the plates cabinet and shine the lantern on the swirling pattern. Pick up a Ouija (Spirit) board that provides a progress map of the house when the [Tab] key is pressed. It includes the status of room puzzles and which areas are accessible, but doesn't provide fast travel as in a related game. Completed rooms are outlined in blue, with a blue butterfly indicating a puzzle that has been solved there (the foyer doesn't have one). The currently-occupied room is indicated by a faint yellow border. The spirit board also includes achievement scores under "Progression". Press [Tab] to return to the game.
Julia Heine Hamilton Temple Elinor Knox Edward Knox Brian Dutton Martine Burden
Gold coin locations:
- On the balance scale in one of the corners closest to the door.
- In the covered casserole dish at the end of the table.
It's now 6:00 and the Dutton, Knox, Heine and Temple bedrooms have opened up. Visit the upstairs hallway next, watching another cutscene in the foyer along the way.
First coin: Take the side hallway by making a U-turn to the left at the top of the stairs. You'll soon pass a dumbwaiter at left that you can open. Press the upper button at right to summon the dumbwaiter if needed and obtain a gold coin for your trouble.
Second coin: Continue down the side hallway and open the drawer of the table next to the door leading to Burden's Bedroom.
Third coin: Return to the main hallway, turn right and proceed to the end of the hallway. A gold coin is waiting for you on the windowsill there.
Visit Dutton's Bedroom next.
Move the hanging garment to the left to disclose a mirror. This suggests entering the 4 symbols on the wall in reverse order. Zoom in on the puzzle and rotate the left four wheels to match the symbols on the wall, then use the right four wheels to enter them in reverse order. Take the object from the puzzle, then move towards the far corner of the room. Slide the large wall painting to the right to reveal Stauf's safe. Transfer the puzzle object to one of the open cardinal points on the safe. Turn around and approach the large trophy on a stand by the window.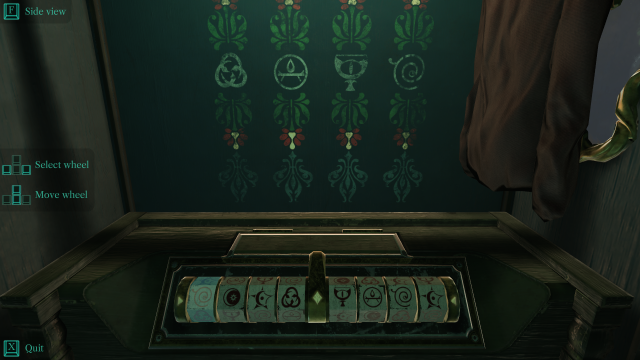
L: LeftUnless traversing a T-intersection, the arrow key is held down until a corner is reached. There are four T-intersections in the solution, each of which may require several back-and-forth attempts since the controls sometimes don't line up the handle precisely. The Q and E keys can be used whenever needed to improve the view.
R: Right
U: Up
D: Down
Move U L U L D:
Move L D L to cross the first jewel. Move U and then L just far enough to move U from the T-intersection to reach the second jewel. Move R U R U R D and the path should look like this: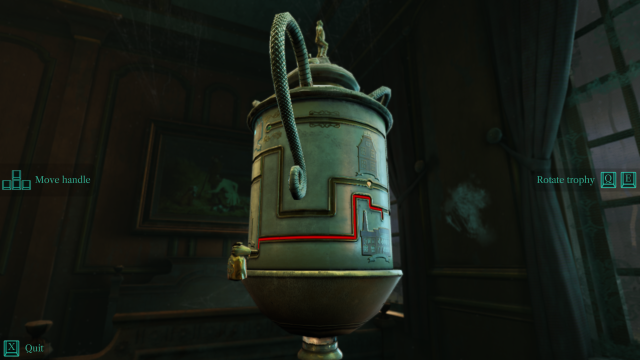
Move R U R D R D to cross the third and fourth jewels: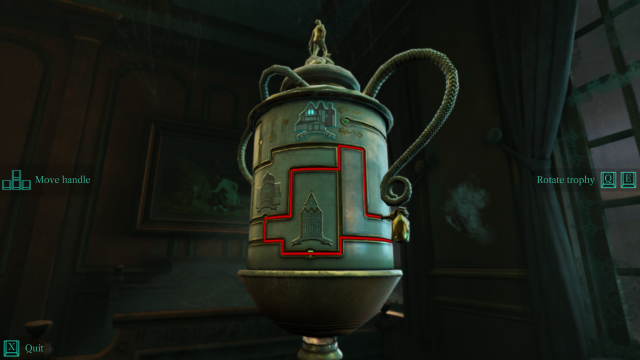
Move R U: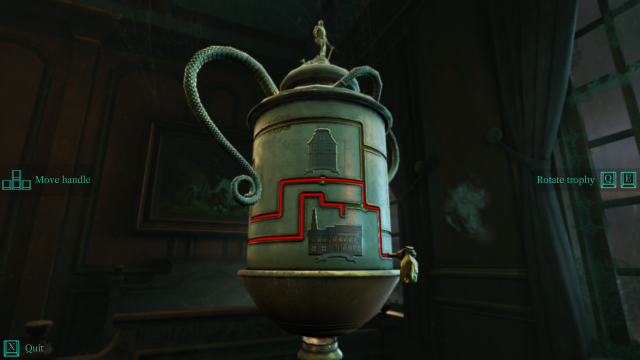
Move R a bit. When you reach the T-intersection between the two houses, move U. Move R a bit to the next T-intersection. Move U and cross the fifth jewel. Move L D L D to cross the sixth jewel: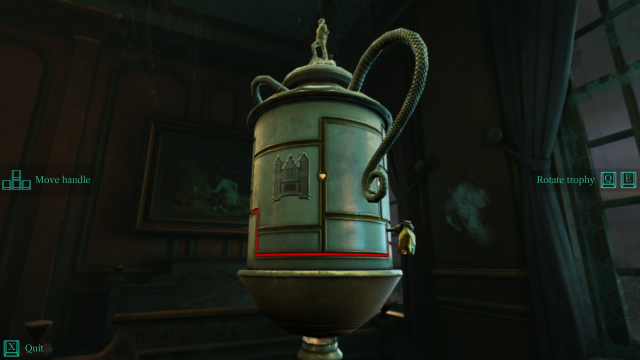
Move L and then U just far enough to cross the last jewel. Continue U to the T-intersection, then move L U: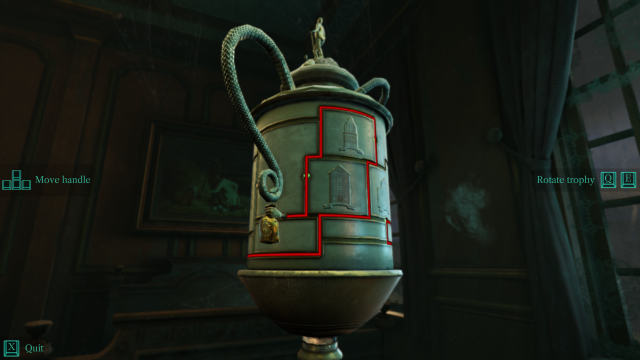
Move L to the end of the maze to finish the puzzle: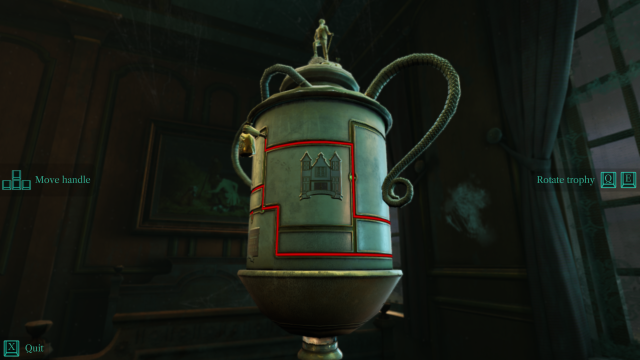
Pick up the object from the top of the trophy and transfer it to one of the open cardinal points on the safe behind you.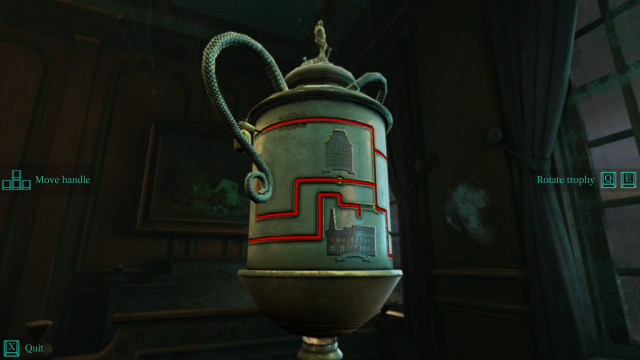
The object of the displayed puzzle is to trace a non-intersecting path from the bottom to the top while turning over all of the money bags. There are four barriers and four pitfalls that constrain your path. To skip the derivation and jump to the solution, click here.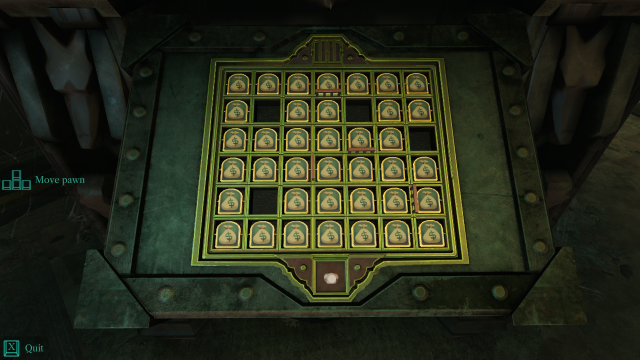
The barriers, pitfalls and boundaries require the solution to include all of the following path segments:
The obstacles above and below cell 17 force the path to be horizontal at that point. Cell 5 will be a dead-end if the path goes from cell 3 to cell 4, so the path preceding the exit comes from the right, and cells 3 and 9 are connected: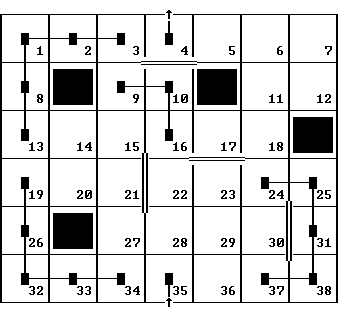
If cell 18 is connected to cell 24, the cells in the upper right corner of the puzzle would be a dead end. Therefore, cells 18 and 24 aren't connected and the rest of the path in the corner is determined. Also, cell 15 must have two exits: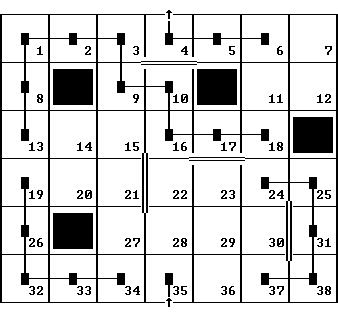
If cells 13 and 19 are connected, there would be an isolated loop for cells 14, 15, 20, 21, so they are not connected and the reset of the path in that vicinity is determined. This completes all of the path except for the very first cells: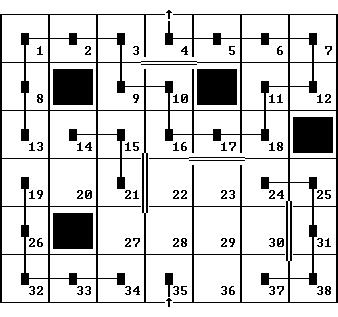
If cell 27 is not connected to cell 34, it becomes a dead end, so those cells are connected. Consequently, if cells 28 and 35 are directly connected, part of the path would be isolated. The current state of the puzzle then is: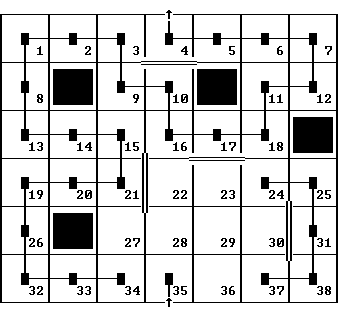
Cell 22 is a corner: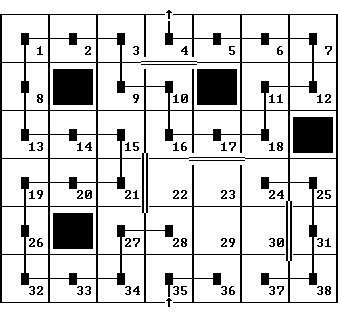
At this point, there are two possible choices to complete the path, either a straight line joining cells 22-25 and an oxbow along cells 36, 29, 30, 27, or the inverse: a straight line joining cells 35-38 and an oxbow along cells 23, 29, 30, 24. The former solution is shown below: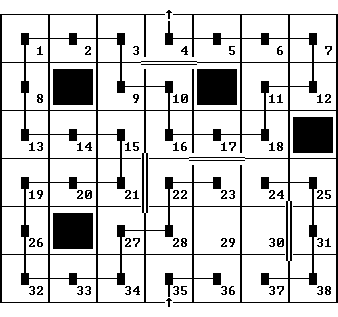
Pick up the object from the lion's mouth and transfer it to the last open cardinal point on the safe.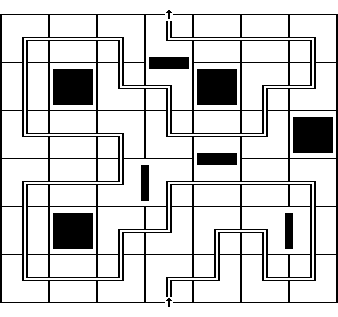
The objective of this puzzle is to transfer the yellow marble to the exit at the bottom, while avoiding the various intermediate pitfalls. The four gear controls are identified here by their compass points. Use the mouse or adjust the rotation of N to drop the marble into the large N gear. Here is a solution in 13 moves: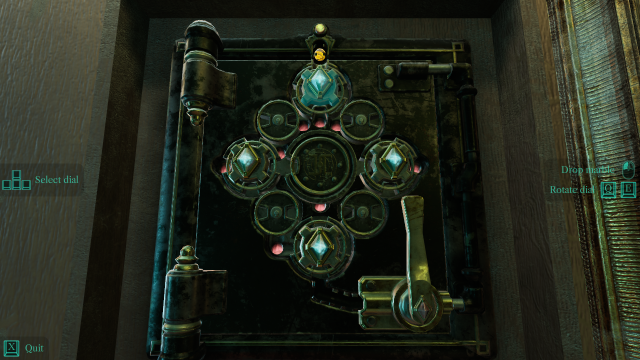
Move the lever to open the safe and trigger a cutscene, after which the room is restored.
Control Rotation Key Task N CW "E" Move the marble into the SE position E CCW "Q" Drop the marble into the small NE gear E CW "E" Put a slot of the large E gear into the NW position N CW "E" Drop the marble into the large E gear W CW "E" Set the hole of the central gear at the SE position E CCW "Q" Drop the marble into the central gear W CCW "Q" Put a slot of the large W gear into the E position E CCW "Q" Drop the marble into the large W gear W CW "E" Put the marble into the SE position of the large W gear S CCW "Q" Drop the marble into the small SW gear S CW "E" Put a slot of large S gear into the NW position W CW "E" Drop the marble into the large S gear S CW "E" Exit the marble
Gold coin locations:
- In the left drawer under the safe.
- On the top of the bed headboard.
Chronicle location:
- On the left side of the desktop.
Exit the bedroom, turn left and enter Knox's Bedroom at right.
Zoom in on the table next to the door and examine the check lying closest to the lamp. Make a note of its amount: 356191. Zoom in on the comptometer device. The objective of this puzzle is to enter the check amount. The columns of the device are numbered 1 to 6 right to left. To skip the derivation and jump to the solution, click here.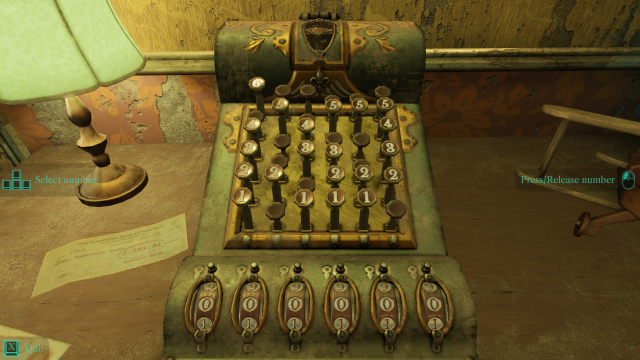
If more than one key is pressed in a column, the associated values are added and
a carry digit will be added to the next column to the left if needed. Carries
are always made to the left, so we will process the digits from right to left.
Since the first check digit is 1 but there's no 1 available in that column, we
obtain a value of 11 by pressing the 5, 4 and 2, creating a carry digit for the
second column. The additional amount needed for the second column is
Pick up the cube that is revealed, then turn around and put it onto the stacks of cubes at the foot of the bed. It will automatically be placed in the row that is in back when facing the bed. Approach the lit-up table along the right wall. Pick up a cube there and add it to the stacks of cubes. Open the left door of the wardrobe cabinet in the corner. Pick up a cube there and add it to the stacks of cubes.
Column: Leftmost (6) 5 4 3 2 Rightmost (1) Desired digit: 3 5 6 1 9 1 Press: 3 5 All except 3 All All All except 3
The objective of this shunting puzzle is to attach cars 1, 2, 3, 4 in order behind the engine. Out-of-order cars won't attach, so you can't move the cars ahead of time to optimize the movements, as a real train would. Switches 1-4 and track segments A-G are identified on the screenshot above. Switches are set so that the yellow flag with the green light points toward the desired track segment.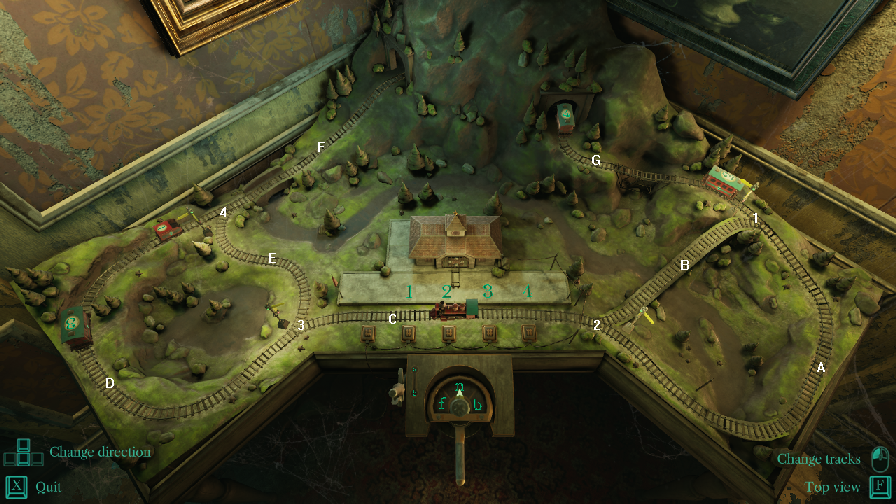
A full list of steps for a solution is shown below. We'll first need to reverse the orientation of the engine by backing it around the loop at right and returning it past the station so that it will be able to connect to Car 1 (tender) at left. Start by left-clicking the mouse to set Switch 2 to point to the right (towards track segment A) as shown above, then move the engine in reverse into that track segment:
Pick up a cube from the station building and add it to the stacks of cubes at the foot of the bed.
Car Switch Point to: Direction Track segments 1 2 A Reverse C A 1 B Reverse B C D 3 E Forward E F 4 D Reverse D 2 Forward D F 4 E Reverse E D 3 C Forward C 2 B Forward B A 1 G Reverse G 3 Forward G A 1 B Reverse B C D 4 3 C Forward D C 2 B Forward B A 1 G Reverse G Station Forward G A C
This is a clue that cube A should be placed there. Confusingly, the back-row stack where cube A is currently placed may be colored green (indicating a correct position), but this is a green herring.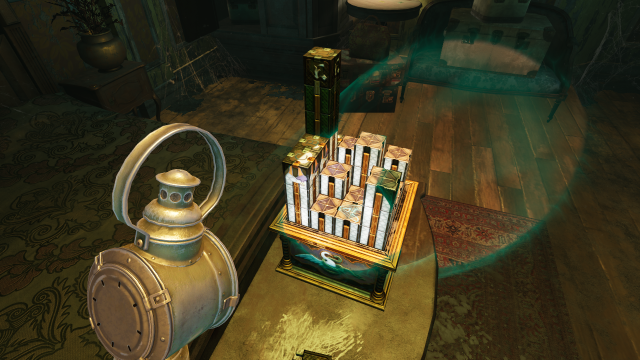
Zoom
Pick up a final cube from the table here and add it to the stacks, activating the final puzzle for this room. To skip the derivation and jump to the solution, click here.
The objectives of this puzzle may be difficult to discern without accessing both of the clues for it. You will need to position the 5 lettered cubes on 5 stacks that have the following properties:
Applying the criteria above, we have four possible stack groupings: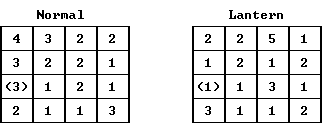
For testing purposes, the aggregate (union) of these possible locations for the lettered cubes is:
Start by moving the 5 lettered cubes to other areas of the grid that don't affect your line of sight, such as the back right corner or the front row. Place cube A into the position indicated above, and its column should turn green. Try placing cube B into the feasible locations above, and you'll find that the only position that turns the stack green is immediately in back of cube A. You may have to Quit the puzzle in order to view the stacks from the side, but the current puzzle state will be saved. Next, you'll find that there are two positions for cube C -- either to the right of or behind cube B. Each of these provides only one solution for the remaining cubes, in each case presenting a continuous path from A-E without any diagonal movements: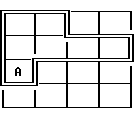
Note that the cubes can be placed in any order as long as they form one of these patterns. After the pattern is placed, activate the lantern to complete the puzzle and trigger a cutscene, after which the room is restored.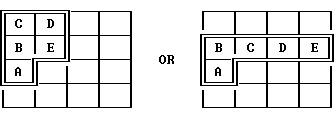
Gold coin locations:
- On nightstand.
- Underneath the doll in the crib.
Exit the bedroom, then make two left turns and proceed straight down the main hallway, opening the first door on the left into Heine's Bedroom.
to create the desired image: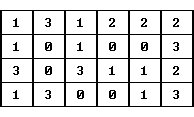
This puzzle has you play a drinking game based on Nim with an opponent. There are 15 drinks in the game, and you get to go first. At each turn, you and your opponent can down 1, 2 or 3 drinks, and the player who has to take the last (ostensibly poisonous) drink loses. A simple strategy to always win is to leave your opponent with a number of remaining drinks that is a multiple of 4, plus 1. So your first choice always is 2 drinks, which leaves 13 for your opponent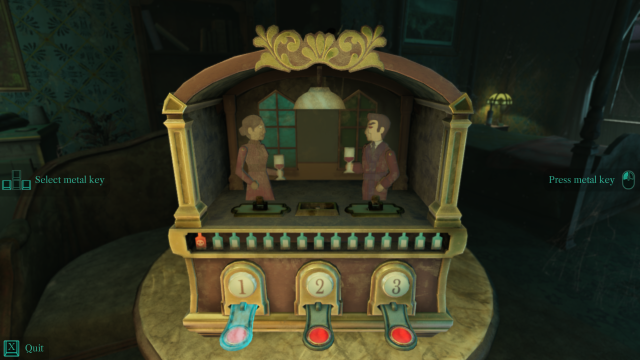
This is a standard warehouse puzzle in which you manipulate the caskets by moving them along their long axes in order to allow the brown casket to move to the right for a proper burial. Denote the caskets by A-L. To move a selected casket, just hold down the corresponding arrow key until the casket cannot move any more. A solution in 17 moves is: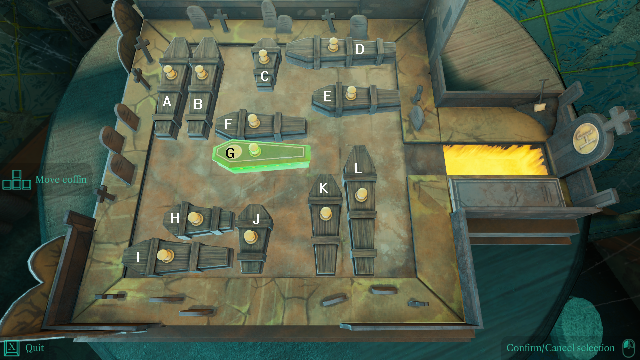
Move G leftAt this halfway point, the graveyard should look like this:
Move E left
Move K up
Move L up
Move J up
Move H right
Move I right
Move J down
Move G right
Turn around and approach the standing mirror next to the bed. Shine your lantern on it to trigger a cutscene and restore the room.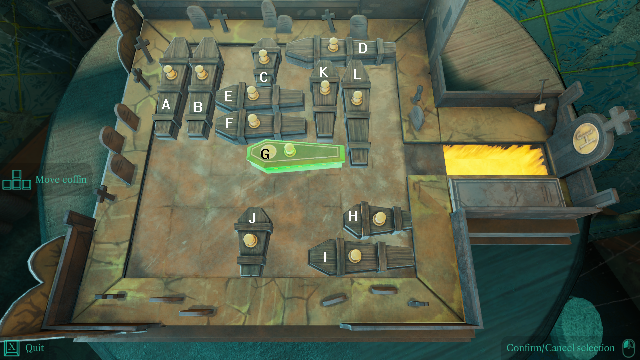
Move A down
Move B down
Move E left
Move F left
Move C down
Move D left
Move L up
Move G right
Gold coin locations:
- In the left side of the quilt cabinet.
- On the center table.
Exit the bedroom, turn left and enter the diagonal door ahead into Temple's Bedroom.
Turn around and approach the makeup table against the far wall. There is a locked cage here with a tophat inside. Turn around and go to the table and chairs, where you'll find another tophat, this one with two playing cards stuck into its brim. Pick up the hat and it will emit a strange energy field. Inspect the hat and you'll be seeing the view from inside the tophat in the cage, so somehow these two hats are communicating with each other. Click on the cage to raise up its lockpin. Back out from the hat and release it back to the table (eventually). You can now return to the makeup table to open the cage and take the other tophat. This hat has six buttons on it like a ringmaster's headgear, but has no energy field emanating from it. When you release the hat, it will return to its new home on the central table, next to the other tophat.
The purpose of this exercise is to show that you have a way of reaching into the tophat with cards and then out of the other tophat to remotely manipulate objects. This will come in handy presently.
Approach the bed to see that it has pressure-sensitive floor plates on both sides that light up when your weight (or the weight of a suitcase) is on them. Activating a floorplate causes the corresponding nightstand to close, so you can't get to the key inside that you can see dimly from a distance:
Retrieve the ringmaster's hat from the table and drop it on one of the nightstands (a blue outline should show up there if you're carrying the correct hat). If there's a suitcase on the floorplate, move it to somewhere else in the room. Return to the table and use the other tophat to get a key from the open nightstand. Insert the key into the chest at the foot of the bed. Repeat the procedure to get the second key from the other nightstand. When both keys have been inserted into the chest, a puzzle there will be activated.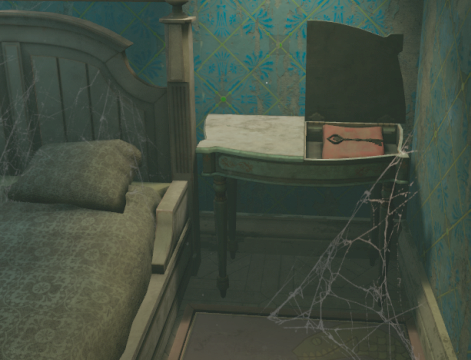
When the puzzle is completed, put the ringmaster's hat into the top part of the chest and watch it get miniaturized. Take it to the locked cabinet next to the five cups. Only the lower part of this cabinet can be opened. In order to place the tophat inside, use the C keystroke to crouch down, then put the hat in the highlighted location at the top of the opening. Go back to the center table and use the same procedure with the other tophat to retrieve another octagonal coin from the upper part of the cabinet. Turn left and take the coin to the chest sitting on the sofa table. Insert the coin into the remaining lit receptacle. This activates a "magic eye" that contains a mechanism for opening that chest, but you cannot reach it directly since the eye closes every time you approach it, similar to the behavior of the nightstands.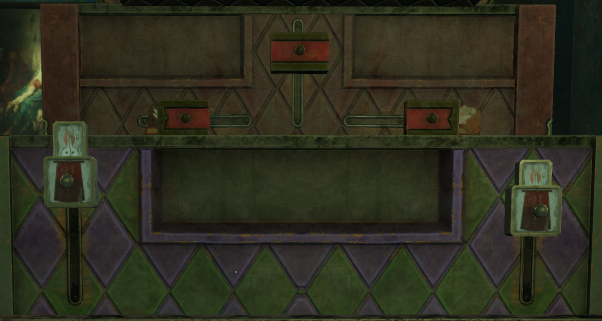
Zoom
Return to the lower part of the cabinet and retrieve the miniature tophat. If you are interested in another gold coin, you can move the tophat to a hole on the upper left side of the cabinet and use the "hat trick" to obtain it. Take the miniature hat back to the bed chest to have it restored to its original size. Return to the sofa chest and use the hat trick method to remotely open the chest. Take the sword inside and use it to open the blue and green cabinet in the corner, which triggers a cutscene before the room is restored.
Gold coin locations:
- In the locked cabinet (see above).
- Right side of sofa.
Chronicle location:
- On the center table.
It's now 7:00 and the library has opened up. Exit the bedroom and proceed left along the hallway. Shine the lantern on a scintillation under Stauf's portrait to obtain a vinyl record. Play it on the gramophone downstairs to learn about Stauf's library. Watch the cutscene in the foyer, then head to the Library.
This is a puzzle somewhat similar to the warehouse puzzle seen in Heine's Bedroom, but with an added twist. The objective is to move the 1 x 3 and two 1 x 2 bookcases to their target positions indicated by the small buttons or dots on the map, with their shelves facing the interior of the room. Left-clicking the mouse rotates the circle clockwise by 90 degrees, but most of the rotations we'll be doing are counterclockwise. Movement abbreviations are: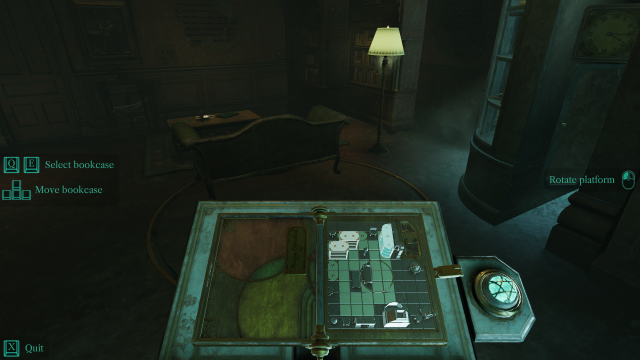
L: Left (Ln for n repetitions)Here is a step-by-step solution:
R: Right
U: Up
D: Down
Move the 1 x 3 bookcase D3 so that it's on the circle.Watch the cutscene with all 6 guests (not seen together since the Dining Room), and the library is restored. It's now 8:00 and the kitchen, Burden bedroom and game room have opened up.
Click 3 times to effectively rotate the circle once counterclockwise.
Move the 1 x 3 bookcase L3 to get it out of the way.
Switch to the upper 1 x 2 bookcase and move it R3 D2 onto the circle.
Move the other 1 x 2 bookcase U R4 D.
Switch back to the 1 x 3 bookcase and move it U2 R U into its final position.
Rotate the circle 3 times, then move the bookcase on the circle D3 L2 U5 L into its final position.
Rotate the circle once, then switch to the remaining out-of-position bookcase and move it D.
Rotate 3 times, then move the bookcase D3 L2 U3 L into its final position.
Gold coin locations:
- Upper-right drawer in the rolltop desk.
- In the bottom of the globe holding some bottles of alcohol.
Chronicle location:
- On the table by the sofa.
Make your way to the Kitchen next, watching another cutscene in the foyer along the way.
Most of these ingredients will involve solving a puzzle, naturally. Turn left from the recipe placard and move toward the large glass cabinet against the wall.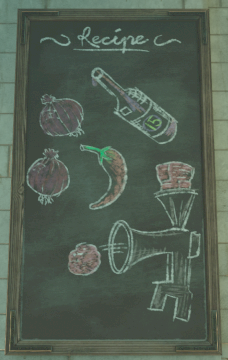
Bottle of wine
2 red onions
Whole red chili pepper
Meatball ground from a cylinder of meat
We can see what appears to be a red pepper that is out of reach in the right compartment. Slide open the two center doors and move in to identify the weights of the three cans on each of the three scales: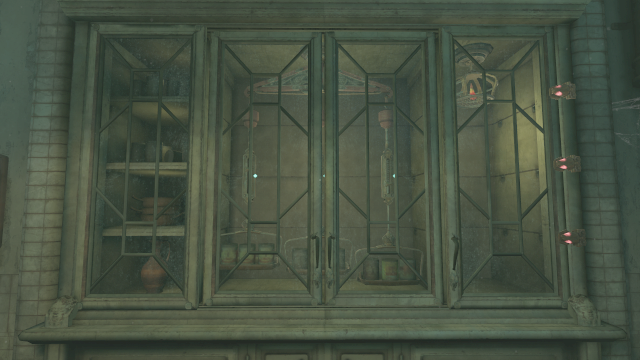
2 2 2 3 3 3 4 5 6This puzzle's subject matter is vaguely reminiscent of the Cans Puzzle in the original game, but the current one is considerably simpler. The object of the puzzle is to make all the scales the same weight using three cans each. The total of all nine cans is
6 + 9 + 15 = 30,so the goal is to set up each scale with three cans totaling 10. This can be done most efficiently with just two can swaps. Here are the steps needed:
The five pieces of meat on the cutting board will systematically be added to the collection on the spike. Important: Perform no rotations of the spike other than the ones listed in the table below. The current puzzle state will be saved if you Quit from it. The steps required for each piece of meat are: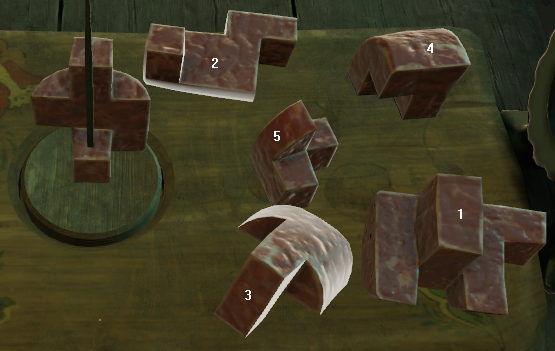
Pick up the cylinder of meat and put it into the top of the meat grinder. Open the refrigerator at right and take out the plate from the top shelf that looks like it might contain a crank for the meat grinder. Put the plate on the burners on the right side of the stove, then flash it with the lantern to melt off the debris. Pick up the crank and attach it to the meat grinder. Rotate the crank to create a meatball, and then add it to the soup.
Piece Rotations (E key) Height 1 2 2 2 4 0 3 2 9 4 4 12 5 2 11
Return to the refrigerator and use the lantern to identify a red onion to be added to the soup. Turn around from the soup pot and approach the meat cleaver at the other end of the table (it may be a bit tricky to see since it's edge-on from this angle). Pick up a second red onion next to the cleaver and add it to the soup. All that's left now is the wine...
Its three sides each contain a 3 x 3 array mostly filled with numbers or numbered bottles. Shine the lantern on the white smudge on the wall, which can be interpreted to mean that the row and the column containing a bottle must each sum to 15. All the slots in the three arrays are filled except one, but there's a wine bottle on the sideboard next to the cabinet that can fill the gap. To skip the derivation and jump to the solution, click here.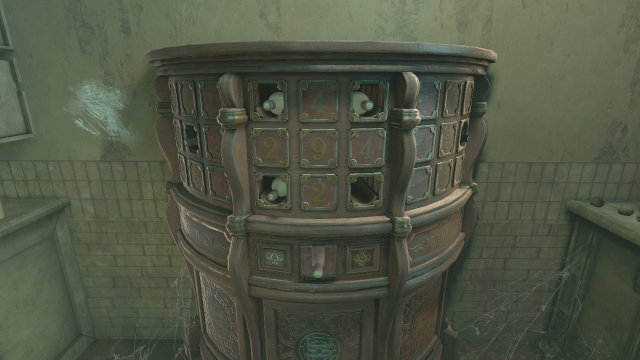
The puzzle reduces to appropriately arranging six numbered bottles into the slots A-F indicated below:
We have the following requirements: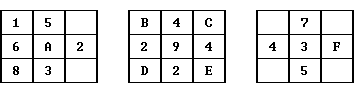
6 + A + 2 = 5 + A + 3 = 15, so A = 7 ✓The second set of equations reduces to:B + 4 + C = C + 4 + E = D + 2 + E = B + 2 + D = 15
4 + 3 + F = 15, so F = 8 ✓
7 + 3 + 5 = 15 ✓
B = EExamining the bottles themselves (including the one on the sideboard), we have the set of values {2,4,7,8,9,9}. Removing the known values for A and F leaves {2,4,9,9} for the four bottles B-E in the center array. Only two of the available values are equal, soD = C + 2 = 13 - B
C = 11 - E
B = E = 9 ✓The desired arrangement simplifies to changing the initial cabinet stateC = 11 - 9 = 2 ✓
D = 2 + 2 = 4 ✓
into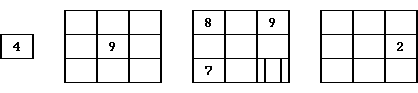
Assuming no changes have been made to the initial bottle configuration, a solution in 12 mouse clicks is: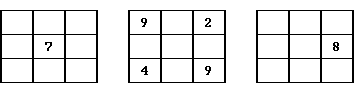
The exit door next to the refrigerator doesn't go anywhere, unlike in a related game.
Gold coin locations:
- In a wooden bucket below the wall telephone. This may be reflected in black
by the lantern, and may be easier to pick up when crouched down.
- Left behind when you send the dumbwaiter (next to the foyer door) up to the
second floor. This can be accessed by pressing the chipped and slightly
discolored tile to the right of the dumbwaiter, then lifting up the panel and
pressing the upper button at right so you can look inside with your lantern.
Chronicle location:
- Next to the sink.
Make your way upstairs and note how Stauf's portrait is becoming more sinister as rooms are solved and the small portraits around his are burned up. Proceed to Burden's bedroom near the end of the side hall.
This puzzle has a reset button. Some experimentation will show that clicking on a selected jewel does two things: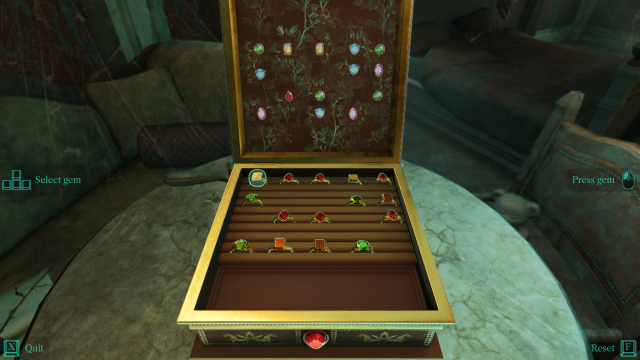
Cycles the color of the jewel through the rainbowThe objective of the puzzle is to recreate the color pattern shown on the lid. Note that the target color for the gem second from left in the bottom row is "None" since there is no jewel there. Some of the starting colors of the gems may appear to be a bit off unless illuminated by the circular cursor. The nature of this multi-state Lights Out puzzle means that the gem changes are cumulative and unordered, except that no gem colored "None" (destroyed) can cycle to any other state.Red → Yellow → Green → Blue → Purple → NoneDoes the same for the jewel's immediate orthogonal neighbors
The upper and lower areas of the puzzle are independent since they have no neighbors in common. The number of color changes needed and the gem locations to achieve those changes are shown below (one of two solutions):
When the puzzle is completed, pick up the heart-shaped ruby, turn around and put it on the female mannequin against the wall, which activates a puzzle that we'll get to later.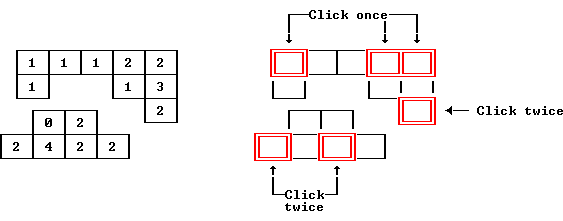
For now, approach the jeweled buste on the table in the opposite corner. Hold the lantern over the broken mirror pieces to restore them.
Start the puzzle and rotate the buste until you can see the "Mirror, Mirror" sign on its back. This is a clue that the desired arrangement of jewels is to be the pattern you see in the mirror after it's rotated back: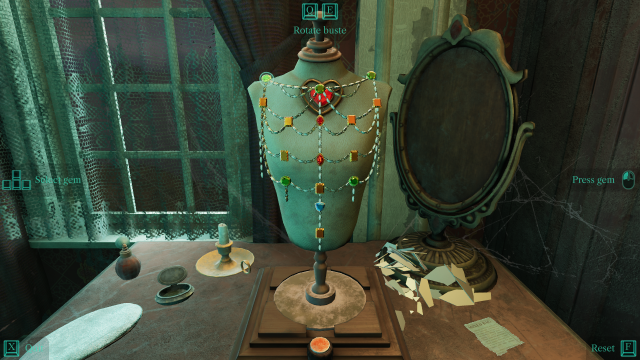
The gems cycle colors as in the first puzzle. The number of color changes needed and the symmetric gem locations to achieve those changes are shown below (there are also two asymmetric solutions):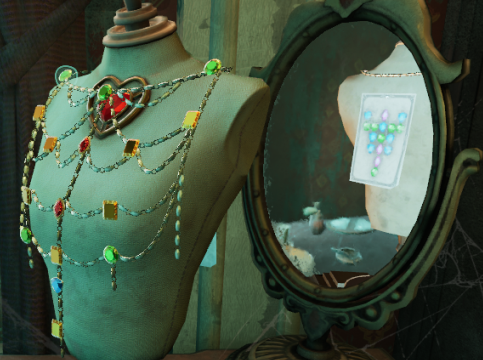
When the puzzle is completed, pick up the heart-shaped ruby and put it on the male mannequin by another window. Go back to the female mannequin on the other side of the room.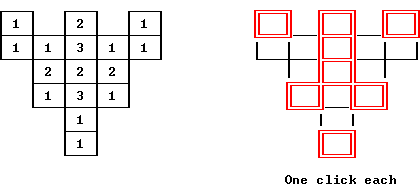
At this point, the male mannequin is ready to move. Select the 5 nodes of his path in this order: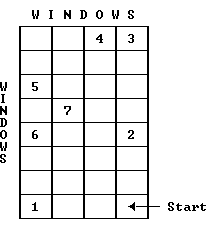
Once the mannequins are united, a cutscene plays and the room is restored.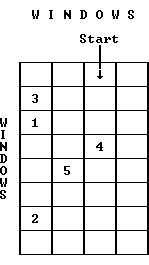
Gold coin locations:
- Left side of wardrobe.
- Behind the trifold mirror of the makeup table.
Chronicle location:
- On the white dresser across from the bed.
Exit the bedroom and turn right to enter the Game Room.
Left to right, descriptions of these bottles are: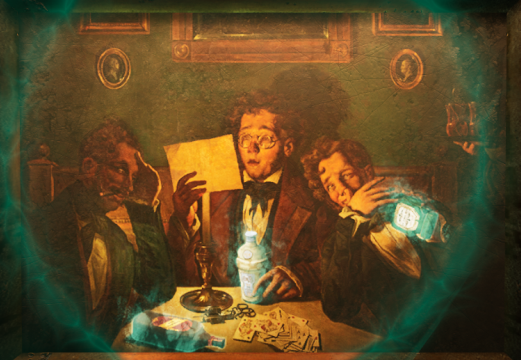
Type 1: Red & diagonal yellow labelThese bottles are to be retrieved from various locations in the room.Type 2: Round bottle with thick band at shoulder
Type 3: Square body with framed label
Go to the other end of the bar and look through the dark bottles there until you find "Toymakers Mark" that matches the Type 1 description above. Turn around and put that bottle on the left pedestal in the back of the bar.
Move close to the back counter of the bar and look through the bottles to the left of the pedestals until you find a squat bottle of "Lost Souls Rum" that matches the Type 3 description above. Place that bottle on the right pedestal.
Go to the small table on the other side of the room, farthest diagonally from the bar. There are only two bottles here, and the shorter of them is "Old Julia Gin", matching the Type 2 description above. Put this bottle on the center pedestal at the bar, and the cabinet above the pedestals opens. Pick up a chess piece there and take it to the chessboard on a table at the far end of the room.
While carrying the chess piece, click the brain icon on the chessboard. As Hamilton Temple indicates, this puzzle is the Eight Queens Puzzle, in which queens are placed on the chessboard so that none are attacking each other. This puzzle is identical to the one in the original game. Here, the white smudges on the board indicate two positions that will be part of the solution. Move the queen cursor (representing the piece you're carrying) to one of those spots and click to place it there.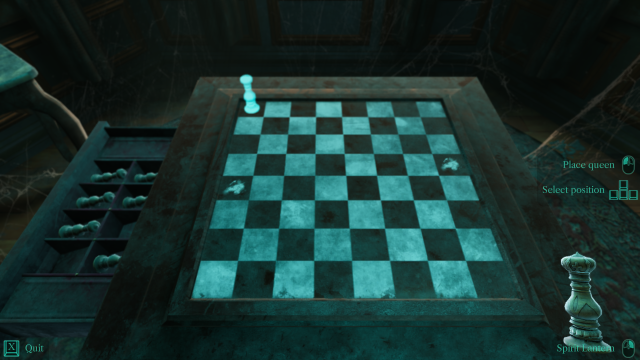
Pick up another queen from the open drawer and move it to the other white smudge. The rest of the solution follows a mirror image of the symmetrical solution give in the Wikipedia article linked above:
Place all of the remaining queens from the drawer according to this plan. One more queen is needed to finish the puzzle, which you'll have to find elsewhere in the room. Exit the puzzle for now and approach the pool table from the window side.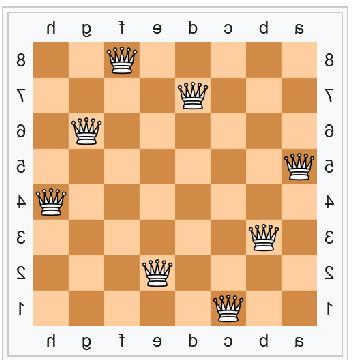
Using the Mayan numbering system of a dot for 1 and a horizontal bar for 5, the pattern indicates the ball numbers corresponding to each of the six pockets of the pool table. It's then a simple matter to put each ball into its target pocket. The only wrinkle is finding the hotspots to get the skeletal hand cursor over the desired pocket, which were found by trial and error and ended up following the symmetric pattern shown by the arrows below: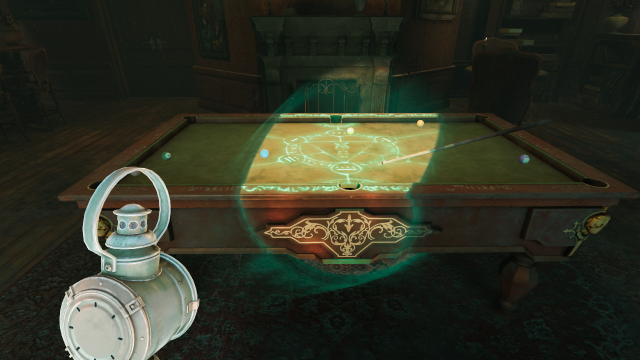
If you drop a ball, it will reappear on the tabletop, but in a new position. To complete the puzzle, perform the following steps for each of the six balls on the table: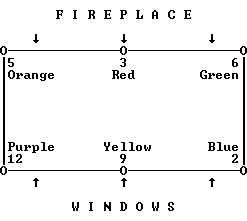
Gold coin locations:
- In the pool cue rack around the corner from the chess table.
- Directly opposite in the smaller bookcase in the nook to the right of the
fireplace.
- Behind some bottles on the right side of the back bar counter. These may need
to be removed with a quick sequence of Left click + R before they reappear to
block the view of the coin.
Chronicle location:
- On the corner table next to the glass doors.
While in the nook, pick up one of the board games near the bottom of the larger bookcase:
This is a real board game created in 1886. Its board has an interesting format and tone (by today's standards), and may be available on eBay. Another real-world game with a lot of history is Round the World with Nellie Bly, seen on the bar: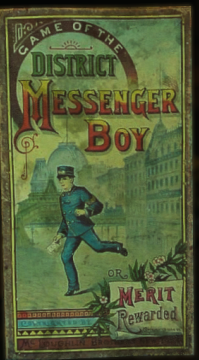
Exit the room, make your way to the end of the hall bearing slightly left and enter the Nursery.
To skip the derivation and jump to the step-by-step solution, click here.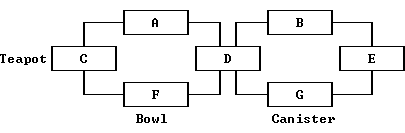
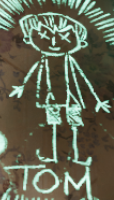
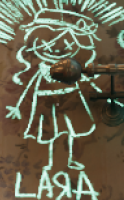
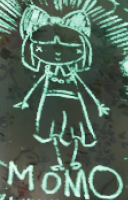
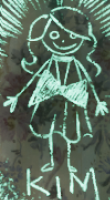
Scanning the walls with the lantern, about half the room is covered with chalk drawings describing the dolls' appearances as well as connections between them and/or objects on the tables. Here we can learn the dolls' names:
Dolls: Angela, Tom, Lara, Ben, Petunia, Momo, KimExamining the doll drawings, we find the following:
Table objects: See diagram above
On the wall, a connection between two dolls indicates that they should be sitting in adjoining chairs. A connection between a doll and a table object indicates that the named doll is sitting at the location with the object. A simplified map of the connections on the wall is:
Name: Angela Tom Lara Ben Petunia Momo Kim Drawing: Gender: Girl Boy Girl Boy Girl Girl Girl Hair/hat style: Spiral curls No hat Wavy with mobcap Hat Bangs with mobcap Large bow on top Shoulder length
where the double lines indicate corners in the wall.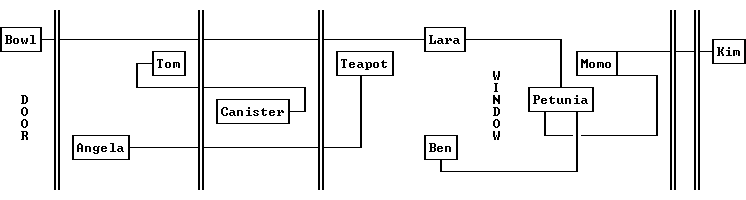
Shine the lantern on the wall to the upper left of the door to identify another connection:
Kim & TomMove toward the small sofa on the far side of the room and shine the lantern above the open crib to identify a final connection:
Angela & BenSo far, we haven't touched any of the dolls, but we have all the information needed to determine the proper seating layout. First, three of the seats are determined by the table objects:
Angela and Ben are adjacent and she has just two connections, so Ben must be in seat A: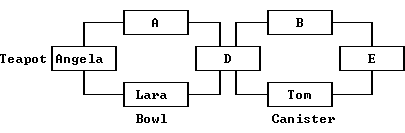
Petunia is connected to Lara, Ben and Momo. Since D is the only seat that has more than two connections, it must be occupied by Petunia: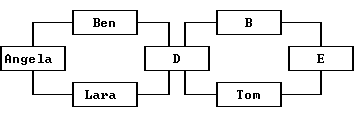
That in turn means that seat B is occupied by Momo: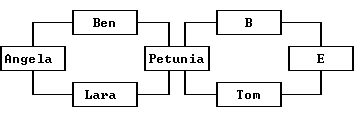
The last remaining doll (Kim) must be in the last open seat (E):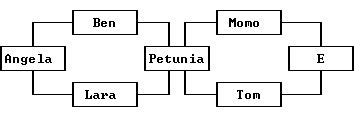
We can confirm the other requirements that Kim and Mono are adjacent, and that Kim and Tom are also adjacent. We will now identify the current seating so that corrections can be made. It turns out that the puzzle allows any head to be attached to any body (shades of Sid's shenanigans in Toy Story). It then becomes clear that when picking up an entire doll, or the body of a doll, it is identified by the ghostly children, but that doesn't happen when picking up a doll head by itself. As a result, we can focus on getting all the doll bodies in the correct seats, and can take care of the heads later. By picking up each seated figure and listening to the children before putting it back on its chair, the current seating is identified: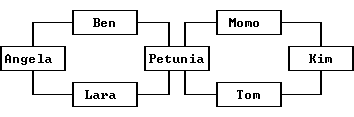
To get the doll bodies in the correct position, follow these steps, referring to the seat labels here: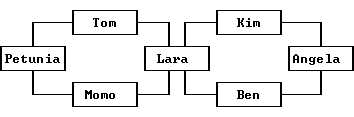
Chronicle location:
- On the fireplace mantel.
From this point on, the game takes an even darker tone. Make your way next to the Music Room.
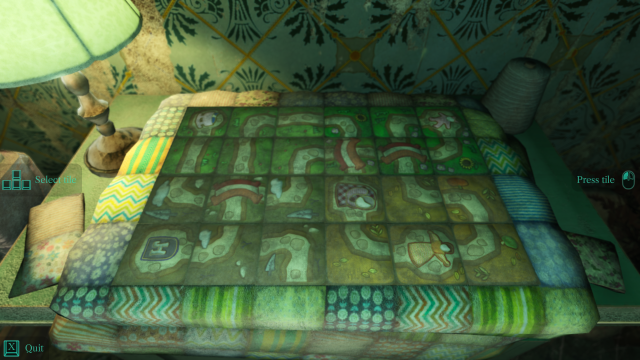
The objective of this simple puzzle is to play the numerical notes in the order shown on the lid decoration: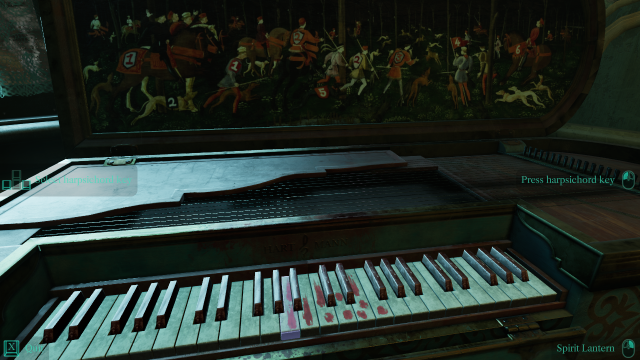
1 2 1 2 5 2 3 4 6The harpsichord keys are numbered in such a way that a bloody fingerprint represents a value of 1 and a bloody smear a value of 3. The required melody can be played by pressing the white keys in alphabetical order:
Behind you is the famous theremin.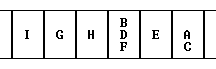
The mouse and arrow keys control the motion of ghostly "x-ray" hands (similar to the ones in the VR version of the game) to vary pitch and volume. It's a pretty good simulation of an actual theremin. Once the volume is set to a comfortable level with the arrow keys, the rest of the puzzle is controlled solely by the mouse. The objective is to create an appropriate 4-note pattern so that the four jars on the fireplace mantel are shattered in a prescribed order. An incorrect pattern will result in the four jars being restored to the mantel. To avoid accidentally shattering any jar prematurely, quickly move the pitch hand all the way left (lowest pitch) during the time the jars are being restored. To skip the derivation and jump to the solution, click here.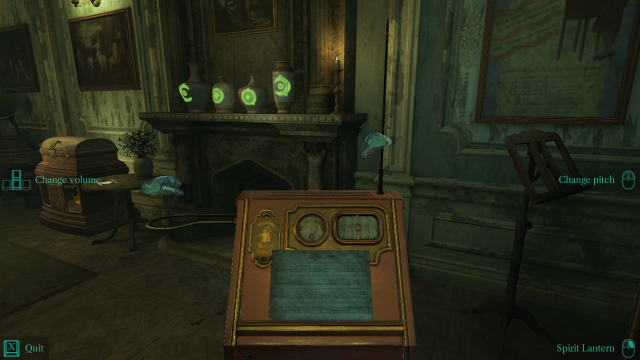
One way of solving the puzzle is to essentially ignore the symbols on the jars and focus only on the order of pitches to be held long enough to shatter a jar. Most importantly, the sheet music as displayed on the theremin is in an incorrect orientation and must be flipped across a diagonal from upper left to lower right:
This means that the four pitches should be held in the following order: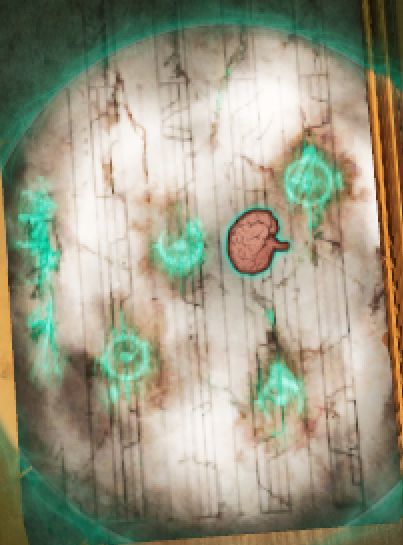
Second lowestThere may be other interpretations of how to solve this puzzle, but the solution will be the same.
Second highest
Highest
Lowest
Numbering the jars from 1 to 4 left to right, perform these steps:
The objective is to move the yellow knight at lower left to "rescue" the purple damsel at the top, avoiding the obstacles and vanquishing two enemy red knights along the way. The path must be completed in no more than 8 compound steps involving moving the knight and aiming his sword. Each step requires placing one or more pins into the vertical column of holes for that step. To skip the derivation and jump to the solution, click here.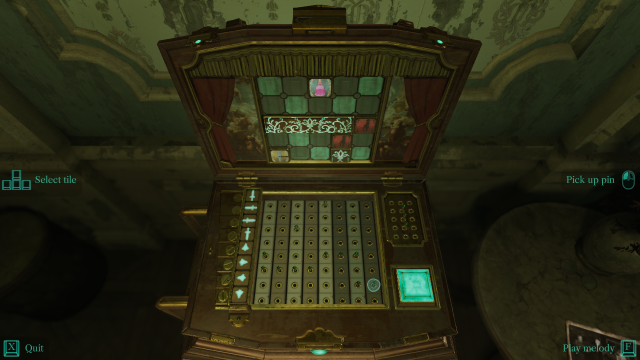
Allowing for diagonal moves (but not across the corner of an obstacle) and ignoring the red knights for the moment, there is essentially one path from start to finish, with a couple of minor variations at the beginning and end:
It's then just a matter of augmenting these physical moves with sword-aiming at the appropriate steps. Here is one of the four solutions: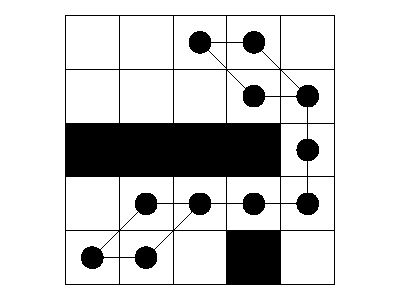
On completion of the puzzle, the damsel violently defends her honor. A cutscene then plays in which Brian Dutton is killed by Hamilton Knox with the squirting and gushing blood that Vertigo Games is famous for. This is the first death of a guest, but there could be others...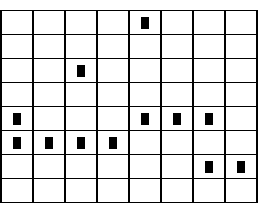
The room is restored as usual. It's now 10:00 and access to the workroom and part of the attic has opened up.
Gold coin locations:
- On the chair behind the harp.
- Inside the violin case on the shelves in the corner.
Chronicle location:
- On the table next to the fireplace.
Return to the grand staircase in the foyer and another cutscene will play. Continue upstairs and shine the lantern on a scintillation under Stauf's portrait to obtain a vinyl record. Play it on the gramophone downstairs to hear some more blather from Stauf. Make your way through a door at the end of the second-floor hallway up to the attic.
Enter the large room to see a model of the Stauf mansion. Turn right and use the lantern on the wall hotspot to see a schematic about how stairs are brought down from the storage room once a lever is released. We'll have more to do in this room later, but for now turn around and approach the left corner of the side of the house facing the circular window and press the power switch, illuminating a lower corner of the house interior. Move a bit along the left side of the model and there will be a latch you can open. Crouch down to see a lever inside. Turn the lever to the left to extend stairs from the storage room behind the kitchen down into the basement workroom seen on the map. Turn around and watch a cutscene, in which Edward Knox is accidentally killed by Hamilton Temple.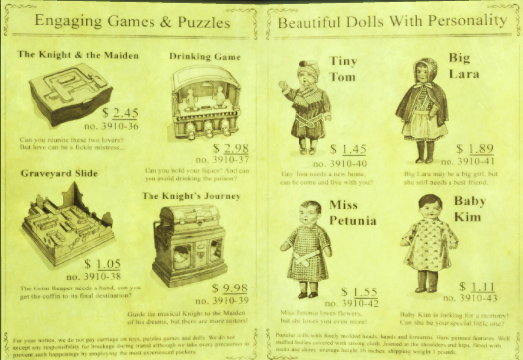
Zoom
Go downstairs to the kitchen and enter the storage room through the door in back.
First coin: Facing the door there, turn around and pick up a gold coin lying on the lower shelf.
Second coin: Turn left and open the door into a toilet. Open the lid of the vault toilet to see a gold coin inside. The toilet lid won't stay up, but with a little patience, you may still be able to get the coin. The idea is to block open the lid for a few seconds, giving you time to get the coin inside. Start by picking up a roll of toilet paper from the stack at right. Face the closed lid straight on and move forward as far as possible. Look almost all the way down, making sure the lower edge of the toilet lid is horizontal. Here is a position with the front edge of the toilet in line with the band on the paper roll that seemed to work:
Open the lid by moving the skeleton hand vertically until the lid is all the way open (the closed skeleton fist may be vibrating a bit with the strain). While holding down the mouse key in this position, press the keyboard R key with your other hand to drop the paper roll, which hopefully will block the lid from closing (this may take multiple attempts). You can then release the mouse button and you'll have about 5 seconds to grab the gold coin by positioning the tiny pixel cursor on it before the paper roll teleports back to its original position. You may need to crouch down with the C key to see and retrieve the coin.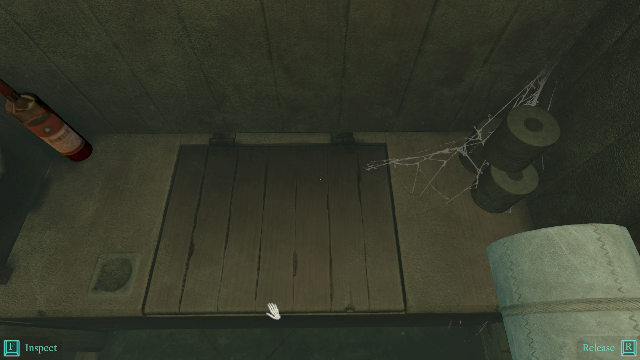
Third coin: Leave the toilet and move to the end of the corridor. Enter the room at left, then turn right to face the window. There's a gold coin here that's being guarded by an ugly white spider. To get it, center the viewpoint laterally between the ladder and the narrow wall. Gradually move forward while keeping the tiny pixel cursor on the coin. When the cursor changes to a skeletal hand, pick up the coin.
Fourth coin: Continue deeper into the storeroom past the hanging pig carcasses to a workbench lit by an oil lamp. Take the gold coin from the neck of the doll's head lying there.
Turn around and descend the stairs that are now accessible since you moved the lever in the attic house model.
Recreate that pattern in the puzzle above: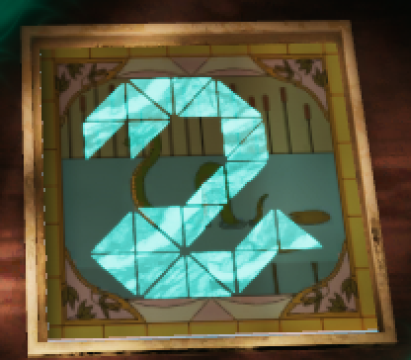
You can't see what you've lit up without moving the cursor. When the design is complete, open the cabinet and retrieve a dildo-like "pawn". Take it back into the other room and put it on the hexagonal stand in front of the barricade at right (two others are already there).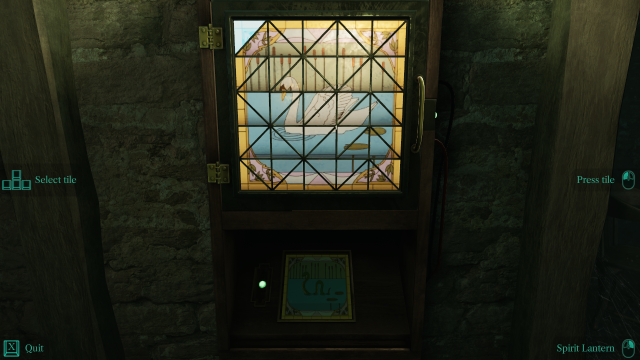
Shine the lantern on the wall smudge at right to see another reference to 7(s), which must be a clue. Access the puzzle, using the F key for a top view:
To skip the derivation and jump to the solution, click here.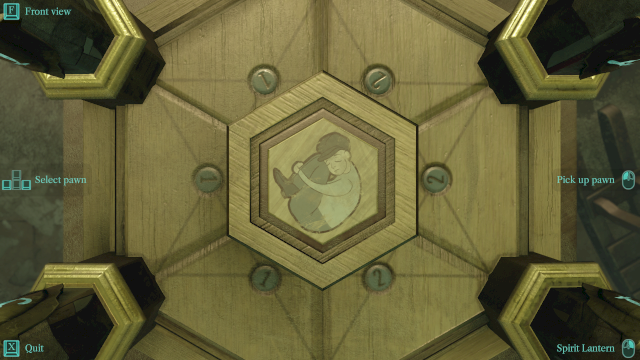
The objective of this puzzle is to find the six numbers that, when placed on the points of a hexagon, create sums of 7 along each of the six lines. By adding together the values that are not on the points, we have two superimposed puzzles. If A through F are the pawn values clockwise around the hexagon starting from the top, we have
so that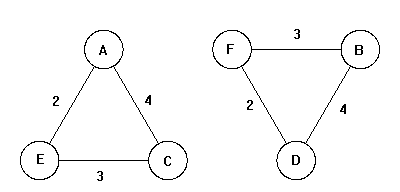
The solution layout for the hexagon is: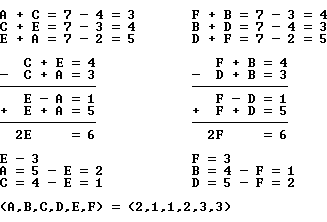
Swap the pawns to create this pattern, and a gap in the barricade is opened into a back room. Move through it and pull the drawstring to the left of the drapes to disclose a wall of information on the guests collected by Stauf. A cutscene plays in which Elinor Knox is killed by Martine Burden. The bodies are starting to stack up...
2 3 1 3 1 2
Gold coin locations:
- Next to a broken doll on the table in the back room.
- Edge-on on a shelf on the wall of woodworking tools.
- Behind a ladder at the right side of the wine rack in the first room.
Chronicle location:
- On the main table.
It's now 11:00 and time for a difficult arcade-style challenge. Head for the bathroom on the second floor. At the top of the main staircase, watch a cutscene in which Julia Heine kills Martine Burden.
Click the lantern on the hotspot on the table at right to get a faucet handle to put on the spigot next to the door. Click on the small rack of shelves on the same table to remove a perfume bottle and (permanently) tilt the upper shelf downwards. Drop the bottle and use the spigot to release a cockroach from the drain below. It will follow the stained path on the wall to a fork near the spigot. Left to its own devices, it will always move upwards and be destroyed by a glowing spider near the ceiling. All you can do is keep the lantern shining on the flap of wallpaper above the fork to get the roach to take the other path, where it will eventually be captured in the hotel.
For the second roach, shine the lantern on any of the smudges next to a hole in the wall to show that the hole needs to be stoppered. Otherwise, a spider will come out of it and squash the roach as it passes. Just shining the lantern on an open spider hole will not dissuade it from coming out for dinner. Put your skeletal hand into the right-hand sink to drain it and get another stopper. Put the stopper into the wall hole next to the toilet. That should give a roach starting from one of the sinks a safe path to the hotel, except for getting past the spiders on the mirror. To facilitate that, click on a sink faucet to start the roach on its travels, then quickly and alternately click on the lower parts of the two webs to keep the spiders away from the roach as it travels past and on to the hotel.
The third roach starts from the bathtub drain after you've emptied the tub by clicking on the lever under its faucet. Move the curtain there to the left so you have a better view of the wall. Following the path through the tub, up the towel and onto the wall stains, there are no less than 8 places where you must protect the roach from a spider in order to get it to the hotel. The first of these is near the end of the tub, where you can block the spider's hole by moving a jar of tooth paste. The next two are a pair of holes to the right of the door, which can be blocked using the two sink stoppers. Next along the path are two forks where you'll have to use your lantern again to keep the roach away from the spiders.
Finally, there's running the gauntlet of three spider holes above the radiator next to the sinks. You'll be (somewhat) busy just using the lantern twice to control the roach, and it will be difficult to relay both stoppers from the other side of the room unless the roach decides to fall asleep along the way, which of course it doesn't. This onerous task is far easier to perform in the VR version of the game simply by using both hands to cover the holes, without the need for stoppers. This seems to be a real flaw in the redesign of the game interface for the flat (non-VR) version. It ultimately just wasn't worth a lot of frustrating replay, and we eventually gave up and used a Stauf coin to get around the punishment. There are a couple more coins you can find in the room that will more than make up for the loss.
After all the roaches are in the hotel, press the red button to electrocute them and trigger a cutscene. Julia Heine murders Hamilton Temple and the room is restored.
Gold coin locations:
- On the soap dish above the bathtub faucet.
- In the wooden washtub under the sink (when crouching down):
It's now 12:00 midnight, so that grandfather clock we saw in the attic must be open. Exit the room and pick up another vinyl record from a chair at the top of the stairs, which you can listen to on the gramophone in the foyer, which is then restored. Based on the warning from Stauf, you should immediately return to the attic.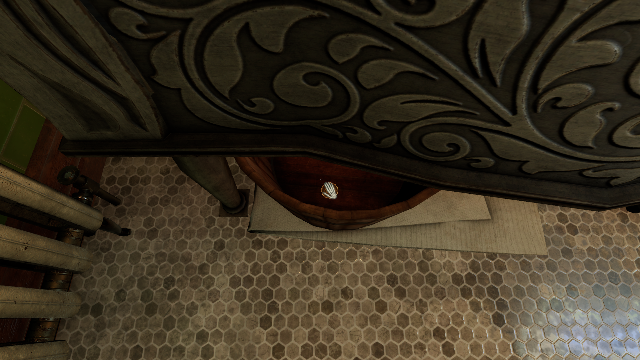
This leaves only Julia Heine and Ted Gorman (and Stauf) walking around. At the top of the attic stairs, the grandfather clock opens up to reveal some character figurines:
Character Fate Location Brian Dutton Stabbed by Edward Knox Music Room Edward Knox Head trauma caused by Hamilton Temple Attic Elinor Knox Stabbed by Martine Burden Workroom Martine Burden Shot by Julia Heine Foyer Hamilton Temple Shot by Julia Heine Bathroom
Return to the location of the switchbox on the wall and restore the power with the lever.
Martine
BurdenElinor
KnoxJulia
HeineTad
Gorman
The Bathroom is already occupied by a Hamilton Temple figurine, which accounts for the one light appearing above the chapel door. If you're collecting gold coins, there's one here.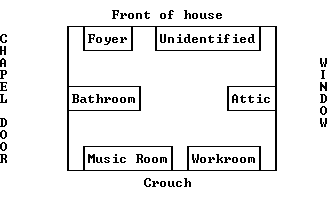
Return to the grandfather clock and transfer the Martine Burden figurine to the foyer in the model.
Return to the grandfather clock and transfer the Elinor Knox figurine to the workroom.
Return to the cell on the other side of the attic and transfer the Edward Knox figurine to the attic.
Approach the small door in the wall opposite the model, which leads to the Crawl Space according to the map. Click on the green light at upper left to open the door. Crouch down to move through the doorway. There's a Brian Dutton figurine on the table here, as well as a slip of paper describing more of Stauf's toys and puzzles on the top of the bookshelf behind the table:
Pick up the figurine from the table and transfer it to the Music Room in the house model (you might as well stay crouched down for this one).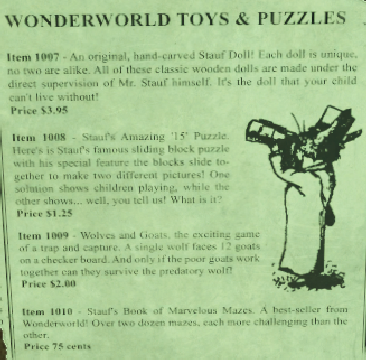
Zoom
At this point, there are two lights unlit on the chapel door and two figurines left in the grandfather clock, so transfer both of them to the Unidentified area of the house model, which is the last one unoccupied (Julia Heine on the larger chalk outline, obviously).
When all 7 lights are lit on the door, the room is restored.
Gold coin locations:
- In the bathroom portion of the house model, where you found the Hamilton
Temple figurine.
- In a crate on a rocking chair next to the chapel door.
- Next to a wooden bucket on a shelf in the crawl space.
- Behind a vase on top of the empty bookshelves in the crawl space.
- On a tilted table outside the cell.
- On the top of the left wall when descending the stairs to the second floor.
Chronicle location:
- On the table with the sales brochure.
Enter the chapel.
Gold coin locations:
- On a table with an oil lamp near the gramophone.
- In a loose drawer on a front pew.
- Next to the green trunk to the right of the door to the Ritual Room.
Gold coin locations: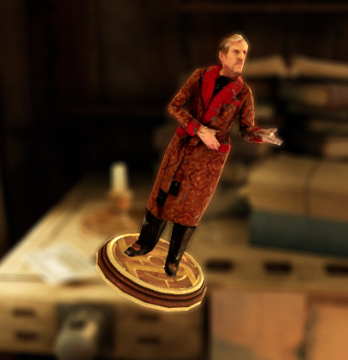
Chronicle location:
- On the padded bench at the foot of the bed.
Return to the chapel. At this point, you're basically in an Open House mode, where you can wander around the fully-restored mansion, but with all its puzzles solved. If you have a way to save your game, you may want to do so at this point since the next room is through a one-way passage.
In the unlikely event that you'll have trouble opening the box, follow these steps: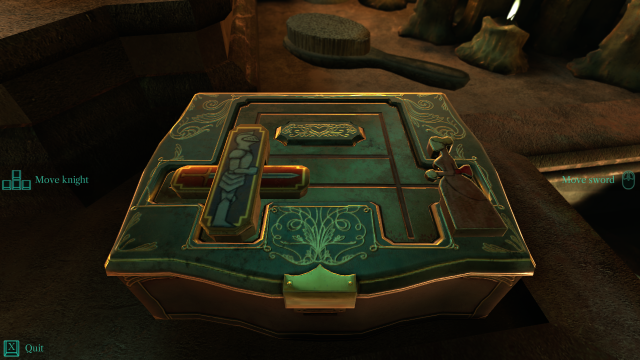
This is another Lights Out puzzle, with binary states (In or Out) on a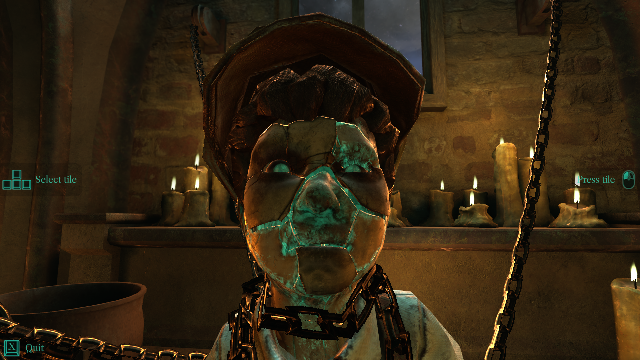
Otherwise, you can click on each tile at left to change its state to match what you see in the game, then press the Solve button. The solver will then indicate the sequence of tiles you should press for a solution. Here is a summary of the steps:
Step 1: Switching back and forth between this web page and your game in progress, recreate the state of the face tiles in the left matrix below by clicking on the cells to alternate between In and Out.No solution requires more than 10 moves.Step 2: When the matrix information below matches what you see in your game, press the red solution button below to show the moves you need to make in the right matrix below.
Step 3: Switching back and forth between this web page and your game in progress, click on the tiles in the game in the order they're shown below. You may need to click on the same tile more than once during the solution sequence.
On completion of the puzzle, the chains are removed. Go into the other room and watch the cutscene, in which Stauf fulfills Julia Heine's greatest wish, for a minute anyway.
Step 1: Click here to set the current doll face appearance: "Out" tiles look like this: "In" tiles look like this: Step 3: In the game, press these tiles in numerical order:
Out Out In Out In Out In Out In 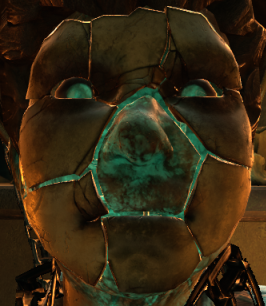
4 1 2 3 5
Warning: Once you start the game here by pressing the brain cursor, you won't be able to press [Esc] for the main menu nor [Tab] for the spirit board. You'll only be able to: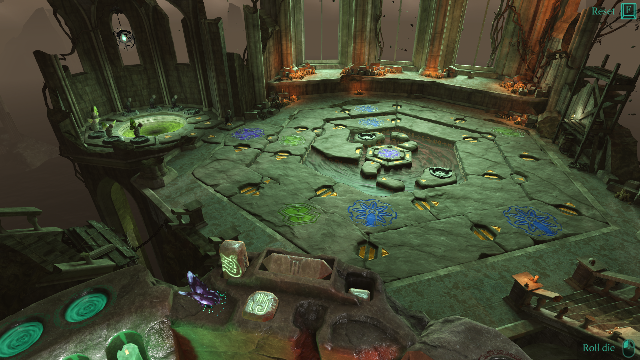
Zoom
- The game is similar to two-player Ludo or Sorry!, but with some significant differences.One general strategy is to focus on moving two tokens at a time as quickly as possible toward the center, planning around avoiding encounters with the fast-moving tornado, or to a lesser extent, with Stauf (who's occupied with his own goals). Keeping two tokens in play gives you a backup in case one gets sent back to the beginning. This means using the extra-turn and ring-jumping spaces whenever possible. You can leave a token on one of the three spaces of the central safe zone as long as needed before moving it to the end. As the number of your tokens decreases, this can help protect you from forced moves that make you more vulnerable. It's a good idea to always cycle through all the tokens for each move to make sure you haven't missed any opportunities. And be sure you've actually selected the token you intend to move.- The game board consists of a segmented path spiraling counterclockwise into the center. There are separate sections for you and Stauf at the beginning and end, but the majority of the path is shared. The perspective of the board from the balcony is quite angled, so the spaces appear to have different sizes.
- You and Stauf each have four tokens, three of which must be moved into one of the two greenish circles bracketing the central hexagon. The first player to do so wins the game. Your tokens look a bit like flapping birds, while Stauf's have a vaguely spider-like appearance. The starting area is around the green pool at upper left.
- You and Stauf alternate turns, each rolling a "die" in the shape of a cylinder having the values 1 through 4. Each roll of the die shows a π-like symbol with the number of legs indicating the value. You can then move any one of your tokens by that number of spaces. There is a vertical stone next to the die that rises up for the current turn, on the left for you and on the right for Stauf. When it's your turn, you'll also have a "Roll die" prompt on the screen.
- You select a token using the arrow keys, but depending on their locations, you may have to use all of the keys rather than cycling through the tokens with just the horizontal or vertical pair. Once you've selected a token that is able to move, its destination space is raised up. This makes it much easier to plan your moves rather than having to count the spaces.
- The Voices act as a third player in the game, appearing as a black tornado. It moves after each roll of the die but before you or Stauf move, and the number of spaces the tornado moves is the same as what's shown on the die. It moves in a clockwise direction, against the direction you and Stauf are moving. The tornado only moves on shared areas, from the central hexagon to a space with a five-armed symbol that is the entrance from your starting area. When it reaches the outer space (not necessarily by exact count), it disappears and then reappears in the center space at the third die roll following, so there is a brief period when the tornado is absent from the board.
- Only you or Stauf can occupy a shared space on the board. If you land on an unprotected space occupied by Stauf, his token gets sent back to the beginning, and vice-versa of course. Either one of you can be attacked by the tornado -- it is indiscriminate.
- It's possible that you or Stauf may not have any moves you can make, in which case you lose your turn.
- Some of the spaces have special properties, but they don't apply to the tornado. If a player lands on a space with a green design, it turns yellow and they then get another roll and can select a different token to move if they want. If Stauf's token or yours lands on a space with a blue symbol, it's in a "safe zone" where it's immune from being knocked back to the beginning by the other player or the tornado. The only times that two entities occupy the same space is when the tornado lands on a protected token or a token lands on a protected space occupied by the tornado.
- If you inspect the board carefully, you'll see that in addition to yellow direction arrows, there are sometimes inward-pointing ones. These strategic spaces give you the option of jumping to the next inner ring of the spiral, but only if you have just rolled a 1. Important: The Q/E key prompt appears at the upper left of the screen only when this option is available, so keep an eye out for it so you can take advantage of significantly shortening your trip. As with the arrow keys, you may need to use both Q and E keys to see all your movement options.
- Once you've made it past the central hexagon, you have three more spaces to reach your destination, and cannot be attacked by either Stauf or The Voices while in that region. Similarly, you can't be attacked in the first three spaces from your starting area. You don't have to reach the final space by an exact roll of the die. Once you complete the trip, your token is retired from the board and appears on your side of the stone control board.
- The die rolls are not purely random. Three copies each of 1's, 2's, 3's and 4's form a 12-element randomized set for each player, but a set must be completely used up before a new set is available. The remainder of the current set is represented by four candles for each player, which can be examined after a die roll by using the right mouse button. Your set and Stauf's may become depleted at different times due to extra turns. Keeping an eye on the candles can be important strategically since the available die rolls can become limited as the candles burn down.
- If you win the game and then immediately Quit, your win will not be saved, so it's important to complete Tad's "one thing left to do".
Stauf plays aggressively and doesn't make any serious mistakes, so if you win one game in three or four you're probably doing pretty well. If you get behind by two tokens, you may want to restart the game (no one's keeping score). Stauf doesn't have any advantage over you once you learn the game mechanics, so your probability of winning will likely increase as you become more adept.
If you don't want to play the game at all, or if you've had enough exasperation trying to win it, you can close the application as described above but still watch the endgame sequence, which plays exactly the same whether or not you win the game. Anytime before starting the final game at the balcony, press [Tab] to bring up the spirit board, then go through the Help function to skip the game at the cost of 10 gold coins.
Move into the swirling column of light to trigger the 2-minute endgame sequence.
With the children's souls set free, the raging voices turned silent once more.After the credits start to roll, wait 10 seconds and then press any key to return to the main menu. If you play all of credits at normal speed, it'll take about 6 minutes. Pressing Continue at the main menu provides a replay of the endgame sequence, final narration and credits. Final counts and profile.The house remained. Hungry as ever.
As for the toymaker, he seemed to have vanished...
But real bogeymen rarely disappear for good...
He was a foundling, forced to grow up in a grim and grimy orphanage. A quiet child without any friends, so he made his own. Soon he discovered he could entertain the other children with the puppets he had made. Everyone loved the shows young Henry put on.
When Henry left the orphanage he started moving from town to town, taking his puppets with him. He performed at county fairs and opened for many well-known magicians.
But when the great depression struck, the young puppeteer fell on hard times. The towns that used to welcome him now left him out in the cold.
Without an audience, Henry Stauf the puppeteer became destitute. Forced to sell his puppets for a pittance, he started looking for jobs. But there were none and no one would take the outsider in.
As Stauf's money ran out, he went to his bank, but they refused to give him a loan. With nothing left to barter with, he resorted to begging. Ignored by all, no one spared him a dime, and the warm summer breeze turned into a cold winter gale.
Embittered, he started to resent all those sanctimonious townspeople. In desperation and out of spite, he turned to a life of crime. Driven out of town he hid in the neighboring woods and robbed those who crossed his path at knifepoint. All alone during the cold winter nights, Stauf was surrounded by nothing but shadows, creeping ever closer.
The shadows surrounding Stauf started to call his name. They were "his friends", they whispered, and then they entered his dreams. They showed him a beautiful doll. It seemed alive somehow, its gaze haunting. The next day, the image still festered in his mind and he carved the small figure out of a dead branch. And he made the doll just as he saw it in his dream.
The voices sent him to an inn at the nearby town of Harley-on-the-Hudson. The innkeeper had a daughter. Stauf offered the doll and in turn got a place to stay. A simple transaction, the first of many.
The voices told Stauf to open up a shop. And soon every boy and girl in town wished for a Stauf Toy. 'A Stauf Toy is a Toy For Life', people said, and 'No Two Are Alike'. The mysterious Mister Stauf grew wealthy overnight.
Then the strange sickness came and children started dying. Dying...clutching their Stauf toys close. Cemeteries, far and wide, begin filling up with small coffins. When the rumors started spreading, the fingers pointed at the toymaker.
Stauf was forced to close up his shop and withdrew from public life. But he had one more surprise left in store. The voices had spoken one last time of a great house that the toymaker was to build. A strange house, a house that scared people. It sat there waiting, with a sinister purpose that no one could fathom. For years, nothing was heard and "old man Stauf" became a bedtime story to scare wicked children. The story of a man who made a deal with the devil. Crazy, sick and mean!
After years of silence, six people from Harley suddenly received an invitation to a party at the Stauf Mansion. Upstanding citizens, who never took notice of that once lonely beggar. But now he would have their full attention. Now he would get his wish... Revenge!
Copyright © 2026 Balmoral Software (http://www.balmoralsoftware.com). Portions copyright © 2025 by Vertigo Games. All rights reserved.