Copyright © 2020 Balmoral Software (http://www.balmoralsoftware.com). Portions copyright © 1992 Trilobyte and Virgin Games. All rights reserved. Republication, redistribution or conversion is expressly prohibited without the prior written consent of Balmoral Software.
Once the number of saved games grows to 6 or 7, the Cancel option may disappear from the Load Game submenu. In that case, you can simply return to the game by pressing [Esc]. If you find that the number of saved-game slots is too few, you can exit the game and take a snapshot of the saved-games folder, which allows slots to be reused. Manual effort is needed to manipulate these folders in order to recover a particular point in the gameplay.
As in the original game, restoring a game or consulting the in-game map resets your location to a fixed "home" position in each room or hallway. Whenever you find a drama mask icon, you can optionally click on it for a one-time video clip of the game's live-action characters (or occasionally a repeatable computer animation). The FMV clips aren't available in Open House mode, so you'll have to restore a saved game to replay them. They are not required to advance the gameplay, but can be useful to shed light on backstory elements. If you encounter a chattering teeth icon, you can (repeatedly if desired) click on it to see a supernatural event of varying spookiness. These are also not required in order to proceed in the game.
A stopwatch icon at upper left (with a clockwise arrow) indicates an animation is in progress, and is replaced with the main menu Ouija-board icon when the animation is finished. The stopwatch icon at lower left (with a counterclockwise arrow) is used to reset a puzzle to an initial unsolved state, or to replay a video clip.
Movement abbreviations for the beckoning skeleton cursor are as follows:
F: Move forwardAn abbreviation may be followed by a number for multiple repetitions. This walkthrough provides a shortest path through the game; other gameplay sequences and exploration are possible.
L: Turn left
R: Turn right
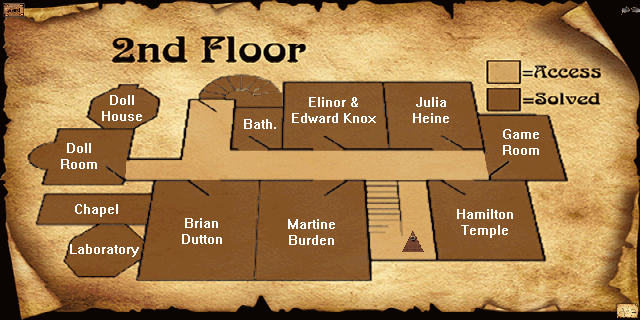
Martine BurdenA quick check of the house Map icon at the lower right of the screen shows that the accessible rooms on this floor are:
Elinor & Edward Knox
Julia Heine
Brian Dutton
Hamilton Temple
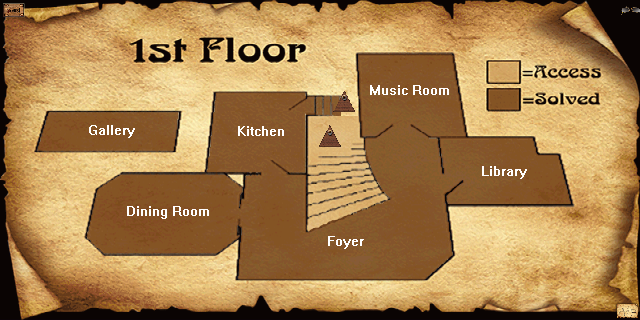
Dining RoomClick the triangular Sphinx pointer icon on the curving staircase on the 1st Floor map to access the upstairs map, in which no rooms are yet accessible off of the hallway. Back in the game, make your way from the foot of the main staircase through the double doors at left into the Dining Room.
Foyer
Library
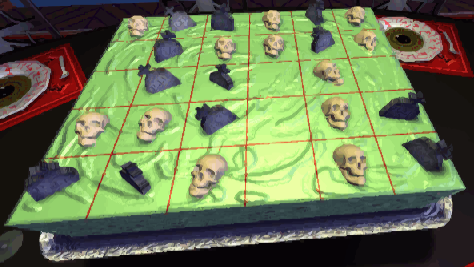
The objective is to remove 30 cake pieces in groups of five, each of which consists of two Skulls, two Headstones and one blank piece. One of 67 different ways to select the groups is as follows:
Solving the Cake Puzzle opens up additional rooms on this floor and the one above: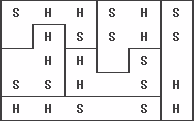
KitchenExit the Dining Room, then turn left and move F2 into the Kitchen. Along the way, you can check out the chattering teeth icon on the grandfather clock to the right of the Kitchen door.
Martine Burden's Bedroom
Elinor & Edward Knox's Bedroom
Julia Heine's Bedroom
Game Room
along with some cheesy voice acting. Here is a collection of letters on cans, arranged alphabetically except for eleven Y's at the beginning. The objective of this puzzle is to swap pairs of cans to spell out a sentence of sorts, consisting of words that have only y's as vowels. The only two-letter English words containing a y as their only vowel are "by" and "my", so given the rest of the letters present as well as the spooky environment of the game, it's a good bet that the last line is "by my crypt". The full solution is: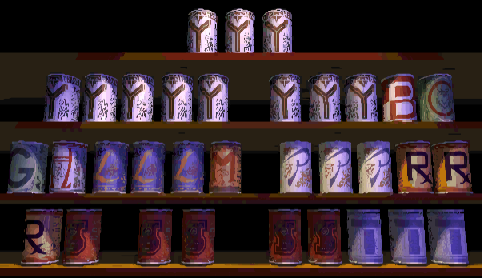
Simply picking the first letter needed in reading order results in 23 can swaps, but the solution can be entered with as few as 17 swaps. To see that, first note that 6 of the 33 cans are already in their correct positions. Start by moving the singleton letters into position:
SHY GYPSY SLYLY SPRYLY TRYST BY MY CRYPT
1. Y Y Y B C → R SAt this point, the arrangement of cans should look like this. Next, several doubleton swaps can be selected that move both letters into their correct positions simultaneously. The following four swaps involve cans that are not part of any other possible doubleton swaps:2. Y Y Y R C → S S T T T
3. G H L L L M → Y Y Y Y Y
4. Y H L L L M → Y Y Y
5. Y Y L L L M → S S
6. Y Y Y R S ↔ Y Y L L L SThe cans are starting to look partially arranged, with only 14 of the original 33 out of position. It can be shown that the puzzle can be completed with no more than 8 additional swaps; for example:7. Y L Y R S ↔ Y Y L Y L S
8. P P P R R ↔ C S T T T
9. T P P R R ↔ C S T P T
10. Y H Y ↔ Y L Y L SThe final result is shown here. Solving the Cans Puzzle opens up the Basement, which we'll visit later. There are drama mask icons available on the stove from both sides of the room. From the kitchen cabinet, move R2 F3 L F to the stained-glass front door of the mansion.11. G Y Y Y Y ← T P P S R
12. G Y P Y Y ↔ Y Y R Y L S
13. Y L Y L Y ↔ B S
14. Y Y R Y L Y ↔ M S
15. S Y R Y L Y ↔ T Y P S R
16. T Y Y S R ← T Y Y S R (same group of cans)
17. T R Y S Y ↔ C R T P T
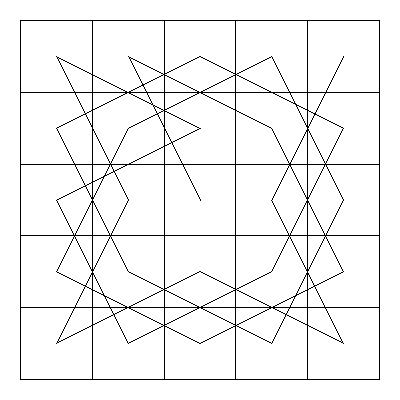
In this puzzle, selecting one of the eight purple spots on the circle causes a spider to materialize there and traverse along one of the lines leading to another spot that is its destination. You get to choose the destination unless there's only one choice. The basic idea is not to have any forced moves until the final one. This can be accomplished by systematically selecting the previous starting position as the current destination. Starting at the top, move three spaces clockwise for the destination, then two more spaces clockwise for the next starting position. Using a compass notation for the purple spots, these moves are: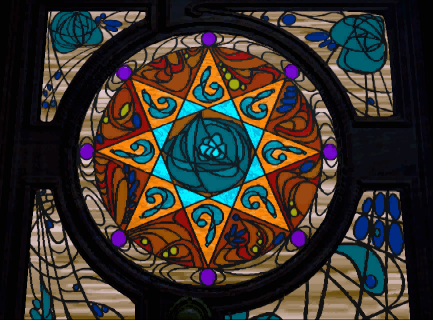
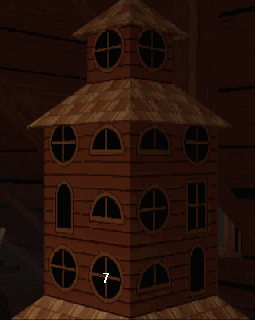
N - SESolving the Spider Puzzle plays a short cutscene, the first in which you encounter the boy Tad, who is The 7th Guest. He's trying to escape through the front door amidst a lot of disembodied screaming. Another side effect of solving the puzzle is that the Library is no longer shown as accessible on the 1st Floor map, but this programming bug can be ignored if you want to visit the Library. From the front door, turn around and climb the main staircase, then move L F L F into Martine Burden's slightly-distorting bedroom. A couple of short cutscenes play along the way, including one of a ghostly woman in white who is not one of the houseguests. You can also click the chattering teeth icon on the picture at the top of the stairs for some spooky escapism.
SW - N
E - SW
NW - E
S - NW
NE - S
W - NE
Move forward and backwards by threes and fives to spell out the hidden message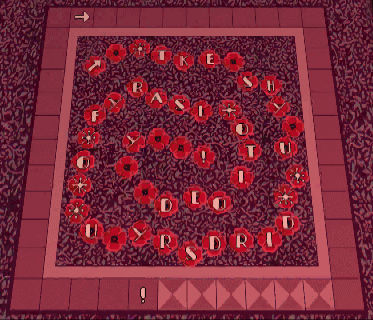
THE*SKY*IS*RUDDY*YOUR*FATE*IS*BLOODYAfter a cutscene involving Martine Burden and Edward Knox, move R F2 across the hall and into Elinor & Edward Knox's Bedroom, which is strangely windowless.
This is the first of several chess puzzles encountered in the game. The objective here is to exchange the positions of the four white and four black bishop chess pieces, while never moving a piece onto a square controlled by the opposing team. You will be making all the moves for both teams, and it's not necessary to alternate between white and black.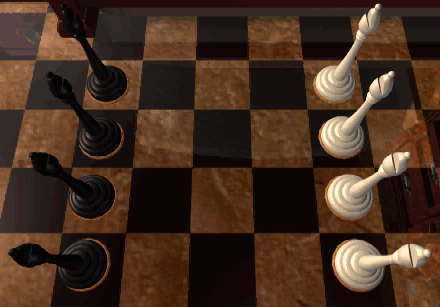
Since a bishop always occupies the same color square on a chessboard, this conundrum is actually two superimposed and symmetric puzzles, one involving two white and two black bishops on the dark squares, and the other involving the remaining pieces on the light squares. A solution to the first puzzle can be found elsewhere, and that solution can be rotated and inverted for the second puzzle. Using the following notation for the dark squares:
the first 18 moves (left to right) are:
4 8 2 6 10 3 7 1 5 9
At this point, the overall puzzle is half solved. Using the following notation for the light squares:
10 ⇒ 7 1 → 8 2 ⇒ 3 7 ⇒ 4 3 → 5 8 → 10 9 ⇒ 6 6 → 1 4 → 6 5 ⇒ 2 10 ⇒ 5 6 → 8 5 ⇒ 7 2 → 4 8 ⇒ 3 7 → 10 4 → 9 3 ⇒ 2 ⇒: Destination selection automatic
the final 18 moves are:
2 6 10 4 8 1 5 9 3 7
Be sure not to accidentally mix up the types of squares between the two solution sequences. After an outburst from Stauf, move R F L F2 L F into another windowless bedroom, this one belonging to Julia Heine.
1 ⇒ 4 10 → 3 9 ⇒ 8 4 ⇒ 7 8 → 6 3 → 1 2 ⇒ 5 5 → 10 7 → 5 6 ⇒ 9 1 ⇒ 6 5 → 3 6 ⇒ 4 9 → 7 3 ⇒ 8 4 → 1 7 → 2 8 ⇒ 9
After some more grade-school acting, move R F L F into the Game Room.
After a cutscene with Hamilton Temple and Tad, click the chattering teeth icon on the rear of the pool table to return to the Kitchen via a secret passage. Turn right and go through the door into the Basement.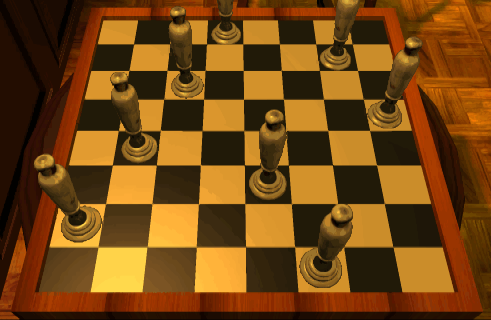
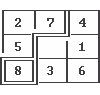
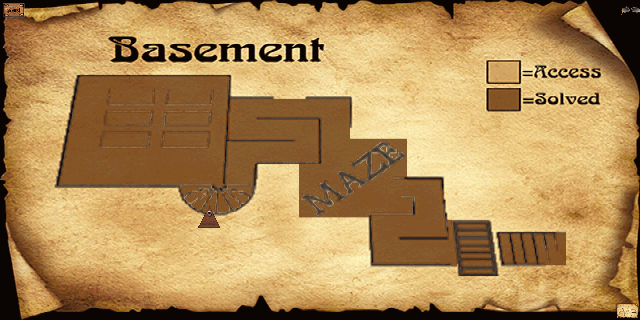
blocks further progress. One of two shortest solutions to this 2 x 3 sliding-piece puzzle is the 17-move sequence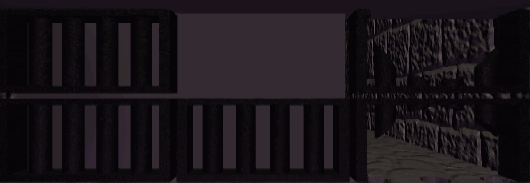
R B L2 A Rwhere each move is made relative to the current position of the space (L: Left, R: Right, A: Above, B: Below). Solving this puzzle grants access to the basement Maze, a map of which was seen earlier in Elinor & Edward Knox's Bedroom and is recreated here for clarity:
B R A L2 B
R A R B L
To traverse the maze, use the following 19 moves: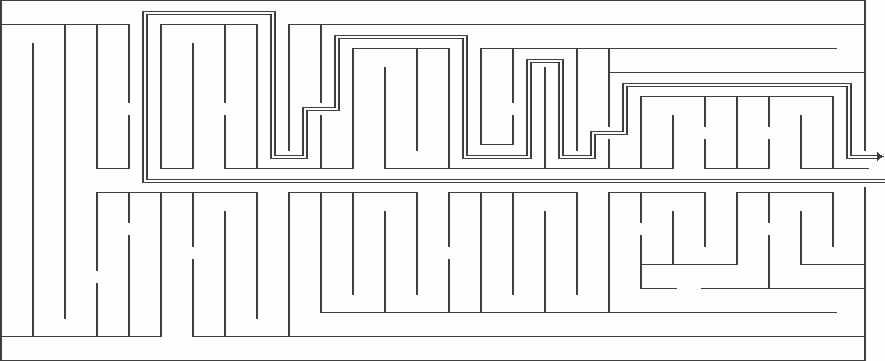
Take the 5th opening on the right (F9 R)
F R3 L R F R L
The objective of this puzzle is to close up all the stinky caskets in the crypt before you. Clicking on a casket changes its open/closed state and that of some of its neighbors. The puzzle randomizes each time it's played, so no fixed solution is possible but you can use the built-in solver below. Instructions: Click on a grid cell to specify the open or closed state of the corresponding casket. Press the Solve button and the caskets you need to click on are shown in green. Press the Reset button to restart.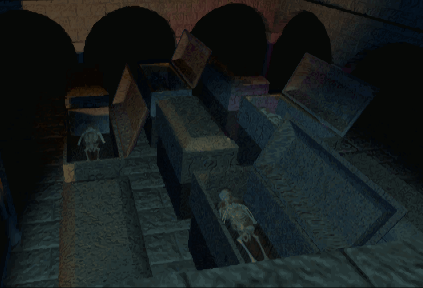
After a gruesome cutscene, move forward through the casket and back to the Kitchen. Move L F3 L F L into the Foyer, then use the rightmost forward-pointing finger to approach the Library door. Move F2 into the room.
In this puzzle, the objective is to visit all of the letters in the network to spell out a phrase. The eyeball icon is active only on the T at the bottom, so start there. The solution is: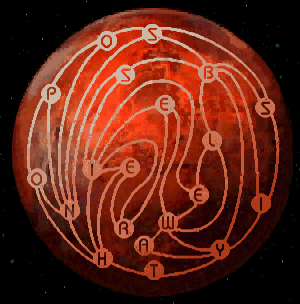
THERE IS NO POSSIBLE WAYwhich ostensibly is a taunt about your ability to finish the game. On solution of the puzzle, you'll be rewarded with a poem from Stauf. A check of the map shows that all accessible rooms have been solved now, so what's next?
Hamilton Temple's BedroomAt this point, you can optionally return to the Kitchen through the door from the Foyer and see a video of how Tad came to be in the house. In the Library, move F R F through a secret passage in the fireplace to return to the 2nd Floor. Move F R F2 into the Doll Room.
Brian Dutton's Bedroom
Bathroom
Doll Room
Doll House
The objective of this puzzle is to recreate a picture of the burned-out Stauf mansion by manipulating images in the 3 x 3 grid before you. Clicking on one of the small golden buttons around the box frame cycles each of the three images in the corresponding row or column amongst the nine possibilities. The puzzle randomizes each time it's played, so no fixed solution is possible but you can use the built-in solver below. Instructions: Click on the foreshortened image in a grid cell to specify which part of the overall picture is shown in the game. Press the Solve button and the numbers of times you need to press the buttons on the frame (in any order) are indicated around the grid. Press the Reset button to restart. Note: The randomized puzzles in the game are not checked for solvability, and many of them are impossible. If a "No solution found" message appears when you press the Solve button below, reset the puzzle in the game using the stopwatch icon at lower left, and try again. You may eventually get a puzzle with three identical rows or columns, and these are always solvable.
After a cutscene explaining more of the Stauf mystery, move F2 into the miniature Doll House at left (its door is incorrectly shown at the right side of the Doll Room on the map).
If you need a hint for this puzzle, you can access the Library through the toy chest on the opposite side of the room after watching an animation of a snarling dog. This is not a crossword or word square puzzle since only the three words in the horizontal rows need to be rearranged, in this case reversed left to right and top to bottom to spell out another reference to The 7th Guest: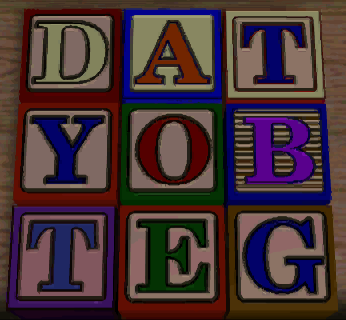
G E TClicking on the edges of the puzzle cycles the letters in the corresponding row or column. There are many solutions to this puzzle; the shortest is 8 moves. Below is one that doesn't contain any repeated moves. Click on the edges of the puzzle in this order:
B O Y
T A D
After a brief cutscene of Stauf, move R F2 L F through the upstairs hallway and into the Bathroom.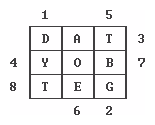
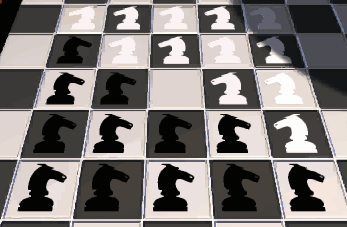
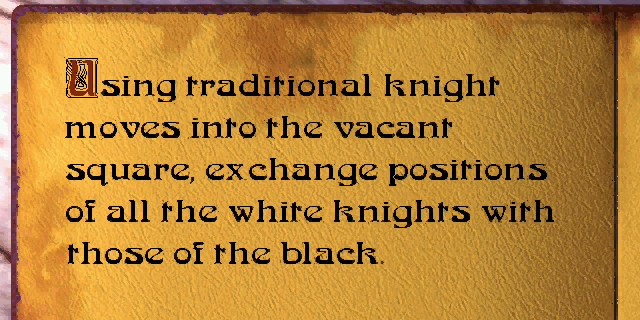
If you need a hint, you can access the Library through the sink and its resident spiders. The objective of this puzzle is simply to exchange the positions of 12 black and 12 white chess pieces using the usual knight moves. Click on one of the knights to move it onto the single empty square. As in the Bishops Puzzle played earlier, it's not necessary to alternate moves between white and black pieces.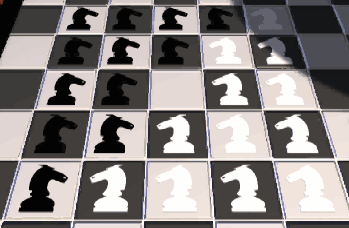
The following diagram describes the notation used for the squares on the board in the solutions below, which may be easier to read for long sequences than standard chess notation. The boundary between black and white triangular regions is indicated (the center position M containing the initial space is a "no man's land" that is not part of either side):
To skip the derivation and jump to the solution, click here.
Since an open knight's tour exists on a 5 x 5 grid (example from this source), the piece positions are not partitioned (unlike the Bishop's Puzzle). Each puzzle arrangement consists of a mixed sequence of 12 white and 12 black knights, with one space embedded. The number of such sequences is the number of ways of selecting 12 positions for the white knights from 24 possibilities, with the remaining positions used for the black knights, which is the binomial coefficient
Multiplying this count by the 25 possible positions for the space gives 67,603,900 different puzzle arrangements.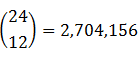
To solve the puzzle, there are 24 knights that need to be changed, each of which requires an individual move to the single vacant square (unlike the Cans Puzzle, in which two changes into correct positions can be completed with a single swap). The key to finding shorter solution sequences for this puzzle is to maximize the number of moves selecting a knight that is across the boundary from the current position of the space. Obviously, any backtracking must be avoided. With the unique dog-leg pattern of knight movements in chess, it can readily be seen that all positions can cross the boundary in a single move, with the exception of the four corner and next-to-corner locations A, F, T and Y, which each require a minimum of two moves. It follows that the minimum number of moves in a solution must be at least 20 single moves + 4 double moves, or 28.
From the center position M, there are eight possibilities for knight moves, but that reduces to only two at the corners. One of the possibilities at each position must be excluded since there will be no backtracking:
This results in an average of 2.84 possibilities per move, or roughly at least 2.8428 = 5 trillion outcomes to consider in an exhaustive search for a solution set of moves. Much can be done to make this problem more manageable for computer-aided solution, but we offer a simple manual solution strategy below: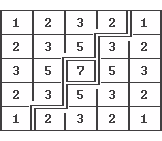
Solution Strategy
Using a consistent set of simple movement rules, a solution can be found in 36 moves as follows:
Step 1: At the beginning of the puzzle, it's relatively easy to transfer knights back and forth across the boundary, since no pre-existing positions need to be retained. One method is to use zigzag paths that put 12 pieces in position after 16 moves. However, this approach leaves the out-of-position knights asymmetrically spread out on the board and doesn't solve any corner positions. A more effective approach with better choices for subsequent moves is to start by moving the space counterclockwise around the 3 x 3 square in the lower left corner of the chessboard:The complete 36-move solution described here is:P W L U R K V MThis is equivalent to clicking on the following positions in order: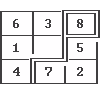
Step 2: Repeat the counterclockwise movements of the space around the 3 x 3 square in the upper right corner:
J C N E H O D MAfter 16 moves, 12 knights are in position (including 2 corners) and the chessboard is:

Step 3: Henceforth, give priority to replacing the four corner and next-to-corner out-of-position knights indicated in red above. Otherwise, always select an out-of-position knight on the opposite side of the boundary from the space. This strategy usually results in only one choice for each move, producing the next ten:
F (next-to-corner priority) *There are now 18 knights in position after 26 moves, and the space is back in the center position.
C (replace next-to-corner knight)
N (cross boundary)
Y (corner priority)
R (move forced)
G (cross boundary)
N (cross boundary)
Q (cross boundary)
X (cross boundary)
M (cross boundary)Step 4: Continuing the strategy, we have
T (next-to-corner priority)and the puzzle is solved!
W (replace next-to-corner knight)
L (cross boundary)
A (corner priority)
H (move forced)
S (cross boundary)
L (cross boundary)
I (cross boundary)
B (cross boundary)
M (cross boundary)*: The final two blocks of ten moves each are completely independent since they have no non-central positions in common, and therefore can be used in either order. The same applies to the first two blocks of eight moves each.
P W L U R K V MVarious computer search methods have been used to determine that 36 moves is minimal, and that many different 36-move solutions are possible.J C N E H O D M
F C N Y R G N Q X M
T W L A H S L I B M
Strangely, arranging the knights to form a quarter-turn rotation of the starting arrangement also solves the puzzle, but is inconsistent with the Book of Clues! The video of a 30-move solution to this other puzzle can be found here and is repeated below:
B I R K H S V MFour of the white knights in the rightmost column (E, J, O and T) are not moved at all in this solution.X Q F C N W P G D M
P G N Y R U L A H S V M
On completion of the puzzle, a cutscene plays of Martine Burden taking a bath (*yawn*). Exit the bathroom and move L F3 R F into Hamilton Temple's Bedroom.
If you need a hint, you can access the Library by turning around and using the right-hand door of three (the left-hand door returns to the Kitchen and the center one to the hallway). The objective is to turn over all 14 cards. Once a card is uncovered, the next one must be selected from the same row or column, but without reversing direction. The ranks of the disclosed cards indicate the order of selection. You can jump over uncovered cards, but not face-down ones. One solution is to follow a counterclockwise inner circle, then continue with a clockwise outer one and a jump to the center: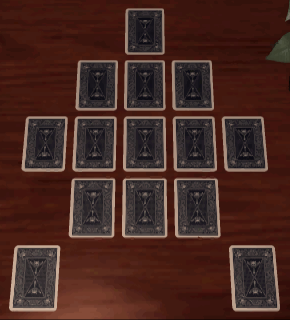
The second part of the puzzle has the same rules: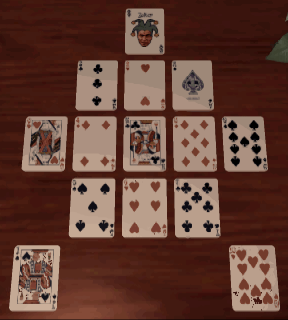
and a solution is: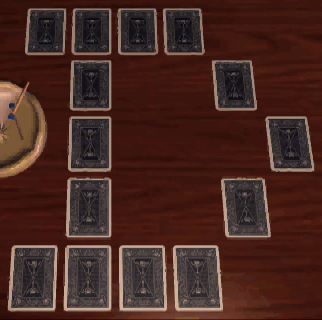
The payoff from solving this puzzle is a cutscene with Brian Dutton and Hamilton Temple. Turn around and exit through the center door, then move L F4 L F into Brian Dutton's Bedroom.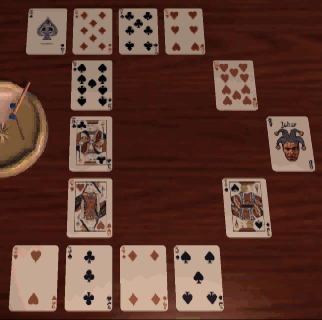
If you need a hint for this puzzle, the nearest Library access is through the sink in the bathroom across the hall. Turn over all of the coins in the pattern by tracing a continuous rectilinear path. Once a coin is flipped over and turns gold, it cannot be revisited. You can jump over gold coins, but not silver ones. You must start or end the puzzle from the isolated coin at the top. One of several solutions is simply to move clockwise around the perimeter from the top: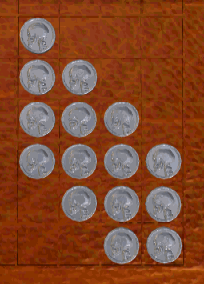
The second part of the puzzle is similar, but you can also jump over spaces and start or end from any coin: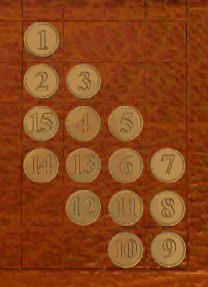
There are many solutions due to symmetry; one of them is to first trace out the four corners in a clockwise direction, then visit the remaining coins on the perimeter in a counterclockwise order: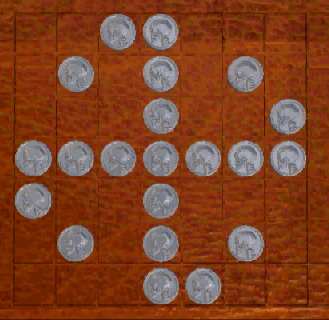
After this puzzle is solved, there is a cutscene starring the character Brian Dutton. Click the drama mask icon on the side door that is now accessible at left to enter the Chapel (this door is incorrectly shown at right on the map).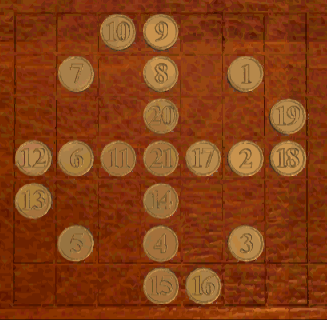
The goal of this puzzle is to move along a path from the green arrow to the red arrow according to certain rules concerning the color of the stones and the path of stones taken. The following stone notation will be used for reference:
Experimenting with the puzzle identifies the following behaviors, which we can safely assume to be consistent throughout the puzzle: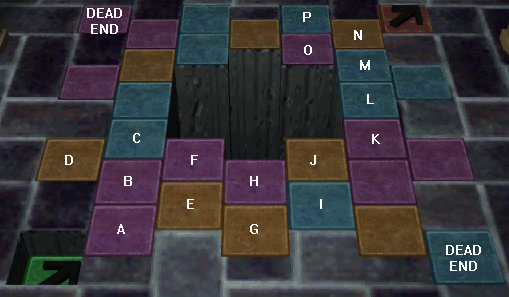
A* E H J* K L* M* O* P N ↗*Solving the Stepping Stones Puzzle opens up additional rooms on this floor and the one below:*: Path cleared
LaboratoryMove forward to the altar for a cutscene of human sacrifice. Turn left and click the drama mask icon for some skeletal organ playing (this animation can be repeated if desired). Exit to the right of the altar to enter the Laboratory.
Music Room
Gallery
https://analogbit.com/software/infection_aiThe puzzle can optionally be skipped simply by moving L2 F back to the Library and continuing with the rest of the game. Completing the Microscope Puzzle with or without hints is not required to finish The 7th Guest or activate the Open House mode at the end of the game.
From the Library, move R F L F R2 to face the grand staircase. Click the chattering teeth icon on the base of the stairs to be magically transported to the Gallery.
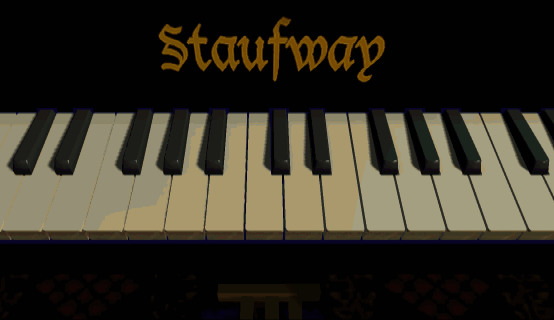
On completion of the puzzle, a nifty 3-D animation of Stauf's picture is shown. Move right and into the piano picture to be transported to the Music Room.
You may want to turn off the game's music at this point so it doesn't interfere with the Simon Says game that is ahead. Click on the piano again to access the Music Puzzle. In this tiresome exercise, you'll need to click on certain piano keys 171 times without making a mistake in order to complete the puzzle. This is done by laboriously adding one note at a time to a melody of 18 notes. Using the notation
the melody is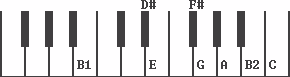
The payoff for all your effort is a bloody murder scene. Click the chattering teeth icon on the potted plant to the right of the piano to return upstairs to Brian Dutton's room.
B1 B2 F# G E D# E F# E B1 B2 C B2 A G F# E F#
This puzzle won't appear on the door unless you've completed all of the puzzles above (with the exception of the optional Microscope Puzzle). If you're interested in replaying the Attic Door Puzzle, save your game at this point since the puzzle is not available in the Open House mode of the game.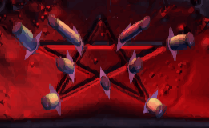
The object of this peg solitaire game is to repeatedly select a knife that can jump over another one onto an empty space, after which the jumped-over knife is removed. The puzzle is solved if there is only one knife remaining on the pentagram. Here is one of the 84 solutions:
Click on the nodes in alphabetical order. Incidentally, there is no solution to this puzzle in which you won't use a node twice. After you've solved the puzzle, you can still wander around the house, but once you open the attic door, there's no turning back.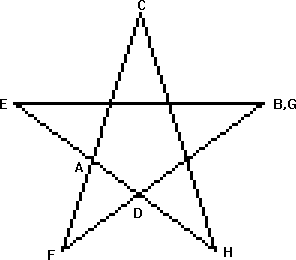
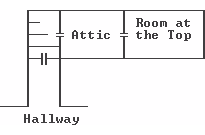
Climb the one-way spiral stairs into the Attic.
After the puzzle has been solved and a cutscene plays, you can click the chattering teeth icon on the trunk for an optional skeleton animation. Move F L past a cutscene in the mirror to the final confrontation with Stauf in the Room at the Top. Watch the endgame sequence, in which the boy playing Tad seems to be laughing at the absurd lines he's been given. If desired, press [Esc] to skip the credits (but some of them are kinda funny).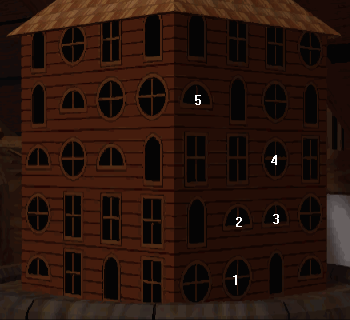
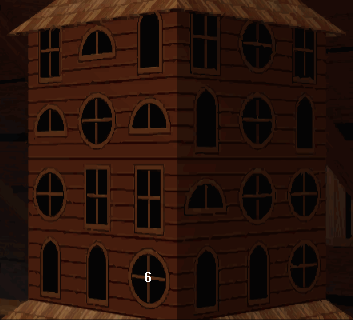
From To Use Prerequisite Library Hallway Fireplace Game Room Kitchen Pool table Knox Bedroom Bathroom Rear door After Bathroom access is shown on the map Crypt Kitchen Coffin On completion of the Crypt Puzzle Brian Dutton Music Room Potted plant After Music Room access is shown on the map Brian Dutton Chapel Left door After the Coins Puzzle is solved Chapel Laboratory Right from altar Laboratory Library Side gate Doll Room Doll House Left door Doll House Library Toy chest Bathroom Library Sink Hamilton Temple Library Right-hand door Hamilton Temple Kitchen Left-hand door Foyer Gallery Base of stairs After Gallery access is shown on the map Gallery Music Room Picture of piano Music Room Brian Dutton Potted plant
3rd Floor Map:
Copyright © 2020 Balmoral Software (http://www.balmoralsoftware.com). Portions copyright © 1992 Trilobyte and Virgin Games. All rights reserved. Republication, redistribution or conversion is expressly prohibited without the prior written consent of Balmoral Software.


