Regular Factory
Escape Room
23 September 2026
Copyright © 2026 Balmoral Software (http://www.balmoralsoftware.com). Portions copyright © 2022 by mc2games. All rights reserved.
There are a handful of inventory items needed in the game, but all manipulation of them is completely automatic. You can't examine items once they've been put into inventory, so it's fair to assume that their visible details are unimportant.
Puzzle resets: The solutions presented in this walkthrough usually rely on the puzzle starting in its initial state. If you've made any change to an unsolved puzzle, you can easily reset it using the button at the top of the screen.
Cheats: If you know some of the passwords in advance, it's possible to skip large sections of the game, but not in the Delta and Beta areas since they have physical or logical interdependencies between virtually all of their puzzles. Of course, the cheats are just a design curiosity since the whole point of the game is to enjoy the puzzles.
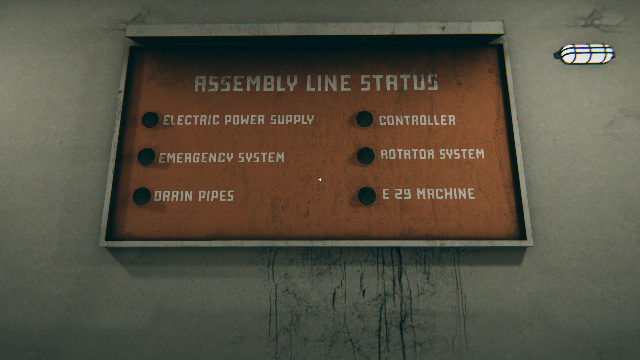
Each of these systems involves solving at least one puzzle. From the entrance, begin by wandering down the right side of the main floor to observe the following:
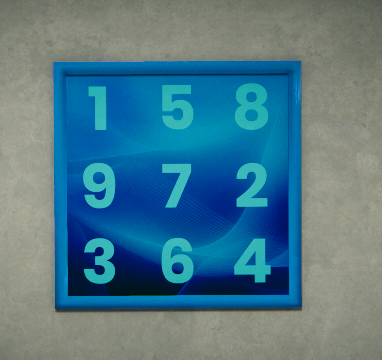
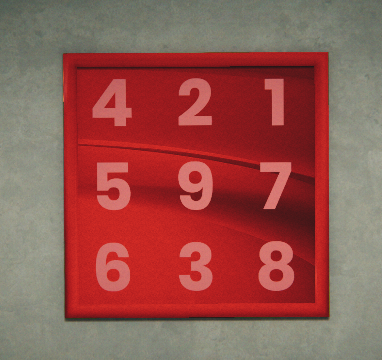
The apparent objective is to line up adjacent numbers on the dials to add up to 10 as shown on the sign overhead. From the initial puzzle configuration, the only solution is to click on the dials the following number of times: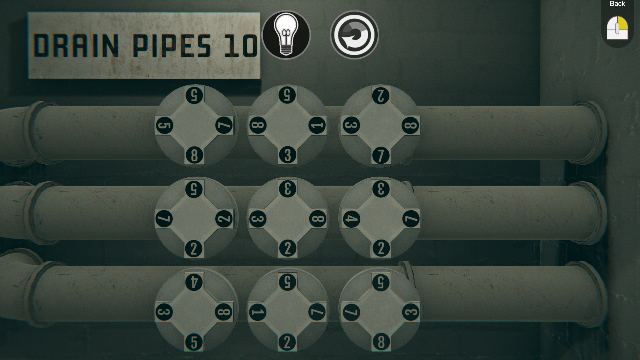
to produce the solution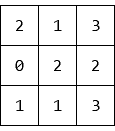
Proceed along the central aisle to a broken machine behind the central stairs. When you click on it, you'll get a white cable added to your inventory. Go back around the stairs to the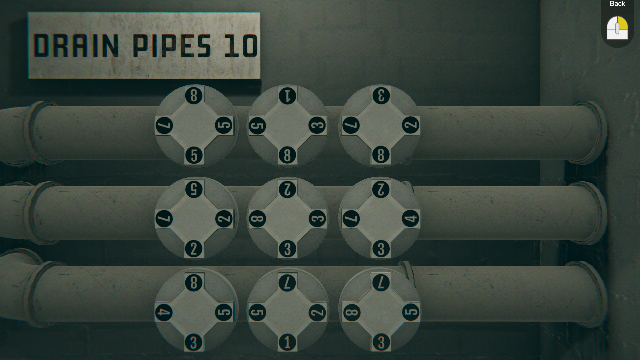
Prerequisite: White cable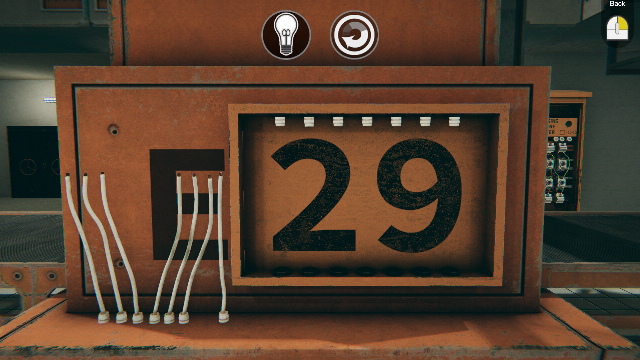
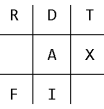
The cable in your inventory is automatically transferred here. Referring to Roman numerals, arrange the slanted cables to form X X I X (29):
Turn around and zoom to the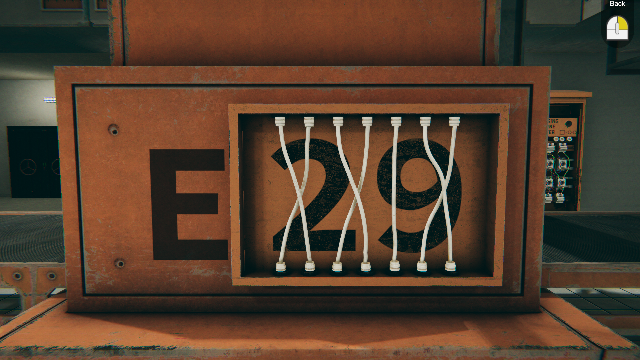
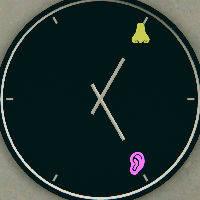
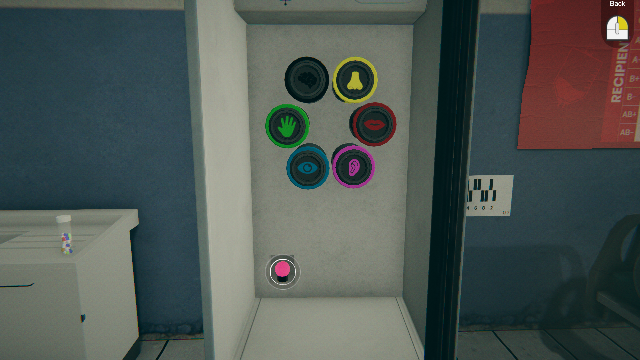
Press the tool buttons in order according to the number of roses seen on the wall posters: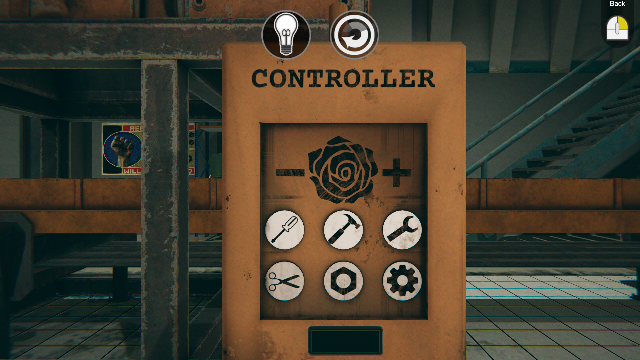
Here, the object is to select the rotation direction of the gear nearest each switch, based on a counterclockwise starting rotation as indicated by the large arrows. Each gear reverses the rotation of the preceding one it meshes with, whereas a belt drive preserves the rotation. The following switch settings can be inferred: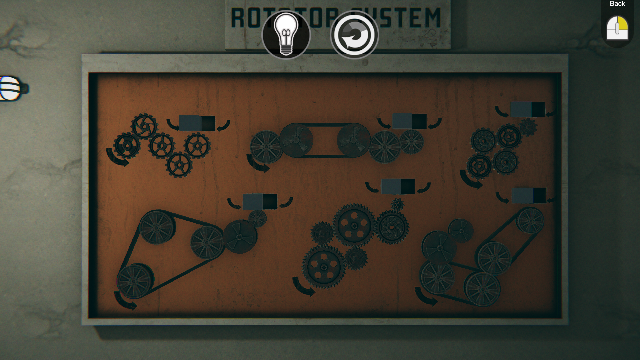
From the initial puzzle state with all switches to the left, change only the following switches: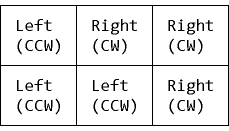
Continue around the balcony to the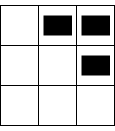
The black outlined boxes on the placard at right show the desired power settings for each of the 4 panels. According to the placard, the power setting is the panel's maximum wattage divided by the number N of buttons pressed (1-4). We then have the following division problems: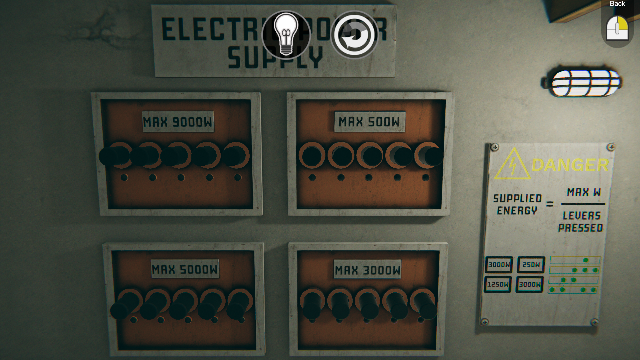
The values for N are entered by pressing the buttons according to the patterns shown in green on the placard:
9000/N = 3000
⇒ N = 3500/N = 250
⇒ N = 25000/N = 1250
⇒ N = 43000/N = 3000
⇒ N = 1
Continue to the end of the balcony to the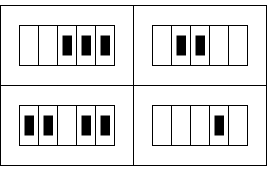
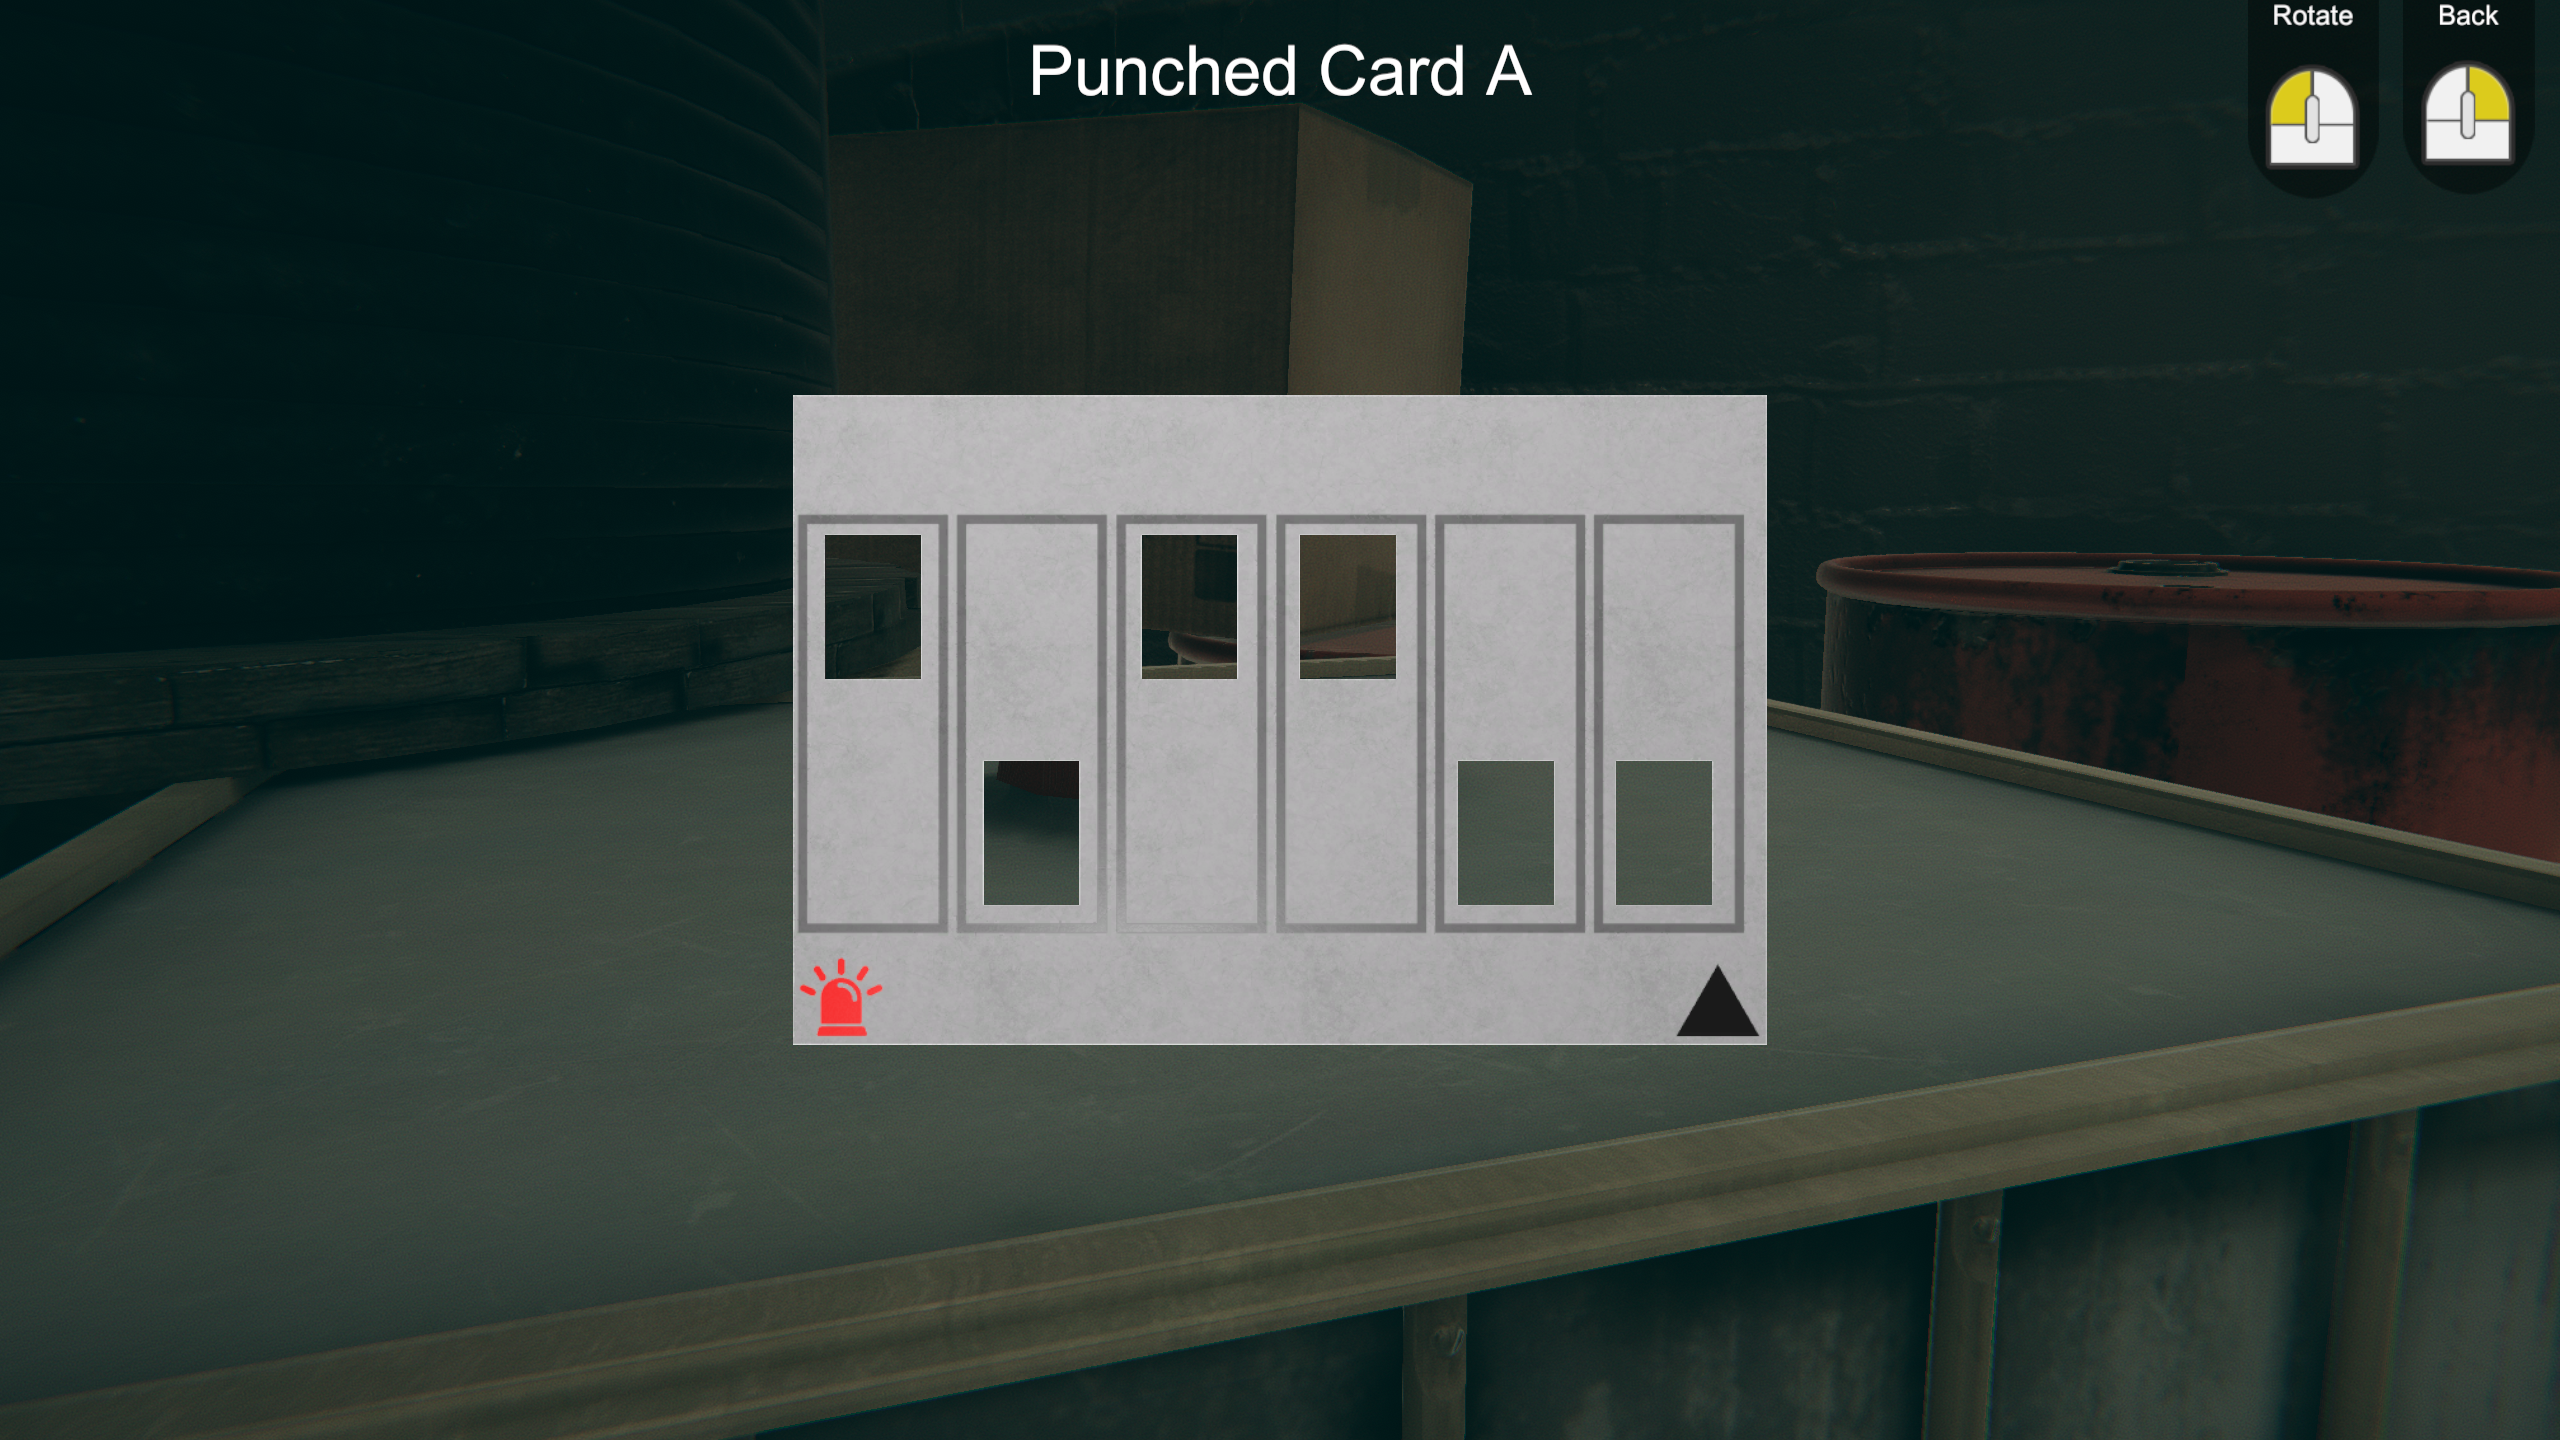
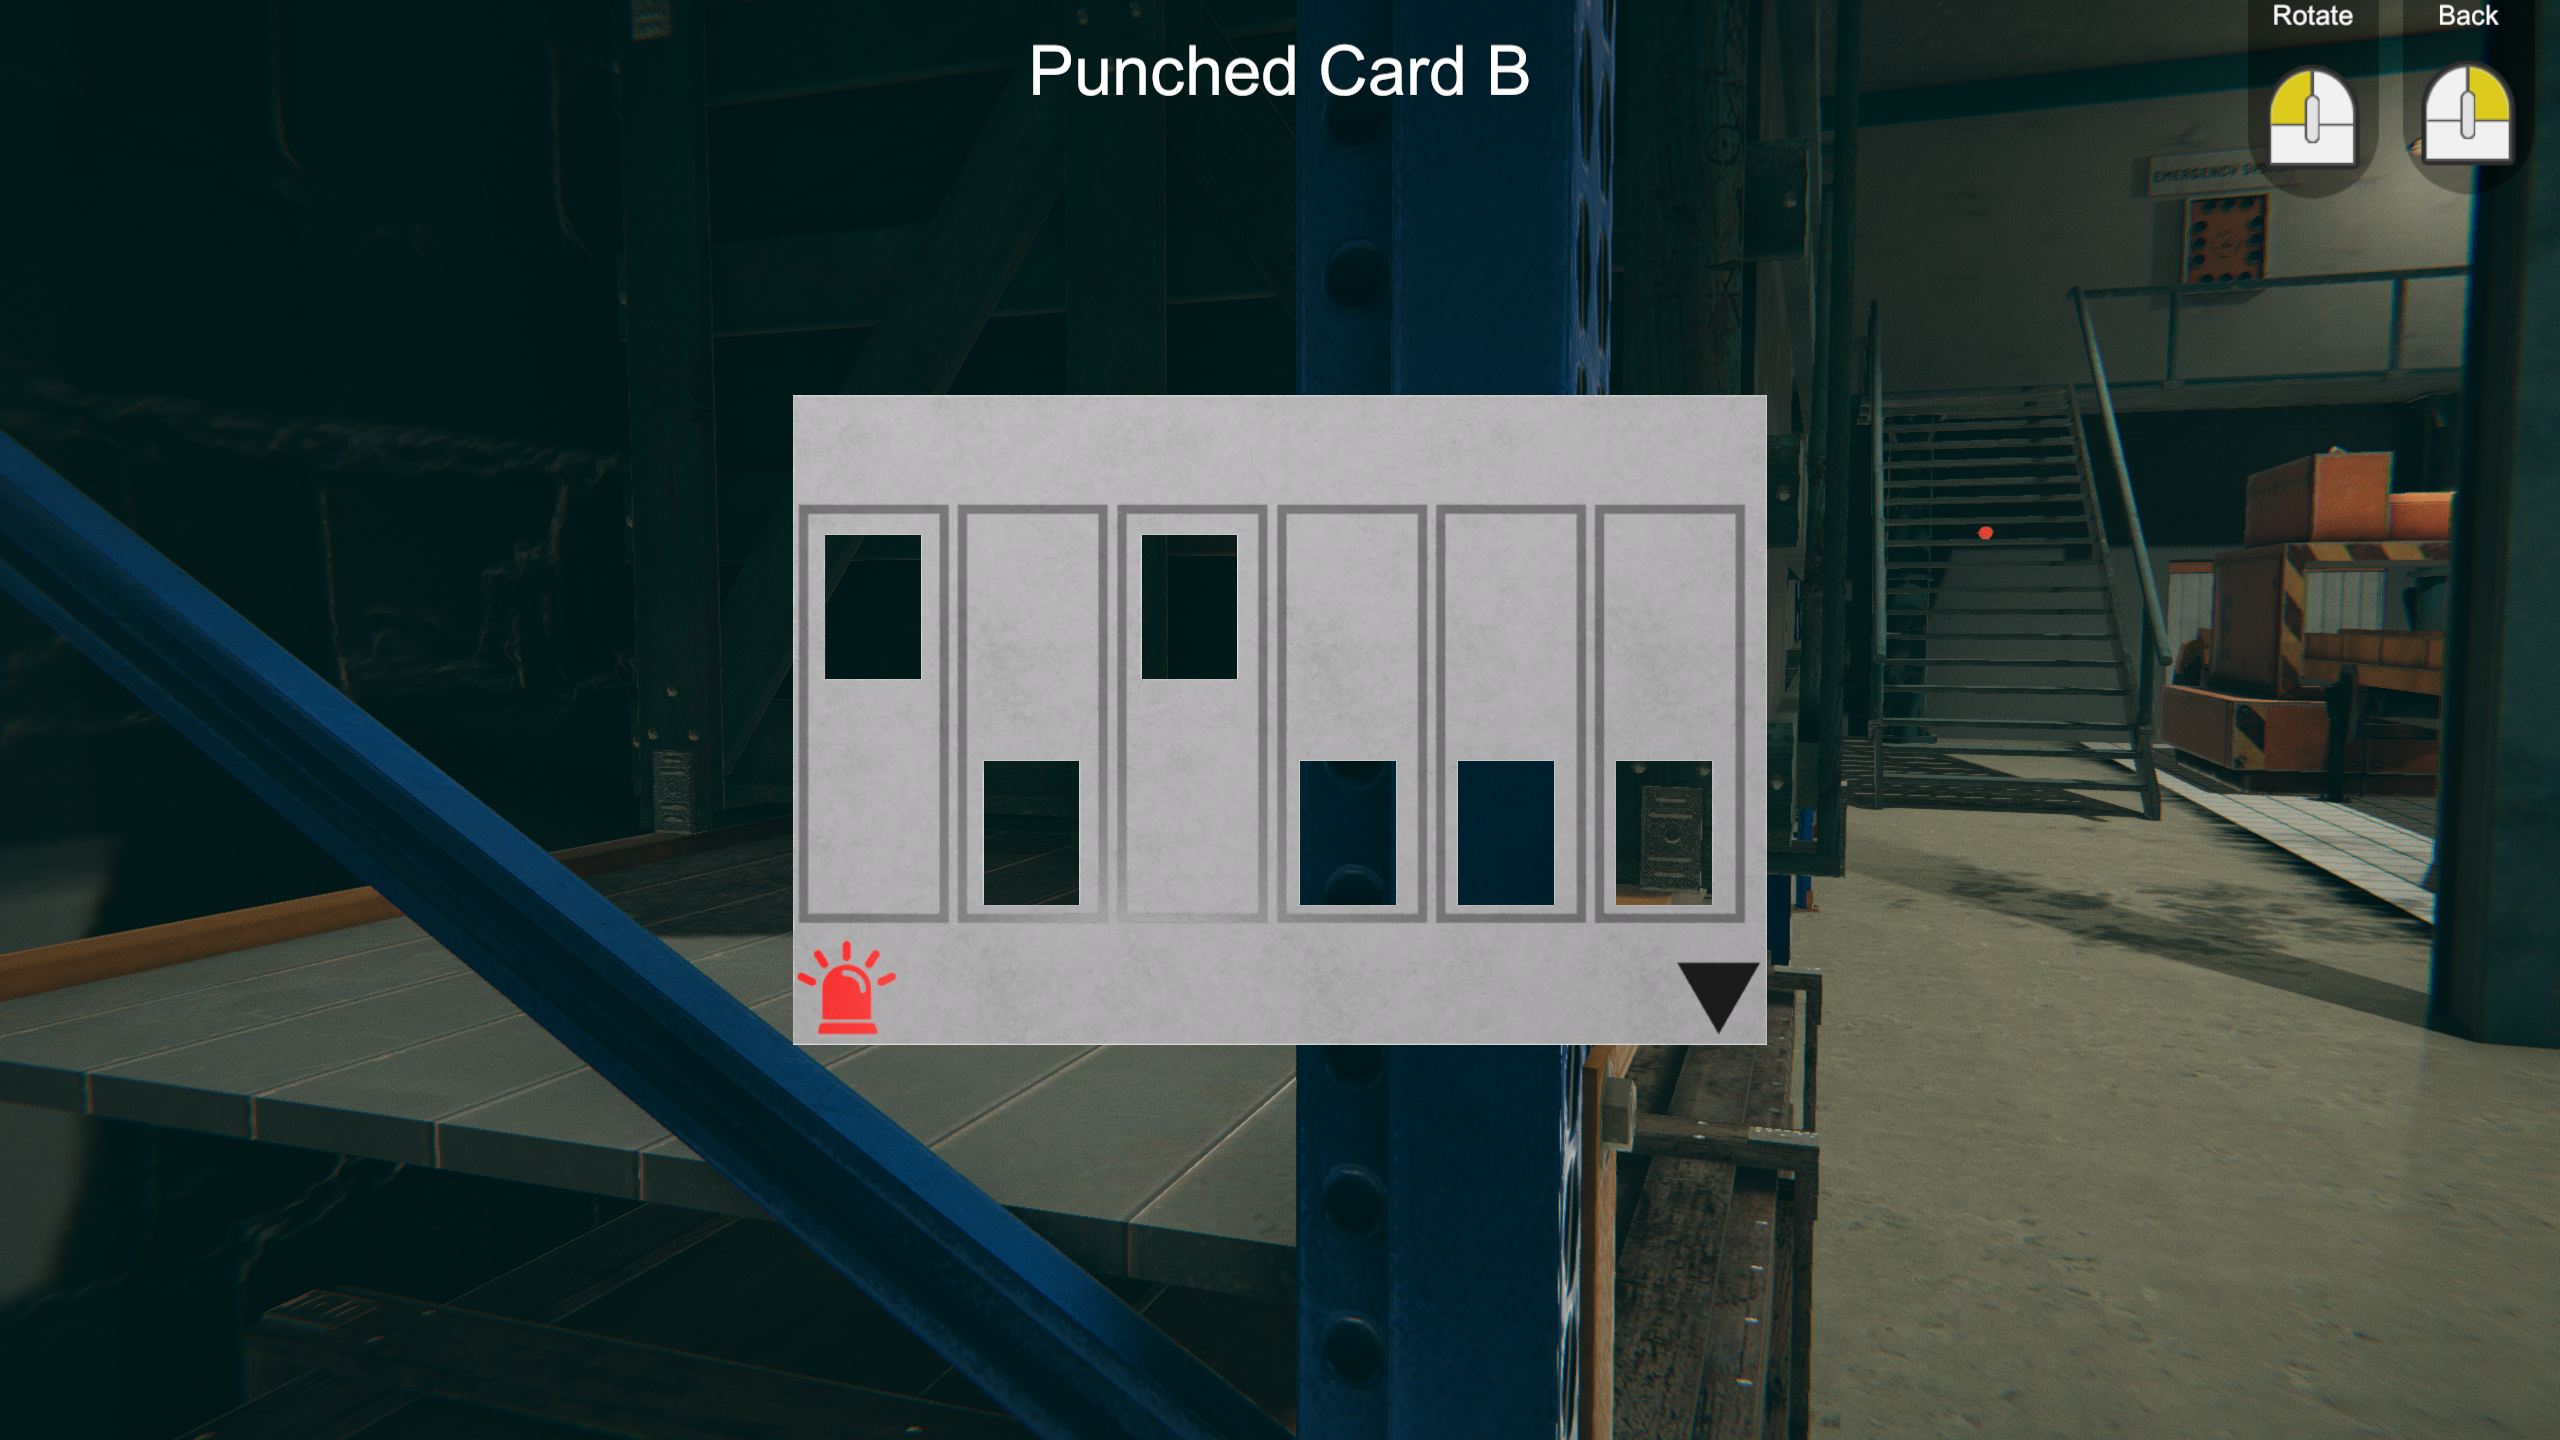
Set the switches according to Punched Card A (top) and Punched Card B (bottom) seen earlier. From the initial puzzle state, change only the following switches: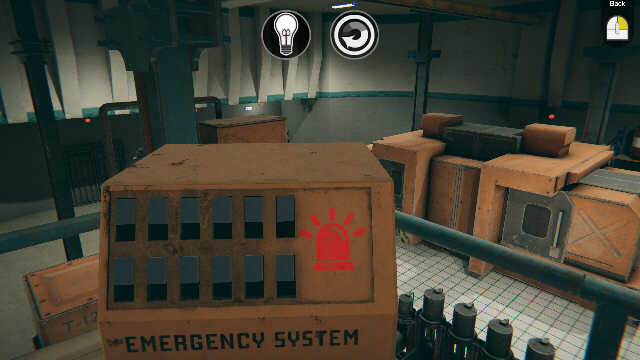
A sound is heard when the correct switches are set, but the status board isn't updated yet. Move all along the balcony to see which of the red lights on the lower level are on (reflecting on the wall). From the balcony perspective, the following status should be seen: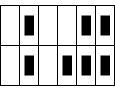
Go to the second part of the Emergency System puzzle, to the left of the Assembly Line Status display at the top of the central stairs: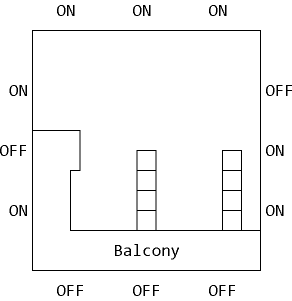
Prerequisite: First part of the puzzle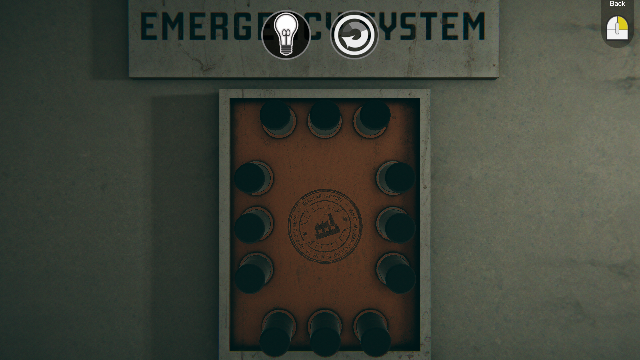
Comparing its central logo to the one on the floor behind you, you can see that the panel's orientation is rotated 180 degrees from the diagram above. Therefore, press the following buttons on the panel to correspond to the lights that are on:
This should complete all of the items on the Assembly Line Status display. Go back downstairs and behind the E29 conveyor belt to the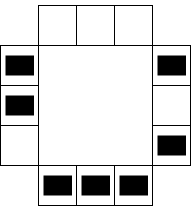
Prerequisite: Completion of all items on the Assembly Line Status display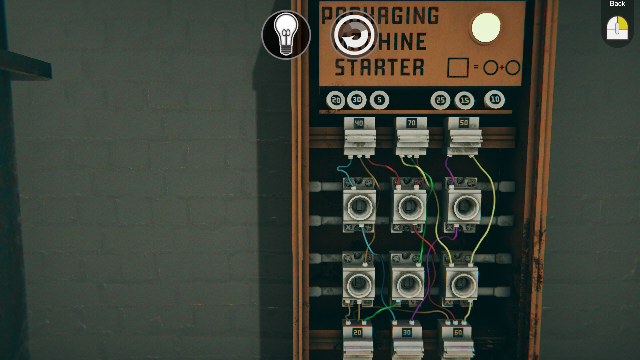
To skip the derivation and jump to the solution, click here. The objective is to place the 6 coins into the receptacles such that the values at the end of each wire leading to the receptacle sum to the value of the coin. Algebraically speaking, if A,B,C,D,E,F represents an arrangement of the coins 5,10,15,20,25,30:
then we have the following simultaneous equations: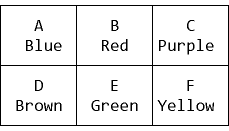
40 = A + D + BThe only solution is to place the coins as follows:
70 = F + E + B
50 = C + F
20 = D + E
30 = A + C
60 = D + B + F
Go to the conveyor belt on the other side of the room to retrieve the Gamma keycard from the hand in the box.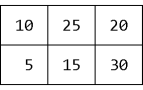
Move to the Security Room door. Its entry code 3241 has already been entered. Go inside and move to the desk.
Room Corner Star points Lockers Upper left 10 Staff Room Lower left 6 Security Room Upper right 4 Workshop Lower right 8
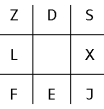
Most of the letters in this list are in alphabetical order but some of them are in the wrong positions: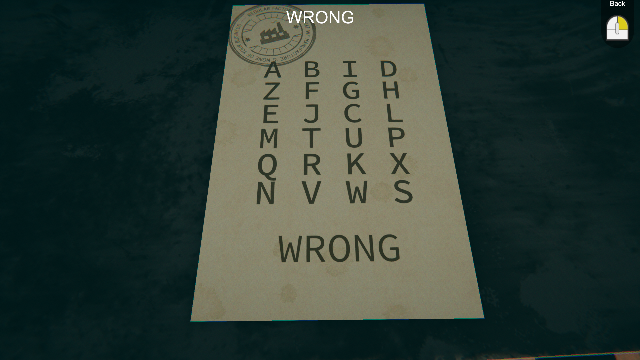
These are the buttons to press on the left panel above. The right panel should be its mirror image: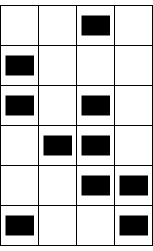
When the puzzle is solved, take the Workshop and Staff Room keycards from the open drawer. This completes all the activities in the Security Room.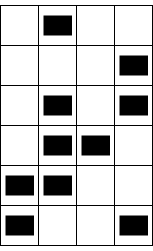
Exit the room, turn left and use the code
These seem to correlate with the 10 diamonds on the wall-mounted device: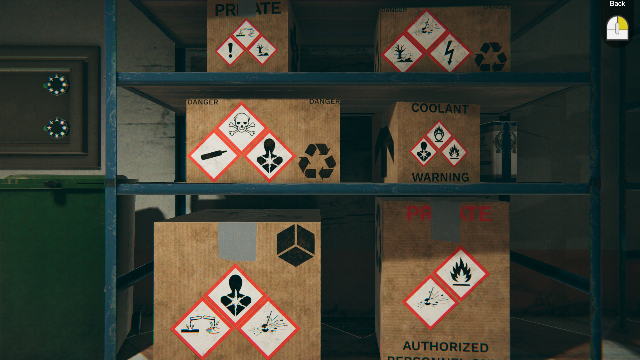
To skip the derivation and jump to the solution, click here. The ! and tree symbols don't have any others beneath them, so they are probably in the bottom row. Placing the patterns from the top shelf of boxes, we have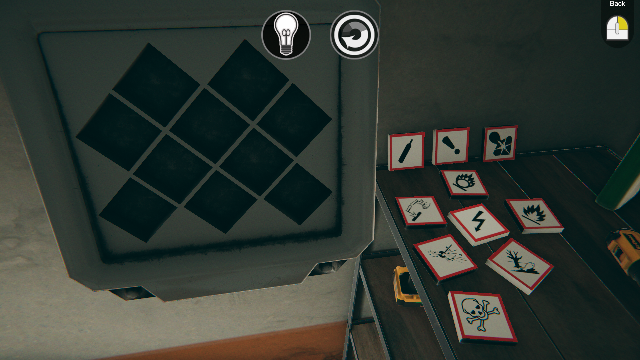
The bottom shelf of boxes determines some of the symbols in the second row from the top: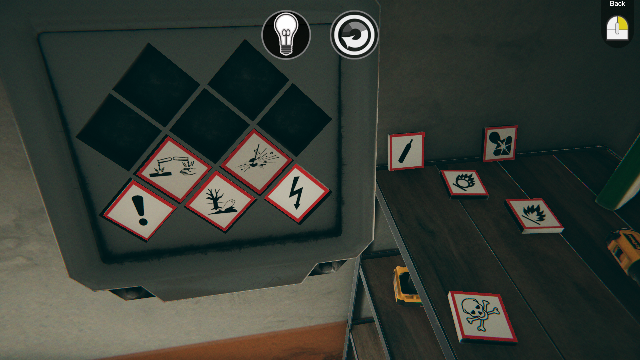
The middle shelf of boxes completes the rest of the puzzle: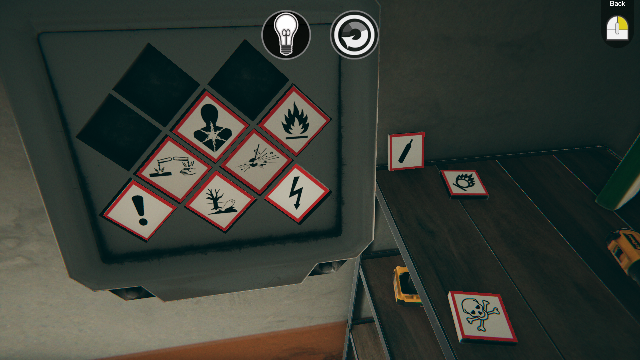
Take the Lockers keycard from the bottom of the wall-mounted device. Turn right and note the can of A C I D on the shelf. Maybe a reference to the WRONG puzzle? Turn farther right to the next puzzle: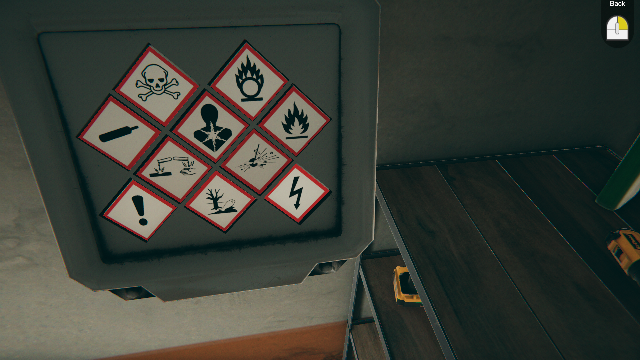
Set the dials to match the information gathered in the anteroom. From the initial puzzle state, click the following number of times on each dial: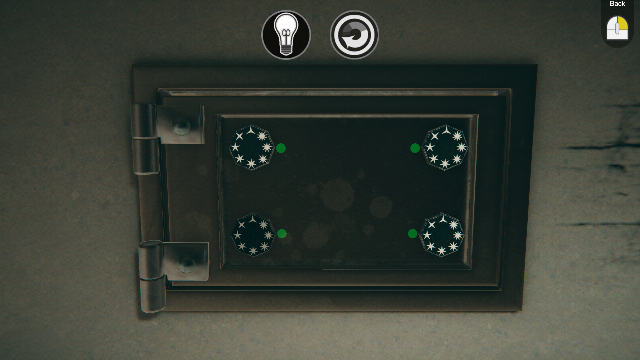
Take one thin dime from inside the sofa. Head to the Lockers door next. Looking up, you can see the number sequence
This diagram shows a sequence of wrenches that we saw in the Workshop: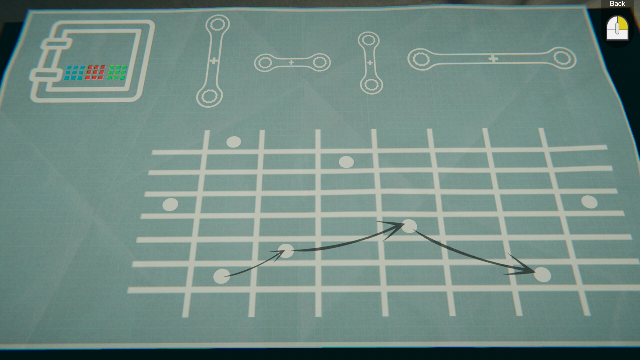
For now, exit the room and move to the Staff Room door. The three door codes seen so far are:
Long vertical Short horizontal Short vertical Long horizontal
These are all 1-digit circular shifts of each other, so it's reasonable to assume that the fourth door code would be the remaining shift:
Security Room 3 2 4 1 Workshop 2 4 1 3 Staff Room 4 1 3 2
1 3 2 4which is indeed accepted. All four doors are now open. Enter the Staff Room.
Walking around, you can see some fairly obvious number-letter codes: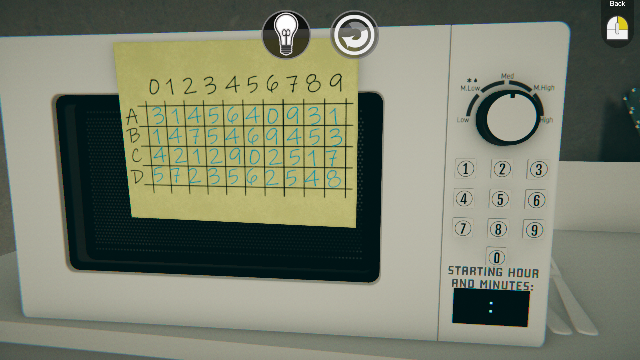
Zoom in on the microwave and use the yellow chart on it to translate the codes above into single digits:
Box of doughnuts next to microwave D7 Apple next to box of doughnuts A8 TV screen C1 Bottom of discarded shoe B6
A8 = 3These are the digits to enter as a 24-hour clock time on the microwave. The only arrangement of the four digits that has the hours less than 24 and the minutes less than 60 is 23:59, so it must now be midnight during the night shift. When the microwave opens, pick up a red key.
B6 = 9
C1 = 2
D7 = 5
Prerequisite: Safe Puzzle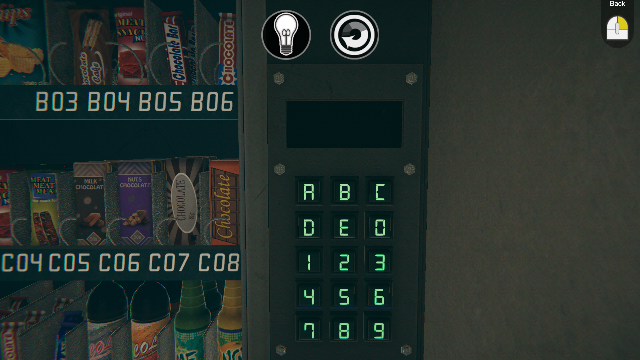
Examine the vending machine to see that the wrench you probably need is at selection C02. Zoom in on the keypad and your dime is automatically inserted. Enter the code and pick up the wrench. This completes all the activities in the Staff Room.
Prerequisite: Microwave Puzzle
Return to the Workshop and approach the red tool box at the far side of the room. Your red key will automatically be used to open the box, from which you can obtain a tray of dowels. Go to the opposite side of the room.
Prerequisite: Vending Machine Puzzle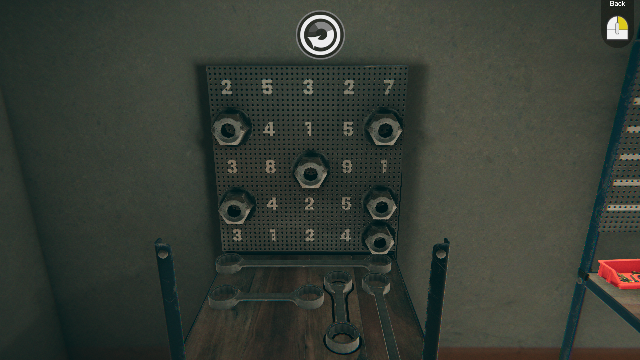
The wrench from the vending machine is dropped here. The objective is to place the four wrenches orthogonally on the pegboard without crossing the hexnuts or each other. Number the rows and columns in reading order. The only possibility for the long horizontal wrench is in Row 1. There will then be room for the long vertical wrench in Column 2 or 4. But in the first case, there's no room for the short horizontal wrench, so the long vertical one is in Column 4 and the short horizontal one in Row 5. Finally, the short vertical wrench is in Column 2:
The sum of the numbers at each end of the wrenches can be arranged as shown on the locker room diagram: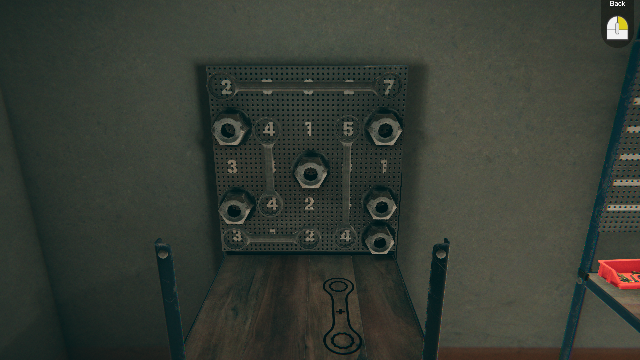
These totals 9 5 8 9 also appear to be correlated with the four lower dots on the adjacent puzzle:
Long vertical Short horizontal Short vertical Long horizontal 5 + 4 = 9 3 + 2 = 5 4 + 4 = 8 2 + 7 = 9
Prerequisite: Tray of dowels from Workshop toolbox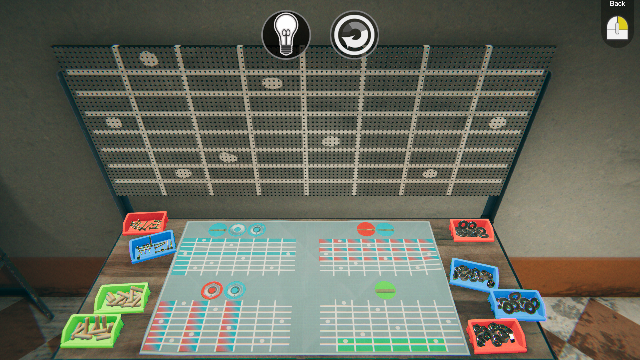
The tray of dowels from the toolbox is dropped here. To skip the derivation and jump to the solution, click here. The objective is to place the 8 colored trays of hardware onto the pegboard dots according to all of the color requirements in the chart below the pegboard. Number the rows and columns in reading order. The two lower dots appear only on the green diagram, so the two trays of dowels go there. The first column tray must satisfy both
Blue tray and (Red hexnut or Blue hexnut),which logically equates to "Blue hexnut". Similarly, the upper Column 2 tray must be both
Blue tray and (Red screw or Blue screw),or equivalently, "Blue screw". The remaining blue tray must be in the only other blue location in Column 8. The only information we have for Column 3 is a Red hexnut. Similarly, the Red screws must be in Column 5. Finally, the Red washers must be in Column 4, even though we have no information on this location.
Correlating the colors of the bottom four trays with the wrench totals as instructed on the Locker Room diagram, we have the complete code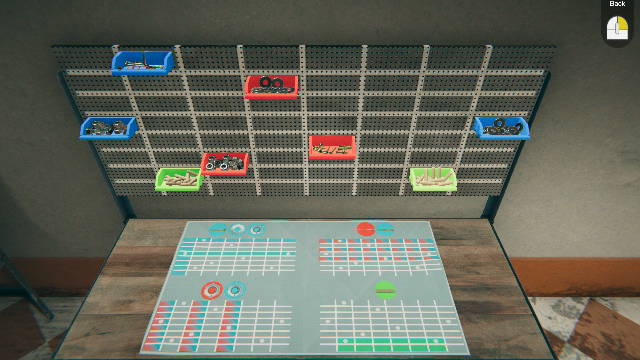
We are now finished with the Workshop and can return to the last remaining puzzle in this area, located in the Locker Room.
Green Red Red Green 9 5 8 9
Enter the code from the workbench puzzle above to open the safe and obtain an access card to the "Beeta" area, which is through the door in the back corner of the assembly line area.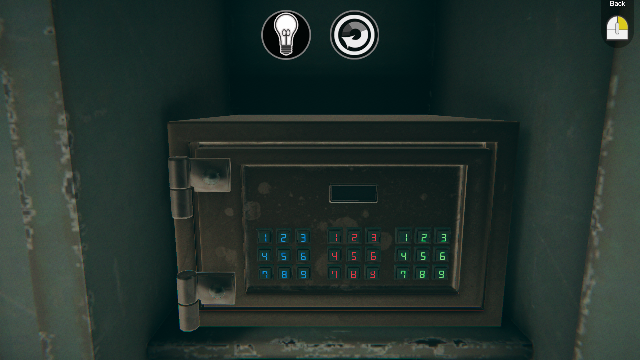
Follow the walls to the right until you come to a floor plan: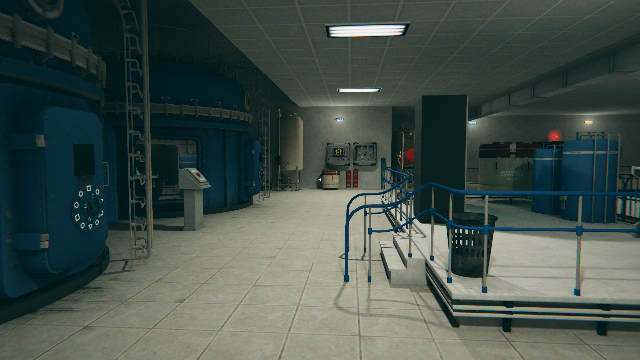
Morse codes are provided here for each digit. Your current location is at the lower left of the diagram. The central double door between the sunken 2nd and 3rd Areas leads to Area Alpha, and a double door on the opposite side of the room leads to the Infirmary. The single doors you may see in the room don't open.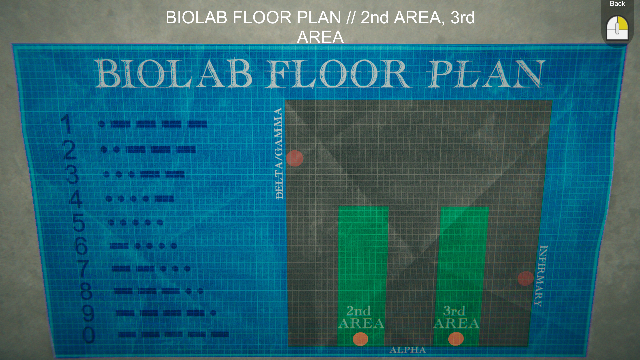
Some experimentation with this puzzle shows that the dangerous sparking after the red button is pressed occurs only between two posts whose numbers are consecutive. Referring to the connection diagram at left, we can work outwards from the central post fixed at 1. The bottom left post should be 2. Next, the top left and middle right posts should be 3. The top right post then is 4, and the left middle and bottom right ones should both be 5: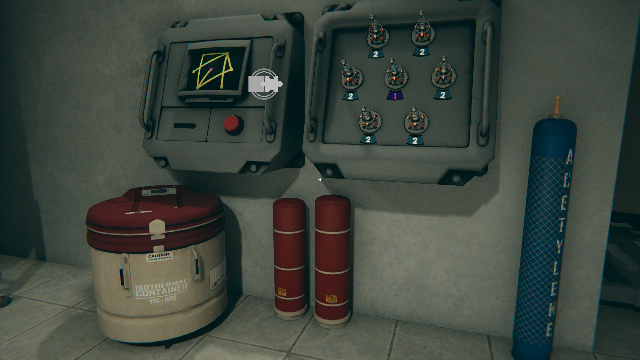
Press the red button to obtain a floppy disk circa 1986. Is this really the year 2032?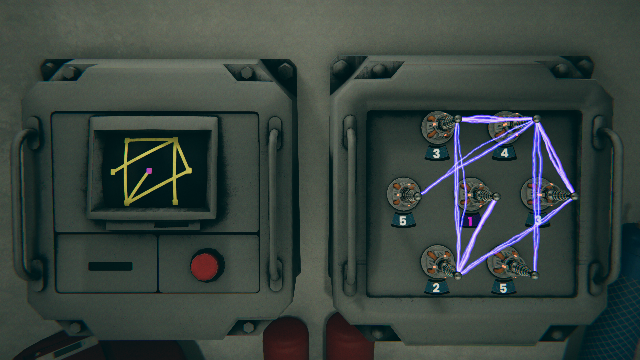
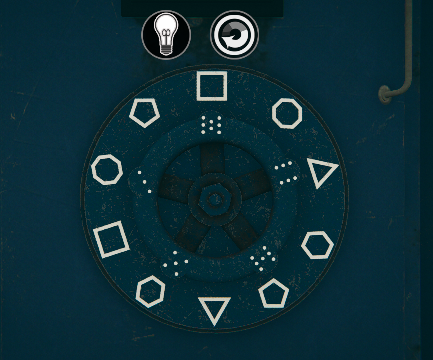
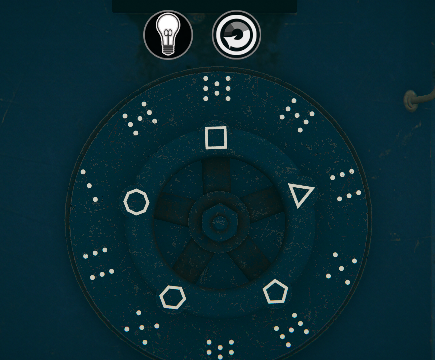
To skip the derivation and jump to the solution, click here. Here we can see a movable dial with 5 polygons surrounded by a fixed ring with 10 dice patterns. Looking at a similar dial on the hatch of the other (left) blue chamber, we see an inverted arrangement that has a movable dial with 5 dice patterns surrounded by a fixed ring with 10 polygons: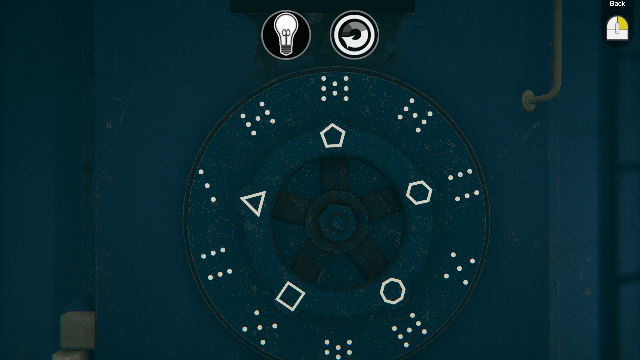
The objective is to configure these two dials together so that the inner dial on one matches the outer ring on the other, and vice versa. Moving clockwise from the top in the initial puzzle configuration, the five dice patterns on the left chamber dial are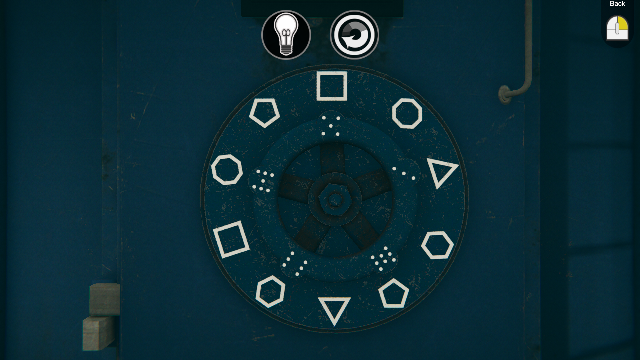
5 3 8 6 7To align these with the dice patterns on the right chamber hatch, we will need to rotate the left dial clockwise 6/10 of a circle (4 mouse clicks since the dial only moves counterclockwise).
Making a similar comparison of the polygon dial of the right chamber hatch with the ring on the left chamber hatch, it will need to rotate clockwise 4/10 of a circle (6 mouse clicks since that dial only moves counterclockwise).
When the dials have been properly set, press the red button on the console between the chambers to open both of them.
To summarize, these are the steps:
Zoom to the green box on the side table marked with a red light to see a numeric keypad begging to be used.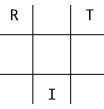
Exit the blue chamber and move around the room to see four red lights on the walls similar to the ones you saw in the assembly line area. However, these are not fixed on or off but pulse every 14 seconds with a pattern of short and long blinks. Some investigation shows the following patterns, which are in Morse code that can be translated from the floor plan seen earlier: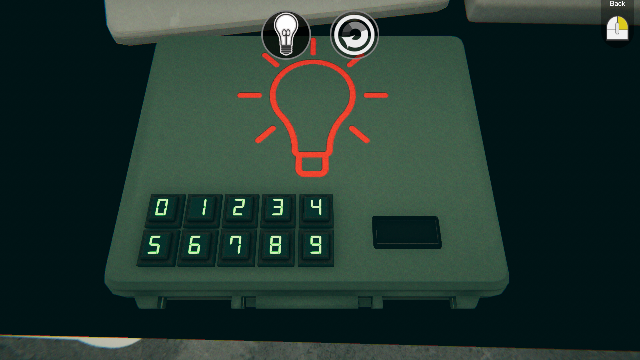
Re-enter the right blue chamber and enter the code
Delta/Gamma door: - - - . . (8) 2nd Area: . . . . - (4) 3rd Area: - - - - . (9) Infirmary door: . . . . . (5)
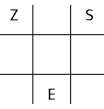
Enter the left blue chamber. Look at the floor and especially under the bare table to see a 3 x 3 grid on the floor with the following letters written on it:
Prerequisite: Electricity Puzzle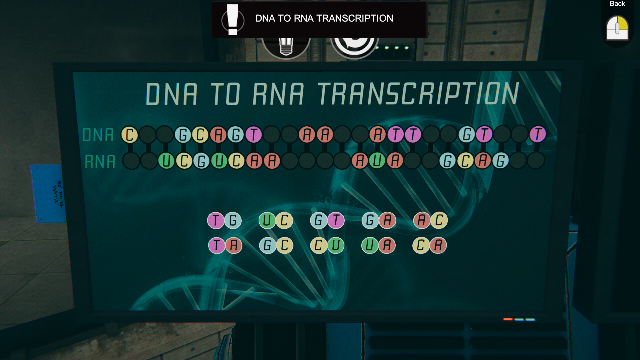
Zoom to the left side of the two blank monitors to insert the floppy disk. The objective is to place the 10 nucleobase doublets into the spaces according to DNA-to-RNA base pairing rules as shown in the completed portion of the sequences:
To skip the derivation and jump to the solution, click here. Each of the spaces consumes two doublets from the available ones below. Number these spaces 1-5 from left to right.
DNA: G C A T RNA: C G U A
Space 2: A is over U and C-U is the only doublet ending in U, so it is on the bottom. Then A C is under T G, so T-G is on top.To summarize, move the doublets to the following locations:Space 3: T is over A and G-T is the only doublet ending in T, so it is on top. Then A G is over U C, so U-C is on the bottom.
Space 4: T is over A and A-C is the only doublet beginning with A, so it is on the bottom. Then C G is under G C, so G-C is on top.
Space 5: C is over G and C-A is the only doublet beginning with C, so it is on top. Then A T is over U A, so U-A is on the bottom.
Space 1: C is over G and G-A is the only doublet beginning with G, so it is on the bottom and T-A is on top.
Completing the puzzle activates an adjacent one at right as well as a second set of instructions on the screen behind you.
T-A T-G G-T G-C C-A G-A C-U U-C A-C U-A
To skip the derivation and jump to the solution, click here. Refer to the completed puzzle just solved to read the RNA sequence in reverse order from right to left: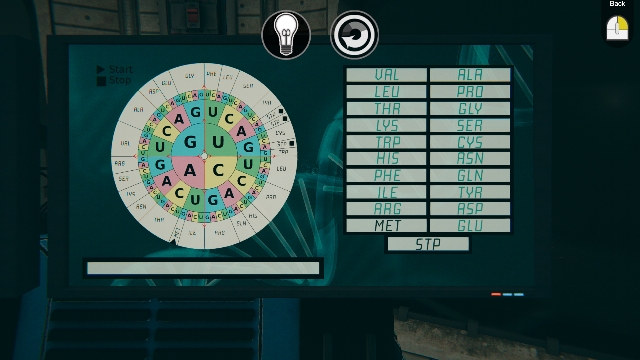
AUGUsing the circular chart in the current puzzle, start on the inside and move outwards to spell each triplet above and determine its 3-letter amino acid translation.
ACG
CAA
UAC
UUC
AAC
UGC
UAG
The correct sequence of acids is:
Pick up the RNA sample from the top of the monitor. Exit the chamber and move across to a console on the raised platform.
MET THR GLN TYR PHE ASN CYS STP
Prerequisite: Red Lights Puzzle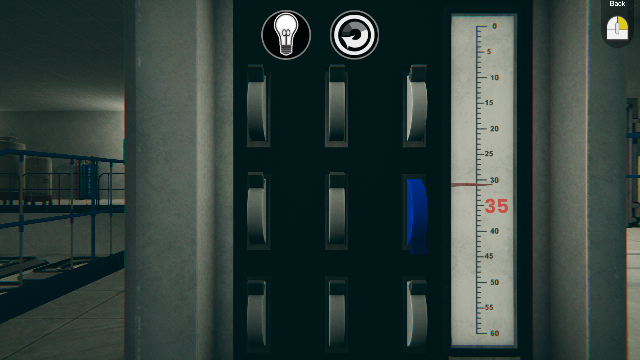
Your blue key will automatically be used to activate the puzzle. The objective is to select a subset of the 8 levers to produce a power level of exactly 35 (a net change of +4). Some experimentation shows the changes produced by lowering each lever:
Of the six solutions to this puzzle, one of the shortest is to lower the following 3 levers in a diagonal:
-9 -11 +8 +2 +1 +6 -10 +12
Prerequisites: Amino Acids and Power Supply puzzles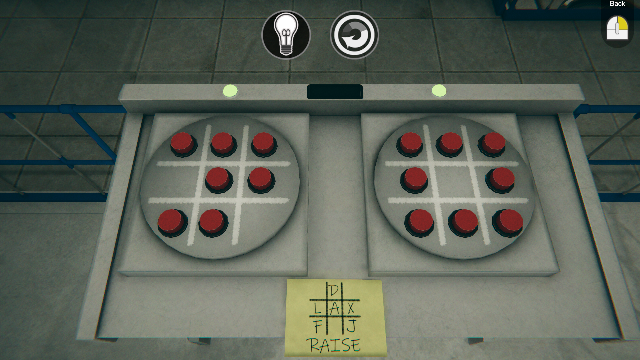
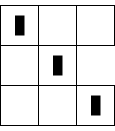
Zoom to the right side of the console and insert the RNA sample to turn the console completely on. Note that the two 3 x 3 grids on the console correspond to the two blue chambers behind you. Combining the information on the yellow sticky note with the patterns seen on the floors of the blue chambers, the following letters are associated with the buttons on the console:
The task is to spell out the word RAISE with the appropriate buttons. This causes 30 cylinders containing bodies to rise up from the sunken areas, men on the left and women on the right.
Left grid Right grid
Prerequisite: RAISE Puzzle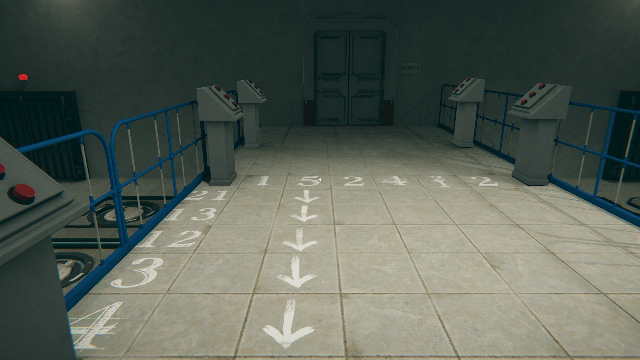
The non-interactive puzzle laid out on the floor is a nonogram grid of 5 rows and 6 columns in which the numbers specified for each row and column indicate how many unbroken lines of occupied cells it has. To skip the derivation and jump to the solution, click here. Labeling the rows from A to E top to bottom and the columns from A to F left to right, the puzzle has the following starting configuration:
Since Row B starts with an isolated single occupied cell, it must be the one in Column B and must be surrounded on both sides by empty cells, indicated below by zeroes. The rest of that row must be occupied. Row C also starts with an isolated cell: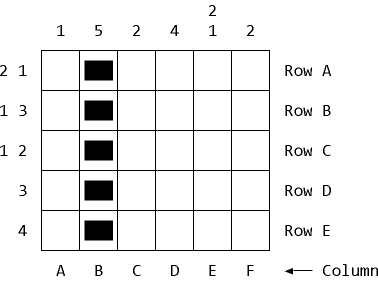
Since Row E contains a string of 4 occupancies, it must start at the first or second column. Either way, the middle portion of that row must be occupied. Similar remarks apply to Row D with its string of 3 occupancies, and so the rest of Column C is determined: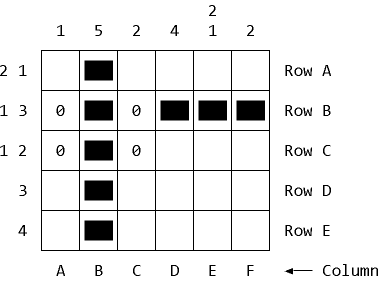
Column D is now determined, after which Row C is and then Column F: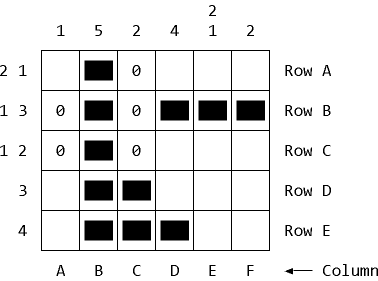
Column E is next, and then Rows A and E complete the puzzle, shown here with a gap representing the walkway: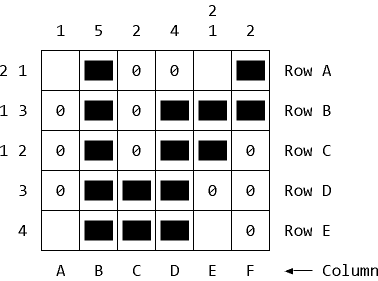
17 of the 30 cells are occupied. To enter this solution in the game, note that each of the five rows has a corresponding pair of left and right walkway consoles with 3 buttons each. The top button of each console represents the cell farthest away from the central walkway.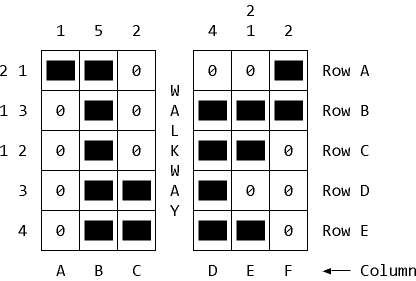
Panning along the left side of the walkway, press the following buttons:
Be sure you're close enough to the buttons to press only one at a time. Panning along the right side of the walkway, press these buttons: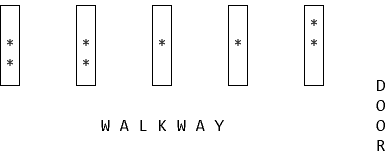
Completing the puzzle opens the door to the Infirmary.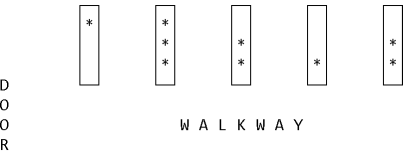
Approach the right-hand patient bay and note the blood bags labeled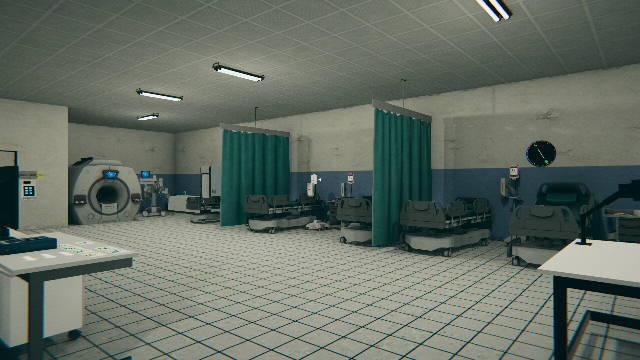
There is also an unusual clock here. in the next patient bay, there are three more blood bags:
B- 101 ml A+ 163 ml
There is also a puzzle here involving an unknown quantity of Type B+ blood needed for a recipient. In the third bay, there is another blood bag on the gurney:
O- 128 ml AB- 73 ml O+ 85 ml
A blood donor/recipient chart is on the wall. Return to the middle bay for the
B+ 215 ml
To determine the quantity of Type B+ blood for the recipient, refer to the blood donor/recipient chart. The fifth row of the chart specifies that Types O+, O-, B+ and B- can be used. Add up the quantities above for those four types: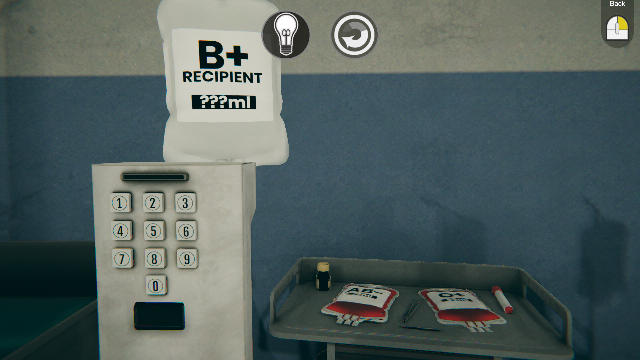
	O+   O-    B+    B-
	85 + 128 + 215 + 101 = 529
Enter 5 2 9 into the machine to obtain a blood donor card. Move toward the table with the computer screen on the opposite side of the room.
Prerequisite: Blood Puzzle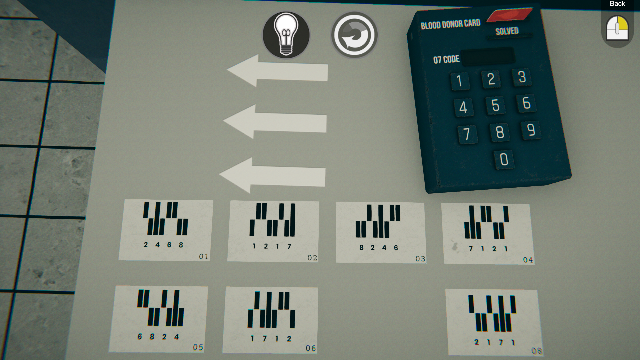
Zoom to the dark blue device on the table and the blood donor card will activate
it. Looking at the cards on the table, there are two alternating
sequences of 4 digits each. Moving from left to right, each sequence is a
1-digit
circular shift of the
previous one, in which the rightmost digit moves to the left side of the
sequence; e.g.,
Look on the wall above the adjacent table for another clock. Move toward the closed door at right for a third clock. Note the reference to "HRIDT" on the Waste Room doorplate. Return to the patient bay with the blood chart and zoom to the adjacent cabinet to have it opened with Card 07.
Prerequisite: Card 07 Puzzle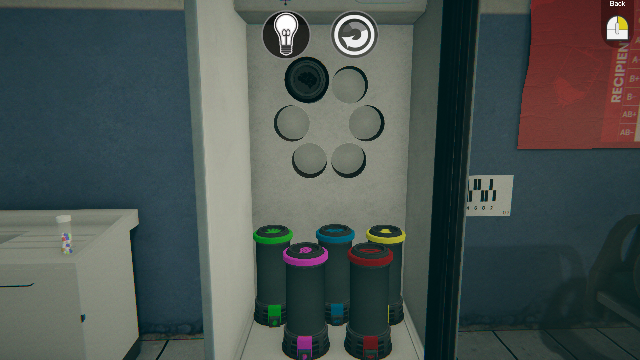
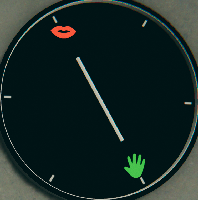
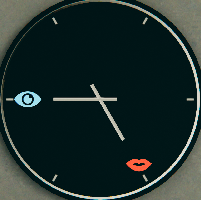
The objective is to arrange the 5 colored cylinders into the appropriate slots. To skip the derivation and jump to the solution, click here. The top left slot is inaccessible. The only relevant input to this puzzle appears to be the three wall clocks around the room:
These cannot represent the absolute locations for the cylinders since the first clock has the red symbol in an inaccessible location. However, the hands may represent the angular difference between the corresponding cylinders. Let the cylinder and clock positions be numbered from 0 to 5 starting at top right. We then have the following requirements for the cylinders (denoted by the first letter of their color):
Looking at all the possibilities programmatically, there is a single solution satisfying all of the requirements above:
Observation Mathematical equivalent No cylinder is in the upper left position B,G,P,R,Y do not equal 5 R and G are opposite (R + 3) modulo 6 = G B is 2 positions clockwise from R (R + 2) modulo 6 = B P is 2 positions clockwise from Y (Y + 2) modulo 6 = P
Pick up the pink lightbulb at lower left. Note the pill bottle to the left of the cabinet. Rotate the bottle in a close-up to see that it contains:
B G P R Y 3 4 2 1 0
Medicine AThere's another medicine bottle on the table next to the adjacent gurney, containing:
4 blue capsules
2 red capsules
1 yellow capsule
4 green capsules
1 purple capsule
Medicine BHead for the whiteboard at the other end of the room.
2 blue capsules
3 red capsules
1 yellow capsule
2 green capsules
1 purple capsule
Prerequisite: Cylinders Puzzle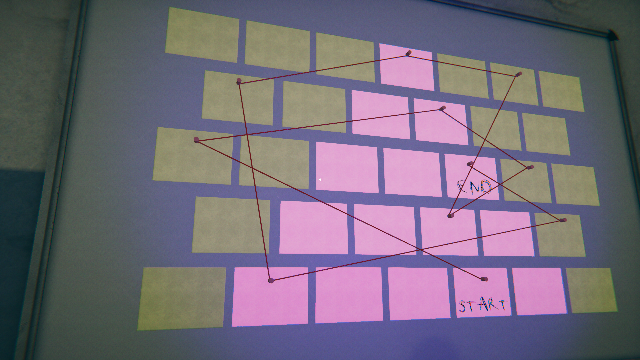
Zoom to the lamp to have the pink light bulb inserted. The screen shows a correlation with the eye chart on the opposite side of the room:
Combining these together and using the _ symbol to represent a letter outside the eye chart, the following text is traced out on the whiteboard: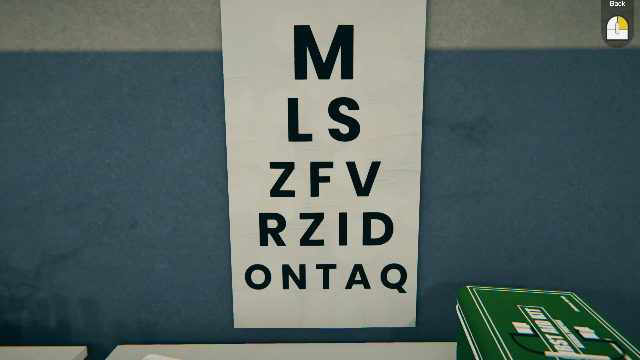
A _ S _ I _ M _ O _ VZoom to the alphabetic keypad on the side of the cabinet near the eye chart and enter the password ASIMOV. The cabinet opens and a Waste Room keycard can be obtained. There is also a report on the subject MO-N1-K4 prescribing a higher dosage of Retinax.
To the right and left of the open cabinet are two more medicine bottles:
Return to the desk with the computer and zoom to the screen. The password is the capitalized letters of the screen icons: T U R I N G. The vademecum (handbook) provides the names of the colored capsules in the medicine bottles:
Medicine C Medicine D 2 blue capsules 2 blue capsules 2 red capsules 2 red capsules 3 yellow capsules 4 yellow capsules 5 green capsules 3 green capsules 2 purple capsules 2 purple capsules
The first letters of the drugs spell out the HRIDT sequence previously seen on the Waste Room doorplate: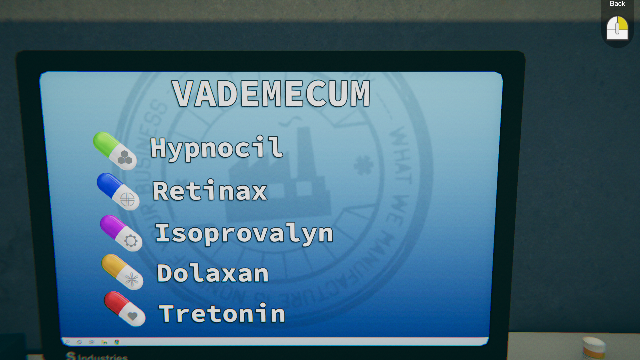
H: GreenRetinax is the blue capsule. Comparing the capsule quantities in the medicine lists, the higher dose of Retinax needed for subject MO-N1-K4 is found in Medicine A:
R: Blue
I: Purple
D: Yellow
T: Red
Putting Medicine A's capsule quantities in the required color order, the door code
Medicine A Medicine B Medicine C Medicine D 4 blue capsules 2 blue capsules 2 blue capsules 2 blue capsules 2 red capsules 3 red capsules 2 red capsules 2 red capsules 1 yellow capsule 1 yellow capsule 3 yellow capsules 4 yellow capsules 4 green capsules 2 green capsules 5 green capsules 3 green capsules 1 purple capsule 1 purple capsule 2 purple capsules 2 purple capsules
4 4 1 1 2is produced. Return to the Waste Room door.
Prerequisite: Eye Chart Puzzle
The Waste Room keycard is inserted automatically. Enter the code above to enter the room and learn about the androids being manufactured in this factory. Turn left and pick up the Area Alpha keycard from the android hand sticking out of the waste bin. Exit the infirmary back to Area Beta. Go to the end of the walkway between the sunken areas. Use the keycard to enter through the one-way doors into Area Alpha.
Each button cycles the lights from 0 to 3 on its panel and those of its immediate neighbors. The objective is to illuminate all 3 lights on each of the five panels. From the initial puzzle configuration, the shortest of the three solutions is to click on the panels the following number of times: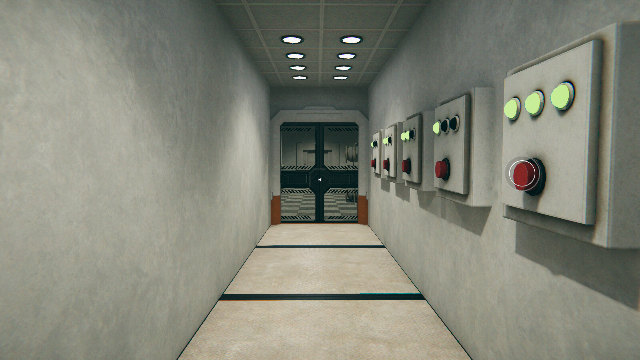
Exit the corridor into the room beyond. Move forward past a red keypad on the right and a blue keypad on the left until you reach an (inoperative) elevator. Turn left and note the blue and red keypad diagrams in the waiting area: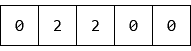
After the door opens, move across to the red keypad to solve a similar puzzle. This time, the code is 756891234 and the order of keys to press is: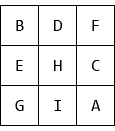
Enter the room with the blue keypad and approach the closest computer screen.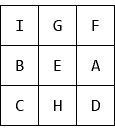
Solving this puzzle activates one next to it, in which the seven-segment display of each letter in the previous password has individual segments alternately removed and added according to the - and + symbols at right in order to produce the representation of a digit. After some painstaking work, the result
is produced. Enter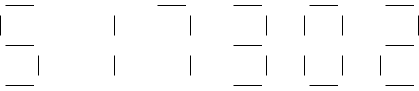
Filling in the entries given in the list at the top produces the following nonogram: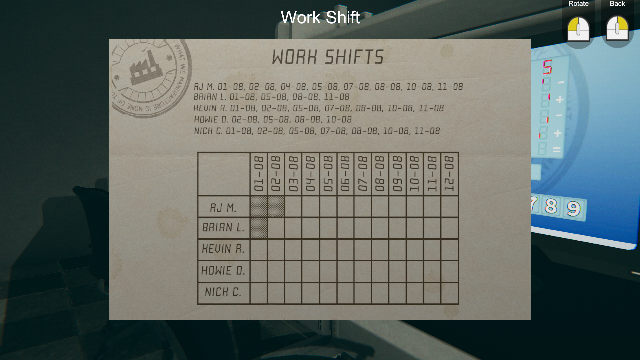
Examining this grid from a distance discloses the code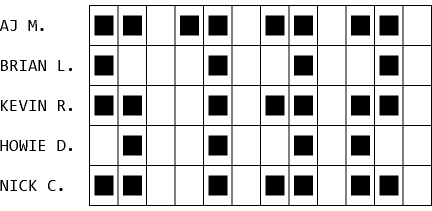
Enter the code from the nonogram above to open the drawer and obtain a thick Binder #7 (called a folder). An important paper map is also here but you'll need to make a note of it (or use the link here) since you can't carry it with you or access it in your inventory.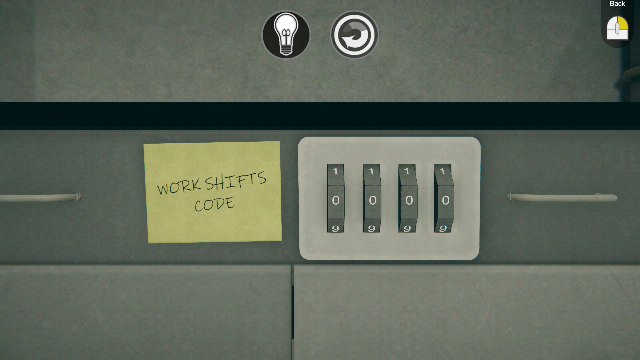
Exit the room and enter the opposite room with the red keypad. Angle slightly left and move to a console with 6 video screens on it.
These show the views that need to be set for the cameras using their knobs: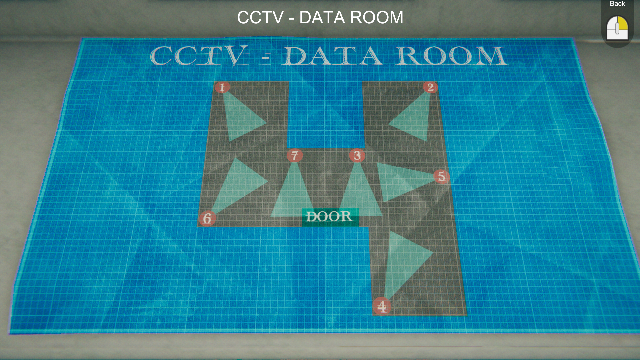
It turns out that the displays are not jumbled, you just need to click on them to cycle through the displays in numerical order. All six screens are initially showing camera #1, so the first knob can be left alone. To have screen #2 show camera #2, click on its knob once. To summarize, click on the knobs the following number of times: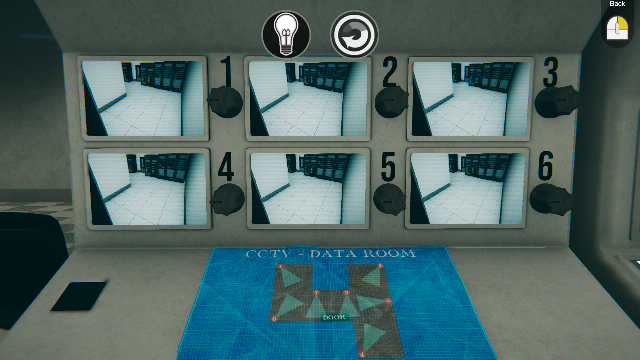
When the puzzle is solved, pick up a green key from the recess at left. Move to the console in the corner.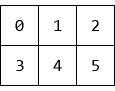
Prerequisite: Work Shifts Puzzle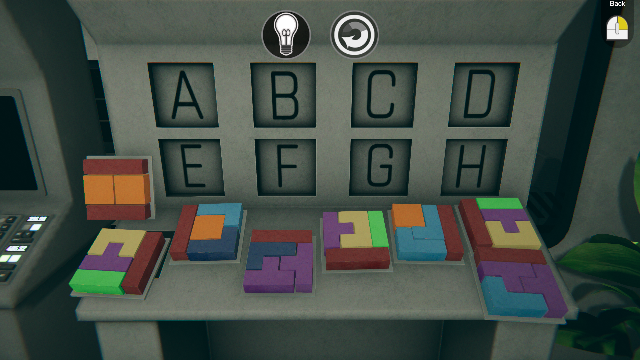
Note the eight grids of four colored polyominoes each, in various colors and orientations. These need to be placed in the indicated positions A-H. To skip the derivation and jump to the solution, click here. Be sure you have the information on the paper map from the work shifts puzzle in the other room before starting the Polyominoes puzzle.
Observing the closest banks of computers in this room, we can see the four polyominoes that each bank has:
Correlating this information with the paper map identifying a letter for each computer bank, we can figure out which polyomino grid goes to each position on the console. For example, the screenshot above shows that Bank A has two purple, one orange and one light blue polyomino, so the grid at lower right on the console goes to location A. This screenshot also shows that Bank D has two orangish straight pieces and two yellowish squares, so the grid at upper left on the console goes to location D. The corresponding colors between the console grids and the lit-up computer displays are off a bit, so the shape and orientation of the polyominoes can also help in identification.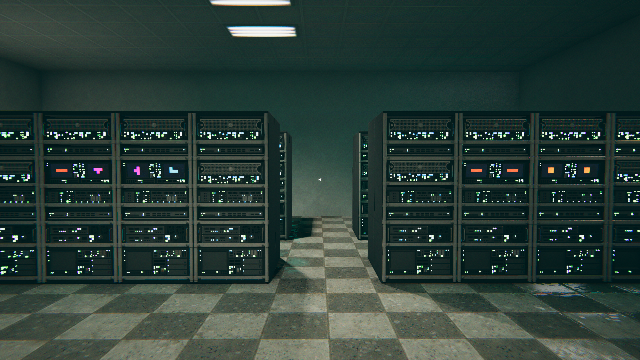
Zoom
When the puzzle is solved, pick up a green light bulb from the recess at left.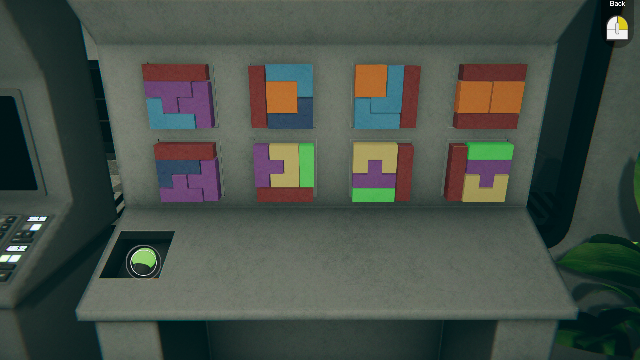
Return to the other room, turn left and head for the desk with the blue lamp. Zooming in will cause the green light bulb to be inserted, which discloses a pattern for associating the period, group and atomic number of a chemical element according to the periodic table:
Go around the desks again and zoom to the first computer screen, next to a photo frame. The text on the screen describes someone named Giselle who will be getting a gift for her work anniversary. Pan left to the next computer screen, which shows visual clues for a 4-digit password: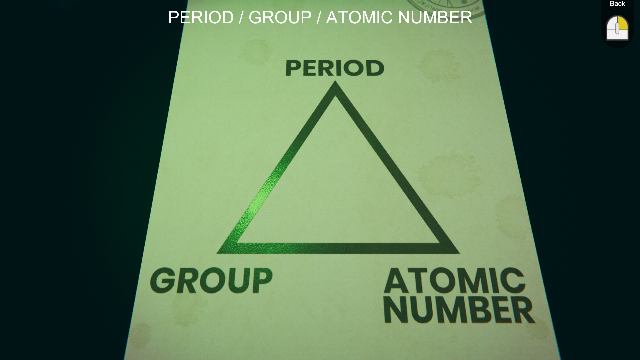
Pan right and zoom to the photo between the monitors to use the green key to release it from the frame. The photo shows individuals with the first three characteristics listed above. Turning the photo over identifies the first letters of their first names as:
Moustache Glasses Stethoscope Gift
and from the previous screen:
Moustache: A(ndrew) Glasses: F(rancine) Stethoscope: D(avid)
The reverse side of the photo also indicates that 1 and 10 are associated with the first and tenth letters of the alphabet. Therefore, we can convert the 4 clue letters (A,F,D,G) into numbers:
Gift: G(iselle)
Checking the periodic table on the wall at left, the missing information can be identified (the colors of the triangles aren't important):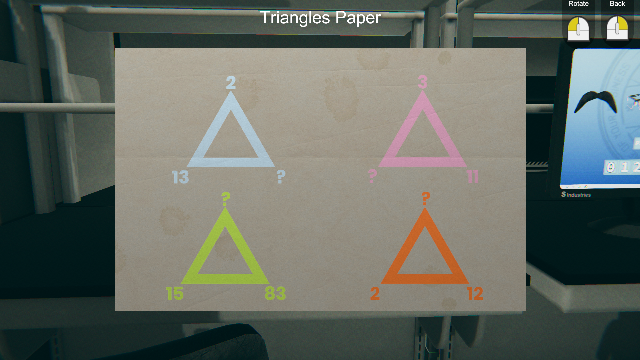
The missing numbers are shown in parentheses above: 5,6,1,3. Return to the other room and proceed to the far corner behind the computer banks. There's a bookcase here with four triangles on it suggesting a tie-in to the previous puzzle.
Group Period Atomic
NumberSymbol Element 13 2 (5) B Boron 15 (6) 83 Bi Bismuth (1) 3 11 Na Sodium 2 (3) 12 Mg Magnesium
Prerequisite: Work Shifts Puzzle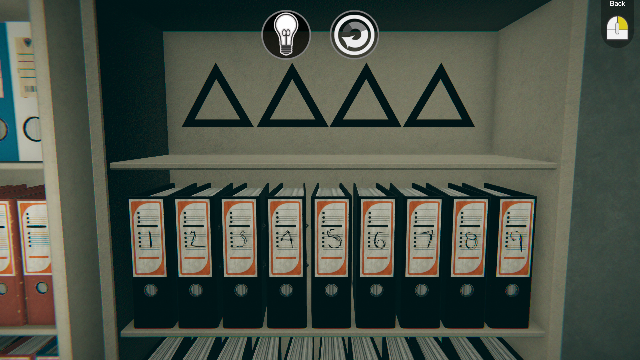
Zooming to the bookcase causes the manual to be moved from your inventory. Since it's been identified that the missing numbers in the preceding puzzle are important, just pull the corresponding manuals (5,6,1,3) to complete the puzzle. A hallway is disclosed behind the bookcase.
Move forward to a keypad beside the door. There are no clues for this puzzle, but attempting a 5-letter password plays a Wordle game in which letters are indicated as follows: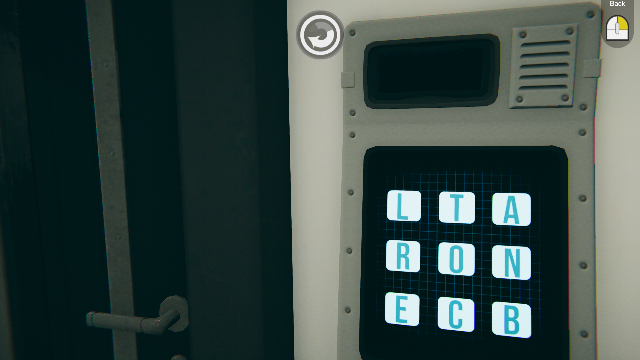
Green: Correct letter in the correct positionSince you have unlimited guesses and only 9 letters to choose from, the game can be won relatively easily. One strategy is simply to enter all 5 of the same letter to rule it out, then try various permutations of the remaining letters. Words such as CLONE (biological) or CLEAN (e.g., computer room) aren't quite right, but they lead to the correct answer: CLEAR, which opens the door.
Yellow: Correct letter in the wrong position
Gray: Incorrect letter
Enter the next room and zoom to the colored diskettes on the table. One of them has your name on it:
Uh-oh. Back out and approach the illuminated computer bank around the corner. Enter the code above: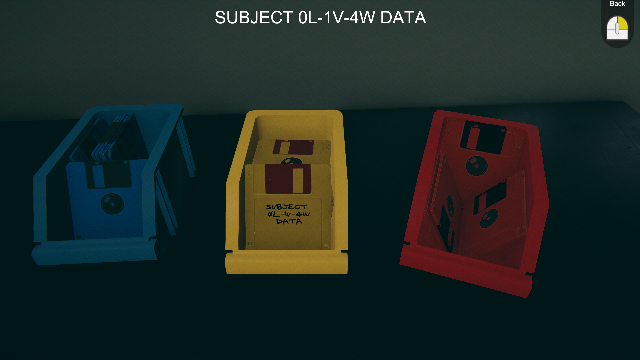
Zoom
Copyright © 2026 Balmoral Software (http://www.balmoralsoftware.com). Portions copyright © 2022 by mc2games. All rights reserved.