Secrets of Velendar Castle
Escape Room
6 October 2026
Copyright © 2026 Balmoral Software (http://www.balmoralsoftware.com). Portions copyright © 2026 by mc2games. All rights reserved.
New Game
This opens an exit from the cell, from which you can wade through a fast-running but shallow stream into an open garden area.
Long Long Short Medium Short Long
This area seems chock full of puzzles and symbols of all kinds. At the exit from the castle, turn left and approach a well underneath a structure with a flat roof. Clicking on its nameplate indicates that it is "first" in some sense. Continue following the path to the right until you reach a gazebo-like structure with a domed roof. Wade through both branches of the river and approach a horn-like structure further on. It has a placard that says "last". Continue moving clockwise until you reach a milky fountain. All of these structures will be important later, but for now pan left and approach a series of octagons with strange symbols on the castle wall: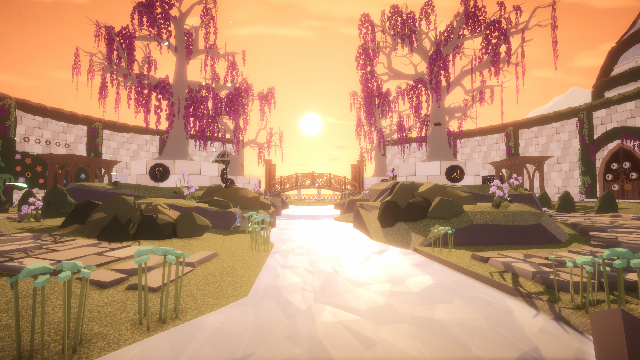
If you explore the central area of the garden with the four purplish trees (particularly when viewed from the footbridge), you'll see the same symbols arranged around the trees. Each pair of tree planters has two symbols facing each other: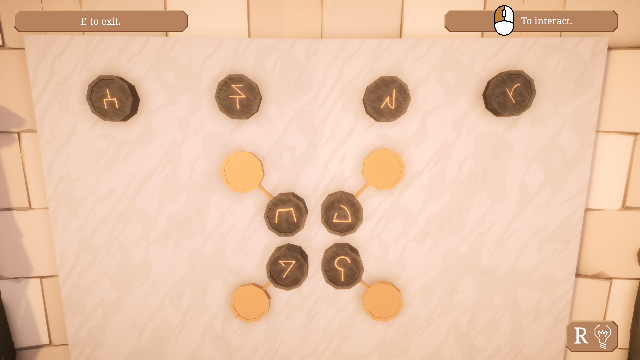
Arrange the pairings on the wall puzzle to match the planters:
This causes some flowers to sprout up on the opposite side of the garden. Head over to them next.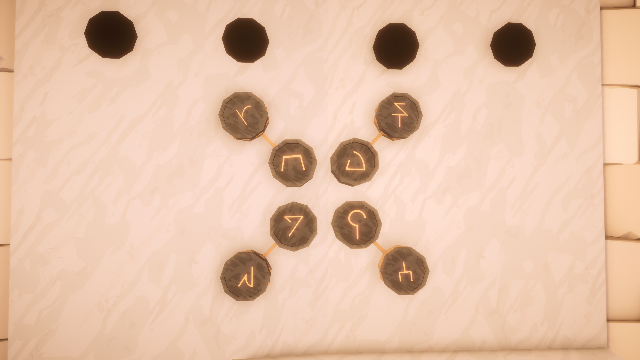
Prerequisite: Symbols Puzzle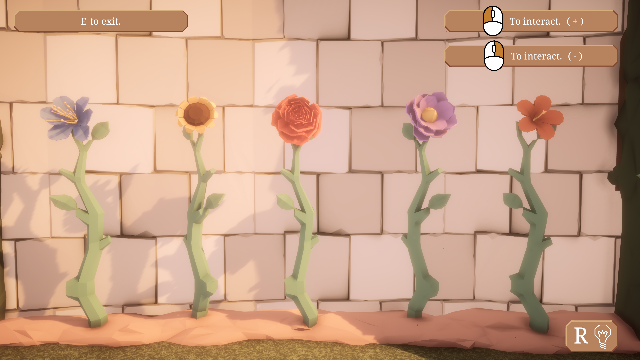
Look at the wall on the other side of the door at right to get some information on this puzzle:
Counting up the flower types, we have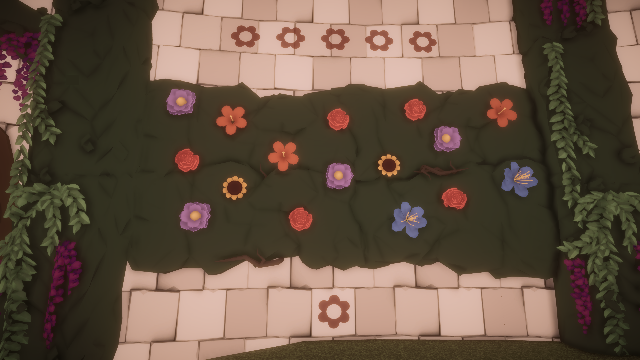
Return to the sprouts and click on each flower the appropriate number of times to make its height consistent with the quantity above. If all flowers are at their maximum height (5), click this many times on the flowers left to right:
Flower Quantity Purple 4 Rose 5 Blue 2 Red/yellow 3 Sunflower 2
Solution of the puzzle causes some bushes or green rocks on the wall at left to open up and disclose a plaque containing a diagram of elements which you can pick up to store in inventory:
3 3 0 1 2
These appear to be a modification of the classical elements: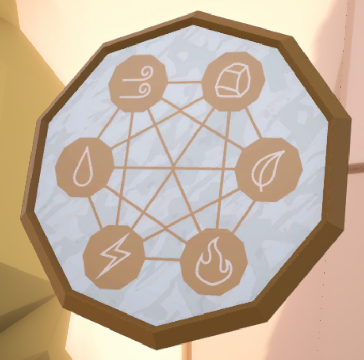
Next, head past the flowers diagram to another puzzle:
Air Earth Water Wood Lightning Fire
This puzzle associates three circles with three arches and selections to be made from black-and-white silhouettes. Continue moving right until you can approach a small island between the two waterfalls exiting the garden. The circular platforms and arches here match the puzzle. Stand on each platform and look down to make sure you're centered on it. Look through the corresponding arch to see what's visible: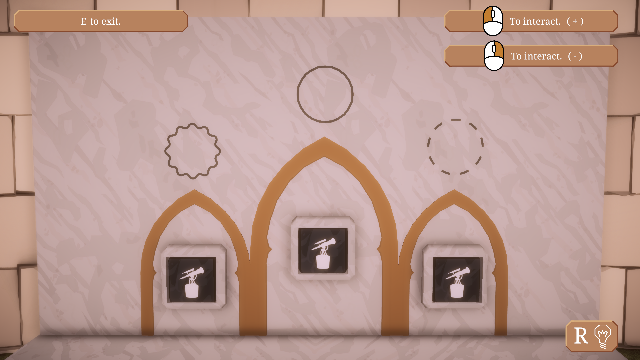
Make the corresponding entries to solve the puzzle:
Platform Arch Visible Solid circle Middle Tree Dotted circle Right Tree Wavy circle Left Soldier statue
This causes some golden objects to materialize above the footbridge railing in the center of the garden. Go to the pedestal on the footbridge for the next puzzle: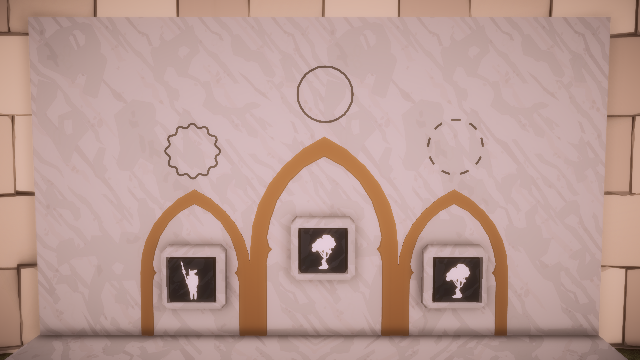
Prerequisite: Arches Puzzle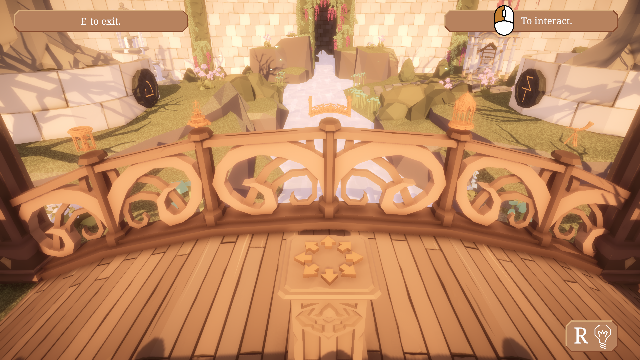
Looking carefully at the floating objects, you can see that they are miniatures of the structures seen around the garden:
By attempting to solve the puzzle on the pedestal, you can see that 4 compass directions need to be input. These could correspond to the 4 gaps between the 5 miniatures on the footbridge railing, and a good guess would be that the directions are those taken to go from one structure to the next one. Visualizing a bird's-eye view of the garden with N in the direction you're facing, these directions are:
Well (first) Fountain Footbridge Gazebo Horn (last)
W: Well to FountainWhen the footbridge puzzle is solved, a diagram is disclosed beneath another puzzle. Turn right and head to that puzzle, which is to the left of the flower puzzle:
SE: Fountain to Footbridge
SE: Footbridge to Gazebo
W: Gazebo to Horn
Prerequisite: Footbridge Puzzle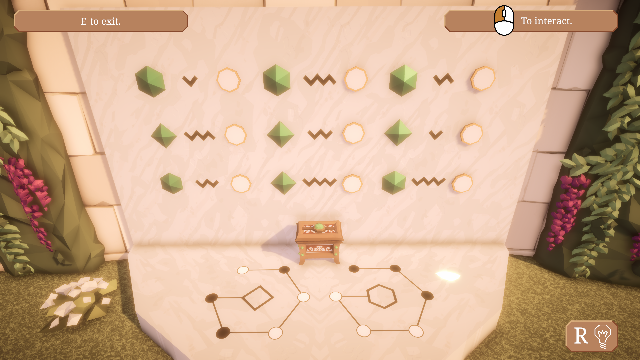
Each line segment of the wave next to a green square or hexagon provides a count for that location in the 3 x 3 puzzle array:
The spot next to each polygon can be selected as white or black. By examining the diagram at the bottom, the black spots are associated with distances of 1, 2 and 5 from a square or distances of 4, 5 and 6 from a hexagon. Set those locations to black:
Hexagon 2 Hexagon 5 Hexagon 3 Square 5 Square 4 Square 2 Hexagon 4 Square 6 Hexagon 6
When the puzzle is completed, you can pick up an arrow tile from the box below. Make your way to the door on the opposite side of the garden for the final puzzle in this area: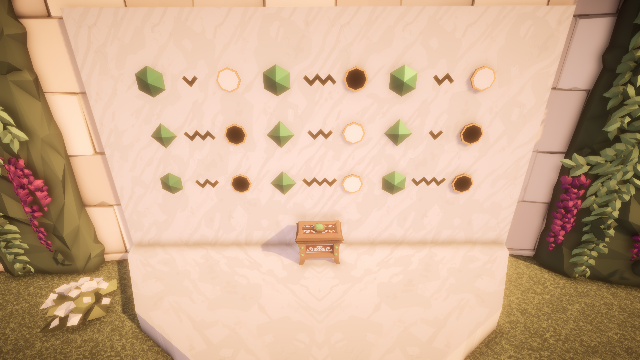
Prerequisite: Hexagon Puzzle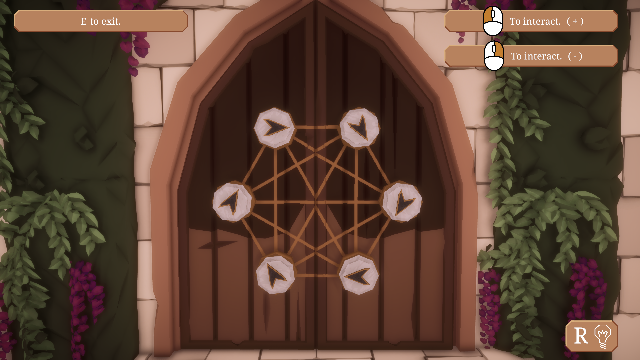
The arrow tile in the inventory is automatically placed here, but you'll need more information to solve this puzzle. Take a look at the diagram on the wall at left:
By following the sightlines between the elves holding each element, we can establish the following: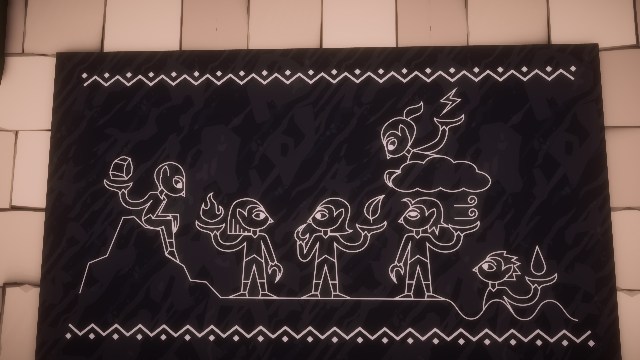
Earth is looking at FireConverting these directions to angles on an analog clock and using the element arrangement on the plaque in inventory, these are the sightlines:
Lightning is looking at Wood
Water is looking at Wood or maybe at Air
Air is looking up at Lightning
Fire is looking at Wood or at Air
Wood is looking at Fire
Trying all four combinations for the arrow tiles in the puzzle, a solution is:
Air Earth 6:00 6:00 Water Wood 3:00 or 1:00 9:00 Lightning Fire 2:00 1:00 or 11:00
Go through a one-way door into a church.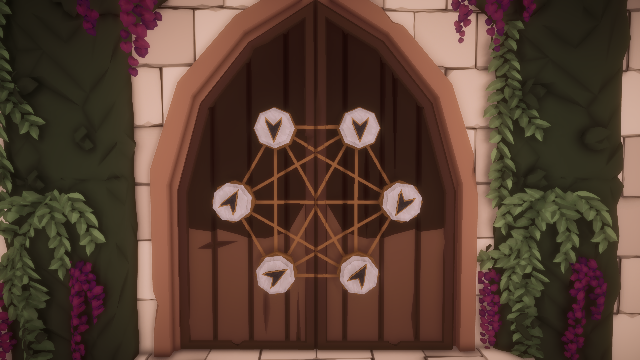
Note the 9 green banners lining each side of the nave, which together contain the following quantities of symbols: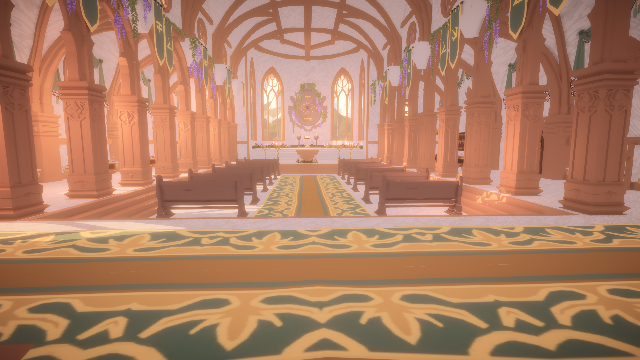
Make your way to the front of the church where a large diagram is shown on the wall:
5 4 7 2
This diagram has the same numeric symbols shown above: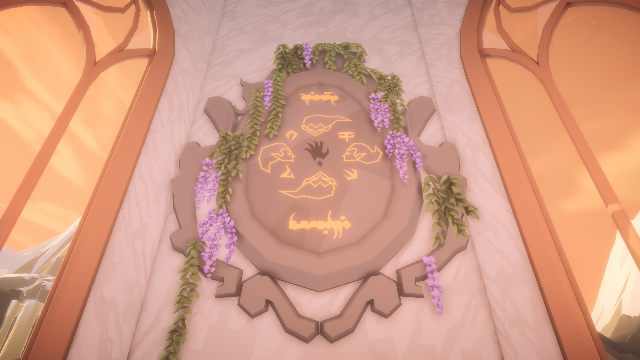
While you are here, pan down and pick up a text message from the open book. Return to the back of the church and zoom in on a row of four dials to the right of the entrance door.
Facing down 5 4 Facing right Facing left 7 2 Facing up
Use the information from the banner counts and diagram above to set the dials to: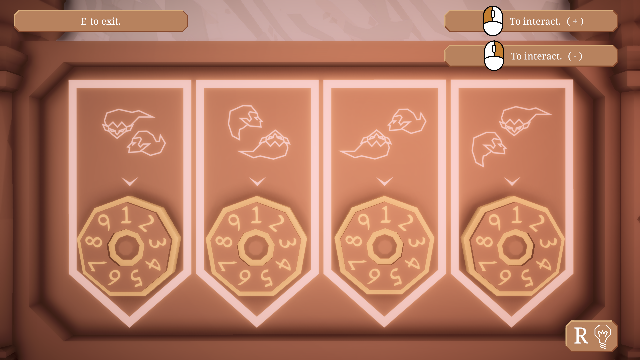
4 7 2 5
When the previous puzzle is completed, a wall diagram on the other side of the entrance door is activated:
These are the same element symbols encountered in the Garden. Examine the puzzle around the corner to the left: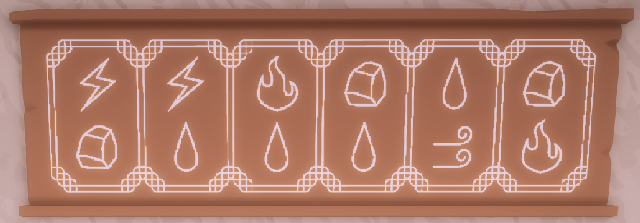
The objective is to rank the elements from top to bottom. The following conclusions can be drawn from the pairings shown on the diagram: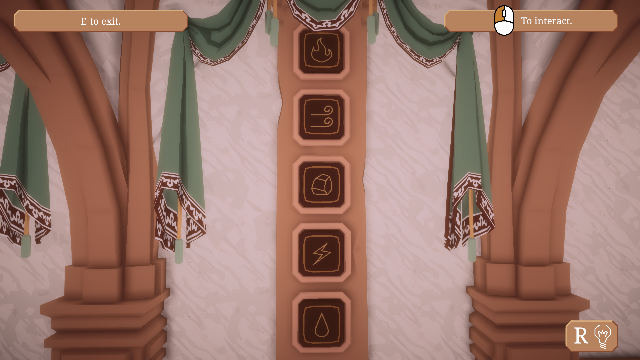
Pick up a scroll underneath the solved puzzle: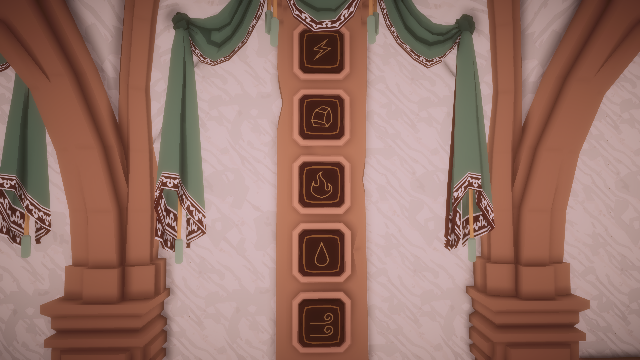
Turn left and proceed past the exit door on the right to the next puzzle: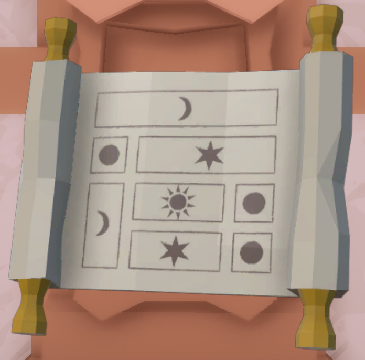
Prerequisite: Text from the book at the front of the church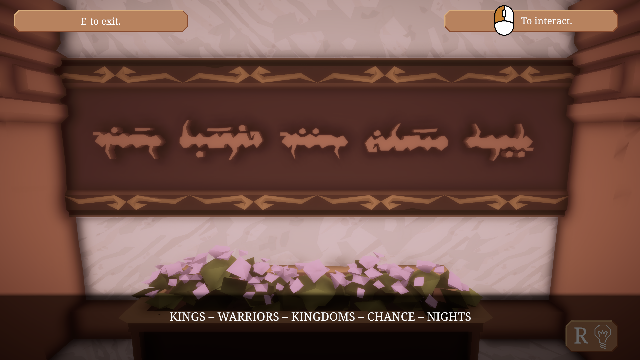
Numbers scattered throughout the text from the front of the church include:
One chanceCorrelating these with the translation of the elven text shown in the puzzle, click on the elven words in numerical order:
Five kingdoms
Four kings
Two warriors
Three nights
This activates a color bar puzzle on the opposite side of the church, which you can head to next.
Kings Warriors Kingdoms Chance Nights 4th 2nd 5th 1st 3rd
Prerequisite: Elven Text Puzzle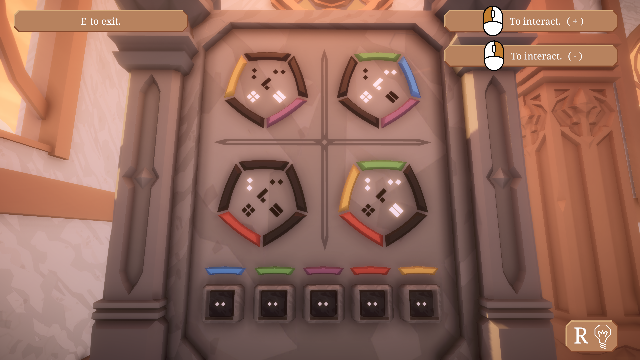
Note that the number of lit white symbols inside a pentagon is the same as the number of colored bars on its perimeter. We must correlate those symbols with colors using the controls at the bottom. This is a logic puzzle that can be solved as follows:
Information for another puzzle is disclosed in the front of the church: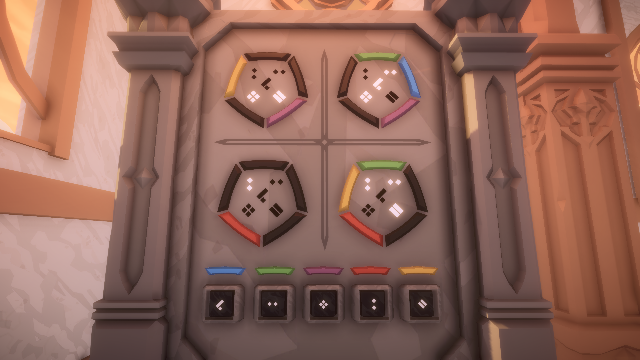
Make your way back to the opposite side of the nave, where you previously solved the Elven Text puzzle. Turn left to the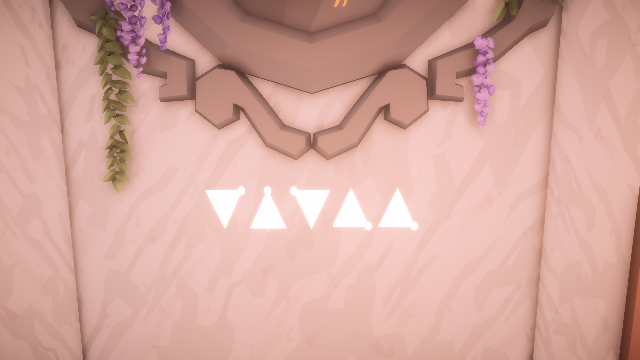
The object is to press 5 bells in the correct order. The diagram you just saw at the front of the church provides the solution, where the corner highlighted in white represents the center of the hexagon. If the triangular portions of the hexagon are numbered clockwise 1-6 starting at the top, the answer is to press triangles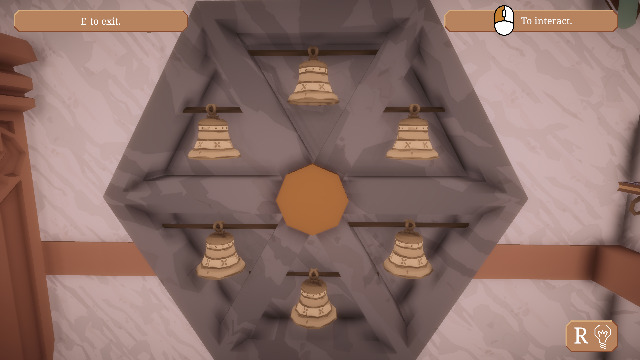
5 4 3 6 6
When the Bells Puzzle is solved, the baptismal font at the front of the nave is drained, revealing the diagram
Counting the symbols in the font, there are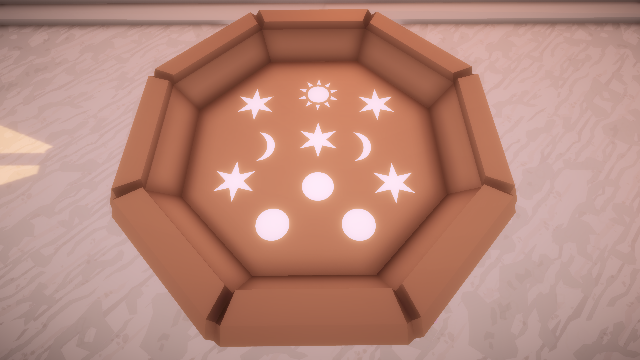
1 sunClimb onto the stairs at the front of the church and turn around to face the nave:
5 stars
2 moons
3 dots
There are four candelabra here, containing: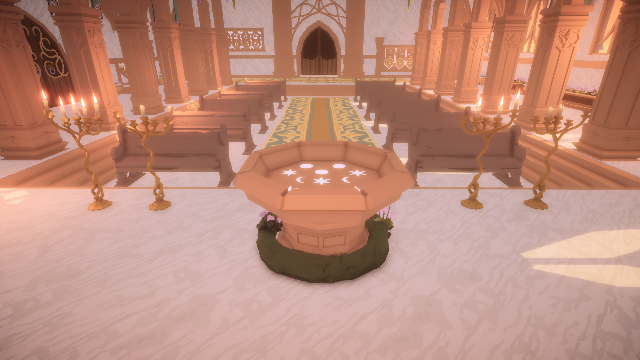
5 lit candlesNote that these counts coincide with those of the symbols in the font. Move to the 4 x 4 array of candles to the immediate right of the exit door on the side of the nave.
1 unlit candle
3 lit candles
2 unlit candles
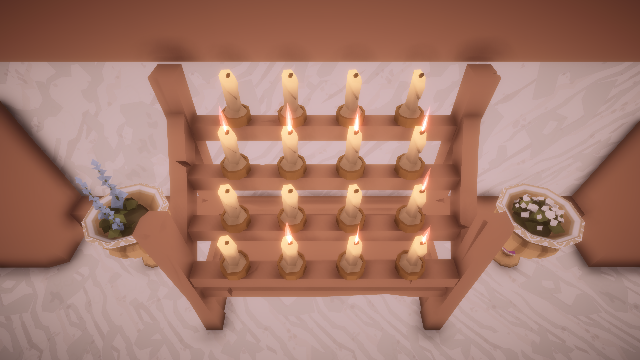
The scroll in inventory appears to be a map of the regions of the candle array, so it's a good bet that the regions with the same symbol contain a total of lit candles equal to the number of that symbol found in the font. However, we can interpret the candelabras to mean that only the regions with 5 and 3 candles are lit in the array. Fortunately, the number of candles in the regions to be lit are exactly the same as the number of the corresponding symbols in the font, so basically all the candles in the stars (5) and dots (3) regions are lit, and the rest aren't. This is indeed the solution: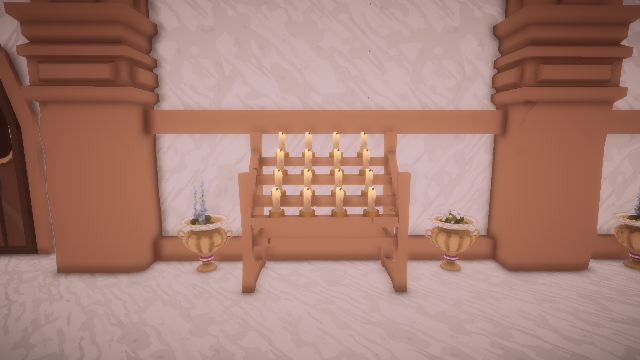
Go through a one-way door and down too many flights of stairs into a library.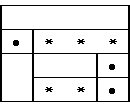
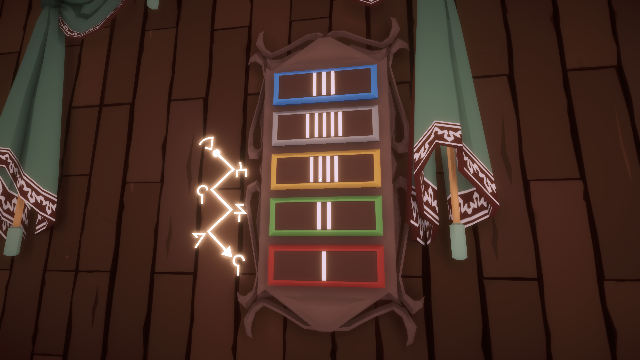
From the bottom of the stairs, make your way around the bookshelf at left until you can see a wall display with five vertical colored and numbered bars: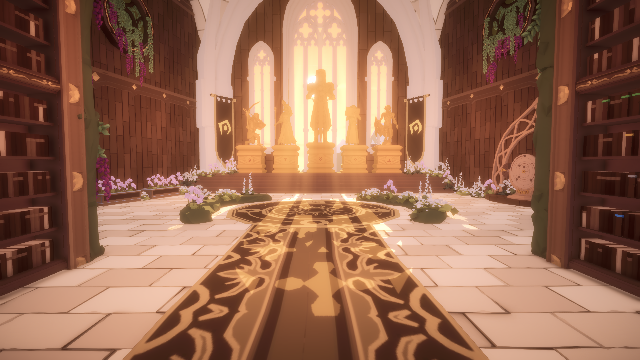
The objective is put these bars into the correct order. Return to the bottom of the stairs and look at the bookshelves with the color bars on the books. Find the shelf with the book quantity and color matching the puzzle, and make a note of which shelf level it is off the floor (1-5). Along the bookshelf from left to right, these are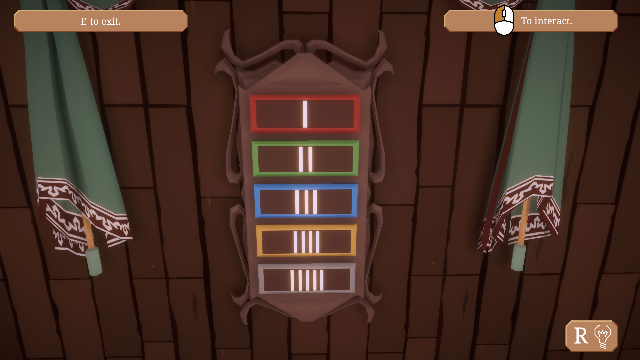
1 Red is at Shelf 1 (bottom)The shelf numbers then determine the proper ordering in the puzzle. When the puzzle is solved, a connection diagram is presented:
3 Blue is at Shelf 5 (top)
2 Green is at Shelf 2
4 Yellow is at Shelf 3
5 Gray is at Shelf 4
Prerequisite: Roman Numeral Puzzle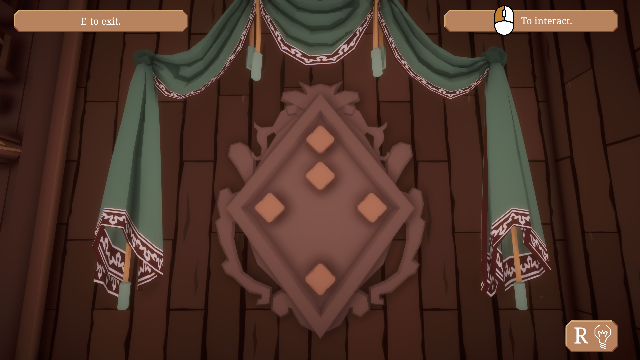
The symbols on the bookshelf at left match those on the connection diagram from the previous puzzle. Scan the bookshelves to gather information:
Note that these locations match those of the five buttons in the current puzzle. Using this information together with the connection diagram, an alphabetical sequence for pressing the buttons is:
Symbol Shelf (bottom to top) Lateral location 5 Middle 3 Left 3 Right 4 Middle 1 Middle
When the puzzle is solved, a scroll is added to inventory: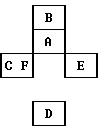
The next puzzle is on the other side of the library, below the statues: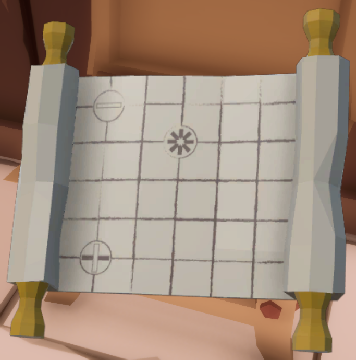
Note the rug on the floor in front of the statues: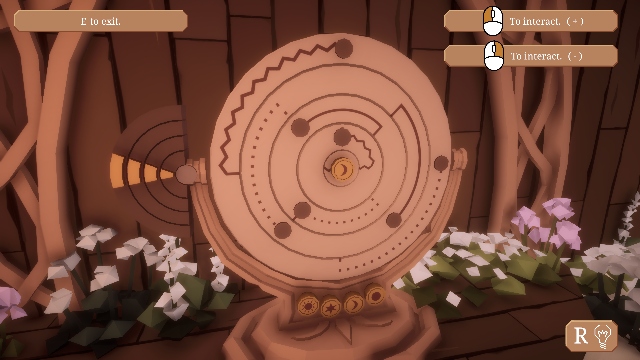
This indicates a rotational order for the symbols at the bottom of the puzzle, as well as which kind of line (solid, dotted or wavy) connects the symbols. Back at the puzzle, note that the dark semicircle of controls at left can be used to rotate the four rings. Rotate the innermost ring 180 degrees so that it matches up with the center, and place the Sun symbol there since it is the one connected by a wavy line to the Moon. This prescribes the sequence for the whole puzzle based on a counterclockwise path around the rug: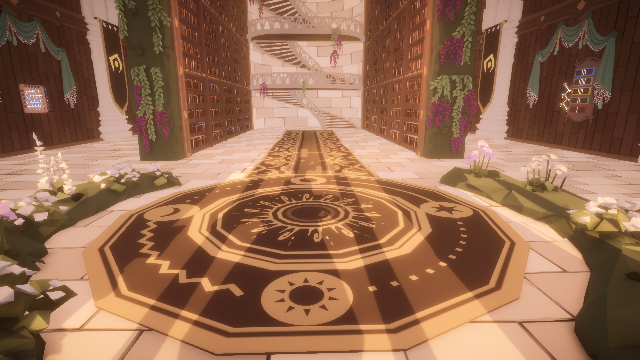
Moon - wavy line - Sun - dotted line - Star - solid line - Dot - dotted line - MoonSet up this path by rotating the rings and placing symbols accordingly:
When the puzzle is solved, the rings flip over and an interactive machine with 5 new symbols is presented: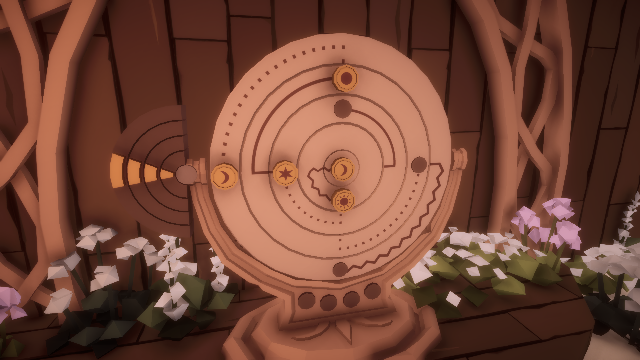
By moving a pair of symbols to the central locations (in either order) and pressing the large semicircular button, a brief animation plays that is indicative of some of the elements encountered earlier in the game: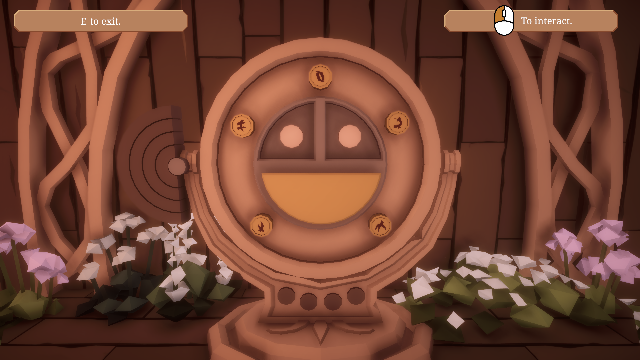
Pan right to the next puzzle.
Element Animation Lightning Sparks Earth Coal Fire Plasma Water Spray Wood Leaves
Prerequisite: Rings Puzzle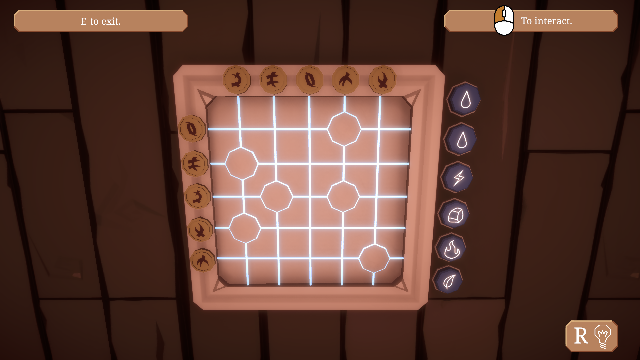
A token representing an element is to be placed at the six intersection points on the grid. Numbering the points 1-6 in reading order, the second and third ones have the same two symbols as their "coordinates", so these have the same token, in this case the droplet for Water since that is the only duplication. The tokens for the other four points can be determined by testing the corresponding coordinates in the machine from the previous puzzle.
The solution is:
When this first part of the puzzle is completed, another puzzle is displayed on the same grid: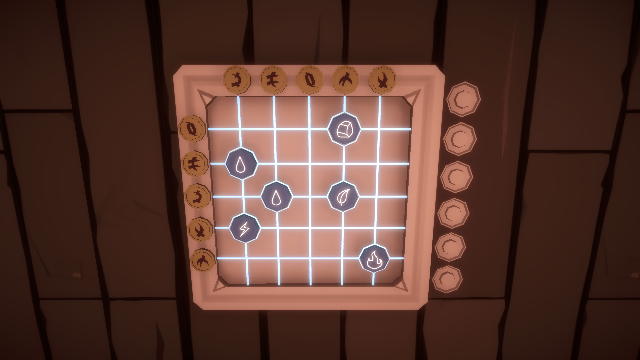
For this one, you can use the scroll in inventory. Point pairs of dials to the intersection points on the scroll such that the combination of the two dial symbols creates the one shown on the scroll.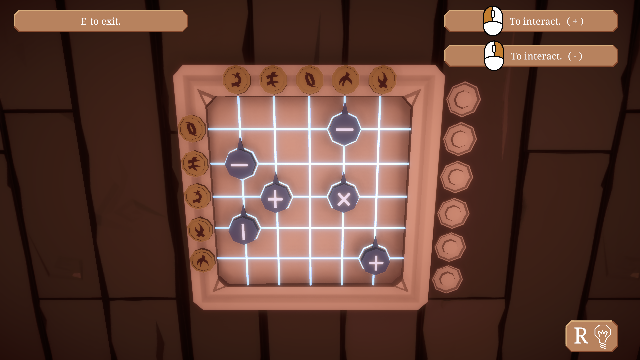
The solution is:
When the puzzle is solved, a nearby door is opened, disclosing shelves containing a single book. Pan right to the next puzzle.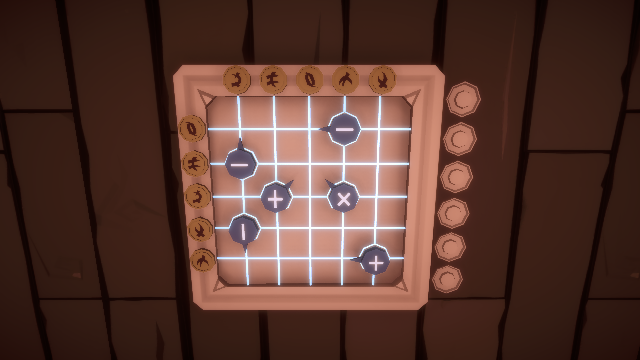
Prerequisite: Grid Puzzle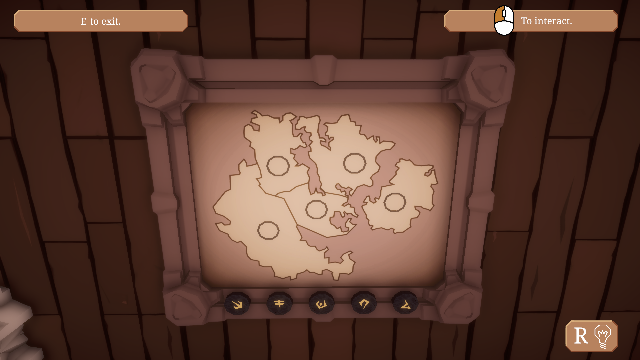
Note the 5 symbols at the bottom of the map. Turn right and pick up the book in the alcove. The information in it can be summarized as:
Go to the opposite side of the library where there are five statues of kings:
King Weapon Description of lands Tharar Bow Central Bila Shield Midelen Spellbook Southern Edala Staff Connect only to Tharar's Ivelod Sword Island
These statues have the same set of symbols on them, so each must refer to a king. Comparing the weapons on each statue with the summary above, the symbols for each king can be determined. Left to right, these are: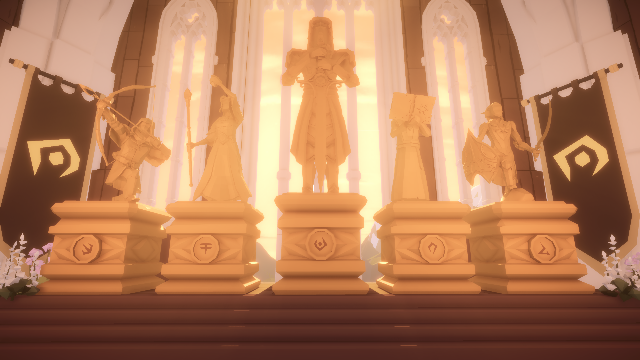
Return to the map. The area that is connected only to the central one is at upper right, so that must be Edala's. Place the kings' symbols according to the lands described above. Bila's area is the one left over after the other four have been identified.
Tharar Edala Ivelod Midelen Bila
The solution is:
The bookshelf dissolves and your path to the one-way exit is cleared (this'll be the last daylight you see for a while).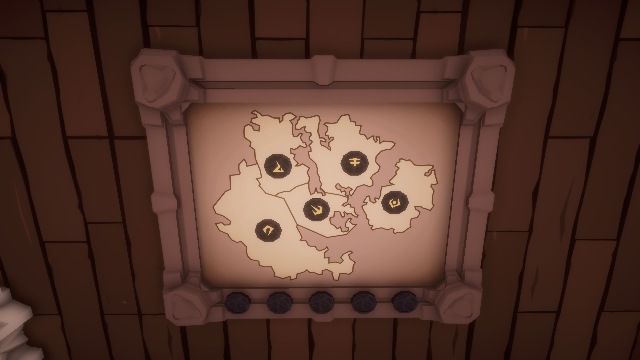
Move forward into the second compartment and note the 5 blue-handled axes on one wall and the 5 white-bladed swords on the other. Examine the four open boxes in the first compartment -- each has silhouettes of one of the axe blades and one of the sword points.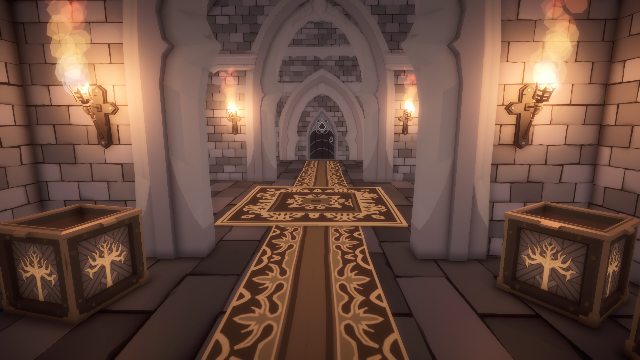
The objective is to rearrange the swords so that each is opposite the corresponding axe on the other wall, according to what's in the boxes.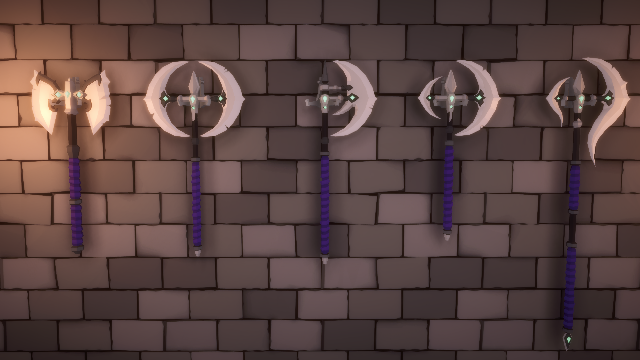
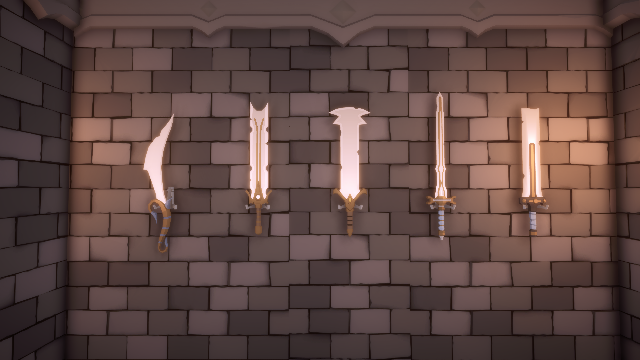
The correct order is:
When the puzzle is finished, an alcove opens up behind the swords.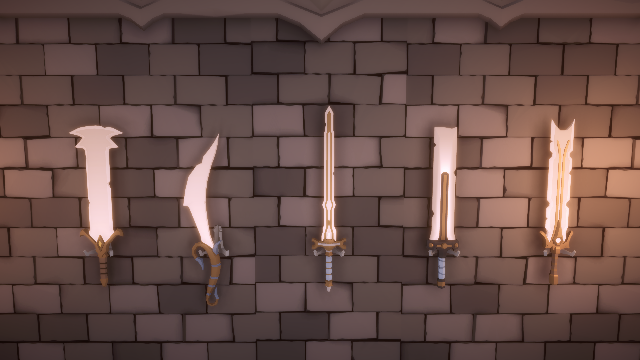
At the top of the wall in the alcove is a crooked hand symbol forming what looks like the beginning of a sequence. Pick up a tablet containing a 7 x 7 grid of king symbols:
When you put it into inventory, the narrator describes the crooked-hand symbol as the mark of the Dark Lord. Move into the third compartment where there are puzzles on opposite walls as well as the rest of the sequence of king symbols: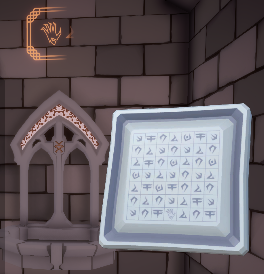
Zoom
Examining the tablet in inventory, a path must be traversed through the grid, starting with the Dark Lord mark on the bottom. Use the controls on the wall to identify the path through the sequence of symbols. Based on compass directions, the correct sequence to enter is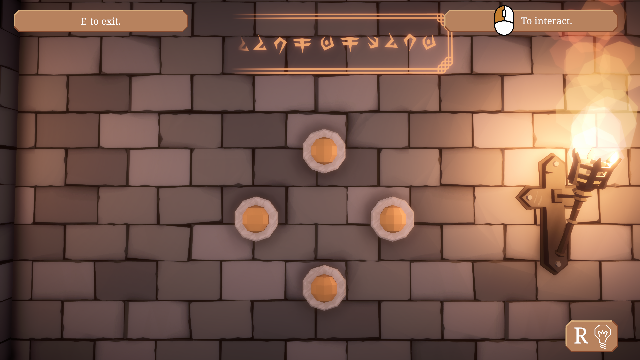
E N2 W3 N E N Ewhere the digits indicate repetition. When the puzzle is completed, some clues are provided for the next puzzle on the opposite wall.
Working through the clues from right to left and the locations clockwise from upper right: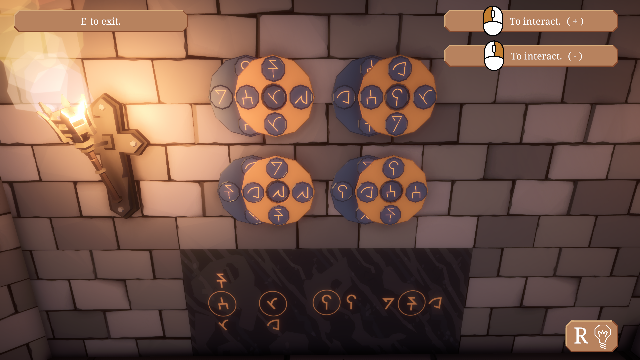
 symbol
is opposite the
 symbol only in the upper right corner, so adjust the blue and gold dials
there to agree with the rightmost clue.
 symbol
occurs only in the lower right corner, so adjust the dials there to
agree with the clue second from the right.
symbol occurs only
in the lower left corner, so adjust the dials there to agree with the
clue second from the left.
Completing the puzzle opens a one-way door at left, allowing access down a long flight of steps into a cavelike room.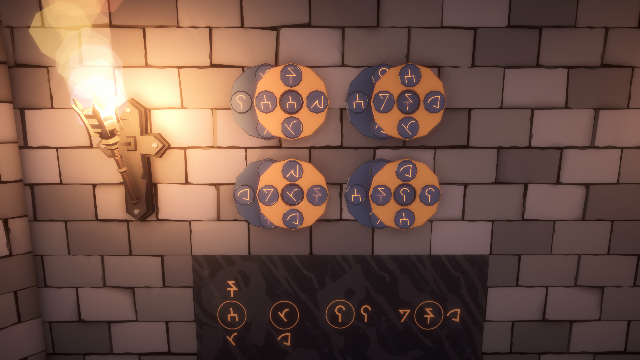
On entry, note the rectangular maze diagram at right having 5 openings in its perimeter and 4 symbols at the bottom. Move farther into the room past the central pedestal, then turn around to see a diagram on its reverse side: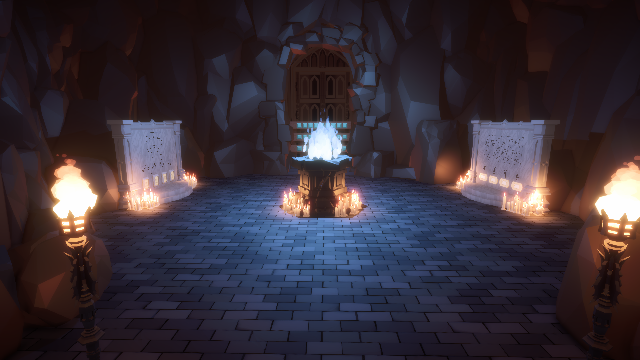
This diagram identifies the maze entrance on the left side and labels the four exits on the top and bottom.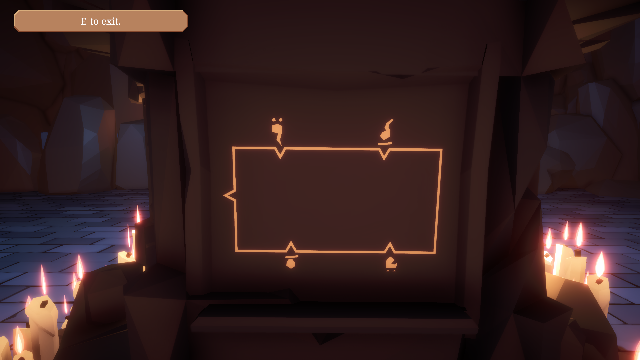
By removing all the dead ends, the paths through the maze to the four exits become clear: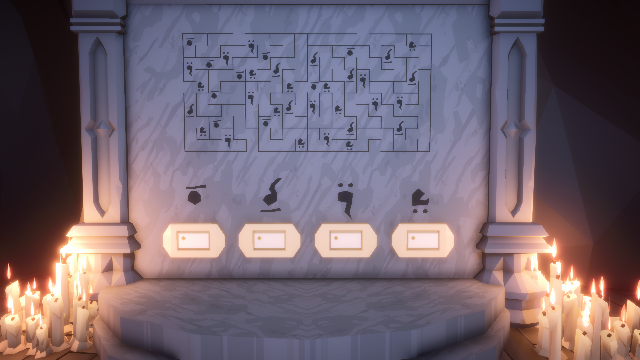
Zoom
The objective is to count the symbols along the corresponding paths: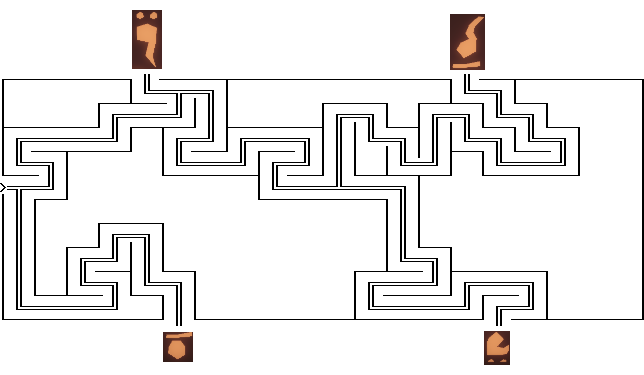
Enter these numbers at the bottom of the puzzle using the appropriate number of dots for each. When done, a diagram is disclosed from behind some rocks:
1 4 3 6
Move next to the opposite side of the room.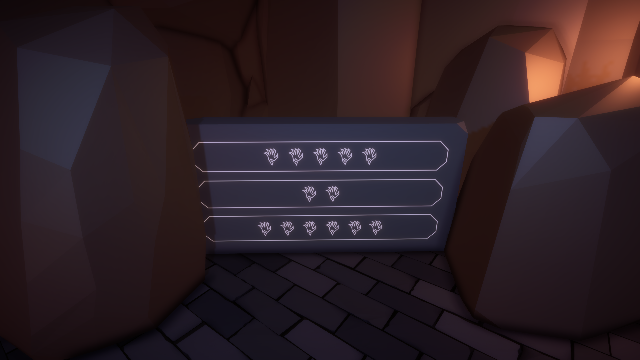
The objective of this puzzle is to identify the symbols at four locations in the 3 x 3 grid. Each grid location is represented by the superposition or combination of the symbols for its corresponding row and column. For example, combining the capital H in the second row with the + sign in the second column produces a "double-H" figure having three vertical bars and one horizontal bar in the middle. The resulting combinations are: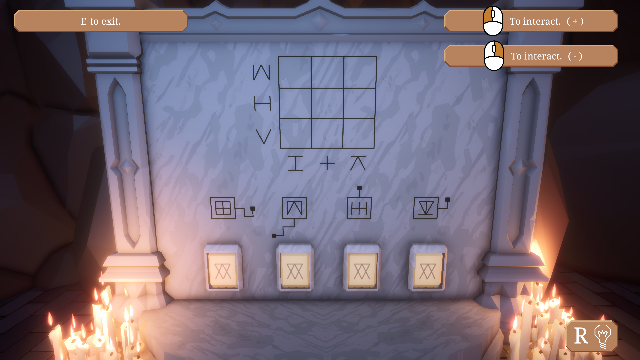
The desired entry to make in the controls at the bottom of the puzzle is the combination at the position of the black square relative to the position of the indicated combination. Since the black square for the double-H figure is immediately above it, its control should indicate the combination
 that is in the first
row and second column.
The solution is:
When the puzzle is solved, another diagram is disclosed from behind some rocks: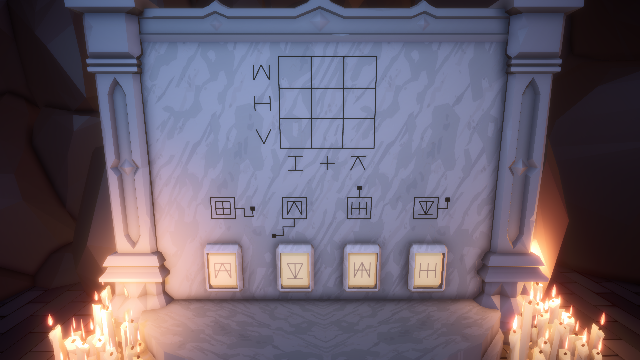
Prerequisites: Maze Puzzle and Superposition Puzzle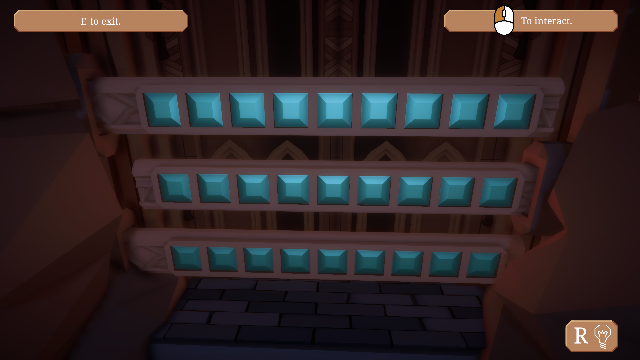
Move to the wall at right where three rows of 9 squares block a doorway. Taken together, the previous rock diagrams seem to indicate:
When these sequences have been entered, a one-way door is opened into the next chamber.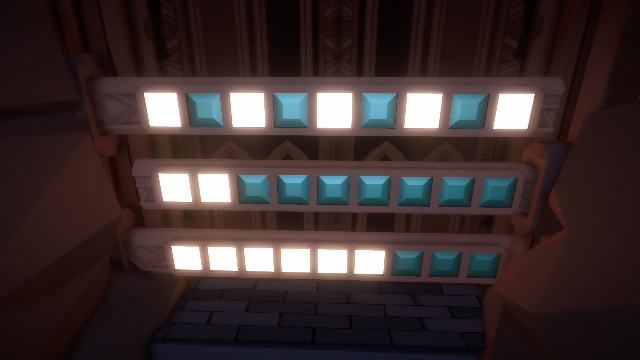
This area is a long bridge that is apparently suspended over or surrounded by a lava pool, which can be seen by peering over any broken section of the bridge wall. The puzzles in this area may seem a bit more obtuse than in the previous rooms, so be sure to make use of the R-key hint function when needed. Move about halfway across the bridge until you reach a panel with four tables adjacent to it: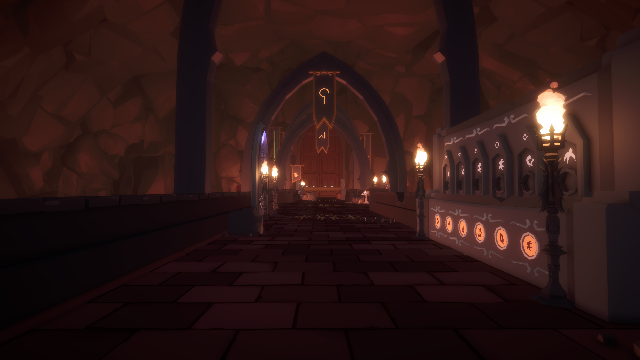
The objective here is to find a table containing a contiguous shape of colored squares in one of the eight patterns shown at the bottom of the panel. Fortunately, the patterns do not appear on the tables in a different rotation than what's shown on the panel. Two patterns of each color can be found amongst the tables. When the two are found, the individual squares are counted in each pattern and the one with the larger number is moved into the top area of the panel with the corresponding color, while the other pattern in that color is moved underneath it. One of the more easily-identified patterns is the one at upper left; the rightmost table has that pattern in a gold color, so the first item on the panel is moved into one of the positions in the first column. Numbering the tables from left to right and using A-H for the patterns on the panel in reading order, some investigation produces the following results: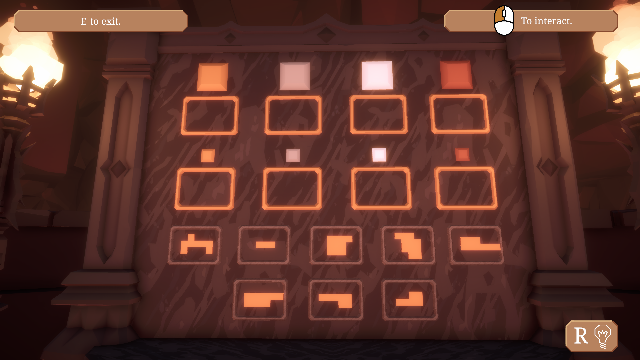
This information is then used to find the solution*: Maximum for that color
Table Shape Color Number of squares 1 D White 11 * 2 G Copper 7 * 2 E Gold 9 * 2 B Gray 3 3 H Copper 6 4 F White 10 4 A Gold 8 4 C Gray 10 *
When the puzzle is solved, a helper device for the next puzzle is activated on the opposite side of the bridge: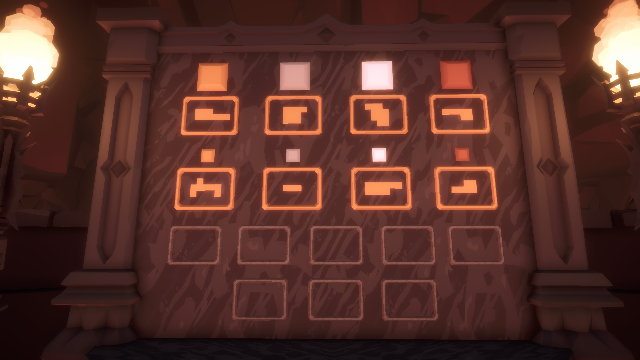
Prerequisite: Polyominoes Puzzle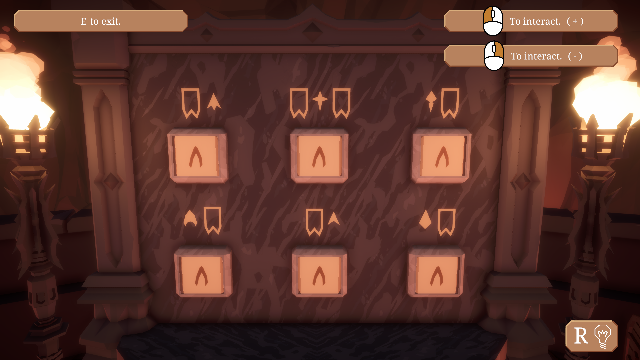
The objective is to identify the patterns on one or two banners associated with each of six pointers. The symbol(s) on these banners are then entered into the helper device at left to produce a single symbol that is entered using the corresponding dial on the panel. The pointers are painted on the floor of the bridge in pairs, facing outwards. For example, when you back all the way out from this puzzle and look down, there is a kite shape pointing at the puzzle itself. Look up from this position and you'll see banners on either side; the left one has two backwards question marks and the right banner has a symbol created from diagonal, curved and vertical lines. Use the helper device to enter these three symbols (in any order) and then press the orange bar to produce one of the four answer symbols, in this case the one that has up/down symmetry. If the panel dial label has only one banner, just use the one on the appropriate side of the pointer. There are two other locations on the bridge where a pair of pointers can be found.
When all the data have been collected, processed in the helper device and entered on the panel, the solution is:
When the puzzle is completed, pick up a chart from the adjacent chest: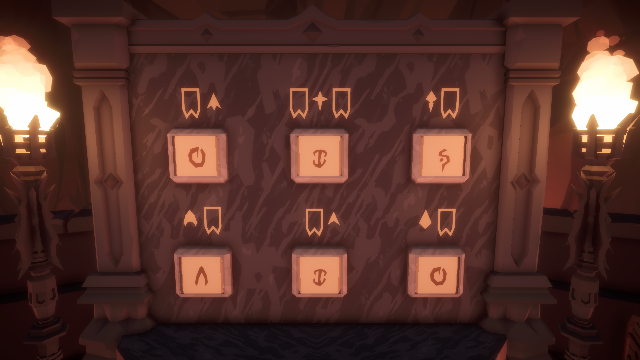
Under each of six geometric shapes is a white starting character that we've seen before and a receptacle for an ending character selected from the tokens at the bottom. Diagonally across the bridge is a helper device containing dials that will be needed to solve this puzzle: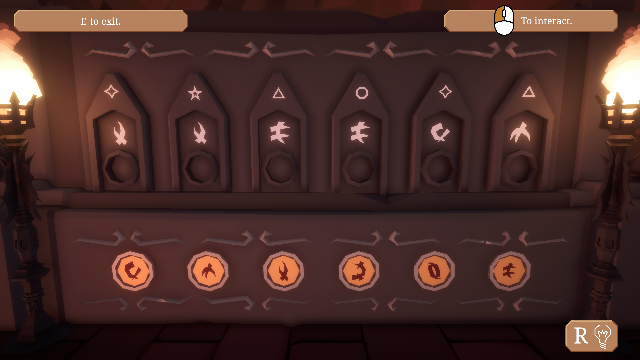
The center of each dial is a geometric button corresponding to those on the panel. To use a dial, note the position of the starting character on the panel, then press its button to see which character moves into that position as the ending character. For example, if you examine the dial at the top and note the position of the F-like starting symbol at 2:00, then that location will be momentarily occupied by a G-like ending symbol when the dial is pressed. Unlike a similar puzzle seen earlier in the game, the symbols don't keep their original orientation when rotated, so extra care may be needed.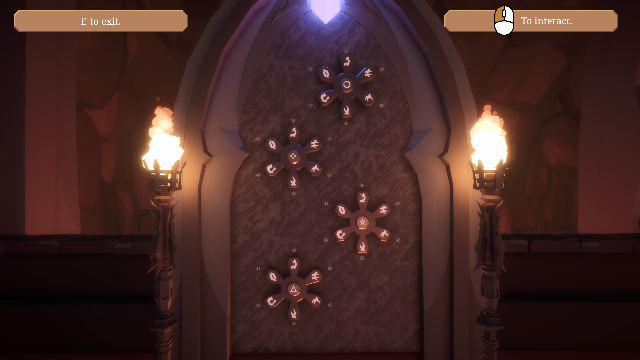
Zoom
The solution is:
When the puzzle is completed, a helper device for the next puzzle is activated on a pillar at the other end of the bridge.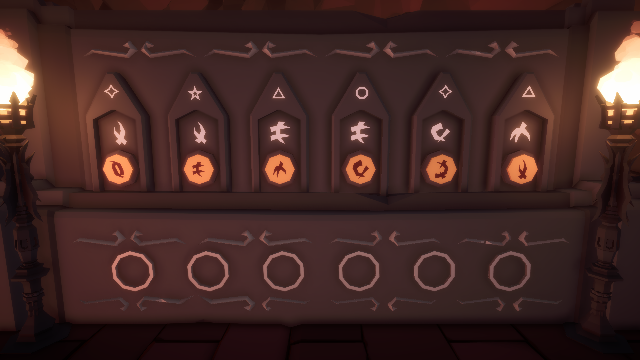
On the left side at the far end of the bridge is the next puzzle:
The objective is to select the correct color for each of the five squares on the panel. Diagonally across the bridge is a helper device containing selectors that will be needed to solve this puzzle: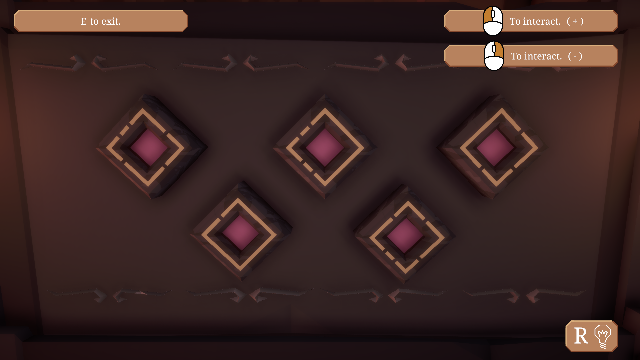
Facing the barred doors at this end of the bridge (ostensibly the exit into the next room), look up to see four colored banners: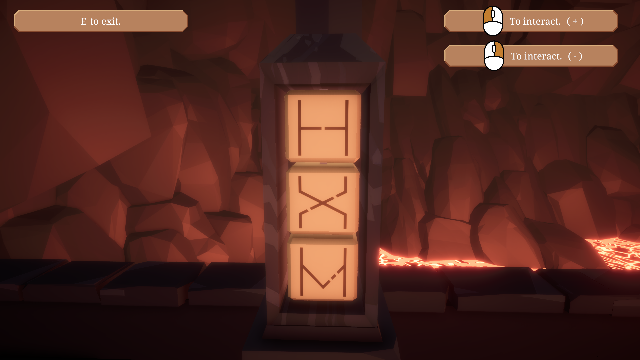
The column of "capital letters" that are shown on each banner can be selected on the helper device. For example, the pillar arrangement for the first (green) banner is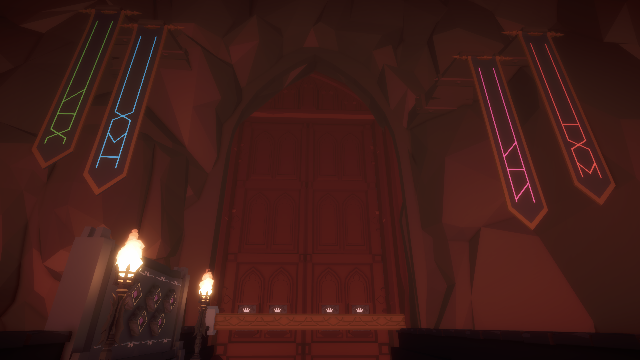
Count the number of gaps in the line segments displayed, 0 + 1 + 3 = 4 in this case. Then the square on the panel having a like number of gaps in its perimeter should be colored green.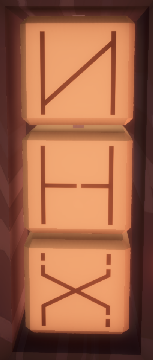
The overall solution is:
When the correct colors have been selected, the bar blocking the exit door is removed, which discloses the next puzzle: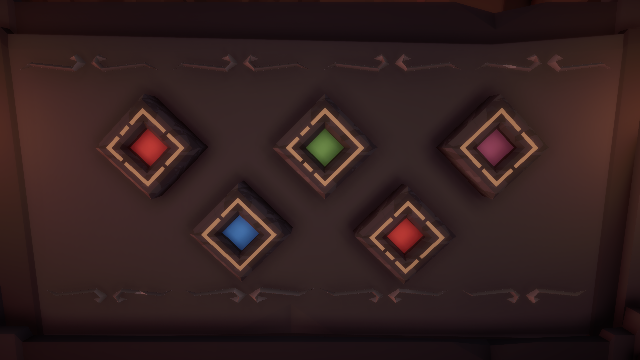
Prerequisites: Banners Puzzle and Color Puzzle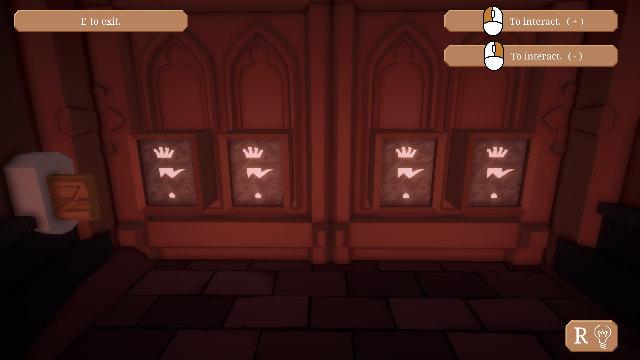
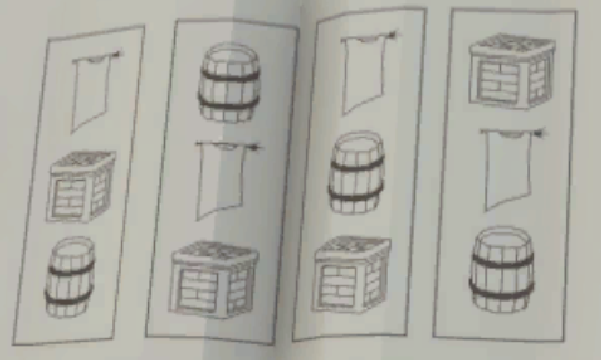
The chart in inventory contains references to a flag, a crate and a barrel. Turning around from this end of the bridge, you can see all three of these items nearby. Each item contains a Dark Lord mark in the form of a glove with the following characteristics:
To solve the puzzle, select the characteristic (top to bottom) associated with the corresponding location using the 4 columns in the chart. For example, the first chart column is flag, crate and barrel in that order, so the glove symbols should be fingers bent 90°, a notched thumb and a diamond wrist symbol.
Location Crate Barrel Flag Fingers bent 0° 180° 90° Thumb appearance Notched Up Right Wrist symbol Pentagon Diamond Chevron
The complete solution is:
Proceed through a one-way door into the next room.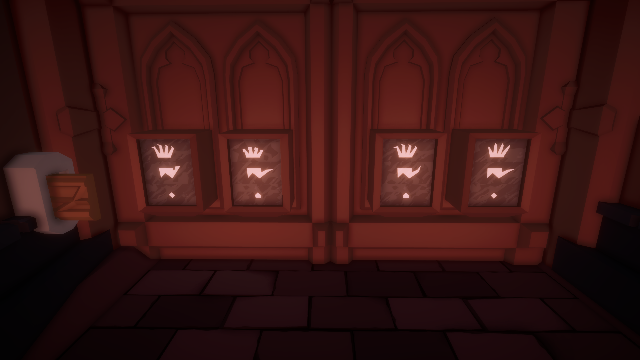
On entering this large chamber, you can see flights of stairs ahead and the Left Balcony and Right Balcony above.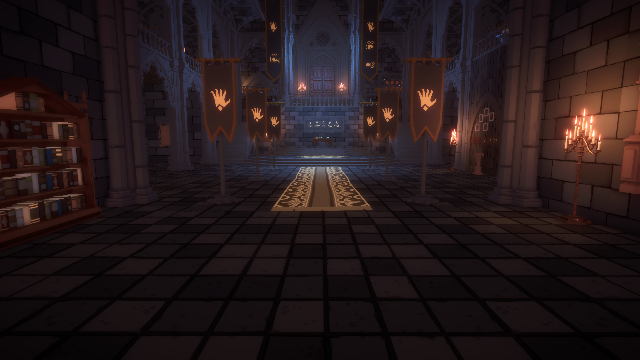
Star on forehead, arms at N and EMove into the alcove at right to see another figure with
Circle on forehead, arms at S and WEnter the alcove on the opposite side of the cathedral to see another figure with
Diamond on forehead, arms at E and WClimb the stairs to the Right Balcony and move to its end to see a fourth robed figure with
Triangle on forehead, arms at N and SFrom the end of the Right Balcony, veer to the right into a shallow alcove with four barrels. From a space between the barrels, pick up a multicolored tiara:
Enter the Left Balcony opposite and enter its first alcove: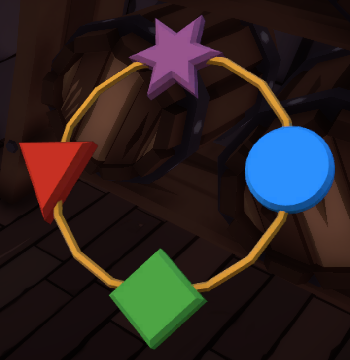
The objective of this puzzle is to place the colored tokens into intersections indicating the arm positions of the robed figures. The color of each token is associated with the tiara in inventory and the forehead shapes noted above. Since the last figure seen had North/South arms and a (red) triangle on its forehead, the two red tokens are placed in the two leftmost positions. Similarly, the East\West arms are associated with a green diamond, so the two green tokens are placed in the top two open positions.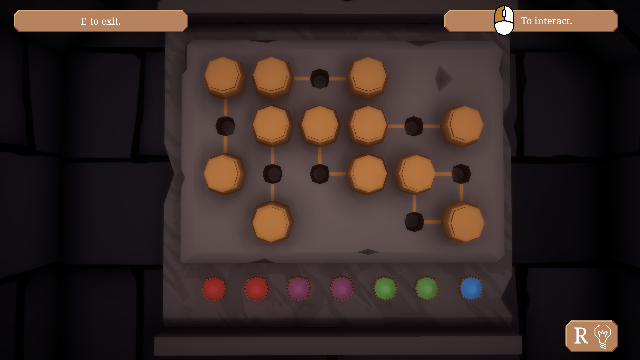
The full solution is:
and some crucial information has been added to the next puzzle at right.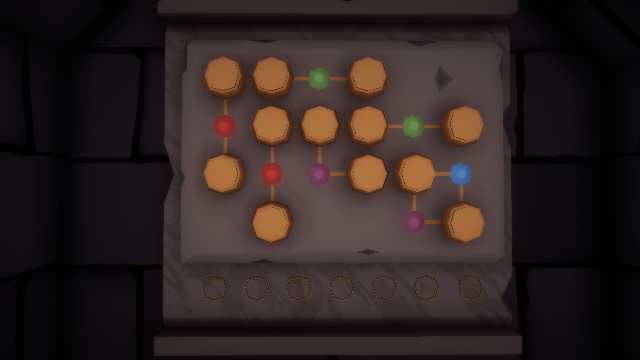
Prerequisite: Robes Puzzle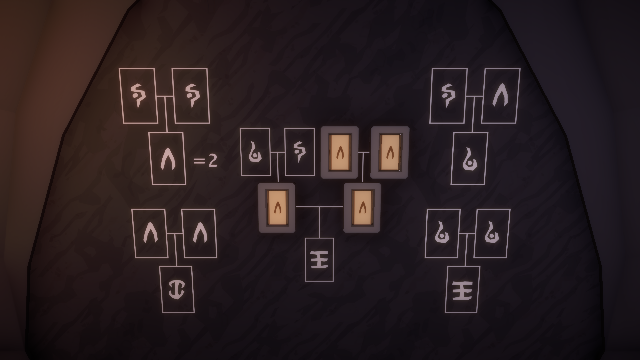
This puzzle involves some simple addition problems using symbols instead of digits. Number the four dials 1-4 in reading order. We can make the following conclusions:
 = 2, then
 = 1
+
= 2 + 2 = 4 =

+
= 1 + 2 = 3 =

+
= 3 + 3 = 6 =

+
= 3 + 1 = 4 =
= Dial 3
+ Dial 4 = 4 +
Dial 4 = = 6, so Dial 4
= 6 - 4 = 2 =
Pick up an X-shaped device from the chest at left and make your way to the entrance to the Right Balcony.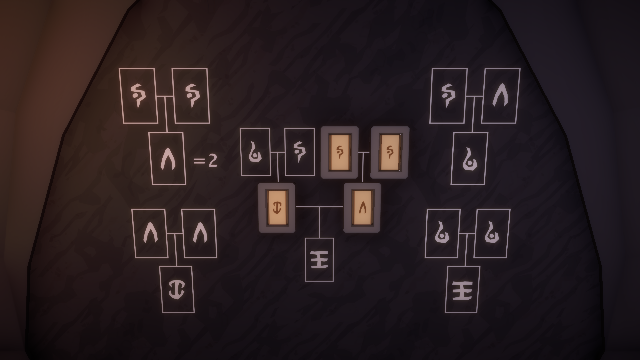
Prerequisite: Arithmetic Puzzle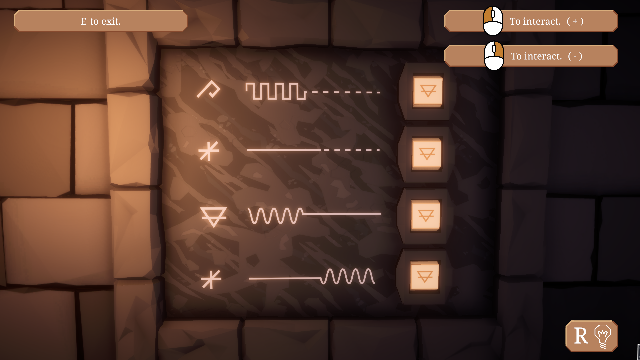
The X-shaped device in inventory is used with the large chart at left to set the four correct dial settings above. The idea is to position the device on four of the white symbols so that the waveforms on the arms of the device connecting two symbols agree with what's in the puzzle at right, after which it's just a matter of dialing in the white symbol at the end of the other arm. For example, the first symbol to solve for is a spiral shape with corners, connected by square-wave and dotted-line arms to the unknown symbol. These are the upper left and lower right rings on the X-shaped device. There are only two locations having the spiral symbol and the rightmost one of those doesn't have space for both rings, so place the device on the leftmost symbol, which is in the second row of the first column:
We can then see from the device that the unknown symbol is approximately an asterisk, so dial in this symbol for the first line of the puzzle.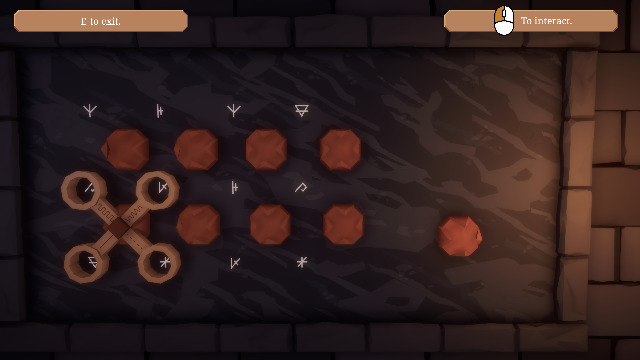
The rest of the puzzle solution is:
When the puzzle is finished, it discloses some text that will be stored in inventory for later use. Go to the end of the Left Balcony.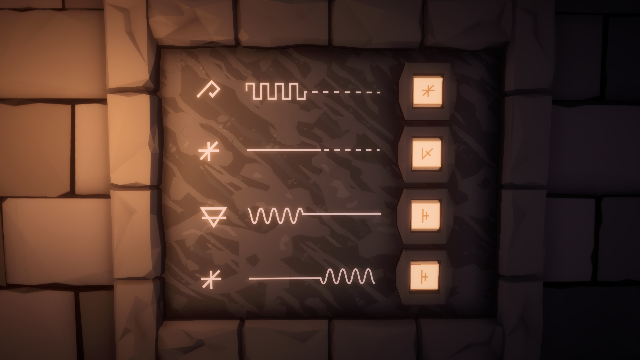
If you stand about midway between this puzzle and the adjacent alcove and look down at the staircase, you can see two long banners that have the same symbols on them as the puzzle: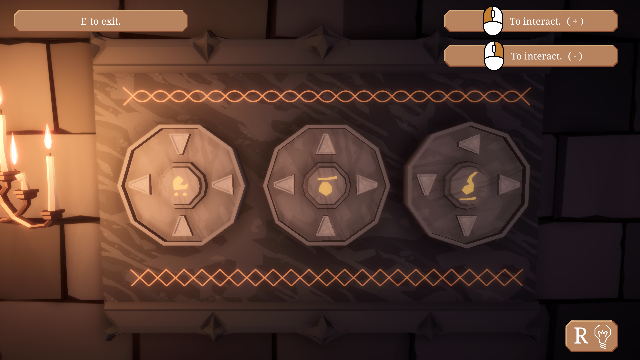
On the banners, note the orientation of each symbol with respect to the line of X's or infinities that look like the lines at the top and bottom of the puzzle. The objective is to orient the three dials to match those relative orientations. Note that this is not a direct match of the symbol orientation that is on the banner.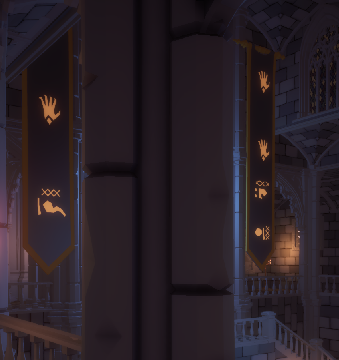
Zoom
The final arrangement is:
which "did nothing" but in fact sets up a preliminary for the second part of the puzzle, which is in the adjacent alcove: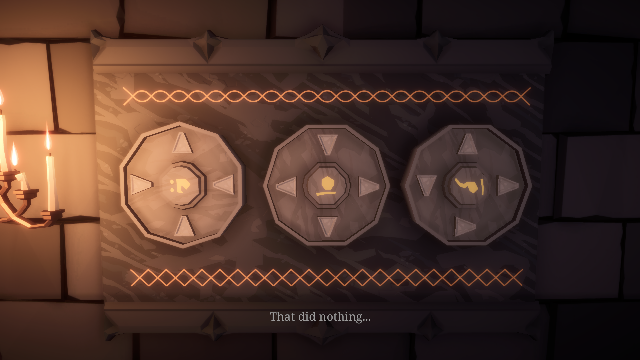
This time the objective is to press the correct two sets of 3 compass direction buttons to match the ones shown on the previous puzzle at the position indicated by the white dot. For example, the third and sixth button to press is the arrow at the E direction of the third dial on the previous button, which has a center symbol resembling a musical note (coincidentally, this arrow also faces E). The hint, if you choose to access it, spells this out fairly clearly. If you make a mistake, just complete the entry of any 6 arrow keys and the puzzle will reset after a brief red flash.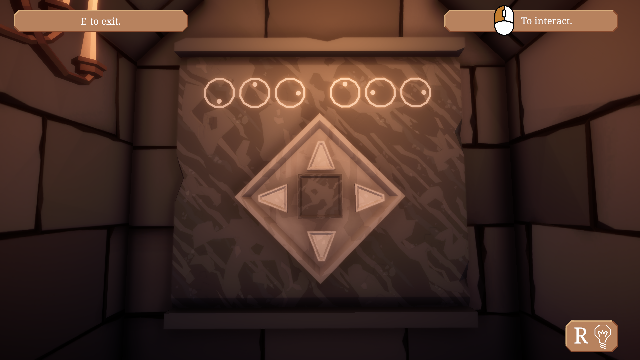
The correct button sequence is
When the puzzle is complete, you can pick up a key from it.
↑ ↓ → ↑ ← →
In reading order, we can uniquely identify these symbols with the following shorthand: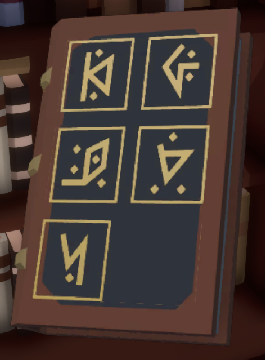
2 far dots (2F)Exit the room and observe the wall at left. Here there are mirror images of the same set of symbols:
2 near dots (2N)
4 dots (4)
3 dots (3)
1 dot (1)
We can use the book in inventory to determine the corresponding shorthand descriptions: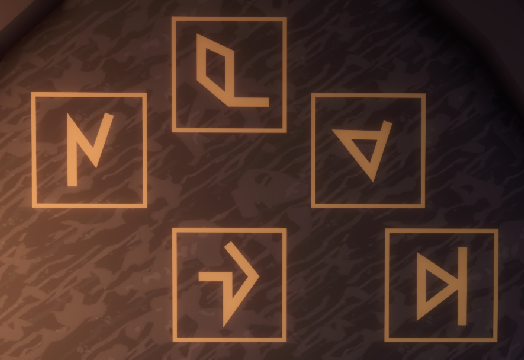
	  4
	1   3
	 2N   2F
Turn around and move across the cathedral to a puzzle directly opposite:
The tile receptacles here are in turn a mirror image of what you just saw on the wall, so the symbols needed are: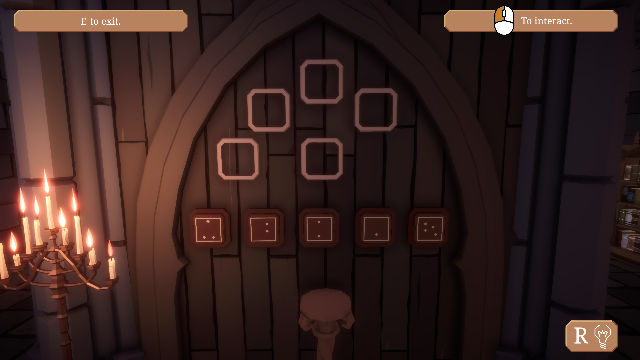
	     4
	   3    1
	2F   2N
Move the symbol tiles up accordingly
and pick up a Dark Lord figurine that materializes there. Turn hard left and go to the table between the two sets of stairs.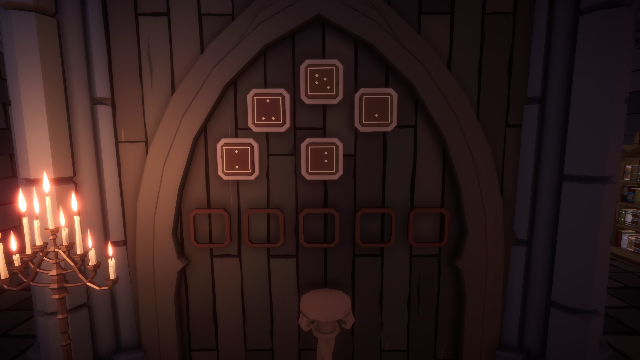
Prerequisite: Mirror Puzzle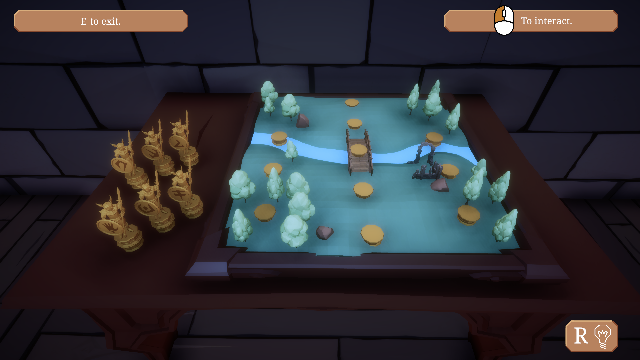
This puzzle isn't accessible until you deliver the Dark Lord figurine to it. As a reminder, you can look at the sign above the puzzle to see the king's name associated with each symbol, equivalent to what was found for the statues in the Library:
The text you picked up from the Quad Puzzle does a pretty good job of identifying the unique locations for each of the kings:
Ivelod Edala Midelen Tharar Bila
Ivelod: On the bridgePlace the figurines accordingly to complete this puzzle:
Edala: Just behind the bridge
Midelen: Next to the ruins
Bila: On the opposite riverbank from Midelen
Dark Lord: Bottom center
Tharar: Enclosed by trees at lower left
Go though the one-way door at the top of the stairs into the next area.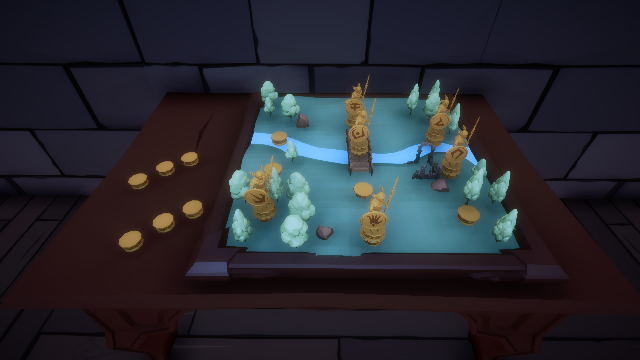
Zoom
On entering this large chamber, you can see a Left Aisle and Right Aisle bordering the main area containing eight sarcophagi. Move forward about halfway along the carpet runner, just past the second pair of sarcophagi.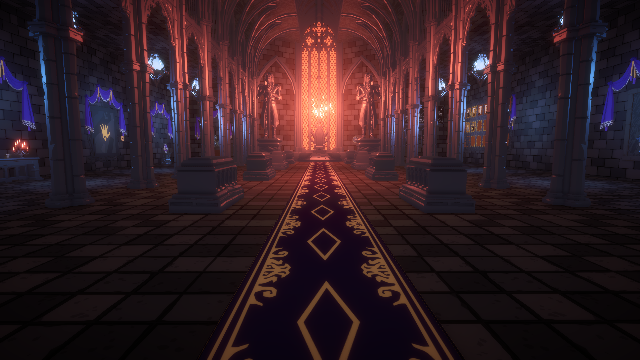
These dials cycle amongst sun, star, clouds, waning and waxing crescent moon symbols, and we'll come back to it a bit later. For now, approach the right wall behind the throne and large statue to pick up an octagon. Go to the other side of the dais and examine the column of six 2 x 2 grids that look like they might correspond to the dials seen on the sarcophagus: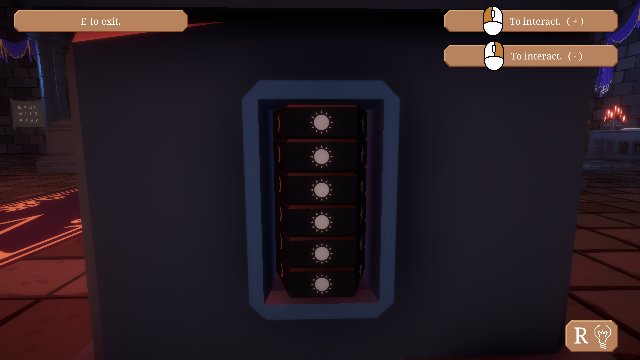
Note that each grid identifies a quadrant and orientation of a sword, if any. Descend the dais, turn left and approach the nearest end of the Right Aisle. There are five line drawings here: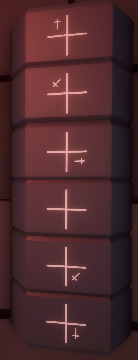
Referring to the clues on the sarcophagus and behind the throne, identify the celestial symbol for each of the column of grids: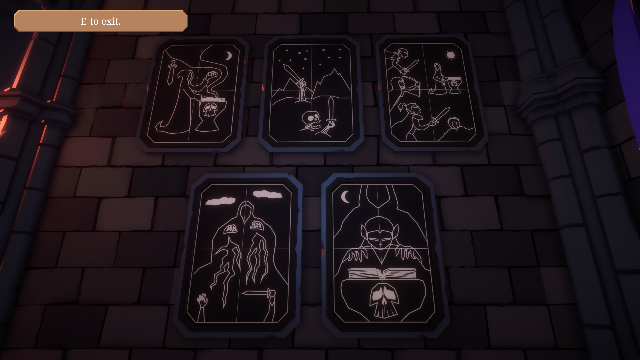
Return to the sarcophagus in the middle of the chamber and enter the symbols above:
Sword quadrant Sword pointing Drawing Symbol NW S Upper left ) Moon NW NE Upper right Sun SE W Lower left Clouds (none) Lower right ( Moon SE NE Upper right Sun SE N Top center Stars
A clue in the interior of the sarcophagus is revealed: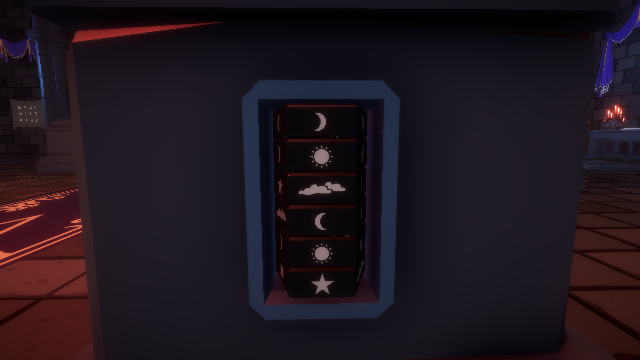
Move to the far end of the Left Aisle for the next puzzle.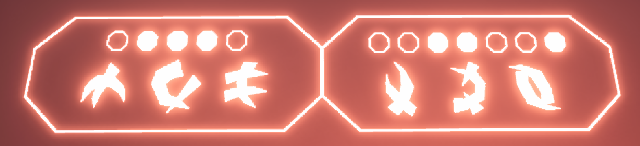
Prerequisite: Octagon from throne area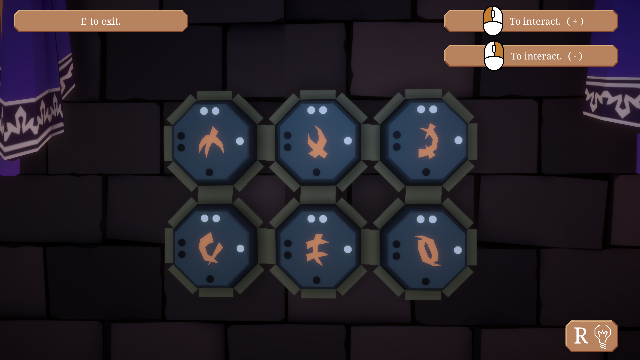
The octagon you have in inventory is automatically added here. Each pair of octagons in the puzzle has a shared side where a symbol and an adjacent one each have one or two black or white dots (but no mixture of them). Since a side of an octagon is never shared with more than one other octagon, we can conclude that a set of three symbols would have from 2 to 4 dots for the first pair and another 2 to 4 dots for the second pair, for a total of 4 to 8 dots. Since each member of a pair has all the same color of dots, a boundary between symbols always occurs when the overall string of dots changes color. Referring to the sarcophagus clue above, we can use this information to determine that:
 has 1 black
dot facing

 has 1 black
dot facing
has 1 or 2
white dots facing
and 2 or 1 white dots facing
It's even easier to see that:
 has 2 black dots
facing

 has 1 white dot
facing
has 2 white dots
facing and 2
black dots facing
Pick up Mom's portrait from the chest below. Go to the other end of the Left Aisle where there's an open book next to a candelabra, containing some information you'll need shortly: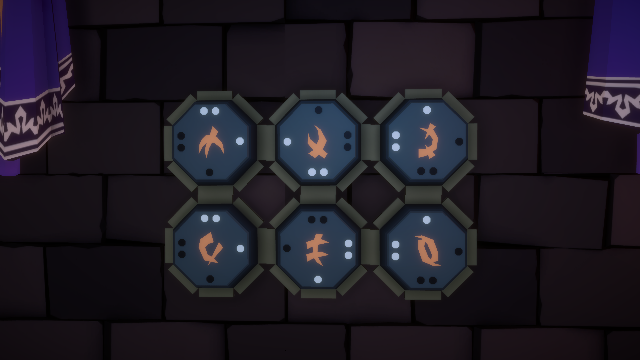
Move directly across the chamber into the Right Aisle where there's a spiral on the wall.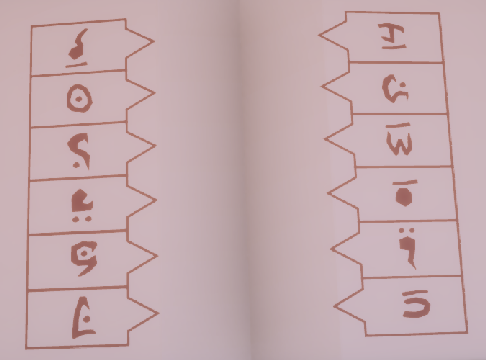
If you get close to the desired position, it will snap into place when you click the mouse to place it. Starting from the end of the spiral, note the order of colors: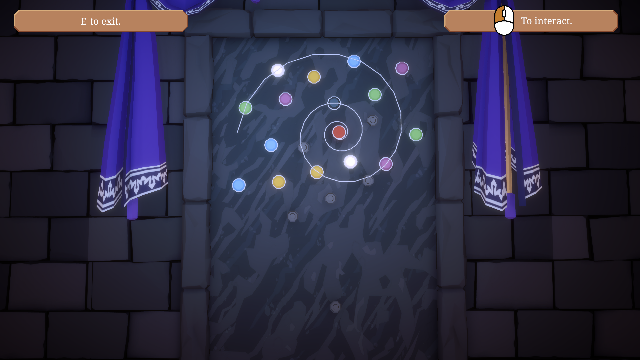
Pan left to the next puzzle, containing a sword:
Green White Blue Purple Yellow Black
Starting at the top, arrange the colors in the same order as the spiral: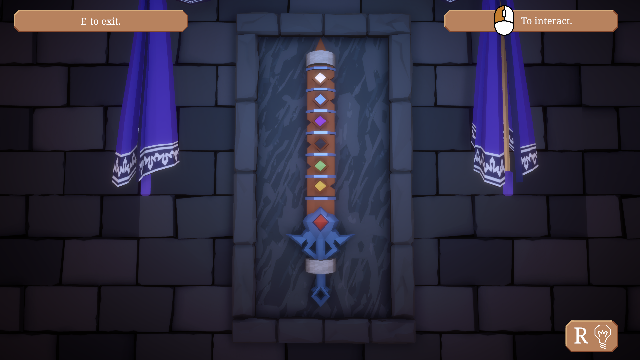
and you can again ignore the message about it "doing nothing". Correlating the notches on the sides of the sword with the information obtained earlier, you can come up with a series of 6 symbols: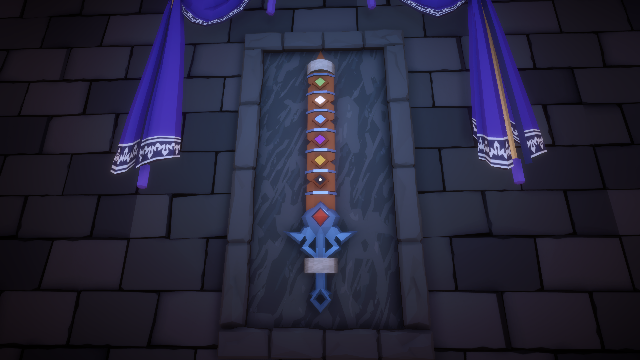
Turn right and go to the end of the Right Aisle where there's a 3 x 4 array of symbols:
Color Notch Symbol Green Left White Right Blue Right Purple Left Yellow Right Black Left
Select the 6 symbols above (in any order):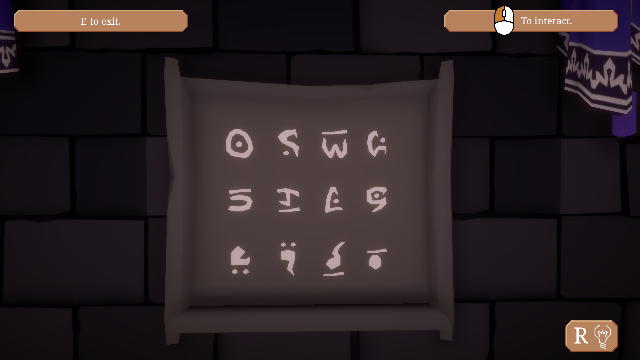
and the sword will be unlocked from the wall. Go pick it up. Return to the Left Aisle where there's the mark of the Dark Lord on the wall.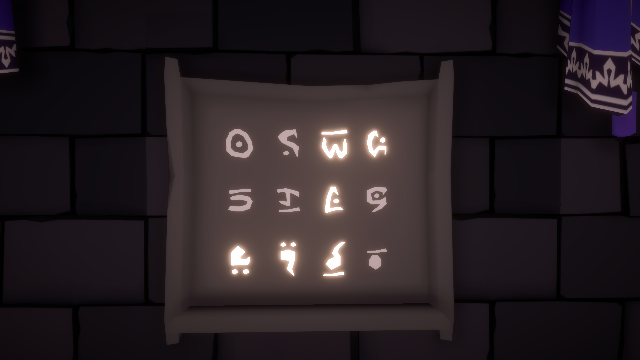
Insert the sword into the slot at right to activate the next puzzle:
Some experimentation shows that a solution consists of 8 moves, probably tracing a path through the provided network. The biggest challenge is correctly interpreting the information at the bottom of the grid (as well as in the clue if it's accessed). There seem to be several ways that it can be applied, but the essential point is that the paired cells at the bottom always contain an empty one and an occupied one. This does not indicate where the path is and isn't present, but instead represents the direction taken for each move (occupied cell), relative to the previous grid position (empty cell). So to put it more succinctly, the instructions are to make the following moves from an unknown starting position: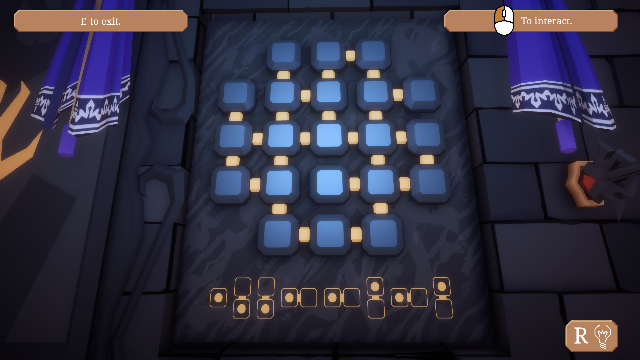
This path traces out the following shape that lies partially within a 3 x 4 rectangle of nodes:
↓ ↓ ← ← ↑ ← ↑ ←
We can visualize this pattern being superimposed on the grid in various positions, and then look for any gaps or missing nodes along the path. It turns out there's only one solution, and that's the following sequence: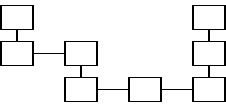
A simple way of describing this path is to start in the middle of the fourth column, move down as far as possible, then follow the perimeter of the grid in a clockwise direction until the puzzle is finished. Pick up King Ivelod's portrait from behind the grid. Return into the Right Aisle where there are a group of portraits in the corner.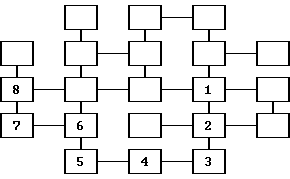
Prerequisites: Octagons Puzzle and Grid Puzzle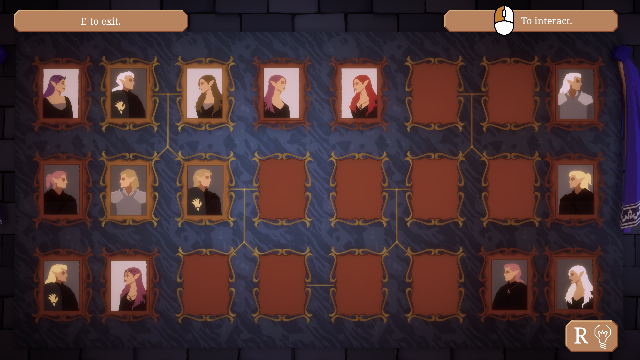
The two portraits you have in inventory are automatically added here. The ten portraits in the dark frames around the periphery of the layout are to be placed into the correct open positions. As in an old-fashioned family tree diagram, horizontal links represent (opposite-sex) marriages and vertical links indicate offspring. Married couples face each other. The principal genetic feature from one generation to the next is hair color, and multiple offspring of one couple all have the same hair color. There also appears to be some generational inheritance of the Dark Lord mark (male) and an amulet or tiara (female). Denote the positions to be filled as follows:
The people having pure hair colors (white, red & dark purple) are not children of others in the tree, and are therefore in positions A,B,C,D. Those four individuals are: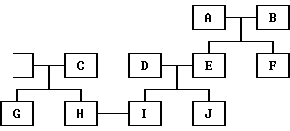
White-haired right-facing malePositions A and B are either a right-facing male and a left-facing female, or vice-versa. Since there is no left-facing male, A must be the white-haired male and B a left-facing female. That female cannot also be white-haired or else their offspring would be white-haired and there aren't any more white-haired portraits available. Therefore B is the red-haired female. Filling out the rest of the pure-haired folks, C is the left-facing white-haired female and D is the right-facing dark purple-haired female:
White-haired left-facing female
Red-haired left-facing female
Dark purple-haired right-facing female
The two couples we've placed each have two children, so we can look for identically-haired people among the rest of the available portraits. There are only two blonds, so they must be the offspring of the brown-haired man and white-haired woman. One of them is married to someone on the right, so H is the right-facing blond man (with the Dark Lord mark) and G is the left-facing blond: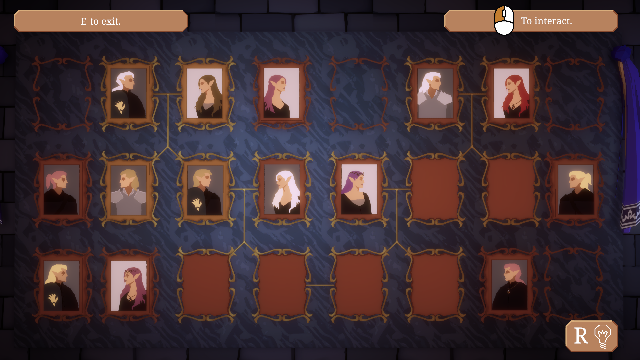
We now have only four portraits left to place, and they're all of people with purplish hair. However, two of them have lighter tones, so they're the offspring of the remaining couple having some white hair. The left-facing male is on the left to match up with the dark purple-haired female already placed: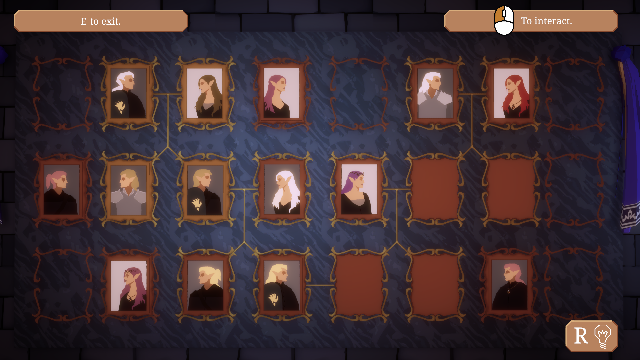
The remaining two portraits must have the left-facing one on the left. The final layout is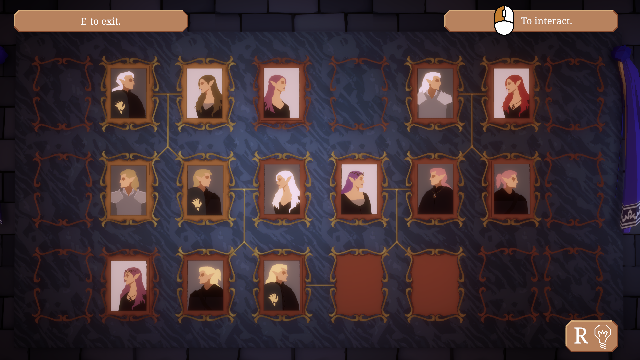
A glowing portal appears; move into it to reach the final destination in the game.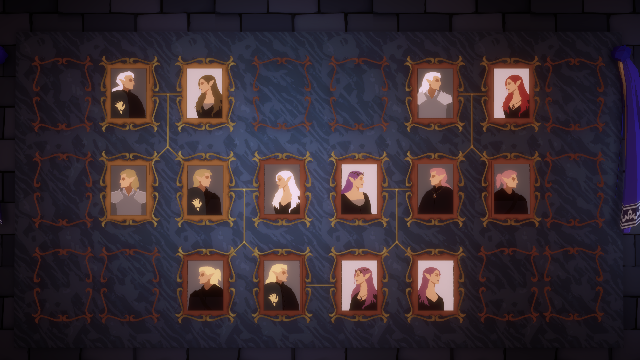
With a layout similar to the previous room, you can see Left and Right Aisles bordering the main area. Move forward to the circular table ahead and slightly right.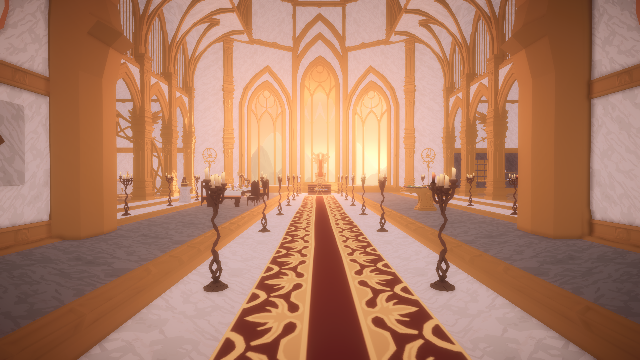
This puzzle has dials for a brick structure, sand, snow, leaves and lightning. Look up and approach the near end of the Right Aisle, where there's a map on the wall: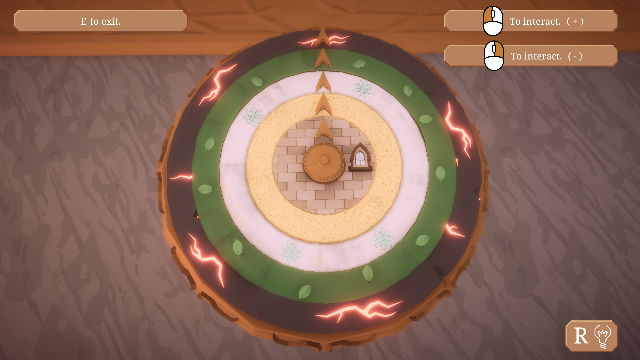
The center part of the map has a set of concentric rings like what was seen on the table, and directions from those rings are: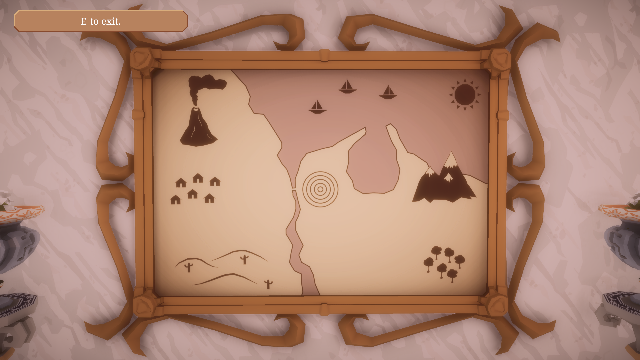
E to snowy mountain peaksThese correspond to the settings needed for the rings on the puzzle. The solution is:
SE to a leafy forest
SW to a sandy desert with cacti
W to some built structures
NW to volcano smoke
A panel opens in a wall near the entrance door.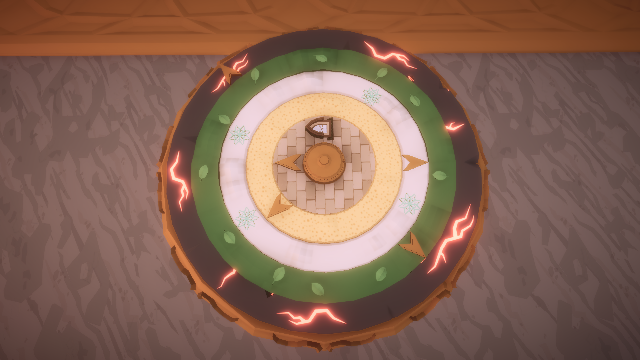
Before leaving the central area, look at the top of the wall of the Left Aisle to see overlapping Blue, Yellow and Red colors, with Green created from Blue + Yellow, Orange from Red + Yellow, and White from all three. Zoom in on the wall puzzle:
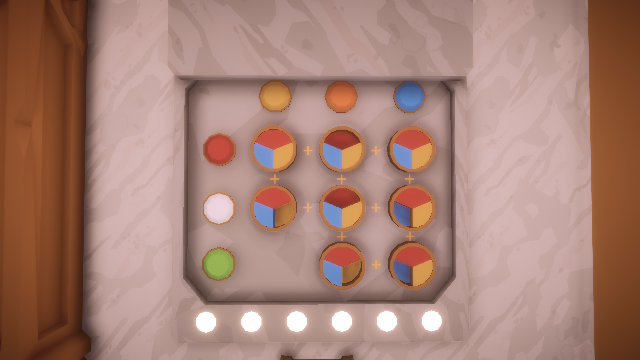
The objective here is to make the appropriate settings (if any) on the tricolor dials to create the target colors for each row and column. Six settings are made, as indicated by the row of lights at the bottom of the puzzle. The 3-element White row must contain one each of RYB, so there are no blank cells in that row that don't have any color selected. Since the first column contains only Yellow or blanks and the third column contains only Blue or blanks, the second row consists of Y, R, B left to right: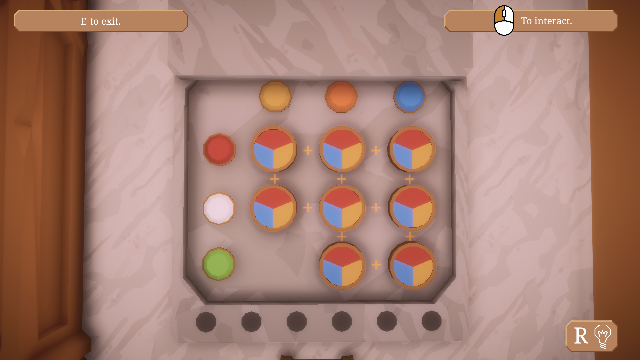
Since Green is made from Blue + Yellow and there can be no Yellow in the third column, the two-element third row consists of Y, B left to right: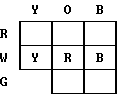
In the first row, there can be no Red in the first column since that's reserved for Yellow and ditto for the third column reserved for Blue. Therefore, the only location for the Red required in the first row is in the second column, and the other two elements in that row are blank, which completes all 6 setttings for the puzzle: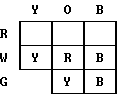
The middle column thus contains two Red and one Yellow, so the result is a slightly darker shade of Orange (i.e., Red-Orange), which can be seen when the column label is compared to the wall displays near the ceiling. Pick up a blue key from a hatch under the puzzle. Return to the Right Aisle and approach the desk in the middle. Use the blue key to open the casket and retrieve some text about nobles in King Ivelod's coterie that will be used later in the game: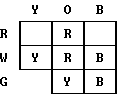
For now, turn around and approach the two square displays just to the right of the map.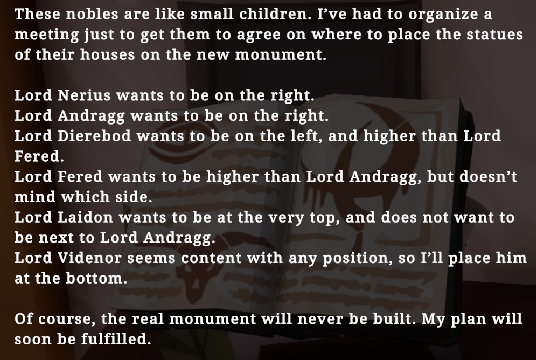
The objective here is to identify the various types of diamond symbols representing the orthogonal movements in the 3 x 3 grid from the diamond-shaped starting point to the indicated element symbol. On the top grid, the movements are Right 2 and Down 2, and these can be in any order. Therefore, the diamond symbols with 2 white rings and with 3 white rings represent Right and Down (or vice-versa).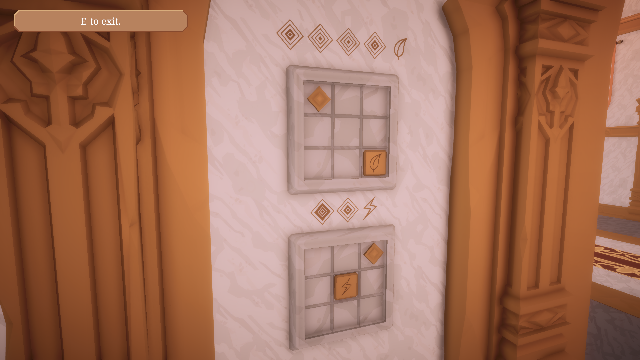
Zoom
On the bottom grid, the diamond symbols with 1 white ring and with 2 white rings represent Left and Down (or vice-versa). Comparing these with the results from the first grid, and noting that the 2-ring symbol is the only common one, the following can be determined:
2 white rings indicates DownPan to the right across the main floor of the chamber to the end of the Left Aisle:
3 white rings indicates Right
1 white ring indicates Left
The only new symbol seen is one with 0 white rings, so that must represent Up. Making the symbol translations, we can determine the directions to take from the starting diamond to each of the four element symbols that must be placed on the 5 x 5 grid: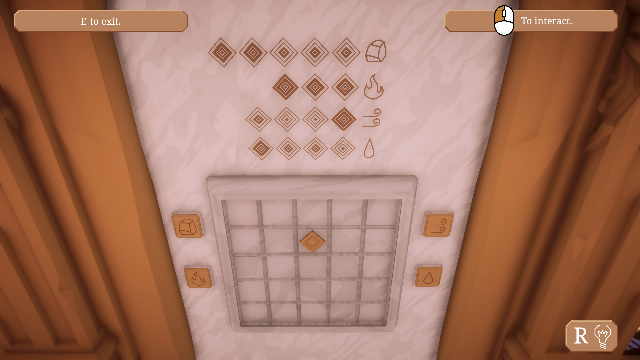
Zoom
Earth (rock): L2 D3Place the element tiles accordingly:
Fire: U L2
Air (wind): D R2 U = R2
Water: L D2 R = D2
Pick up a plaque from the open box below: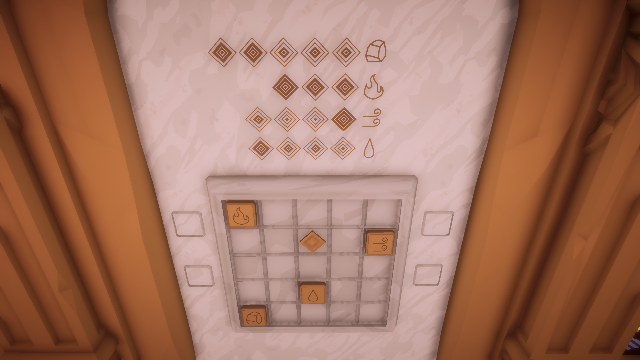
Move right to the next puzzle in the corner: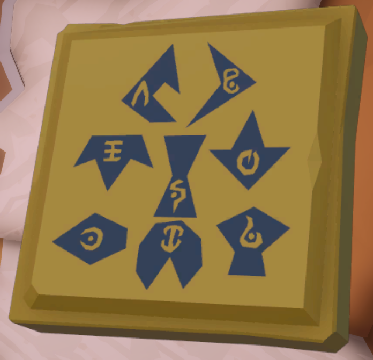
Prerequisite: Diamonds Puzzle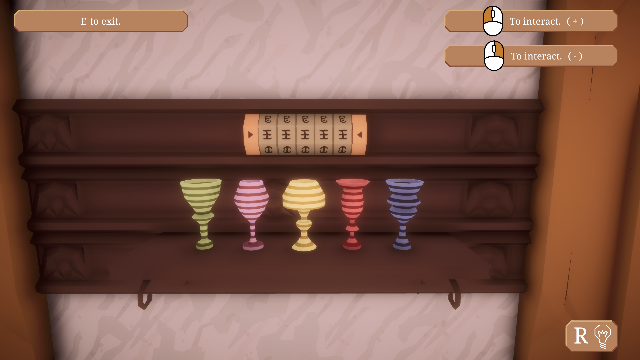
This complex puzzle involves coordinating between the plaque in inventory, the masking display at left and the puzzle itself. The objective is to identify a symbol for each colored goblet that in turn is written on the various geometric shapes on the plaque. These shapes are shown in the wall display at left. The process goes like this:
After all the work is done, the final solution is:
The payoff is the cabinet at right opening to reveal an arrangement of blue containers: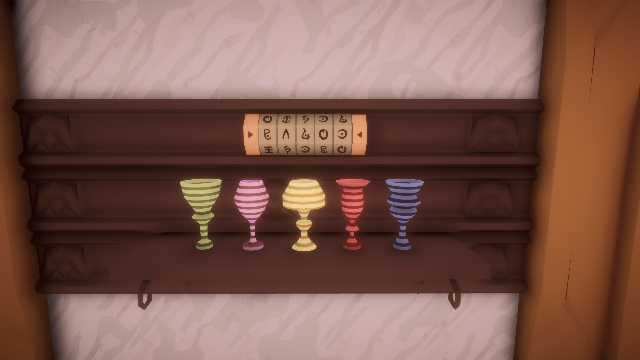
Move diagonally to the opposite end of the Right Aisle.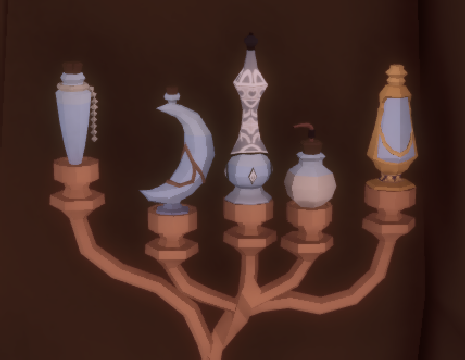
Prerequisite: Goblets Puzzle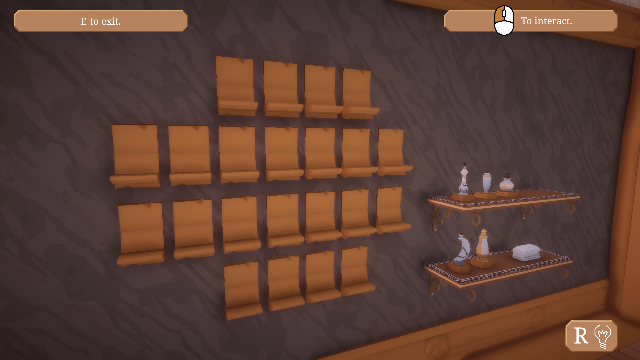
Note the 4 rows of shelves on which to place the 5 blue bottles at right. These correspond to a bird's-eye view of the numerous candelabras on the main floor of the chamber. The perspective is from where you're standing at the puzzle, with the throne at right and the entrance door at left. Scan the rows of candelabras out on the floor to identify which ones have a single red candle, and that candle's location amongst the 5 candles on each stand (1-5 left to right). For example, in the closest row of candelabras, the red candle is on the leftmost stand, at candle position 2 (second from left). The results of the search are in this birds-eye view:
Place the blue bottles on the shelves in numerical order of the red candle positions and in the left-to-right order seen in the cabinet. The completed puzzle is: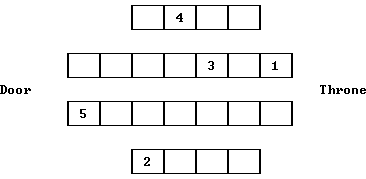
Pick up a gold key from the open box on the shelf next to the puzzle.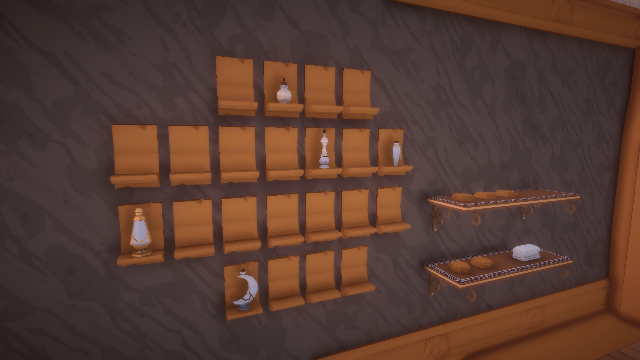
Pick up a note lying on the first chair, which describes some disturbances that have occurred at the various place settings at the table: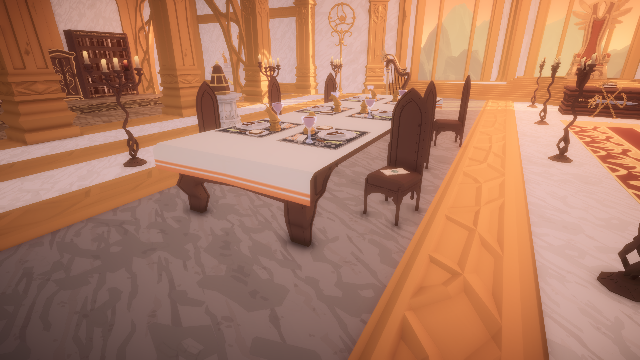
By examining the table, it will be possible to identify which Lord sat in which chair and therefore is associated with the animal figurine at each place setting.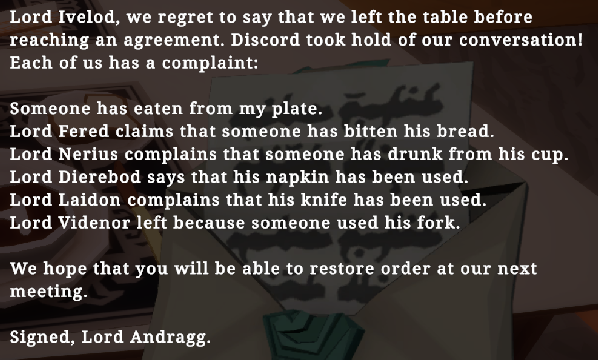
Numbering the place settings counterclockwise from the chair with the note, we find:
The only place setting that has a used knife is #6, so that must be Lord Laidon's. The only other place setting that has bread eaten is #2, so that must be Lord Fered's. Then the only other place setting that has a used napkin is #3, so that must be Lord Dierebod's. The only other place setting that has some steak eaten is #1, so that must be Lord Andragg's. The updated unknowns now are:
Place
settingAnimal
figurineCup
drunkNapkin
usedBread
eatenFork
usedSteak
eatenKnife
used1 Hawk ✓ ✓ 2 Owl ✓ ✓ 3 Wolf ✓ ✓ 4 Bear ✓ 5 Horse ✓ ✓ 6 Stag ✓ ✓
The only place setting that has a used fork is #5, so that must be Lord Videnor's. The remaining place setting #4 must be Lord Nerius's. Summarizing the animal associations, we have
Place
settingAnimal
figurineCup
drunkNapkin
usedBread
eatenFork
usedSteak
eatenKnife
used4 Bear ✓ 5 Horse ✓ ✓
Go to the throne end of the Left Aisle.
Animal Lord Hawk Andragg Owl Fered Wolf Dierebod Bear Nerius Horse Videnor Stag Laidon
Zoom to the gold box to the left of the statues and open it with your gold key to obtain a hawk figurine. This will automatically be added to the animal statues at right:
The object is to rearrange the animal statues to satisfy all the requests in the text about the nobles. This will be done by first determining the order of Lords, then translating that using the list of animals above. Note that the central pedestal is occupied by Ivelod and therefore is inaccessible. The other pedestals consist of three pairs at different heights, which we can call 1,2,3. Numbering the pedestals 1-6 from left to right, the heights are: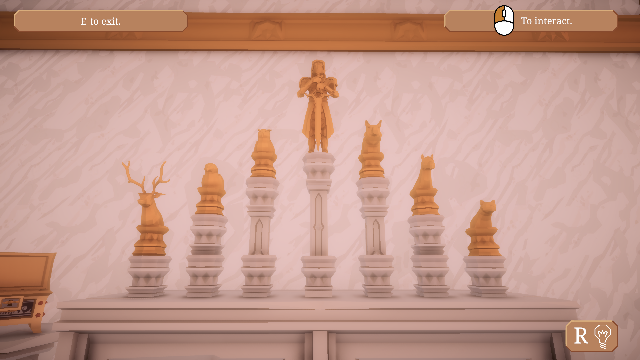
The first initial of each Lord's name will be used for which pedestal his animal is on. Let h(x) denote the height of Lord x. From the letter, we can deduce that since
Pedestal Height 1 1 2 2 3 3 4 3 5 2 6 1
The only two places left are 2 and 5 for F and N. Since N is on the right,
and the corresponding animals complete the puzzle:
V F D L N A
The chains are now removed from the chest in front of the throne.
Horse Owl Wolf Stag Bear Hawk
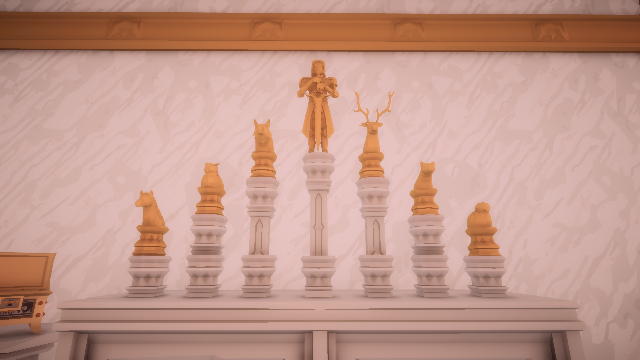
Head over to that location and the narrator will give you a choice between the good ending (sword) or the bad ending (book). Darth, I mean Ivelod, wants you to join him raising his zombie army. After the chosen endgame plays out, you're returned to the main menu.
Copyright © 2026 Balmoral Software (http://www.balmoralsoftware.com). Portions copyright © 2026 by mc2games. All rights reserved.