
Copyright © 1998 Balmoral Software (http://www.balmoralsoftware.com). Portions copyright © 1998 The Coca Cola Company. All rights reserved. Republication, redistribution or conversion is expressly prohibited without the prior written consent of Balmoral Software. Contents subject to change! For the latest information, see http://www.balmoralsoftware.com.
Alanna is a challenging, free game being offered as a promotion for Cherry Coke. It is available for download here (159 MB).
Walkthrough abbreviations:
F: Move forward (Fn for n repetitions)To combine inventory items together, put the first item on the stone at lower right, then shift-click on the other inventory item(s). It may be necessary to first return inventory items from the list at right. A number of "cast member not found" errors were encountered while manipulating the forked antler and vine, so avoid combining these items together until absolutely needed.
L: Move left
R: Move right
B: Move backward
Thanks to the Alanna players in the comp.sys.ibm.pc.games.adventure newsgroup.
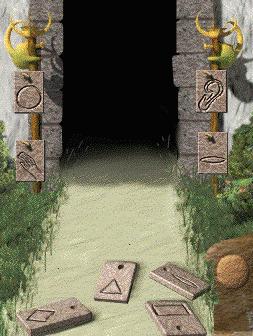
Your starting inventory consists of a spool of twine, a bag of gunpowder, a bullwhip and a box of matches. In the opening scene (where there's nothing behind you), click on the stick second from the far left to bring it into your inventory as a long staff. Move F L and pick up a wedge-shaped rock by clicking on a rough-edged shape just below the ruts in the path. Move B F to the closed gate. You can dial the gate combination by using the levers to rotate the three stones. In Katherine Leonard's Standlake University notes, you'll find the symbols for the top two stones:
|
|
Then just rotate the bottom stone until the gate opens. Or, you can reset the gate puzzle if necessary by moving B F and then press the left lever four times and the center and right levers once each.
Move F L and pick up a curved antler in the grass to the left of the path and a forked antler to the right of the path. Move B R F to play the slider puzzle. This puzzle is equivalent to transforming
Using the position notation
a 71-move solution is
	P  O  N  J  F  E  I  J  F  G  K  J  N  O  K  L  P  O  N  J

	K  O  N  J  F  B  C  G  K  J  F  E  I  J  N  M  I  J  K  G

	F  J  K  G  H  L  K  J  F  G  H  D  C  G  F  E  A  B  F  G

	C  B  F  G  H  D  C  G  K  J  I
The final picture is
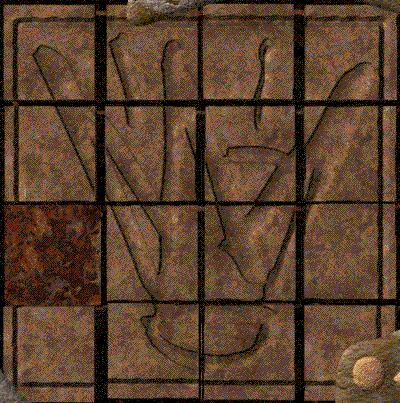
which looks like the Alanna logo in the Main Menu. Since the game remembers previous changes you've made to the slider puzzle, you may not be starting with the original configuration. In that case, a general slider solution program may be of help.
Pick up the sword and bag of coins from the well. Move B3 R and use the sword to cut a piece of vine from the thicket by positioning the point of the arrow cursor just below a squarish black spot in the tree shadow. Pick up the rubbery vine, then move B F and pick up a small stone to the left of the gate control levers. Move F2 to the ravine and pick up a short piece of rope from the right side of the path. In your inventory control panel, combine the long staff, spool of twine and curved antler together to make a hook. Put the hook in the list at right, then use it to hook the rope hanging from the tree, making it possible for you to swing across the ravine (in both directions).
Move F R to a "slot machine" inside a rock. Each of the three dials moves on a cycle of six and presents one-third of a cuneiform pattern. In the Standlake University notes are cuneiform patterns for Love, Wisdom and Friendship; the only one that can be completely formed in the slot machine is the first:
After resetting the puzzle (if necessary) by moving B R, this pattern can be produced by pressing each of the buttons three times. Pick up a saw, book and bag of carved stones from inside the slot machine. Also pick a red flower from a spot immediately below the left-hand slot machine button. Move B L to a ferry landing. Three offerings must be placed on the barrels to allow passage across the water. In left-to-right order, they are: bunch of flowers, book and bag of coins. Be sure all these items are available in the list at right, or you'll have to restart the offering. After all three items have been deposited on the barrels, ring the green bell at upper left to summon the ferry.
Move F and pick up the empty barrel second from left. Move R and knock down the beehive in Indiana Jones fashion (with your bullwhip). Use the matches to ignite the bush behind the fallen beehive, then move B R to allow the bees time to calm down. Use the saw on the lower tree branch and pick up the "heavy log" that falls to the ground. Move B3 F to a boulder blocking the pathway. Combine the heavy log and wedge-shaped rock together to make a levered log. Use the levered log to remove the boulder from the path.
Move F to a mechanical bridge-raising apparatus. If you look carefully at the marks drawn in the sand of the pathway, you'll be able to discern the Roman numeral XLIII, or 43. Drop the bag of carved stones onto the path and they'll separate into ten stones numbered 1-10 in Roman numerals. Select stones adding up to 43 and place them into the black kettle at right (one way to do this is to select all stones except X at lower center and II at lower right). Raise the bridge by clicking on the partially-submerged post at the end of the path.
Move F and combine the empty barrel, bag of gunpowder and short piece of rope (fuse) in your inventory. Place the homemade bomb in the pile of rocks at the end of the wooden walkway. There's a potential dead end in the game at this point - you must obtain the vine before setting off the explosion. If you already have the piece of rubbery vine in your inventory, then light the fuse with a match and move B. The explosion you've set off will have repercussions throughout Alanna...
From the bridge, move B2 R and pick up a shovel from underneath the toppled stone slot machine. Move B F4 and use the shovel to dig in the soft sand next to the tree burnt by the explosion, then pick up a gold key. Move B6 R and pick up some wooden stakes off to the right that were formerly connected to the ropes holding up the slider puzzle. Move B3 L and pick up a rope ladder from a hole in the path. Move B R and pick up a hammer from a sunken area of the path. Move B F4 L F L to a locked chest by the side of the path. Open the chest with the gold key and obtain a flask of oil inside. Move B F to a rusty gate. Combine the forked antler, rubbery vine and small stone to make a loaded slingshot. Open the rusty gate by aiming the slingshot at a small lever on the right side of the path beyond the gate.
Move F L to the "chess game" puzzle. The object of this game is to use five adjacent-square moves to entrap the yellow lion piece with your two brown knights. You cannot "defeat" the lion by trapping him in one of the sunken squares that appear as a result of your movements. If you allow either of your knights to be located one diagonal square away from the lion, it will destroy the knight, making it impossible to win the game. Consequently, most of your moves are "forced", in which you're moving a knight out of immediate danger from the lion and avoiding any sunken squares. The lion's moves, on the other hand, are primarily directed toward moving into a position one diagonal square away from one of your knights. Using the position notation
a solution sequence for the left-hand knight is
A B B C C D D E E Fwhich traps the lion in the uppermost square.
After you've won the game, pick up the pile of planks to the right of the playing board and move F. Fill both yellow torch reservoirs with the flask of oil, then drop the pile of planks on the path. Hang a pair of planks on each torch pillar in the following arrangement:
Light the torches by spinning the T-shaped flints just below the top of each pillar. When both torches are lit, move F2 into the cavern. Drop the wooden stakes on the ground, then pound them in using the hammer. Attach the rope ladder to the stakes and move F2 to the final puzzle challenge.
In order to open the door, you must select the correct pair of inner-ring picture and outer-ring cuneiform for each of eight Akkadian words shown on the central dome. A selection is made from the inner ring, followed by a selection from the outer ring. If the selected picture is the correct one for the displayed word, it is highlighted and you can proceed to select the corresponding outer-ring cuneiform. If the picture is not correct, or if the corresponding cuneiform is not selected correctly, the central dome cycles to the next word. Consequently, it is possible through a trial-and-error process to identify the correct selections for each word, shown here using a clock analogy:
	Word        Inner ring   Outer ring

	IBRUTU        11:00         2:00
	IRNITTU        1:00         7:00
	TUB LIBBI      2:00        11:00
	LALU           7:00         1:00
	RAMU           5:00         4:00
	NEMEQU         4:00         8:00
	TAKLUTU       10:00         5:00
	KASITTU        8:00        10:00
Click on the tablet inside the hole and go through the silly endgame sequence in which you are shown how to read fortune cookies on Cherry Coke labels.
Copyright © 1998 Balmoral Software (http://www.balmoralsoftware.com). Portions copyright © 1998 The Coca Cola Company. All rights reserved. Republication, redistribution or conversion is expressly prohibited without the prior written consent of Balmoral Software. Contents subject to change! For the latest information, see http://www.balmoralsoftware.com.