 Roxy's House & Grounds
Copyright © 1997 Balmoral Software (http://www.balmoralsoftware.com). Portions copyright © 1996 Hue Forest Entertainment. All rights reserved. Republication, redistribution or conversion is expressly prohibited without the prior written consent of Balmoral Software. Contents subject to change! For the latest information, see http://www.balmoralsoftware.com.
Amber's introductory sequence is very well done, showing an excellent animation of a car driving into the mountains (and a little bad weather). Further into the game, you'll notice many spooky little details seen from time to time. Many of these (but not all) are mentioned in the walkthrough below. These details certainly contribute to setting the mood of a real ghost story.
Amber's music is particularly enjoyable. Often very subtle, it never overpowers or distracts from gameplay. It's definitely a successful example of the "less is more" idea. Sound effects are effective, and never seem inappropriate or overdone. In the 1943 domain in particular, the radio announcers sound quite authentic for the era (a favorite is the advertisement for the Budco Bread Slice Slicer). The music, too, sounds absolutely believable (is that Ethel Merman?). These game features are probably the most responsible for Amber having such an immersive environment.
Amber's cursor was a little annoying with its constant animations and nonstandard shapes, and it would have been nice to have a "back out" icon distinguished from a "no op" or "no-hotspot" one. Otherwise, the game interface was adequate, with save-game management performed via a top menu line. Quitting the game requires a confirmation at a secondary menu. Some "handler not defined #getProp" script errors were experienced on restoring games saved when on a closeup to the radio in Margaret's domain.
Inventory is limited to a few items, and is not used at all in the three ghost domains. Items thankfully disappear once used, so you won't end up with a lot of clutter in your viewport. In a few places, gameplay requires that certain objects be manipulated or certain locations be visited in a particular order.
All in all, Amber is a joy to play (and replay). With its interesting and uniquely-presented ghost-playing premise, one is left wishing the game were a bit longer. As a result of recent changes in Amber's marketing, it can now be found in various retail outlets at a very attractive price.
Return downstairs from the loft and note that the side door of the garage is locked - you'll have to leave the same way you came in. Exiting the garage, turn left and move forward to the front porch of the house. Open the mailbox and remove the package. Open the package and pick up the oscillator you'll find inside. Open the front door and enter the house. It'll be very dark inside, so the first order of business will be to turn on the lights. Move forward and climb the staircase ahead. Proceed through the open door into the upstairs office, where you can turn on the lights using the large switch on the wall below the red light.
From the light switch, turn right and zoom in on the computer table. Pick up an 8mm videotape lying on the table near the mouse. Go to the desk in the center of the room and open its upper drawer. Read the BAR (Bulbic Activity Reader) User's Manual. Suggested BAR settings are:
Level: 6Note the references to remote cameras (which can be seen in corners throughout the house) and to the hand-held "PeeK" device. Climb the spiral staircase next to the desk and pick up the PeeK device from the reading table on the balcony. Be sure to click on the leftmost of its three LCD-style buttons to play the "tonal residue". Other interesting things in the office include sticky notes on the wall, postcards on the bulletin board and a cute "Ask Me" paperweight.
Frequency Modulation: 8
Exit the office and return downstairs. Enter the parlor to the left of the front door, in which a circular table occupies the center of the room. Zoom in on the device on the table. Put the oscillator from your inventory into the small oblong depression at the top of the base unit, right below the triangular shaped decoration. When the outline of the PeeK unit in your inventory flashes, click on it to confirm that the AMBER device has gone online.
Zoom out from the table, turn right and enter the dining room beyond. Find the videocamera on the sideboard, open its side panel and insert the videotape from your inventory. Click on the camera's eyepiece and select the play button. Note Roxy's references to the AMBER (Astral Mobility By Electromagnetic Resonance) device, to a 1940's-era spirit in a locked upstairs bedroom, and to the BAR setting
Gain: 5Open the cupboard immediately below the videocamera and pick up the Weed Killer. Return to the parlor from the dining room and enter the living room on the opposite side of the entrance hallway. Zoom in on the BAR device at right. Press the red Power button, then use the Select, + and - keys to set the Level, Gain and Freq Mod settings discovered earlier (6, 5 and 8, respectively). Click on the Run setting. When the PeeK unit in your inventory flashes, activate it and note the scan of cameras at various locations in the house.
Now that the BT cameras have been activated, you'll need to wait for six ghostly camera sequences to be displayed on your PeeK device before you can wear the AMBER headgear and enter any of the spirit worlds. It's not enough to merely wait for the displays to occur - you must actually move around before each sequence triggers, perhaps 40-50 mouse clicks (although the interval seems to shorten a bit with each sequence). You can use this opportunity for further exploration of the house and grounds until you've seen all six ghostly sequences:
Return to the parlor and pick up the AMBER headset from the center table. When you back away from the table the headset will activate and you'll be able to hear ghostly voices calling you. These voices get louder as you approach one of the three portals into the spirit worlds. As you move around, you may notice the regular occurrence of strange circular "vibrations" in your viewpoint.
Many activities involve witnessing non-repeating "haunts", or ghostly phenomena, at various locations. Some of these occurrences will appear only after the BAR unit has been turned on, or if the AMBER headset is being worn (or not). Check out the steamed-up mirror in the bathroom upstairs. In the unlocked bedroom at the head of the stairs, open the armoire facing the bed and turn on the television (ouch!). Touch the mechanical man on the nightstand to the left of the bed. If you've previously opened the 1943 bedroom, you can see a ghostly animation in the mirror. Examine the black waters under the dock next to the boathouse. If you've reached the gazebo, you can see a shooting star from inside it and particularly spooky shadows on the ground beside it.
More of the backstory can be derived from written materials throughout the house. In the nightstand to the left of the bed in Roxy's bedroom, check out her dream journal. Read the "Realms of the Paranormal" book on the coffee table in the living room. View Roxy's checklist and a newspaper clipping in the parlor desk. Review the e-mail message from the game introduction (reprinted in the CD-ROM booklet). Check the memo enclosed with the oscillator in the mailbox package.
And don't miss the sign at the end of the dirt road...
Avoid opening any doors except where noted below. Movement between the various rooms of Margaret's domain can be accomplished by tuning the radio in each room. Zoom in on the radio in the bedroom and change the dial setting from 62 (Bedroom) to 75 (Kitchen). Zoom out and press the U button to send the dumbwaiter up to the bedroom. Return to the bedroom by dialing 62 on the radio. As you're moving the dial, note that station 65 can almost be tuned in. Zoom out from the radio and rotate the knitting needle at left to flip it into the dumbwaiter. Return to the kitchen (75) and bring the dumbwaiter down. Click on the needle in the dumbwaiter to add it as a second radio antenna, improving reception. Now you'll be able to tune the radio to station 65 (Dining Room).
Wait for the radio to announce the debut of its sister station at 7 PM, then return to the bedroom (62). Open the bedroom door, which resets the time to 4:00. To terminate the static display, move the mouse cursor to the white border of the "photograph" and pump the mouse button until the arrow cursor disappears. Your ghost will then say:
I wonder what time it is, I don't want to miss that broadcastReturn to the kitchen (75) and open the door to the left of the radio to advance the time three hours to 7:00. Terminate the static display as before. Zoom in on the radio and set the dial to the new station (130).
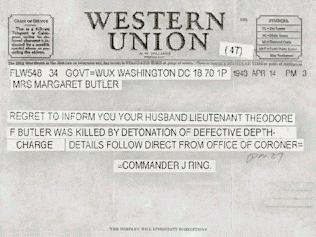
Examine the wastebasket to the right of the desk in the study - your ghost is definitely becoming uncomfortable! You need to reassemble the torn-up telegram by completing the 3 x 4 sliding piece puzzle. Using the positional notation
the 47-move sequence
	J  K  G  C  D  H  G  K  L  H
	G  K  J  F  E  I  J  F  G  C
	D  H  G  C  B  F  G  K  J  F
	G  C  D  H  G  C  B  F  E  A
	B  F  G  H  D  C  B
will restore the telegram to a readable state. Read the solution sequence lines left to right and just click on the torn piece in the indicated position. To start, click on the piece in position J, which is in the bottom row and second column from the left. The piece will automatically move to the left, allowing piece K to be moved next.
The assembled telegram is:
and Margaret can finally find peace. On your return to Roxy's house, your PeeK unit will report the isolation of a "psionic fragment", and you'll have to turn the lights back on using the switch in the upstairs office.
The mirror on the bureau in the bedroom reflects the room as it looks at present, and its reflection ripples when touched. If you touch the metal boxes on top of the bureau in the correct order, they'll say:
I miss you, MaggieYou can "accidentally" crack the glass covering a rose in the wall cabinet in the dining room. Doors advance time by varying amounts:
Bedroom door resets clock to 4:00Clocks are located on the bureau in the bedroom and on the dining room table.
Kitchen door to the left of the radio advances 3 hours
Kitchen door to the right of the radio advances 15 minutes
Kitchen door to the right of the stove advances 15 minutes
Dining Room door by the mop advances 15 minutes
Dining Room double doors advance 30 minutes
Can't click on the roof? Remember that you can't enter a spirit world until your headset is activated (glowing). Go back to the house and turn on the light switch in the office upstairs to activate the headset. When you return to the gazebo, there'll be a light shining down on it and you can enter it and look up to enter Brice's world.
Your view will expand to a distorted rectangle and you'll be looking at the corpse of Brice the gardener. For a gruesome sight, peek through the keyhole of the white door leading into the rest of the house. Exit the solarium and proceed down the grey-rock path to a dark spot amongst the undergrowth. Pass through this "tunnel" into another section of the garden, containing several beehives. Follow the path in a U-shape until you come to a triangular-shaped dark spot on the ivy. You can try listening to the bees in each beehive, but their voices may be unintelligible. Continue through the triangular opening (watch out for spiders) into a garden area with green-and-white checked paving. This area has no exit other that the one by which you entered. You'll discover potted plants at the four corners of the building each holding a mirror that is or can be positioned on the diagonal. On the far side of the building, set up these mirrors in the same way as the two plants on the near side of the building; that is, orient both mirrors so that they face toward the sculpture. Enter Brice's workshop behind the brick backdrop of the sculpture. Turn around and close the door behind you for some interesting saxaphone music.
On the far side of the workshop, look through the right-hand peephole near the floor. Here you'll be able to read a message to Brice from Mandy:
If you reorient the mirror immediately outside the peepholes and use the left-hand peephole from inside the workshop (with the door closed), you'll be able to see a gazebo under construction elsewhere in the garden.
Return to the beehives area and make for the rectangular dark spot amongst the ivy on the far side of the clearing. Pass through another tunnel into a new garden area containing blue flowers. Follow the grey path to the far side and zoom in on the carved wooden heart on the bench.
This interesting puzzle consists of a wooden heart punctured by three nails, each of which influences the motion of one other. To open the heart, all nails must be extended outward. A solution is to click on the central nail twice, then on the left nail five times. Inside is the three-digit code
3 2 1Zoom out from the bench and leave the garden area through a new exit on the wall adjacent to the one behind the bench. This time, the passage will take you up steps with railings into a clearing containing a gazebo under construction. Use the red button on the left back side of the gazebo to raise the floor panels inside the gazebo. Climb the steps into the gazebo and zoom in on the floor grate. Enter the combination from the carved heart and descend into the basement.
Halfway down the ladder, you can see a small shrine to Mandy, including a letter from her. Continue down the ladder to the lower level. Look around and examine Brice's things, showing his fixations with Mandy and UFO's. Zoom in on the white flag to the left of the locked door. Look down to see a pool of red paint on the floor. Look back up and attach the white flag to the lanyard. Click on the right-hand rope to dye the flag red and run it up to the top of the gazebo's flagpole. Open the oval wood panel covering the door lock and press the four keys corresponding to the covered window panes in Mandy's message to Brice. Open the door and send Brice's ghost on its way.
Return to Roxy's house and restore power using the switch in the upstairs office.
Navigation on the lake is a bit tricky - objects in the distance are seen only faintly, and there are snowdrifts on the surface of the lake that obscure the shoreline. We found the best results were obtained by avoiding the use of the diagonally-pointing mouse cursors, instead limiting turns whenever possible to right angles by positioning the cursor at or beyond the edges of the viewport.
On arrival at the lake, you'll hear Chippy, Edwin's poppet, calling for help. If you zoom in on him, you'll see he's firmly frozen in the surface ice of the lake. You can try pulling his finger as he asks, but all you'll get for your trouble may be a few bubbles. Instead, turn around and enter the festively-decorated boathouse. On the back wall, turn the crank clockwise twice to lower the block-and-tackle down to the table. Face the table and swing the tackle to knock the bag of rock salt out the window.
Return to Chippy's hole; he's been knocked free and you'll now be able to descend under the ice. After you descend through the hole in the ice, look to the lower left and you'll see a rubber duck. Squeeze on the rubber duck to summon a vehicle from the Amber Car Co. Get into the car and Chippy will join you. Clear the windshield and drive the car forward four times to the castle, where Chippy will get out and then tell you to go get the bear.
After you re-clean the windshield, you'll find yourself in the car back at the starting position of the underwater roller coaster. This time, turn the car to the right before starting, then move forward three times to a location containing many stalagmites. Here you'll find yourself outside the car; move right, then forward nine times along one of the two paths available for walking (the rest are only for driving). Look down to see your teddy bear - he needs some help up but is too far away for you to grab. Looking up from the end of the walkway, you'll see an anchor hanging down from the lake surface - maybe you could use that to pick up Teddy.
Turn around and return to the stalagmite area. From this location, you have two ways to return to the surface. One is to enter the cluster of stalagmites and catch a rising bubble, which will take you to the bubbling hole on the frozen surface of the lake. Another is to move forward to the opposite side of the stalagmites and follow a pathway that does not have flanking spires at its entrance. After climbing a spiral of steps, you can look up and exit the lake through the hole caused by poor Edwin's sled. This hole also offers another way to return underwater.
Find the windmill buoy on the lake and activate it by moving the lever underneath its pivot. This provides a source of wind power for the boat sail. Return to the boathouse and climb the trellis on its back wall up to the roof. Alter the wind direction by moving the vane so that it's pointing away from you. Head for the boat on the lake and use the rope inside it to raise its sail, causing the boat to move forward and lower its anchor deeper into the lake. Revisit the wind vane and reverse its direction so that it's pointing towards you. Return to the boat and raise its sail again. The boat will pull its anchor back up, but this time the anchor will be holding the teddy bear picked up from the bottom of the lake, as can be seen by looking down into the anchor hole.
Return underwater through Chippy's hole. Enter the car and clean the windshield again. Turn the car to the left before starting, then move forward three times to pick up the teddy bear and take him to the castle. You'll follow the bouncing purple ball into the castle and free Edwin's ghost through a jack-in-the-box portal.
After a CD change, return to Roxy's house.
On your return to consciousness, get up off the floor and zoom in on the computer to your right. Click on its screen to bring up the password prompt. Type in the word WISDOM (all upper-case or all lower-case) and wait for the system to bring up the Fragment Stabilization display. Click on the "remove constraints" and "apply positional bias" boxes. To stabilize the psionic fragments, the following sequence can be used:
Right-pointing Alignment buttonClick on the "continue" button to start the re-entry algorithm. In the Algorithm Construction display, you'll need to align three columns of symbols so that all horizontal and vertical lines leaving each square line up with those in the rest of the array. The desired arrangement
Left-hand Bias button
Right-hand Bias button
Right-pointing Alignment button
Center Bias button
Left-hand Bias button
can be composed using the following moves:
Press left down-arrow three timesMake your way to Roxy's location in the garage loft. You'll still have to enter the garage through the door in front. Zoom in on Roxy's face. Remove the AMBER headgear you're wearing by clicking on one of its visible parts. After your mouse cursor turns into a headgear icon, click it on Roxy's forehead and watch the endgame sequence.
Press center up-arrow once
Press right down-arrow three times
During the credits, you'll hear a montage of the musical themes played throughout the game. The credits repeat until they are cancelled with mouse clicks.
Copyright © 1997 Balmoral Software (http://www.balmoralsoftware.com). Portions copyright © 1996 Hue Forest Entertainment. All rights reserved. Republication, redistribution or conversion is expressly prohibited without the prior written consent of Balmoral Software. Contents subject to change! For the latest information, see http://www.balmoralsoftware.com.