Aura 2: The Sacred Rings
Aura 2: The Sacred Rings
1 December 2019
Copyright © 2019 Balmoral Software (http://www.balmoralsoftware.com).
Portions copyright © 2007 DreamCatcher Interactive Inc. All rights
reserved. Republication, redistribution or conversion is expressly prohibited
without the prior written consent of Balmoral Software.
Aura 2: The Sacred Rings is a 2007 sequel to the previous 2004 release
Aura: Fate of the
Ages, continuing the story of the adventurer Umang immediately following
the end of the previous game. For the most part, the game is absorbing with a
immersive storyline, believable voice acting and reasonably-fair puzzles. Game
controls are typical for a standard point-and-click adventure. A main menu is
accessible with the [Esc] key if you're not in a close-up view. Right-clicking
the mouse toggles the inventory bar and returns a wielded item to it. There is
no way to examine or combine inventory items, so that dimension is excluded
from gameplay. The spacebar can be used to skip the logos and/or introductory
movie on game startup, as well as cutscenes and some of the animations (such as
doors opening).
Generally, graphics are on a par with the previous Aura game, not much
improved after an intervening three years but still fairly good. There is
frequently a shortage of detail in the underlying polygonal meshes, so
characters and objects often appear blocky. A few locations consistently had
the display rotated counterclockwise slightly on arrival, almost as if a strange
"correction" to the view was being made. These were evident at the Forest
destination in Part Two; for example, at the second and third nodes after
exiting the tram.
Unfortunately, the saved-game interface has not been improved from the previous
Aura game. There are a paltry eight saved-game slots, far fewer than
what's needed since there are numerous points in the game where your character
can be captured or killed without warning and the gameplay terminates. There is
no autosave feature, so you must save often. Saved games are identified only by
a timestamp and a small, often dark thumbnail image. The timestamps don't use
a 24-hour clock or otherwise distinguish between AM and PM, and may be partially
occluded by the limits of the display area. There is still a tedious multi-step
manual process needed to identify saved games for future reference. As before,
games cannot be saved while zoomed in on a close-up scene, which is particularly
irksome during at least one difficult puzzle in the game.
Overall, Aura 2 is a challenging adventure that is a worthwhile
continuation of the Sacred Rings storyline. This walkthrough provides a minimum
path through the game; other gameplay sequences and dialog choices can provide
additional backstory elements.
New game
{Cutscene}
You start as the adventurer Umang, immediately following the end of the previous
game Aura: Fate of the
Ages
You've just been rescued by the begoggled Nikifor outside his big metal
house
In Nikofor's bedroom, your starting inventory is an
Amulet and a Tetrahedron
Make your way through three doors into the study and look at the desk in the
corner
Examine the captain's diary to find directions to your current whereabouts from
your previous location in Manula Valley. These directions are added to the
journal that you can access at the right side of your inventory bar.
{Cutscene}
In the close-up, open the small rolltop box at upper right to learn of crystals
needed to power the mobile home. Additional information is automatically
added to your journal from the other sheets.
Back out, turn right and approach a cabinet in the bookcase
Rotate right and move the scrolls on a shelf to obtain a Cabinet key
Use the Cabinet key to open the cabinet and take the page inside
Zoom in on the security box in the opposite corner of the room, and enter the
code found in your journal:

At that point, the device is activated and you can use the circular button to
relate certain colored symbols with their associated number of crystals:
| Color | Image | Number of crystals |
| Black |  | 2 |
| Green | 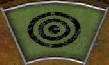 | 5 |
| Red | 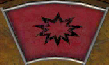 | 6 |
| White | 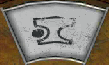 | 1 |
| Yellow | 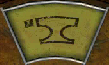 | 3 |
| Light Blue | 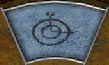 | 4 |
Return to the bedroom and open the cabinet in the corner
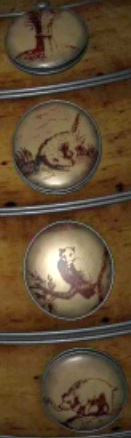
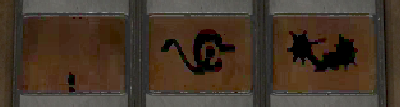
Pick up the encyclopedia excerpt inside and read its pages to identify an animal
image associated with each line on the paper found in the study cabinet:
| I depend only on myself. | Elephant |  |
| Decisiveness is more important than eloquence. | Owl |  |
| He cries to devour its victim. | Crocodile |  |
| It belongs to the grazer, instead of the reaper. | Wheat |  |
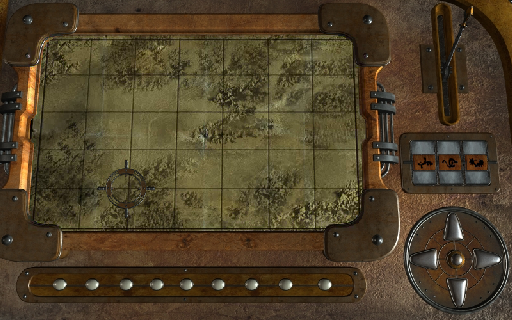
Go back to the study and approach the globe in the corner behind the desk
Save your game at this point
To align the appropriate (mirror-image) symbols from the list above, you'll have
to enter them from bottom to top:
Elephant: Click bottom ring 11 times
Owl: Click next-to-bottom ring 7 times
Crocodile: Click next-to-top ring 4 times
Wheat: Click top ring 13 times or until the globe opens
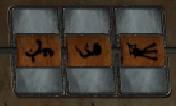
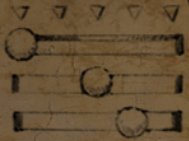
Pick up the four Generator Room Keys
Exit the study, go downstairs, turn around and zoom in on the door to the left
of the staircase
Carefully put the four Generator Room Keys from your inventory into the
corresponding slots, but in reverse order. For example, place the key
at the left end of your inventory bar into the far-right slot. This will
align the sides of the symbols with each other like a jigsaw puzzle, which
unlocks the door.
Open the door, turn right and go downstairs
At the bottom of the stairs, turn left and approach the pedestal at the far end
of the generator room
Click on one of the two crystals occupying the 3 x 2 array, then click on the
white button at upper left, corresponding to the 1-crystal
symbol seen earlier (be sure the ring around the
button is lit)
Back out, turn around and move forward
{Cutscene}
Return to the corridor and note the corresponding white symbol above the
(previously-locked) door next to the bedroom door
Enter this room and open the cabinet ahead
Take the Crystal Capsule (a crystal inserter and extractor) and the Oil Can
Back out and move to the left
Rotate left and pick up the Waterlamp (a light source that runs on water) and a
Rope
Turn around and open the porthole to the outside
Attach the Rope to the rungs below the porthole, then exit through the
porthole
As soon as you land, turn around and pick up the Crowbar lying on the rocks
Tilt up and use the rope to return inside
Exit the room
Return to the generator room pedestal
Turn on the second crystal and click on the dark button
at upper right
Return to the corridor and go through the door at the far end into a
hallway at right angles to the corridor
Rotate right and go through the door at left with a light-blue
symbol above it into the bridge area of the mobile
home
At the other end of the hallway, there is another door to the bridge with the
same symbol above it, but it's in deep shadow and can be seen better with
enhancement
Go down the stairs and note the colored dials on the wall at the foot of the
stairs; we'll come back to that later
From the position of the colored dials, you can rotate left until you are
facing the large steering wheel. There appears to be a
square green symbol on the floor next to the wheel,
but it mysteriously disappears on closer approach.
Rotate left and descend to the lower wooden floor
Rotate left to a bookcase and click on the button disclosed by the fallen
book
Note the black 2-crystal symbol above the desk; having
two crystals activated in the generator room allows access to this secret
room
Rotate right, approach the two boxes stacked on the floor and pick up a
Crystal lying on them
Open the top box to get a page added to your journal describing an array of 6
tubes arranged with their red ends all at the top
Exit the room
Return to the generator room pedestal
Use the Crystal Capsule on one of the open spots to insert the third crystal
Turn on this crystal and click on the yellow button at
center left
Return to the bottom of the stairs here, then continue forward through the door
into the pump room
Pick up a Wrench from the table at right
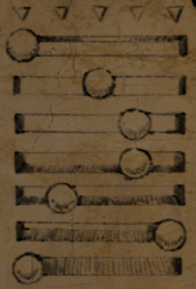
Notice the diagram attached to the wall:
If you scan left and down, you'll see a pretty serious oil leak, but that's not
your concern
Zoom in on the control levers in front of the pair of spherical pump chambers
against the wall opposite the door
Use the Wrench in place of the missing left lever
From the initial position with all levers vertical, arrange the pattern seen on
the previous diagram by:
Moving left lever 4 times
Moving center lever 3 times
Moving right lever twice
which starts the pump
Turn around and zoom in on the
engine order
telegraph (EOT) to the right of the door, displaying some of the
symbols seen earlier
Move the selector to the third position clockwise to see that the yellow power
line has been activated on the wall dials in the bridge room
Return to the hallway, turn right and exit through
the door at the end
Once outside, turn right and close the door
Use the rung above the door to climb to the roof of the mobile home
Use the Crowbar to dislodge the stone blocking the gear
Return to the hallway and operate the wide lever on the right-hand wall to
activate an elevator
Get on the elevator platform and press the circular button to ascend into the
telescope room
Zoom in on the device at right, which is displaying the yellow 3-crystal
symbol on it
This device is the safe, whose solution was described in the journal:
Three diagrams, the first of which is missing, seem to indicate the order of
buttons to press on the safe. There are 24 possibilities for the first
diagram; trial and error shows that the correct sequence is
When using the Bottom button, be careful that you don't accidentally zoom out of
the puzzle and have to restart it
The remaining sequences are found from the journal page:
| Right | Bottom | Top | Left |
| Bottom | Right | Top | Left |
Each sequence removes a layer of panels blocking access to the safe's
interior
Take the Telescope Key and put it into the front panel of the large device on
the opposite side of the room, which activates the telescope
Turn around and zoom in on the EOT
Move the selector to the second position clockwise to see that the orange power
line has been activated on the wall dials in the bridge room
Back out, turn around and use the telescope eyepiece
{Cutscene}
Back in Nikifor's bedroom, it's nighttime and some areas of the mobile home are
darkened
Return to the generator room pedestal and activate only one crystal along with
the white button at upper left
Re-enter the white room and again use the Rope to
exit the house
At each node outside, use the first available hotspot to the left of the house,
which is silhouetted against the sky and has lighted windows in various
colors. When the icon changes from an arrow to a green oval, start using the
Waterlamp on the hotspots. This route takes you around the house in a sort
of defilade, hidden from the Shadow Legion. If you lose sight of the house,
use the most brightly-lit rock face as a reference point instead. When Umang
says to be more careful, return the Waterlamp to inventory.
Approach one of the Shadow Legion vehicles and use the Oil Can on the hatch
Open the hatch and use the Crystal Capsule to extract a Crystal
Back out and repeat the process on the other vehicle to get a second Crystal
Retrace your steps back into the house, this time taking the first available
hotspot to the right of the house/rock reference point
Exit the white room back into the corridor
{Cutscene}
Next morning, return to the generator room pedestal and use the Crystal Capsule
to insert the two new Crystals from your inventory
Activate 4 crystals along with the light blue button at
lower left
Return to the bridge at the other end of the house and zoom in on the helm where
the large steering wheel is located
Two of three coordinates for the current location of the house are visible:
There's an interesting waterfall visible from the window here
Turn around and zoom in on the chart table in front of the right-hand
bookcase
Enter the sequence from the journal

by pressing the symbols as follows:
At the two coordinate hotspots at middle right, match the helm coordinates as
follows:
There are 5 charts to choose from using the lever at upper right; the correct
one can be found by trial and error as 3 lever pulls:
The journal says the path from the Manula Valley to the current location is

so the path back to Manula is the same sequence in reverse, with the compass
directions also reversed:
N E S E N E E N N
Enter those 9 directions using the keypad at lower right
Note the resultant coordinates for Manula Valley:
Back out
and return to the helm
Zoom in on the selector at the wheel and enter the Manula coordinates as
follows:
| Click 5 times | Click twice | Click 3 times |
Turn left and zoom in on the EOT
Move its selector to the first position at lower left to see that the blue
power line has been activated on the wall dials in this room
Return to the generator room pedestal and activate all 5 crystals, along with
the green button at center right
Back out
and return to the bottom of the stairs here
Turn left and zoom in on the EOT
Move its selector to the 4th position clockwise to see that the green (and last)
power line has been activated on the wall dials in the bridge room
Return to the helm in the bridge room and pull the large lever to the left of
the steering wheel to move the house somewhere else
{Cutscene}
Nikifor tells you to seal the passage from the Shadow Legion, so think big! The
house isn't moving, so you no longer need to be concerned with the power
lines shown on the wall dials in this room.
Return to the pump room and use the Crystal Capsule to extract the crystal from
the receptacle at right
Return to the generator room pedestal
Insert and activate the sixth and final crystal, then press the
red button at lower right
Go back to the bridge and enter the secret room, which somehow opens even though
there are more than 2 crystals activated
Zoom in on the desk at left, pick up the Spyglass and press the button
underneath
Turn around and zoom in on the 6-tubes puzzle whose solution is in your
journal
Numbering the tubes left to right from 1 to 6, there are two solutions to this
puzzle:
{Cutscene}
Portal
The game demo starts here
Turn around and pick up the sparkly Iron Bar from the rocks
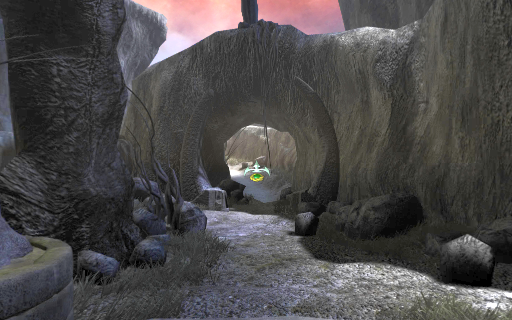
Follow the canyon away from the wreck until you reach a mist-filled gorge
Turn right and follow the cliffside path past a cable car on the left and into
some rocks at right
Pass a stone staircase at right and continue forward to some concentric stone
rings
Put the Iron Bar into the slot in the outer stone ring (try again if Umang says
it's a "bad idea")
Go back and ascend the stone staircase to the top
Go around to the front of the large statue and zoom in on the control panel
{Cutscene}
Click on the control panel again. The middle and inner rings can be rotated,
and each has 6 different states, so there are 36 possibilities for the
orientation of the two rings. The solution can be found in a few minutes by
trial and error or by examining the pathways between the stone rings:
Click middle ring 5 times
Click inner ring 4 times
{Cutscene}
Michael, the guardian of the Keeper's portal, gives you a Ferry Key
Return to the cable car location and zoom in on the mechanism at the cliff
edge
Open the hatch and insert the Ferry Key, then click on the rotary handle to call
the cable car
Step onto its wooden platform, turn left and use the T-shaped handle to travel
to the promontory
Exit through the stone arch, then bear right until you can turn left
and mount the tram
The tram control panel symbols represent the following destinations:
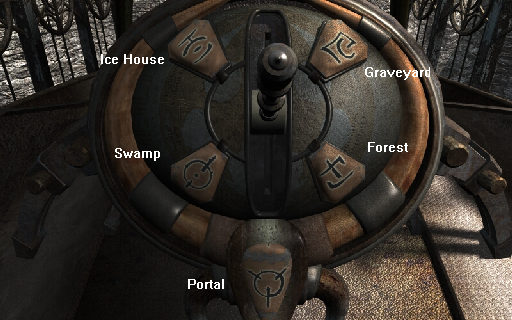
where Portal refers to the current location. To reach a destination, select
its button and then use the central lever
Take the tram to the Forest location (lower right)
Forest
Go down the path past a house and onwards to a gray mine area
Zoom in on an oval frame to the right of a well, then back out and return to the
house
Talk to the man Nafal sitting in front of his house
Talk to Nafal a second time to learn a tragic love story involving the Shadow
Legion's executioner Fird, his son Rizan, and Rizan's lover Mila
Climb the ladder, then turn right and zoom in on a table
Take the Bottle shaped like a flask
Turn around and move toward the three windows
Turn around and talk to Nafal's wife Sarah lying in bed, then talk to her a
second time to learn that she needs a tincture of Lukerii for her
headaches
Return to the tram and take it to the Ice House (upper-left symbol)
Ice House
On arrival, turn around to see some truly bizarre-looking icicles
Exit the tram and follow the snowy pathway to a building entrance
Pull the vertical cable at right to extend an offering box at left
Put the Amulet into the extended drawer, then proceed through the door and move
forward
{Cutscene}
Go around the right side of the desk and pick up Himus' Book
Go to the area behind the screen across from the desk
Examine a book on the shelf to learn of some elements and their symbols:

The second and third pages of the book contain enough information to create
Tincture Lukerii from equal parts of Cure Oil and Moon Elixir. It's
important to note that the listed ingredients must be assembled in left to
right order
Approach the front of the blue desk here and save your game at this point
Zoom in on the apparatus at the center of the desktop. From its initial
configuration
perform the following steps:
Rotate the top once to select the element Mercury Vine
Use the top spigot once to put a measure into the collection tube
Rotate the top twice to select Vinegar Oil, then use the top spigot
twice
Rotate the top once to select Morning Dew, then use the top spigot
once
Use the middle spigot to empty the Cure Oil into the bowl
Click on the collection tube to change it to a new one
Rotate the top once to select Blood of Unicorn, then use the top spigot
once
Rotate the top three times to select Sea Salt, then use the top spigot
once
Rotate the top four times to select Moon Water, then use the top spigot
twice
Use the middle spigot to empty the Moon Elixir into the bowl
Place the Bottle from inventory underneath the bowl
Use the bottom spigot to empty the Tincture Lukerii into the bottle,
then take the Bottle with Elixir
Return to the tram and take it back to the Forest (lower-right symbol)
Forest
Return inside the house and give the Bottle with Elixir to Sarah, getting a
Musical Sphere in return
Go back to the mine site and zoom in on the oval frame again
Put the Musical Sphere into the central receptacle, then click on it to hear a
six-note tune. Numbering the hanging chimes 1 to 5 from left to right, click
on them in the following sequence:
4 5 4 2 5 1
to emulate the tune from the Magical Sphere and raise an elevator
Step onto the elevator platform
The demo ends here
{Cutscene}
After an unsuccessful attempt to talk with Fird, revisit Sarah in her house and
talk to her. After she whines about the medicine you gave her, a bottle will
magically appear on the table to the right. Pick up the Bottle with Elixir
from this table.
Return to the tram and take it to the Swamp (lower-left symbol)
Swamp
Exit the tram and follow the path to a console with four colored stones
controlling a barrier over the bridge ahead
Click on the blue stone to turn the barrier to ice, then climb the bridge and
destroy the barrier with the Crowbar
Cross the bridge and continue down the path to an organic house
Open its front door. If you have been returned to the swamp, turn around and
try the door again (several attempts may be required). Once you're inside
the house, immediately turn left and go through an interior door into a
living area
Take the glowing bottle of Phosphorus from the shelf ahead
Rotate slightly right and examine the book to learn the symbol for a Lightning
spell:

Turn around and talk three times to the fairy Reina to learn of your next
objectives in the game
Exit the house and walk down the path
Right before the bridge, explore an area to the left of the path
Near a pool of water at right is a flickering white butterfly. Click on it and
follow its trajectory as it changes colors in sequence:
| Yellow | Green | Blue | Purple | Green | Red |
There's plenty of water here, but it cannot be used to replenish the Empty
Waterlamp (maybe later)
Go back to the tram and return to the Ice House (upper-left symbol)
Ice House
Once inside the house, go through an opening next to the closed door, climb the
spiral stairs and enter the room at the top
Comets Puzzle
Here is probably the most difficult challenge in the entire game, particularly
if you don't like arcade-style hand-eye coordination puzzles. Click the
arrow cursor on the pointed object to the right of the glowing area on the
floor. The cursor changes to a wand or stick with a bulge in the middle.
Three comets appear and traverse the screen randomly as they also change
colors randomly. The objective is to click a comet in the color order
displayed by the butterfly seen earlier. Your score
is shown by the row of stars at lower left. Since this is a close-up,
there's no way to save partial progress. Best results were obtained by using
the bulged part of the wand to follow the head of a comet and click on it
very soon after it changed to the desired color, but while the comet head was
isolated on the screen away from the other two comet trajectories.
Thankfully there is no time limit to this game, so you can wait for
near-perfect conditions in order to proceed. If you get a color wrong, back
out and try again.
Click on the opened pedestal to have information added to your journal about
lightning needed for the Keeper's portal and a flower needed for Sarah's
headache remedy
Also take the Book of Alchemy and leave Himus' Book in its place
Next, take the tram back to the Swamp (lower-left symbol)
As you arrive, you'll see a brief cutscene showing flowers blooming in the swamp
Swamp
Cross the bridge, turn right and proceed to the location of the butterfly
Take the Lukeria Flower,
then return to the Ice House (upper-left tram symbol)
Ice House
Revisit the area of bookshelves and zoom in on the center part of the middle
shelf
Place the Bottle with Elixir underneath the grinder, then put the Lukeria Flower
into the top of the grinder
Turn the crank to have a Bottle with Lukerii Elixir added to your inventory
Return to the tram and take it to the Graveyard (upper-right symbol)
Graveyard
Exit the tram and move forward on the path to a large gate
Rotate slightly left and approach the smaller gate
Click on the gate to talk to Salan the gravedigger
Retrace your steps back to the tram and return to the Forest (lower-right
symbol)
Forest
Enter the house and give the Bottle with Lukerii Elixir to Sarah
{Cutscene}
Exit the house and talk to Nafal
Return to the Graveyard (upper-right tram symbol)
Graveyard
Click on the small gate to talk to Salan
{Cutscene}
After he leaves, move forward into the cemetery to a circle with three statues
in the center
Go around the statues and continue forward until the path ends at a tomb
Turn left and enter a smaller tomb
Turn right and zoom in on the pedestal
Remove the tile attached to the wooden block and then push one of the wooden
handles to open the tomb
Enter the tomb, open the sarcophagus and take the Staff inside
Return to the circle with the statues and go up the stairs at right
Just before the blocked end of the path, turn right and approach another
tomb
Put the Phosphorus on the stone floor here so you can track Fird
{Cutscene}
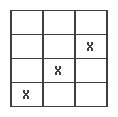
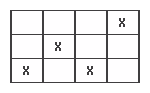
Approach a grid of 25 candles, one of which is chosen at random to be lit.
After some experimentation, you can get two or more candles lit
simultaneously. The next candle to be lit is in the same row or column as
the previous one. It turns out that the candle size, flame color and grid
border color are all irrelevant. The objective of the puzzle, which requires
a lot of trial and error, is to find the sequence of candles so you can get
all 25 lit. The answer is the following alphabetical sequence:

Since the starting point can be anywhere in the sequence, you will need to
loop from Y to A when you reach the end of the alphabet.
Once all 25 candles are lit, you'll be inside the crypt facing 8 urns with
candles in front of them
Move forward, then turn around and extinguish the lights to the right of the
dark exit steps
Turn back to face the urns and you can see that Fird's footsteps are near the
two urns at far right
Turn the lights back on and move forward to these urns
Only the one second from the right can be approached so that you can take the
Urn containing Rizan's ashes
Head back to the tram
After a brief cutscene of the tram arriving, move off the path to the right to
avoid being seen by Salan (and game over)
Return to the Swamp (lower-left tram symbol)
Swamp
Give the Book of Alchemy and the Urn to Reina in her house
Talk to her about lightning
Exit the room and ascend the ladder ahead to the roof
The objective of this Towers of Hanoi puzzle is to move all five nested "mood
statues" to the right-hand tray showing the Lightning symbol
seen earlier. Denote the three trays from left to
right as A, B and C, and let AB mean moving a statue from tray A to tray B,
etc. The puzzle requires 31 moves (62 mouse clicks) to solve:
| AC | AB | CB |
| AC | BA | BC |
| AC | AB | CB |
| CA | BA | CB |
| AC | AB | CB |
| AC | BA | BC |
| AC | BA | CB |
| CA | BA | BC |
| AC | AB | CB |
| AC | BA | BC |
| AC |
Return to the tram
{Cutscene}
Go back to the Forest (lower-right tram symbol)
Forest
Talk to Sarah in her house to get another Musical Sphere
Use the same procedure as before to enter the mine
Move forward, then turn left and examine a sheet of paper on the table to have a
code recorded in your journal
Talk to Fird and get Mila's medallion and the sign of the Shadow Legion
Go up in the elevator, return to the tram and take it back to the Portal (bottom
symbol)
Portal
Return to the stone circle area and climb the stone staircase to the top
Go around to the front of the statue and put the Staff into its hands
Return to the Swamp (lower-left tram symbol)
Swamp
Talk twice to Reina in her house
{Cutscene}
On arrival, you're in the center of a stone circle, facing a circular tunnel in
the rock with a pathway beyond. Assume you're facing north into a narrow
canyon:
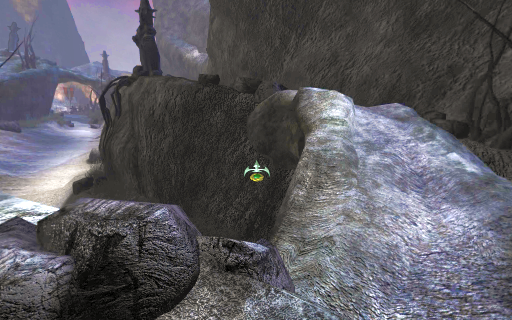
Move forward twice, then turn left and follow a side path towards a ledge on the
west side of the canyon
Move a bit further on alongside the ledge until you can climb some vines at
right up to a pathway paralleling the lower one through the canyon
Move north along this upper pathway until you can cross over a bridge to the
east side of the canyon:
Continue north along the east side of the canyon until you can cross another
bridge:
Back on the west side of the canyon, turn hard left and move south until the
path is blocked by rubble
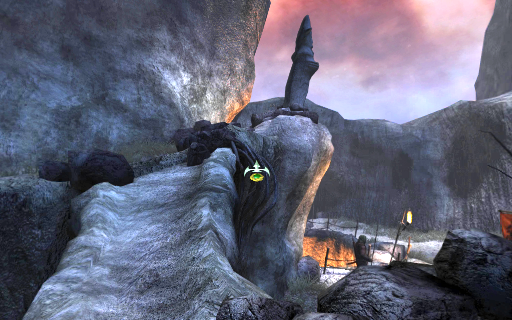
Turn right and move into a cleft overlooking a mist-filled valley
Use the Spyglass on the hotspot to view the castle
Return to the ledge and proceed north until the path ends
Turn right and use the Crowbar on the base of the statue to dispatch the
guard below
Retrace your steps across the two bridges and back to the vines at the southern
end of the west pathway
Climb down the vines and return to the main pathway on the canyon floor
Proceed through the tunnel and under both bridges until you can see a bottomless
pit at left, into which the guard must have fallen
Look down and pick up a Sword that the guard dropped
Rotate up and continue around the pit and through the large stone arch in the
background
The following movement abbreviations will be used to navigate the rocks and
tunnels:
F: Move forward (Fn for n repetitions)
L: Rotate horizontally at least 1/8 turn to the left and move
forward
R: Rotate horizontally at least 1/8 turn to the right and move forward
Some directions are approximate since the game software usually does not
reset the cursor's relative position on the screen between nodes. For the
first part of the navigation, it's helpful to get your bearings by
referencing the mountains on the other side of the valley below. There's no
real depth perception amongst the rocks, so it can be difficult to identify
the boundaries between near and far objects.
Facing the front of the castle, turn left and click on the grass in the cleft
between the rocks to the right of the hanging skeleton
Move forward three more times until you are blocked by a group of trees
Move R L R to face a stone wall
Moving to the right here leads to a dead end, so instead move L3
Rotate right until a hotspot appears, then insert the Sword there
Move forward and over the sword, then turn around, scan down and retrieve the
sword
Return the sword to inventory, then turn around, scan up and move forward
Move forward once more to a ledge with a single squarish blue rock on it:
Face directly away from the misty valley and move F R
Use the Sword to cut the vines blocking the path
Return the sword to inventory, then move F2 R
Facing the valley, scan down and to the right until you can see a waterfall
Move forward, turn right and refill the Empty Waterlamp from the waterfall
Return the Waterlamp to inventory
Turn right, scan upwards to the top edge of the rock ahead, then move F L
Scan down and move L2
Facing an opening in the stone beyond:

move F3 L3 F L2 and some bats will fly out of the cave
From your position inside a cave:
move F2
Use the Waterlamp to proceed through a one-way passage into the castle
Move F L R F2 and watch a squad of guards pass below
Move diagonally forward and right:
then rotate 1/4 turn right and move forward:
through a gap into the attic
Approach a hole in the wall to eavesdrop on the Shadow Legion
{Cutscene}
Now in the dungeon, zoom in on the base of the iron
maiden at right and enter the code you got from Fird:
The ghost of Trey asks for your help in getting Mila's forgiveness
Look in the bottom of the iron maiden to find the rest of Fird's code:
Exit the dungeon by entering this code on the door
Exit, turn left and go to the end of the curved hall of prison cells
Zoom in on the levers and pull the left one forward
Back out, turn around and visit the open cell on the left
Pick up the Shackles next to the skeleton
Exit the cell and turn left
Move forward once, then turn right and re-enter the dungeon
Turn left and zoom in on the guillotine
Put the Shackles on the platform and rotate the handle at upper right
Pick up the Shackles and click its icon on the handle to raise the blade
Put the Shackles on the platform and rotate the handle at upper right
Pick up the Chain and back out
Exit the dungeon, turn right and proceed to the end of the hall
Go through the door at left and a second one further on to the right
Zoom in on the apparatus on the right wall
The shortest solution to this cylinder puzzle is 20 rotations. One solution is:
Rotate the far-left cylinder twice
Attach the Chain to the post on the near-left cylinder
Rotate the far-left cylinder twice
Click on the hotspot on the near-left cylinder, then attach the Chain to
the upper post on the near-right cylinder
Rotate the far-right cylinder 4 times
Click on the hotspot on the near-right cylinder, then right-click twice
to return the Chain to inventory
Rotate the far-right cylinder 10 times
Rotate the far-left cylinder twice
{Cutscene}
Wield Mila's Amulet and use it to identify which one of the four identical
doorways should be used at each junction
Return Mila's Amulet to inventory
Go to the end of the L-shaped corridor
At the two doors in the corner, go through the right-hand one into the
chapel
Turn right and use the Crowbar on the stone wall
Move forward and put Mila's Amulet on her remains
{Cutscene}
Mila's ghost will tell you that she needs a magical orb
Back out, scan down and to the right, and pick up a Stone
Exit the chapel and go through the door at right into the
main staircase of the castle
Ascend the curving stairs to a closed gate
Scan to the lower right and put the Stone on the iron wheel to permanently open
the gate
Continue up the stairs to the next door on the left
Go through this door, down a corridor of demon statues, and through a second
door into a large dark room with a broken spiral staircase in the center
Proceed forward and through the door opposite into a room with a wooden elevator
cage
Enter the elevator cage, turn around and use the lever to the left of the
elevator opening to descend
Move forward once (only) to exit the elevator
{Cutscene}
After the warning, rotate right to a point left of the elevator cage and click
to run up the stairs
{Cutscene}
Save your game at this point
Use the Sword to cut the rope and kill another Shadow Legionnaire
Alternatively, you can go back downstairs and enter the elevator that the guard
has vacated. Use the lever dimly seen in the darkness to raise the elevator
(the Waterlamp has no effect here). Exit the elevator and turn around to see
that it has silently disappeared! But you can summon it again with the lever
and repeat the process with the guard all over again.
Once the guard is out of the way, go back downstairs and proceed through the
zig-zag corridor
Enter the second door on the right (other doors lead to unsatisfactory
results)
Move forward into the weapons room, then turn sharp right and pick up a
Spear
Exit the room, turn left and retrace your steps around the elevator shaft,
through the room with broken stairs and the demon corridor back to the main
staircase
Continue up the stairs to the top, then enter through the door there to a
location with a giant crossbow
Climb the ladder to the left of the door to an upper level with a rope crane at
left
Stand next to the crane and use the Spyglass on the lit window in the castle
tower beyond
Zoom in on the crane and click the nearer of two vertical gears until it has no
effect, then click the farther gear twice
Go back down the ladder and zoom in on the crossbow aiming device at right
Click the (azimuth) control with the reddish dial until its pointer is at the
bottom (three clicks from its initial position)
Click the other (elevation) control until its pointer is at the back (one click
from its initial position)
Back out and climb the steps up to the crossbow
Turn left and take the rope ending in a ring, then turn around and put it onto
the crossbow
Go around to the back of the crossbow and click on it to fire the bolt and
connect a rope to the Mage's tower
Go to the front of the crossbow and use the Spear on the rope for a fun zipline
trip to the tower
Enter the tower through the window
{Cutscene}
Save your game at this point to preserve initial conditions in the puzzle
ahead
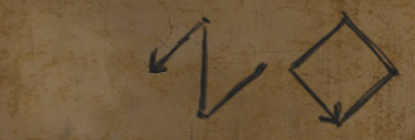
Move to the raised pedestal opposite the door and examine the spell book
Flip through its pages until Umang identifies the stone ritual:
Note the three-pointed symbol on the right page. A diagram on the left page
corresponds to the pedestal you're standing on and the locations of six other
books in this room. From a bird's-eye view, identify the book locations as
follows:
The spell book diagram is associated with the sequence
A C D G E F B
Starting with location C, visit each of these books in sequence to
establish the same series of symbols in the book on the raised pedestal.
Starting from the initial state with the three-pointed symbol on the
left-hand page, click on the books as follows:
Location C: No clicks
Location D: 1 click
Location G: 2 clicks
Location E: 3 clicks
Location F: 4 clicks
Location B: 5 clicks
Umang responds with "Success!"
Approach the raised pedestal, then turn right and hide behind the support
column
{Cutscene}
After Gugon turns to stone,
take the Spider Key from the door and exit the room
Turn left, descend the stairs and go through the elevator room back into the
dark room with the broken stairs
Head for the door in the large alcove at left
Unlock it with the Spider Key, which is then deleted from inventory
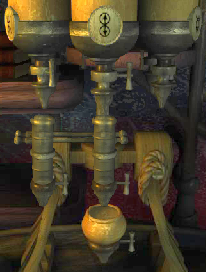
This location is referred to as the "bedroom" as it seems to be the only room
in the castle with a bed. It is also the same place shown (more brightly) on
the main menu screen.
Examine the top of the desk and pick up a Library Card and a Valve (key) that
was lying on top of it
Turn around and approach a large movable mirror in front of the right-hand
bookcase
Click just to the left of the mirror to move it into its forward position
Compare the view in the mirror with the reality behind you and you'll see some
differences, such as the torch above the book pedestal not being lit and an
invisible lever on the wall between the windows. Click on the lever and hear
a musical tone.
Go to the real wall and click on the hotspot that is now visible between the
windows where the lever was in the mirror image
This discloses a 3 x 3 array of spheres behind the bookcase in the corner
Pull the mirror back to its rear position and look into it to see a highlighted
sphere in the lower left corner of the array. Click on the blue sphere and
hear the musical tone again.
Turn around and click on the lower right sphere corresponding to the mirror
image. The sphere disappears and Mila's Soul (curse) is placed into
inventory.
Exit the bedroom and go back down to the zig-zag corridor leading to the weapons
room
Enter through the door at the end of the corridor into the
library
Move forward and climb the steps at left
Approach the right-hand window and pick up a Library Card lying on its sill
Go back down the steps and move to the far side of the central device
Turn around and open the hatch in the bottom of the device
Insert the Valve into the hole
The objective of this puzzle is to get all handles oriented horizontally
(although in the absence of other information, all handles vertically would
seem just as valid). Rotating a handle also rotates all the other handles in
the same row and column. The puzzle is reset by backing out and re-opening
the hatch. There are 8 different solutions to this puzzle; the shortest is
to rotate only these four handles (in any order):
Go to the other side of the device and insert one of the Library Cards into the
slot to have a book retrieved and its pages recorded into your journal
Repeat for the other Library Card
Return to the chapel and give Mila's Soul (curse) to
her corpse in the wall; she will tell you to dispel the curse on the wind
Go back up the main staircase to the location of the crane above the
crossbow
{Cutscene}
Return via the prison hallway to the dungeon
Click on the iron maiden to get help from Trey's ghost
{Cutscene}
Go back up the main staircase and enter the second door on the left, across from
a bench
Move through the tunnel into a moonlit circular chamber
Open the door on the left that's inside a circular lintel
Move forward into the tetrahedron chamber
There is a circular path running around the periphery of this chamber, but for
now, continue forward to a "strange mechanism" at the base of the giant
rings
Load the Tetrahedron into the black circular receptacle
Back out and return to the circular path
Follow it clockwise (as viewed from above) to a location on the right where you
can zoom in on a control panel
Using its orientation with respect to the giant rings beyond, depress only the
lower-left and upper-right buttons, corresponding to the dark circles in the
lower-left diagram on the journal page recorded from the library book:
(The entrance to the chamber is at the bottom of this diagram.)
Continue clockwise around the chamber to the next control panel, where only the
upper-left button is depressed
The third control panel has all four of its buttons depressed, and the last
control panel has the upper-right and lower-right buttons depressed
Continue clockwise on the path two more nodes and climb the dark stairs at
right
At the top, turn right to face the giant rings
Look down and pull the lever to operate the machine
{Cutscene}
Go down the stairs and return to the base of the rings
Click on the black circle to display symbols for the possible
destinations that can be programmed into the tetrahedron:
Comparing these five symbols with the corresponding diagrams and descriptions in
the journal pages recorded from the library book, they can be identified as
follows:
| | Na-Teixu | | |
| Dragast | | Bazzard Desert | |
| The Island of Unity | | | | Ademica Valley |
where Dangan is the current (castle) location
Obviously the best place to banish the surviving members of the Shadow Legion is
"a lonely and desolate place for survival", so select the Bazzard Desert
symbol at upper right
The programmed Tetrahedron is automatically returned to inventory
Exit the tetrahedron chamber, then go through the peaked double doors at
left
Move up two flights of stairs, then move around the four-sided stone portal to a
pedestal on the opposite side
Put the Tetrahedron onto the pedestal
{Cutscene}
Turn around and move forward to hide from the Shadow Legion, who apparently
never thought to leave anyone (alive) behind in the castle
{Cutscene}
Turn around, move forward and click on the tetrahedron to destroy it and trap
the Shadow Legion in Bazzard Desert
{Cutscene}
Watch the endgame sequence and credits
Table of Contents
Home
Copyright © 2019 Balmoral Software (http://www.balmoralsoftware.com).
Portions copyright © 2007 DreamCatcher Interactive Inc. All rights
reserved. Republication, redistribution or conversion is expressly prohibited
without the prior written consent of Balmoral Software.