Black Mirror
Black Mirror
6 November 2019
Copyright © 2019 Balmoral Software (http://www.balmoralsoftware.com).
Portions copyright © 2003 Future Games S.R.O. All rights reserved.
Republication, redistribution or conversion is expressly prohibited without the
prior written consent of Balmoral Software.
Black Mirror is a 2003 release from Czech software developer Future
Games. Consisting of six substantial chapters, it is a lengthy and absorbing
game that explores the history of an aristocratic English family beset by an
ancient curse. Graphical backgrounds are fairly detailed for a release of this
vintage, but the characters are somewhat lacking in detail. The occasional
animations are effective, but in the outdoor scenes throughout most of the
game, there is bluish rain falling that ends up looking more like snow. The
new game sequence and the short cutscenes within the game are pixelated.
The gameplay is functional without any serious shortcomings. However, much
pixel-hunting is required since no there is no interface function to optionally
display the hotspots in a scene. Some hotspots are tiny and easy to miss, but
are trigger events required to advance the gameplay. Many hotspots are
presented for background information only and disappear after use, some after
two clicks of the mouse. Close-ups typically remain as active hotspots even if
there's nothing left to do in them. New hotspots may show up in a scene at a
later point in the game, so rescanning is sometimes required. On occasion, it
is important to right-click on inventory items or screen hotspots to
perform a necessary activity. There is no diary function, so intermediate
goals can get a bit obscured, especially since the dialog is usually not
repeatable. There are several tedious exercises where you have to wander
around waiting for a character to do something before advancing the gameplay.
There is no Pause function, but Alt-Tab can be used in Windows instead. Most
of these issues are resolved in the sequels
Black
Mirror II and
Black
Mirror III, no doubt due to feedback gathered from players of this game.
Played in the third-person on static rendered backgrounds, the game navigation
interface is generally effective and explained well in the accompanying game
manual. Dialog can be skipped by pressing the left mouse button or the
spacebar. An inventory item pulsates where it can be used in the scene. There
are only 24 saved-game slots. As a result, it may be necessary to manually
manage the sav*.* files in the game installation directory (we used a separate
group for each chapter to allow more frequent saves). The Load game list
scrolls slowly, and some of the non-playable characters are slow to respond to
a dialog request. Although an exit can be quickly taken by double-clicking on
its icon, there is no way to speed up the character walking, which can be slow
in the side-scrolling scenes. There are a few timed sequences in the game, but
they are not difficult once the correct moves have been worked out. The voice
acting of the main character sometimes seems a bit overly emphatic, but it
wasn't distracting.
This walkthrough provides a minimum path through the game; other gameplay
sequences and dialog choices can provide additional backstory elements.
New Game
It's the year 1981 and you're playing as Samuel Gordon, a member of an old and
aristocratic English family who has recently returned to his ancestral
home after an absence of 12 years.
From the globe in the castle lobby, go to the rear hall
on the second floor
Use the key to my room on the door to the room
Click three times on the suitcase to get pills and a wallet
Go to the old wing and try the door to the attic to discover it's locked
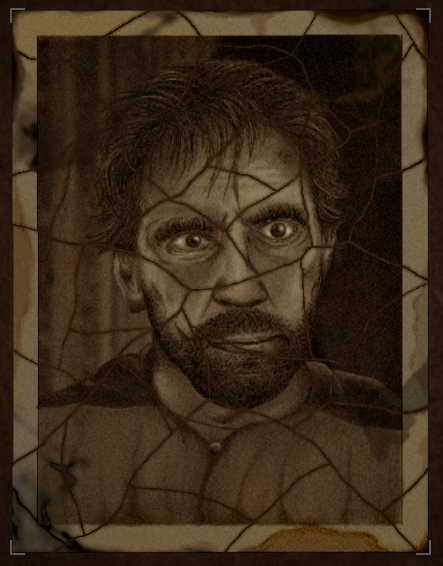
Right-click on the dead fireplace to get a torn-up photograph
Right-click on the torn-up photograph in inventory and solve the jigsaw puzzle.
Press the left mouse button to select and release a piece, and use the right
mouse button to rotate a piece clockwise. Start by solving for the face,
the hair and the shirt, which then allows the rest of the picture to be
assembled within the provided frame limits. There are blurry vertical
regions in the left half of the picture. Pieces snap into position when they
are in the vicinity of the final position in the frame. The solution is
Go to the fireplace in the lobby and talk to Bates
- key to the attic
- exit
Exit to the library and to the central part
Pick up the scroll on the table for a handy game navigation map
Go to the dining room and examine a bowl with fruits
Take a piece of sweets
Back out and exit to the kitchen
Take the key on the wall to the right of the cellar door
Right-click on the map of the manor and click on the castle building
Return upstairs to the old wing and use the key to the attic on the door to the
attic
Examine the chest to see that it's locked
Scroll left and examine the door to the tower
Use the map to go to the castle
Go to the base of the tower and examine the fence
Exit to the stable and into its interior
Open the drawer and take the hammer
Return to the attic via the map
Scroll left again and use the hammer on the door to the tower
Click twice on the door to the tower
Go to the common room via the map
Talk to Victoria
- photograph
- key to the tower
Exit left to the lobby fireplace and talk to Bates
- Victoria
- exit
Return to the common room and talk to Victoria again
- apologise
- exit
Return to the library and talk to Hermann (who's moved to the right side)
- personal belongings
- exit
Return to the lobby and talk to Bates again
- the place of William's death
Examine the stain and the symbol
Back out and right-click on the shrubs to get a strange object
Return to Samuel's bedroom and examine the lower drawer to see that it's
locked
Right-click on the door frame to get the key to the drawer
Use the key to the drawer on the lower drawer
Open the lower drawer and take the camera
Back out and return to the front hall
Knock on Robert's study door
- film
- chest in the attic
- photograph
- positive answer
- photograph
- exit
to get Robert's key
Return to the attic and unlock Robert's chest with Robert's key
Open Robert's chest to get some film
Combine camera & film
Use the map to return to the base of the tower
Use the camera on the stain
Use the map to return to the front hall
Talk to Robert in his study
- develop the film
- exit
Use the map to go through the dining room to the kitchen, and talk to Bates
- strange object
- exit
Use the map to go to the bottom of the outdoor stairs
Talk to Henry
- strange object
- bill of exchange
- exit
Use the map to go to Willow Creek
Exit to the pub and enter the pub
Talk to Harry
- what's new
- about the pub
- about the pub
- exit
Talk to Tom
- debt
Talk to Harry
- debt
- pay off the debt
- exit
Talk to Tom
- debt
- Mark
- exit
Go out and cross the bridge
Go to the pawn shop, then back to the pub
Talk to the boy
- What's your name?
- positive answer
- pawn shop
- photograph
Use the map to go to the Warmhill vicarage
Scroll right and exhaust the dialog choices with the grave-digger
Scroll left and exit to the rear cemetery
Exit to William's grave and examine the gravestone, where you'll learn that
William lived from 1903 to 1981
Back out and return to the cemetery
Exit to the church
Scroll right and talk to the grave-digger again
- Father Frederick
Church bells ring 7 o'clock and you're automatically returned to the castle
gate
Pick up the box and right-click it in inventory
Right-click on William's watch
Right-click on the small piece of paper for a reference to the work table in the
library
Back out and use the map to go to the rear part of the library
If you haven't already done so, you can optionally click on the big book on the
desk to read the Gordon family chronicle.
Examine the table and then the inkwell
Examine the secret cabinet to get a box of planets
Return to the central part of the library and examine the globe
Put the planets into the depressions in the globe frame
From closest to farthest from the sun, place the appropriate planets onto the
receptacles:
Dark red planet from position 2 counterclockwise from the front
Light purple planet from position 4
Earth-like cloudy planet from position 5
Orange planet from position 3
Brown planet from position 9
Yellow ringed planet from position 8
Green planet from position 7
Blue planet from position 6
White planet from position 1
Take the big key
Use the map to return to the attic and scroll left
Use William's key on the door
Exit to the tower
Click twice on the roll-top desk and take the chess piece
Take the small cabinet to hear a Harry Potter-like melody
Back out and click twice on the drawer (why wasn't this accessible in the desk
close-up?)
Take the book and right-click it in inventory to get a key
Back out and right-click on the drawer
Back out from William's diary
Use the key on the massive chest at right
Click twice on the massive chest and take the strange sphere
Right-click on the black rook in inventory to disclose a small knife
Back out and use the small knife on the door
Exit through the door
{Cutscene}
Strange blue rain is falling, looking more like snow
Exit right three times to the rear garden
Right-click on the fountain to see something glittering
Enter the door to the dining room
Exit to the kitchen and to the cellar
Scroll right and talk to Bates
- fountain
- exit
Exit to the rear part of the cellar and examine the pump controls
Return to the front part of the cellar
Talk to Bates again
- draining the fountain
- exit
and learn that the second column from the right is the fountain water
level
Go back to the rear part of the cellar
and zoom in on the pump controls
The object of this puzzle is to lower the second column from the right 13
levels. The quickest way to do that is:
Right-click the leftmost wheel twice
Left-click the rightmost wheel three times
Retrace your steps back to the fountain and zoom in on the symbol in it
Pick up a small key and use the camera on the symbol
Go to the greenhouse interior and open the right-hand
drawer
Use the key from the fountain on the metal box
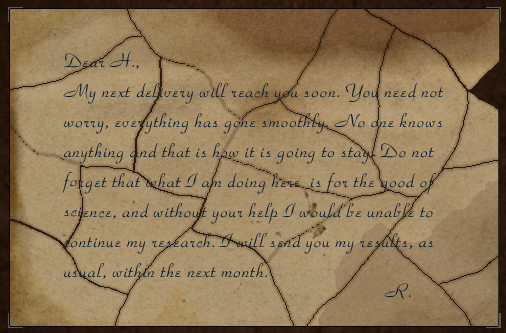
Open the metal box and take the letter, from which you learn that Henry was
blackmailing Morris
Back out from the letter
Back out and return to the fireplace in the entrance hall
Talk to Victoria
- doctor Hermann
Go to the stable interior and talk to Morris
- blackmail
- exit
Use the map to go to Hermann's house
In the dialog with Hermann:
- exit
Ring the doorbell and go downstairs to the morgue
Examine the keys on the wall and the canisters on the floor
Talk to Hermann
- Henry
- develop the film
- exit
Use the map to go to Willow Creek
Exit to the pub and cross the bridge (twice)
Enter the door to the pawn shop
Exhaust the dialog choices with Murray to get some toner
Use the map to go to Hermann's house
Ring the doorbell and go downstairs to the morgue
Give the toner to Hermann
- exit
Use the map to go to Willow Creek
Exit to the pub and enter the pub
Talk to Harry
- Mark
- exit
Talk to Mark
- Hermann
- positive answer
- exit
Examine the desk drawer and pick up a piece of imprint plastic
Back out and examine the box on the shelves to get Henry's bill of exchange
Use the piece of imprint plastic on the keys at left
Use the map to go to Willow Creek and return across the river to the pawn
shop
Talk to Murray
- bill of exchange
and get a strange object
Combine both strange objects in inventory
Use the map to go to Willow Creek
Exit to the pub and enter the pub
Talk to Harry
- making a key
- exit
Talk to Mark
- making a key
- exit
Exit to the pub and enter the pub
Talk to Harry
- Mark
- exit
Exit and re-enter the pub
Talk to Harry
- Mark
- exit
Exit and re-enter the pub
Talk to Harry
- Mark
- exit
to get a small key to the garbage container
Use the map to go to Hermann's house
Examine the dustbin to get a torn-up letter
Right-click the torn-up letter and solve the jigsaw puzzle. Press the left
mouse button to select and release a piece, and use the right mouse button to
rotate a piece clockwise. The solution is:
Use the small key to the garbage container on the garbage container
Open the garbage container and take the clothes
Right-click on Henry's clothes in inventory
If necessary, right-click the black rook to turn it into a small knife
Use the small knife on Henry's clothes
Combine the strange object & the diamond
Back out, ring the doorbell and go downstairs to the morgue
Talk to Hermann
- developed photographs
- exit
Use the map to go to Hermann's house
Ring the doorbell and go downstairs to the morgue
Talk to Hermann
- developed photographs
- exit
Examine a box with photographs on the sink
Use the map to go to the Warmhill vicarage
Enter the church
Examine the (locked) grate and then exit to the altar
Exhaust the dialog choices with Father Frederick
In the belfry, examine the opening underneath the candle
Put the strange object into the opening
Save your game at this point
Examine the altar
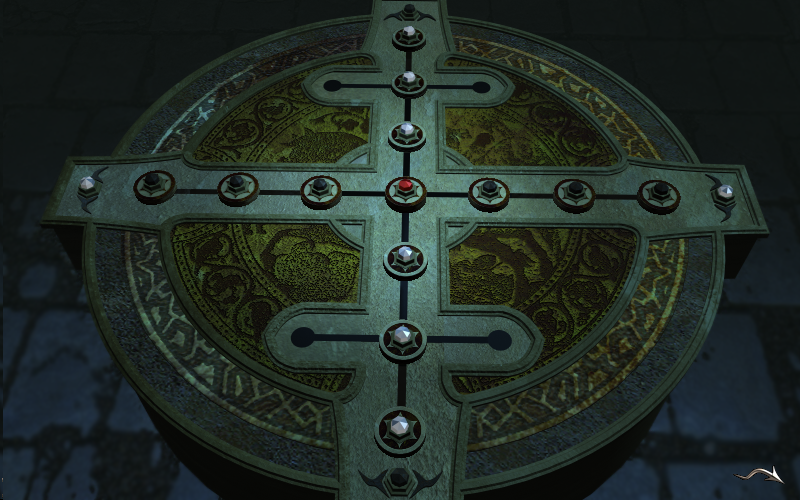
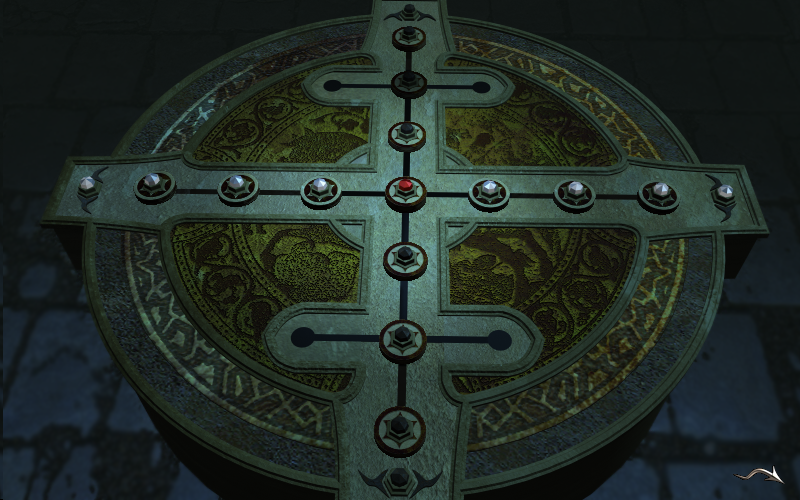
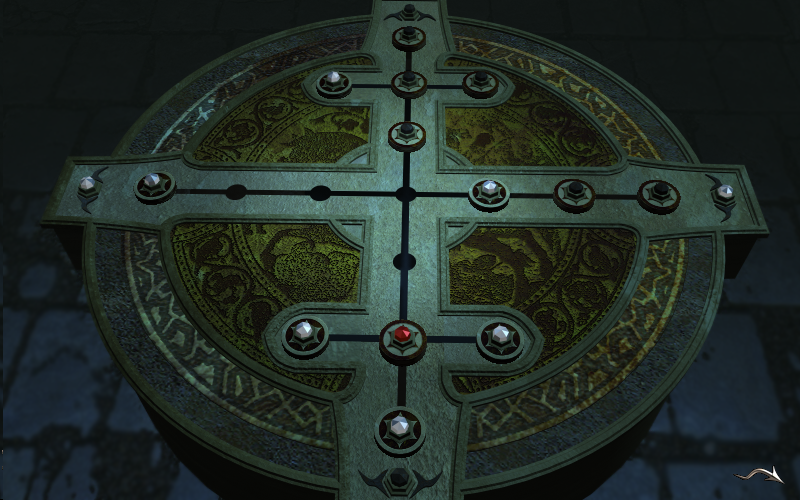
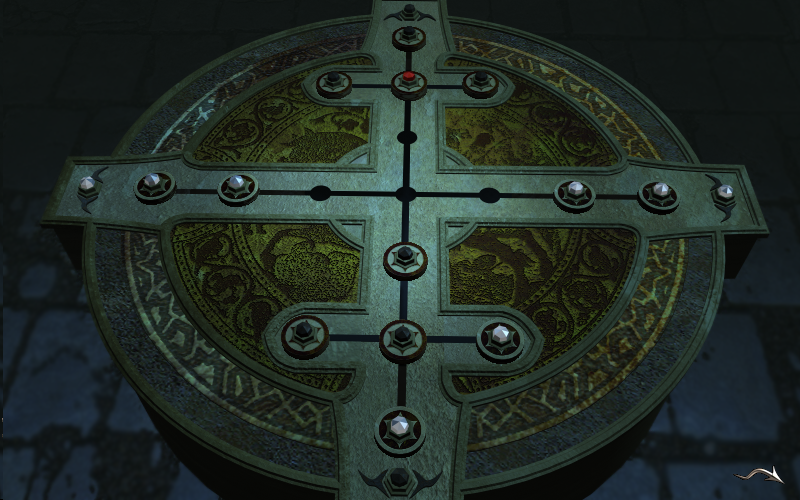
The object of this "railway shunting" type of puzzle is to exchange the
positions of black and white stones, finishing up with the red stone in the
middle. Once started, the puzzle state is retained and the game can be
saved. Numbering the stone positions as
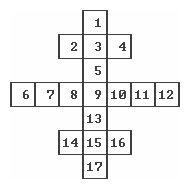
a solution in 102 moves (read top to bottom in each column) is:
| Image | 10-9-8-7 | 13-9-5 |
| 15-14 | 5-9-10 | 15-13-9-8 |
| 13-15-16 | 3-5-9-13 | 16-15-13-9-10 |
| 9-13-15 Red | 2-3-5-9-8 | 8-9-13-15-16 |
| 5-9-13 | 13-9-5-3-2 | 17-15-13-9-8 |
| 3-2 | 15-13-9-5-3 Red | 5-9-13 |
| 10-9-5-3-4 | 14-15-13-9-5 | 16-15-17 |
| 1-3-5-9-10 | 10-9-13-15-14 | 14-15 |
| 8-9-5-3-1 | 11-10-9-13-15 | 3-5-9 Red |
| 7-8-9-5-3 | 12-11-10-9-13 | 4-3-5 |
| 6-7-8-9-5 | 5-9-10-11-12 | 2-3 |
| 13-9-8-7-6 | 8-9-10-11 | Image |
| Image | Image | |
Move the carpet and descend
Examine the opening
Go up and examine the other opening to retrieve the strange object
Descend and put the strange object into the opening
Examine the leftmost old book near the opening to discover the riddle
It can't be seen,
but it can be heard.
It will not speak
unless it's spoken to.
Back out and examine the stone block closest to Samuel
Top to bottom, dial in the answer to the riddle: ECHO
Examine the old book to the left of the carved lettering to disclose the riddle
The more you take away,
the larger it grows.
There is a clue in the picture in the book
Back out and examine the adjacent stone block
Enter the answer to the riddle: HOLE
Examine the old book to the right of the carved lettering to show the riddle
Cities without houses,
rivers without water,
forests without trees.
Back out and examine the adjacent stone block
Enter the 3-letter answer, which is also shown in William's diary: MAP
Examine the rightmost old book to discover the riddle
Black when bought,
red when used,
gray when thrown out.
Again, there is an indirect indication of the answer in the picture next to the
riddle
Back out and examine the remaining stone block
Enter the answer to the riddle: COAL
Click twice on the stone tomb and take the book to learn of the five keys that
are your objectives
Back out from the book and take the first sacred key from the tomb
Back out and right-click on the candlestick, then examine the suspicious spot at
right
Click the cursor on an unlabelled red hotspot immediately behind Samuel to
identify it as a valve
Click twice on the valve
To the upper right of the valve, click the cursor on an unlabelled red hotspot
at a control panel on the wall to identify it as a mechanism
Click on the mechanism
and set its levers to the positions
then click the ON switch at right to illuminate the room
But the control panel levers in the background are not in the positions you
set...
Get your missing inventory items returned (except the camera)
Pick up the rope from the fence
Examine the metal box on the shelves in the far room to get some wire
cutters
Click on the button on the wall at right to temporarily turn off the power
Use the wire cutters on the cable at left, then click on the wall button
again
Right-click on the "leave" hotspot at left
Use the wire cutters on the "leave" hotspot
Click on the "leave" hotspot to get a key
Use the key on the "leave" hotspot
Exit via the "leave" hotspot
Take the rod from the dirt pile
Examine the skeleton to get a rag
Scroll left and exit on to the tunnel
Examine the lid under the barrel, then click on the barrel
Use the sharp rod on the barrel to half-empty it
Try opening the trap door
Attach the rope to the trap door
Click the rope icon on the mining cart
Right-click on the mining cart, then push it to open the trap door
Exit down the trap door, then climb down further
Click on the unlabelled hotspot where the red light is shining
If necessary, right-click the black rook in inventory to turn it into a small
knife
Use the small knife on the switchboard, then open the switchboard
Connect the colored wires to the three clamps in the following order, left to
right:
Green Red Blue
then press the button at upper left
Right-click on the skeleton to get a small key
Use the small key on the left-hand locker
Click three times on the locker to get a revolver, bullets and plans to a
machine
Combine revolver & bullets to get a revolver loaded with two bullets
Climb up twice and exit to the engine room
Use the plans to a machine on the control panel
Return to the control room and examine the steam
leak
Return to the engine room and put the rag into the pool
Go back to the control room and use the wet rag on the steam
Examine the fusebox
Return to the first mine shaft and use the small knife to open the switchboard
there
Examine the switchboard to get a fuse
Go back to the control room and put the fuse into the fusebox
Use the generator controls at left
Climb up and click twice on the pulsing-red control panel
Enter the main lift
{Cutscene}
Save your game at this point
Examine the grate
Right-click on the firm padlock to find out that it's rusty
Use the loaded revolver on the firm padlock
Open the grate and leave the mines
Timed sequence. You have about 15 seconds to shoot the dark wolf with
the revolver
Leave to the right
{Cutscene}
The weather is much better in Wales...
Click twice on the doorbell, then right-click on it
Click twice on the broken statue and then take the nail
Timed sequence. Use the nail on the doorbell. After the caretaker stops
talking ("I must insist"), you have about 6 seconds to quickly give him
William's mourning-card from your inventory
In the dialog with Eleanor:
- doorbell
- exit
Leave the mansion and exit to the path fork
Talk to caretaker Louis
- fixing the doorbell
Exit (twice) to the old garden
Examine the faucet to get a firm wire
Scroll left and exit to the abandoned house
Exit to the chapel area, then exit to the tomb to see that it's locked
Exit back to the abandoned building
Right-click the door, then use William's mourning-card on it
Use the firm wire on the door to get a key
Use the key to open the door
Touch the sleeping cat, then pick up the key that it knocked to the floor
Use the key on the small door to the right of the fireplace
In the close-up, take the candle and the lighter
Combine small knife & candle to get a wick
Combine alcohol cigarette lighter without a wick & wick
Back out and use the alcohol cigarette lighter on the cabinet
Examine the posted up clippings on the cabinet door
Exit to the secret passage
- positive answer
Pick up the small bottles at right and the shards at left
Enter the secret passage
Take the logs, dirty paper and tea kettle
Examine the table at far right
Open the little drawer and take the fountain pen
Back out, go outside and exit to the garden
Scroll right and fill both the small empty bottle and the kettle at the
faucet
Combine fountain pen & small bottle with water in it
Exit to the path fork and to the main gate
Talk to caretaker Louis
- tomb
- positive answer
- exit
Return to the mansion and Eleanor will give you more instructions for Louis
Go to the main gate and talk to caretaker Louis
- lawnmowing
- exit
Return to the mansion again and talk to Eleanor
- tall grass
- exit
Return to the main gate again and talk to caretaker Louis
- lawnmowing
- exit
Exit to the mansion facade to allow Louis enough time to finish the doorbell
Go to the main gate
Click twice on the toolbox to get glue and wire
Exit back to the path fork
When Louis is facing away, put the wire on the lawn hotspot at right
Examine the jacket to get the key to the tomb
Return to the chapel area and use the key to the tomb on the grate
Examine the inscriptions above each of the three statues
Examine the stone tomb, then re-enter the abandoned house
Put the newspaper, logs, kettle with water in it and alcohol cigarette lighter
on the stove at left
Go outside and come back in to allow time for the kettle to steam
Use the shard on the steam to get a label
Combine glue & label
Combine small bottle with dissolved ink & label painted with glue
Enter the secret passage and talk to Richard
- signs
- exit
Go back to the tomb and examine the stone lock
Return to the lab and talk to Richard
- meaning of the signs
- exit
Go back to the tomb and examine the stone lock
Return to the lab and talk to Richard
- meaning of the signs
- blood
- exit
Examine the freezer to get blood
Enter the secret passage and take the kettle
Return to the chapel area and examine the stone flower-pot to get some soil
Enter the tomb and put the blood into the left-hand stone bowl
Put the soil into the center stone bowl
Put the kettle with water in it into the right-hand stone bowl
Examine the altar
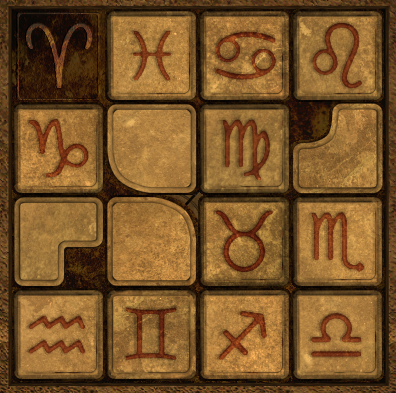
This is a 4 x 4 sliding-piece puzzle that randomizes every time you zoom in on
it, so no fixed solution is possible. The twelve zodiac symbols are shown,
the first of which (Aries) has no corresponding tile. Some experimentation
with the tiles will disclose an irregular shape underneath the center portion
of the grid that corresponds to the outline formed by the four blank tiles.
Also, underneath the four corners are the 1st (Aries), 4th (Cancer), 7th
(Libra) and 10th (Capricorn)
zodiac symbols, clockwise from upper left. It is evident from this
information that the solution to the puzzle has the zodiac symbols in order
clockwise around the perimeter of the square grid, with the appropriate blank
pieces in the center:
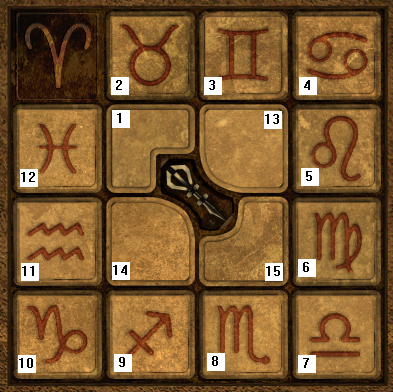
The easiest way to solve this puzzle is to identify the jumbled pieces using
the numbering above, and then use Balmoral Software's
solver to find the
moves required. For example, the jumbled arrangement
has the following input screen
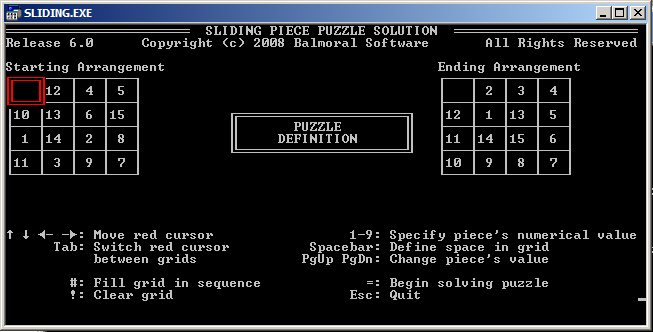
with a 38-move solution.
Take the key
Go back to the lab and talk to Richard
- locked crypt
- exit
Return to the mansion and night falls...
Go to the old garden and pick up the grit on the walkway at far left
Exit to the abandoned house and try opening the door
Exit to the garden and scroll right
Throw the little rocks at the tower window twice (or more)
Take the acid from the table behind Samuel
Go to the chapel area and use the acid on the tomb gate
Insert the key into the lock
Exit into another secret passage and examine the grate lock
Return to the lab and talk to Richard
- symbol on the grate
- exit
Take the key from the table behind Samuel
Go to the facade and use the key to enter the mansion
Save your game at this point
Zoom in on the wooden jewel box at left
As indicated by the central symbol, the object of this puzzle played on a 3 x 3
grid is to exchange the positions of the black and white knights. Using the
grid notation
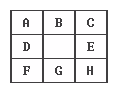
the possible knight moves are easier to see from the adjacency diagram
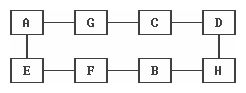
Four rotations of the set of pieces on this diagram are sufficient to solve
the puzzle. The 16 moves are:
A → E
C → G
H → D
F → B
B → H
E → F
G → A
D → C
and then repeat.
An amulet is added to your inventory
Return to the tomb and through its secret passage to the grate
Put the amulet into the grate lock to open it, and move into the crypt
Throw the little rocks at the skull (third from right)
Examine the broken skull
In the close-up, examine the key
Back out and return to the abandoned house to pick up a poker
Go back to the crypt and zoom in on the broken skull
Use the poker to retrieve the key
Back out and put the key with a skull onto the monolith
Click twice on the grave and take the second sacred key
then back out
{Cutscene}
The old mine destination has been added to the navigation map, but it's never
accessible in the game
Use the map to visit the pub in Willow Creek
Talk to the grave-digger
- Vick
Stonering has been added to the map; go there next
In the dialog with the detective:
- positive answer
- positive answer
- exit
Right-click on the plant at left
Put the blood from your inventory onto the rock behind the detective
Talk to the detective
- blood
Right-click on the plant again to get a handkerchief
Examine the menhir in the back
Use William's diary on the mysterious symbol to make a sketch of it
Use the map to go to Hermann's house
Ring the doorbell and go downstairs to the morgue
In the dialog with Hermann:
- Robert
- exit
Use the map to return to the castle grounds
At the front gate, check the mailbox to get a letter from James to William
Back out and use the map to go to the castle interior
Go upstairs and talk to Victoria in her room off the front hall
- Robert
- exit
The Ashburry sanatorium has been added to the map; go there next
Ring the doorbell
In the dialog with the nurse:
- exit
Leave the building, scroll left and go around the building
Click twice on the dustbin under the lean-to to get a syringe
Take the hammer from the roof above the dustbin
Examine the bottles next to the door
Knock on the door to talk to the boilerman
- beer
- exit
Return to the sanatorium lobby and put the handkerchief into the fountain to
make it wet
Speak to the nurse
- telephone
Go through the counter door and pick up the vase
If you don't have a coin in inventory, right-click on the wallet to get one
Right-click on the vase, then combine vase & a coin to get a small key
Use the small key to open the cabinet
Take the sedatives
Combine syringe & sedatives, then back out
In the dialog with the nurse:
- exit
Return to the boiler room door
Use the syringe with amobarbital on the beer
Zoom in on the small window
Wield the hammer and get ready to use it on the brick
Click three times when the machine starts to squeak (which lasts about 6
seconds). The squeak recurs about every 29 seconds if you need more
time.
Remove the rod and examine the machine
Put the wet handkerchief on the thermostat
Back out and wait about 45 seconds before entering the boiler room
Right-click on the coal at left to get the body of a doll
Exit to the rear part of the boiler room and zoom in on the notice board
Note the number 1918 predominantly displayed
Take one of the pins at lower left and the small key at lower right
Back out and zoom in on the panel to the left of the door
Put the small key into the opening and enter 1 9 1 8 > on the keypad to open the
door
Back out and exit through the door
Retrace your steps back to the lobby and talk to the nurse
- duty schedule
- exit
Return to the rear part of the boiler room and use the duty schedule on the
intercom next to the notice board
Exit through the door and on to the hall
In the dialog with Ralph:
- positive answer
Right-click on the dustbin to get the head of a doll
Right-click the body of a doll in inventory to get a thread
Combine pin & thread
Combine body of a doll & head of a doll
Combine pin with a thread and head and body of a doll to get a (complete)
doll
Give the doll to Ralph
- positive answer
Use the switch to turn out the light, then tear down the wire
Pick up the wire on the ground and click its icon on the window fencing
Put the jewel box onto the fencing
Right-click on the doctor to get the keys to the cells
Use the keys to the cells on James's cell
Right-click on a hole in the mattress to get James's diary
Back out and take the picture from the easel
Right-click on the drawing of an eye and exhaust the dialog choices with
Ralph
Climb under the bed
Back in Black Mirror castle, go to the kitchen and talk to Bates
- lighthouse
Sharp edge has been added to the map; go there next
Examine the entrance
Save your game at this point
Timed sequence. Go around the lighthouse. Quickly use the small
knife on Samuel. As soon as the cursor reappears, use the jewel box on
James.
Exhaust the dialog choices with James, then use the map to return to the
castle
Go to the kitchen and take the key next to the cellar door
Use the key to the cellar on the door to the cellar
Exit to the cellar
and pick up a rope with hooks from the well
If you don't have a coin in inventory, right-click on the wallet to get one
Throw the coin into the sewer grate to the right of the well
Climb down and pick up the cogwheel in front of the fountain
Exit on to the underground, where a water reservoir is located
Examine the railing at left to get a rod
Exit back to the room with a fountain
Scroll left and exit to the cellar
Sharpen the rod on the grinder
Go back to the reservoir and put the sharpened rod into the opening of the large
column, which opens a hatch at right
Use the acid on the chained wheel below the scary face carving
Turn the wheel to fill up the reservoir
Combine rope & hook
Combine sharpened rod & hook on a rope
Use the rod to retrieve the floating cogwheel at left
Exit back to the room with a fountain and put both cogwheels onto the mechanism
on the wall at right
Operate the mechanism, then exit on to the underground
Go downstairs and pick up the small chest
Right-click on the small chest to get the third sacred key
Examine the stone relief,
then back out
{Cutscene}
Ring the doorbell at Ashburry Sanatorium
In the dialog with the nurse:
- visit James
Enter James's cell and right-click his body to get Robert's keys
Use the small knife on the plastered hole in the wall at left
Talk to Ralph
- James
Use the alcohol cigarette lighter on the hole in the masonry to disclose another
death symbol
Use William's diary on the symbol to make a sketch of it
Back out and leave Sharp edge
At the morgue, ring the doorbell
When no one answers, enter the morgue and go downstairs to the morgue
Move the sheet to get a shock
Examine another death symbol on the sink
Use William's diary on it to make a sketch of it
{Cutscene}
Back out and turn on the lamp over the desk at right
Zoom in on the desk drawer
Move the book and pick up the plastic bags
Take the medical forceps from the desktop
Back out and examine the doctor's body
Use the medical forceps to open the corpse's hand
Use the small plastic bags on the hair in the hand,
then back out
At the sanatorium, ring the doorbell
In the dialog with the nurse:
- James's body
Leave the building, scroll left and go around the building
Exit to the graveyard and try to enter the chapel
Exit to the sanatorium and talk to the boilerman
- chapel
- exit
Exit to the main entrance and enter the sewers
Leave the cell and exit back through the hall
Exit to the boiler room and to the front part
Take the rag from the fencing
Retrace your steps to James' cell and use the rag on the dripping faucet
Go back to the front part of the boiler room
Open the left-hand locker and take the rubber boots
Use the damp rag to open the boiler
Turn the tiny valve above the boiler opening to allow its smoke to enter the
room
Throw the pair of rubber boots into the boiler
Return to James' cell and climb under the bed
After an unseen trip through the sewers, go around the building
Take the cluster of keys from the open boiler room door
Exit to the graveyard and use the key to the chapel to enter the chapel
Pick up one of the shards from the floor and use it on James to get a hair
sample
At the morgue, put the hair of the murderer on the microscope at right
Repeat with James's hair
Use the map to go to the interior of Black Mirror castle
Leave the castle and proceed to the stable interior
If desired, read the letter Morris has left in the vise
Turn on the light switch and take the cap inside the stall
Right-click the cap, then combine small plastic bags & cap
Return via the map to the morgue and use Morris's hair in the microscope
Go back to the second floor of the castle and use the keys to enter Robert's
study
Look at the picture in the corner to see another sacred key
Back out and examine the small table underneath
Click twice on the small box to get a key
Use the key to unlock the upper drawer
Open the drawer and take the paper
Back out and note the date MCXX (1120 in Roman numerals) on the top of the
right-hand bookcase
Zoom in on the grandfather clock in the corner and click on the minute hand
From its 12:00 position, drag it counterclockwise until it's pointing to IIII
(11:20)
Click on the needle at the top of the clock to disclose a hidden safe
Use the paper with one of the three greenish lights flanking the bookcases to
discover the code number 6 3 0 8 1
Back out and zoom in on the safe
Click on each window to open it, then press the large center button to enter the
code number above
Zoom in on the safe and take the ring
Also take the diary, parchment and letter, each of which is read aloud followed
by comments from Samuel
Back out from the safe and exit to the hall
Speak to Victoria's room at left
- picture
- positive answer
- Lothar Gordon
- Lothar Gordon
- exit
Use the map to go to the sanatorium
Use the doorbell, then scroll left and go around the building
Zoom in on the small window and take the screw at upper left
Back out and exit to the graveyard and to the rear part of the graveyard
Right-click the grave behind the bushes to the left of the structure closest to
Samuel
Return to the centre of the graveyard and enter the chapel
Examine the box near the door to get broken gardening scissors
Combine screw & broken gardening scissors
Leave the chapel and return to the Gordon grave
Use the gardening scissors on the dried shrub and attempt to open the grave
Go back to the boiler room door
Right-click the dark corner under the lean-to to get a rod
Return to the Gordon grave and open it using the rod
Go back into the sanatorium lobby and talk to the nurse
- ancestor's grave
Use the map to go to Warmhill church
Enter the church and go to the altar
Talk to Father Frederick
- ancestor's grave
Use the map to go to Warmhill
Exit to the rear cemetery and to William's grave
Exit to the cemetery and to the church
Enter the church and go to the altar
Talk to Father Frederick
- ancestor's grave
Use the map to go to Warmhill
Exit to the rear cemetery and to William's grave
Exit to the cemetery and to the church
Enter the church and go to the altar
Talk to Father Frederick
- ancestor's grave
At this point, Father Frederick will tell you that Lothar Gordon's ashes are in
the graveyard behind the church
Return to William's grave and talk to the grave-digger in the open crypt
- positive answer
- urn
Right-click the urn to get the fourth sacred key
Examine the toolbox to get a flashlight
Go back to the church entrance, then scroll all the way right
Shine the flashlight on the barrow, then take the shovel
Return to William's grave via the map
Attempt to use the shovel on William's grave
Release the wire and peg holding the crypt door open
Use the shovel on William's grave
{Cutscene}
Take the sacred key
Use the map to return to Warmhill church
{Cutscene}
You are now back in the sewer with much less inventory
Exit on to the underground and go downstairs
Zoom in on the stone relief
Put the ring into the center of the pentagram, then click on it to rotate it
Press the red buttons in the order of death symbols recorded in William's diary:
Northwest
Northeast
East
West
South
Enter into the passage that has opened, and refer to the
catacombs map
From the initial position with Greek and Hebrew letters overhead, go right to a
location with large roots
Go forward to a location with skeletons, and pick up a sword
Go left to a location with 2 kegs
Go left to a location with a flag, and pick up a helmet
Go left to a location with an abyss, then drop both sword and helmet into it to
close up the abyss
Go back (towards the bottom of the screen) and examine the opening in the wall
at right to get a talisman
Go right to a location with 4 kegs in the foreground, then go forward to return
to the location with a flag
Press the brick at left, which discloses a door elsewhere in the catacombs
Go forward and put the talisman into the opening to open the door
Put the black sphere onto the stand in the room ahead, which activates red light
switches throughout the catacombs
Examine the small alcove hotspot to the left of the stand to get a map
Go right to a location with a carved head, then go right again to a location
with a candlestick
Ignite the candlestick with the alcohol cigarette lighter, then use the map on
the candlestick to reveal locations that must be lit
Assuming no lights have yet been lit, follow these steps:
Back out, then go back twice and go left twice to the location with 4 kegs
Turn on the right-hand light using its red button
Go forward and go left to the former location of the abyss
Press the red button to turn on the light
Go forward, then go right twice to the location with the stone head
Use the red buttons to turn on both lights and disclose a portal
Enter the portal
Zoom in on the altar and take the dagger
Back out and click the point of the dagger on Samuel's head
Put the five sacred keys into the correspondingly-colored hexagonal holes:
| Green | |
| Blue | | White |
| | |
| Yellow | | Red |
which discloses some verses
Read the verses and watch the endgame sequence
{Cutscene}

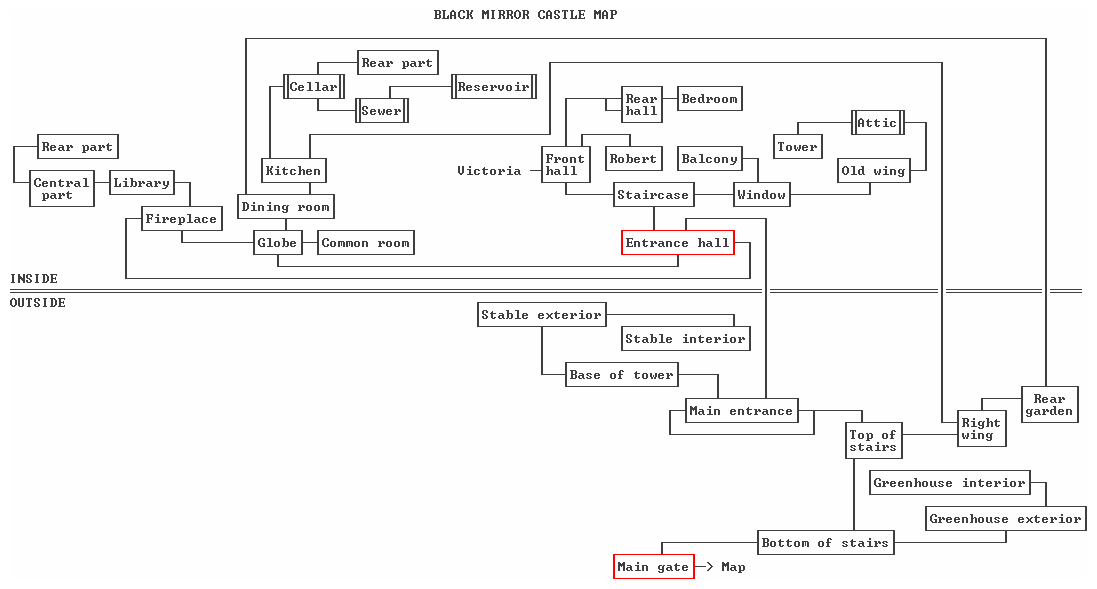
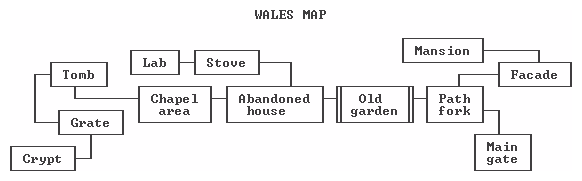
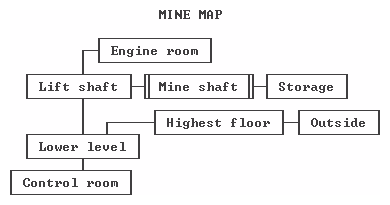
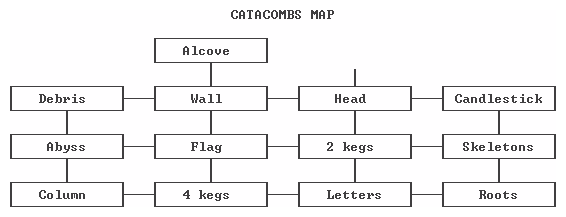
Table of Contents
Home
Copyright © 2019 Balmoral Software (http://www.balmoralsoftware.com).
Portions copyright © 2003 Future Games S.R.O. All rights reserved.
Republication, redistribution or conversion is expressly prohibited without the
prior written consent of Balmoral Software.