The Book of Unwritten Tales
The Book of Unwritten Tales
1 August 2017
Copyright © 2017 Balmoral Software (http://www.balmoralsoftware.com).
Portions copyright © 2011 by KING Art GmbH. All rights reserved.
Republication, redistribution or conversion is expressly prohibited without the
prior written consent of Balmoral Software.
The Book of Unwritten Tales is a 2011 point-and-click adventure game
from King Art with a great storyline and tongue-in-cheek dialog. Voice acting
is top-notch, with many fanciful characters brought to life with humor and
quirkiness. A lengthy game providing many hours of play, it often provides an
interesting feature of playing multiple characters. There can be different
gameplay paths to achieve objectives, but often a single trigger event or
dialog choice is needed to progress in the game. Most tasks involve inventory
manipulation, with just a few easy puzzles thrown in along the way. There are
several timed sequences in the game, some rather unforgiving. To speed up
replay, dialog sequences (but not character movements) can be skipped by
clicking the mouse. Double-clicking can sometimes be used to quickly exit a
scene.
This walkthrough provides a minimum path through the game; other gameplay
sequences and dialog choices can provide additional backstory elements.
Flying Dragon
New Game | Chapter 1
Loading...
Annoy Earthpixy...
Cast magic... done.
Throw a 20...
Hide Bugs...
Playing as the elf Ivo, left-click on the dragon's leg to move Ivo there
Look at the rope
Use the rope to swing to the other side of the leg
Examine the transport cage
Speak to the Gremlin
Select either of two responses
Select either of two responses
You are a true hero, farewell!
Press the spacebar to show all the hotspots in a scene
Look at the support strut
Look at the securing rope
Speak to the Gremlin
I can't open the cage with just my bare hands.
I'm not going to be able to get onto the dragon's back without some
help!
I'll carry on then.
Inventory consists of Bullwhip
Use the whip with the support strut
Climb up onto the dragon's back
Look at the box
Search through the carton
Look at the flag
Take the wooden baton
Combine the String with fishing hook & Wooden staff in inventory
Use the Homemade fishing rod to Fish for the sword
{Fanfare}
Climb down the dragon
Speak to the Gremlin
I was eavesdropping on the sorcerer... what does he want from you
exactly? A weapon?
I've found a sword. Now I can cut you loose at any time.
Select any of the three responses
Use the Sword to Cut through the securing rope
{Cutscene}
Intro and credits roll (press [Esc] to skip)
White Ridge Mountains
Playing as the gnome Wilbur, scroll left and Go into the kitchen
Click on the Rubbish hotspot
Take on rubbish
Look at the net
Take the net
Enter the dwarf tavern
Click on the Crowbar hotspot
Take the crowbar
Open the box with the crowbar
Look at the rat hole
Examine the rat hole, get Piece of rat's fur
Feed the robot with rubbish
Feed the robot with the rat fur
{Fanfare}
Exit through the Gate to outside, then again after talking to the Master
Brewer
{Cutscene}
Get ring from MacGuffin
Look at the icicle
Take the icicle
Look at the roll
Take the rolled up tarpaulin with you
Look at the entrance to the gnome hole
Enter the gnome hole
Look at the group of four levers at left
Use the lever for the gnome room (second from the right)
Look at the tennis racket
Take the tennis racket
Look at the rucksack
Take the rucksack
Look at the strange ball
Take the mechanical flying fish
Combine Net & Tennis racket frame in inventory to get Homemade net
Catch the mechanical flying fish using the Homemade net
Use the kitchen lever (at far right)
Look at the knife block
Take the scissors out of the knife block
Look at the blue bottle
Look at (take) the blue bottle
Open the kitchen cupboard
Look at the vial
Take the vial out of the cupboard
Look at the grain mill three times to get Barley
Go down
Nuclear First Strike.
Look at the silver rope
Take the elf rope
Look at the toolbox
Take the toolbox
Look at the extendable arm
Take the extendable arm
Speak to Grandpa Gnome
About my equipment... what was all that stuff I need?
Then I'll keep on looking...
Combine Tarpaulin & Elf rope in inventory
Combine Tarpaulin with rope & Rucksack in inventory to get Parachute
Return to the brewery kitchen
Click on the Kitchen waste hotspot
Take the kitchen waste
Put the icicles in the coffee pot
Take the coffee pot full of crystal clear water
Look at the cooking pot
Take the cooking pot
Combine Extra strong anti-bacterial kitchen cleaner & Extendable arm in
inventory
Tip the anti-bacterial cleaner into the cooking pot
Take the cooking pot
Enter the dwarf tavern
Have a go at the Master Brewer's beard with the scissors
Scroll right and Feed the robot with rubbish
Feed the GHR-X-100 with the Master Brewer's DNA
Take the map of the region
Return to Grandpa's basement
Scroll left and Show Grandpa Gnome the parachute
I've found a helmet!
I've got the map!
{Fanfare}
Return to the brewery
Speak to the Master Brewer
I'd like to ask a question... it's about dwarven ale.
Can you tell me how to brew dwarven ale?
Could YOU maybe brew me some ale?
Where am I supposed to get hops from?
I'll let you carry on celebrating then!
Look at the rat hole, get a single hop
Return to the gnome hole
Plant the hops in the flower pot
Fertilise the hop plant
Wilbur puts the fertilizer back in his pocket, but it's gone from inventory
Look at the hops
Harvest the hops
Return to the brewery
Speak to the Master Brewer
I've got a pile of hops for the ale here!
Here's a lovely big jug of crystal clear water!
I've found a large handful of barleycorn for the ale!
Now have Tankard of dwarven ale in inventory
Return to Grandpa Gnome's basement
Scroll left and Clamp the mechanical fish in the vice
Open the flying fish with the tool, get Cog
Speak to Grandpa Gnome
Here's a tankard of dwarven ale!
I've got the cog for the machine!
{Fanfare}
MacGuffin's House
Playing as Ivo, you have no inventory
Enter the house
Examine the wooden tub (red underpants)
Look at the small, silver shield
Take the small, silver shield
Place the silver shield in the frame
Click on A tool bag with tools hotspot
Take the sieve
Look at the pile of documents
Take the documents
Look at the wooden box with the stone chest
Examine the stone chest
Open the stone chest
Use the sieve to Sift through the sand in the chest, get a Little key
Open the wooden box using the key
Look inside the wooden box to get Hexagonal stone disc
Use the stone disc with the recess in the socket
Look at the statue
Talk to the machine, get Aromatic beans
Back out by clicking the exit icon at the top of the screen
Leave the house
Pour the brown beans into the mill
Grind the brown beans in the mill
Look at the watering can
Take the watering can
Look at the flower pot
Look under the up-turned flower pot, get Flint
Look at the stack of wood
Take a bit of kindling
Put the firewood into the stove
Place the unbelievably valuable documents in the stove
Use the Flint to Light the fire in the stove
Use the crank handle
Tie the watering can to the well rope
Hang the watering can on the holding bracket
Turn the holding bracket
Swing the holding bracket out of the fire
Combine Aromatic powder & Watering can in inventory
Enter the house
Examine the machine
Pour the fuel into the bowl
{Fanfare}
Look at the spiral staircase
Go into the cellar
Look at the garden shears
Take the garden shears
Look at the wooden staff
Take the wooden staff
Go back up and Leave the house
Open the wooden cover with the staff
Use the shears on the undergrowth
Examine the gravestone (Kinski)
Enter the house
Look at the sarcophagus
Open the sarcophagus (bad lip sync here)
Open the sarcophagus
Do you know where I can find the jewel for the staff in the cellar?
Mortimer sent me!
It is red!
The cat was called Kinski.
The answer to your question is: 234
You don't know?! But you surely have to know that!
It's lucky you outsmarted the mummy since you don't really know what Count
Grundschfeld of Pieperbock said to his Adjutant Henniger shortly before the
battle of Buddlerberg! You now have a Ruby in inventory (which briefly
showed as green when Ivo caught it from the mummy).
Go into the cellar
Combine Wooden staff & Ruby in inventory
Stick the staff with the ruby into the hole in the floor
Look at the little stone figure
Examine the little stone figure
Turn the little stone figure 3 times until it reflects the beam of light into
the ruby
{Fanfare}
Read the book
Lower Town
A playable demo of the game starts at this point
Loading...
Playing as Wilbur, you encounter the town guard
Select any of the three responses (aliases are remembered later)
Is the Arch-Mage actually in town then?
Upper town?! Is that where the Arch-Mage's tower is?
I need to get going. Goodbye!
You have no inventory except The ONE ring
Enter the town
Scroll right and Go to the gate to the upper town
What do I have to do to be admitted to see the Arch-Mage?
I'm afraid not.
If I rustle up a mage... can I then go along with him into the
tower?
So how do you recognise mages?
I'll go and get my mage's diploma then!
Go down the street
Enter the tavern
May I ask who you two are?
I'd like to know who you two are in real life.
Can you perhaps lend me a Mage's diploma, Master Markus?
Look at the door and the sign
Enter Server's room
Go back into the tavern
Look at the jar
Take the preserving jar
Look at the box
Take the saw out of the box
Leave the tavern
Leave the town through the town gate
Look at the flat stone
Lift up the flat stone
Use Empty preserving jar to Catch a few beetles
Enter the town
Scroll right and Go to the gate to the upper town
Speak to the town guard
The food's for the demon?
Where does Server's food come from?
And you're allowed to just take a few of these things out of the
basket?
I could tell the players about it...
Now have Banana in inventory
Go down the street
Enter the tavern
Enter Server's room
Saw the chair (in the back corner of the room)
Look at the large wooden box
Mess up the file cards
Mess up the file cards
Timed sequence: Quickly click on the monkey's chair to swap them
(otherwise, you have to mess up the file cards again and retry)
Use the bugs with the server
Show the hairy demon the banana
{Fanfare}
Go back into the tavern
Look at the sticky tape
Take the sticky tape
Leave the tavern (in order to make the monkey disappear)
Enter the tavern
Enter Server's room
Look at the little jar
Take the ink pot
Go back into the tavern
Leave the tavern
Enter the mage school
I have to get to the Arch-Make urgently!
But I HAVE to get to the Arch-Mage. Can you really not help me?
So I can become a qualified mage with a diploma?
Do you perhaps have a spare old robe for me?
Now where am I supposed to get a heap of gold from?
I'll go again then.
Markus has given you a Map for quicker navigation around Seastone
To enter the mage school, you need an enchanted robe, a wand, and a pile of
gold
Look at the carton
Search the carton, get Needle and thread and three colored Potions
Look at the crystal ball
Take the crystal ball
Enter the street in front of the mage school
Look at the merchant
Talk to the merchant
Why are you looking so down?
The King of Thieves? Who's that?
If I can catch the King of Thieves, what would you give me?
I need to get along.
Scroll right and Examine the entrance to the sewer
Click on any one of the Potions in inventory, then Drink it
After Wilbur's face turns colors, click on another one of the Potions in
inventory, then Drink it
After a brief period of weightlessness, click on and Drink the third Potion in
inventory
Take (another) swig of the world-enlarging potion
Examine the entrance to the sewer
Scroll left and Talk to the merchant
I can't get into the sewer. I'm too big...
I can't hunt down the King of Thieves without the ring!
I need to get along.
A shrinking ring has been added to Wilbur's inventory
Scroll right and Examine the entrance to the sewer
Take a swig of the world-enlarging potion
Put the ring onto a finger
Take a swig of the world-enlarging potion
Put the ring onto a finger
If you save and restore your game at this point, Wilbur will show up full-sized
on the screen but can still enter the sewer
Enter the sewer
Select any of the three responses
I saw you outside by the merchant's stall. That was... impressive!
Why did you become a thief?
Can't you get hold of food any other way?
I've got a task to carry out... I'm supposed to render you
harmless.
But I need your mask urgently!
And if I get you enough to eat?
I need to get into the fresh air.
Look at the mouldy slime
Take the mouldy slime
Leave the alley
Go to the gate to the upper town
Speak to the town guard
Your giant sandwich there... could I have a bit of it?
What er... what about playing a small game for the sandwich?
Select any of the three responses
How does the game work?
I'll go and get my mage's diploma then!
Go down the street
Scroll left and Enter the mage school
Talk to Master Markus
Do you by chance know the game 'Master of Dragon Slayer's Defender'?
I'll go again then.
The mage teacher's half card has been added to Wilbur's inventory
Enter the street in front of the mage school
Scroll right and Enter the sewer
Speak to the King of the Thieves
I've found something for you to eat! But I can't quite get to it right
now.
I need to get into the fresh air.
The King of Thieves needs time to find a card for you, so you'll need to return
later
Leave the alley
Go to the gate to the upper town
Go down the street
Speak to the King of the Thieves
The rat's half card has been added to Wilbur's inventory
Combine Sticky tape & The mage teacher's half card in inventory to get a
Supercard
Go to the gate to the upper town
Speak to the town guard
I've found a playing card here... why's it like that?
I'll go and get my mage's diploma then!
Go down the street
Scroll left and Enter the mage school
Talk to Master Markus
The town guard won't accept my Supercard!
I'll go again then.
A rule book has been added to Wilbur's inventory
Enter the street in front of the mage school
Scroll right and Go to the gate to the upper town
Speak to the town guard
I've had a look at the rules to see what they say about ruined
cards...
I won fair and square. And I'm going to tell everyone that as well.
A sandwich has been added to Wilbur's inventory
Go down the street
Push the giant sandwich into the sewer
Enter the sewer
A mask belonging to the King of Thieves has been added to Wilbur's inventory
Leave the alley
Scroll left and Give the merchant the King of Thieves' mask
{Fanfare}
Talk to the merchant
I'd like to choose my reward.
I'd like to have a roll of the magically treated material as a reward
for the mask!
I'll find myself something later.
I need to get along.
Enter the mage school
Talk to Master Markus
Who can sell me a magic wand?
None of the merchant's magic wands worked!
I'll go again then.
Enter the street in front of the mage school
Scroll right and Enter the sewer
Speak to the King of the Thieves
Perhaps you could get something for me...
I'd need a magic wand...
I'd need a cutting pattern for a mage's robe...
And something else...
Goodbye, Mr. King!
Leave the alley
Click on Map in inventory, then on the highlighted area at lower left (the
showman)
Look at the crystal ball
Use the Crystal ball in inventory to Swap the crystal balls (attempt fails)
Examine the large cage at right
Take the pigeon feather
Examine the empty cage
Speak to the showman
You're a showman, aren't you?
Master Markus says you're very rich...
Select any of the three responses
Can you really predict the future?
Do you think you could maybe predict the future for me?
What's the next question I'm going to ask you?
Speak to the showman
What's going on with these cages?
I think there's something not quite right about that squirrel...
Timed sequence: As soon as the red-arrow icon turns back to normal,
quickly move the cursor to the bottom of the screen to access the inventory.
Select the crystal ball from inventory and then quickly click on the
showman's crystal ball on the table to swap it.
Select any of the three responses
Speak to the showman
Could you just predict the future for me again?
Will I meet the Arch-mage?
Nothing horrible's going to happen to me in this adventure, is it?
Speak to the showman
Can I have a go at the wheel of fortune?
Select one of the four colors (Red, Green, Blue or Yellow)
No. I'm not going to win anyway.
Speak to the showman
Could you just predict the future for me again?
Select any of the three responses
Could you just predict the future for me again?
There are 3 rounds in the wheel of fortune, each selected from 4 colors. Your
odds of winning with random answers are only (1/4)3 = 1 in 64, so
you could use some help. You'll need to identify the 3 rounds of colors
using exactly 5 questions to the showman. The answers can be reduced to just
two possibilities for the final round, so you may need to repeat the
following prediction/guessing process more than once since you'll have a
50-50 chance of being right each time.
Select the first question (two colors)
Based on the showman's response, select the second or third question to
determine the color for the first round
Let's talk about the next round.
Select the first question (two colors)
Based on the showman's response, select the second or third question to
determine the color for the second round
Let's talk about the next round.
Select the first question (two colors)
Based on the showman's response, you'll have narrowed down the answer
for the third round to two colors
I'd really like to have another spin of the wheel of fortune...
Select the color of the first answer you determined above.
Select the color of the second answer you determined above.
Select one of the two colors of the third answer you determined above.
If you guess incorrectly, then select:
No. I'm not going to win anyway.
and restart above at the point where you Speak to the showman.
If you guess correctly, then select any of the three responses and get a heap of
gold from the showman.
Click on Map in inventory, then on the highlighted lower town area in the
center
Look at the white handkerchief
Reach into the hole
A mage robe cutting pattern has been added to Wilbur's inventory
Reach into the hole
A magic wand has been added to Wilbur's inventory
Combine Magic needle and thread & Rolls of magically treated material in
inventory to Sew a robe
Enter the mage school
Talk to Master Markus
I've found a magic wand.
I've got a heap of gold here!
{Fanfare}
What are the THREE TESTS?
Please tell me more about brewing potions.
What sort of a potion should I make then?
Where am I supposed to get a magical artefact from then?
So there's a powerful magical artefact behind the mirror?
I'm supposed to cast a spell? How does that work?
I'm going to study a bit more then.
Wilbur learns that the three tests for the mage diploma are making a potion,
finding an artefact, and casting a spell. The Swamp of the Dead has appeared
at lower right on the map in inventory. Also, a carrot has appeared at
Wuppermann's camp.
Look at the bookcase to get a magic potion recipe:
Red Devil's Armpits
Ghost Mushrooms
Stag Beetle Antler Powder
Peppermint
Mouldy Slime Extract
Bone Worms
Asthmatic Trans-fat Maggots
Crystal Vial
Examine the containers with the potion accessories
Take a vial
Examine the small casket to get Asthmatic transfat maggots
Look at the clay pot to get Peppermint
Enter the street in front of the mage school
{Cutscene}
Scroll right and Enter the sewer
Speak to the King of Thieves
Perhaps you could get something for me...
I need to brew a potion and I'm missing a few ingredients...
And something else...
Goodbye, Mr. King!
Leave the alley
Go to the gate to the upper town
Go down the street
Reach into the hole to get Stag beetle antlers
Click on Map in inventory, then on the highlighted swampy area at lower
right
Examine the plant by the tree
Take the Red Devil's Armpits
Look at the skeleton
Take a bone to get Bone worms
Exit into the shipwreck
Examine the blue-ish shimmering mushrooms
Take the ghost mushrooms
Take a piece of the heavy rope
Use the Map in inventory to return to the lower town
Enter the mage school
Grind up the stag beetle antler powder in the mortar
Pour the mouldy slime into the press
Press out the mouldy slime
Timed sequence: Brew a magic potion (cannot save game at this point)
Step 1: Put ghost mushrooms into the pot and stir until the water turns
green. Stop stirring.
Step 2: Add mouldy slime extract and stir anti-clockwise until the
potion turns pink.
Step 3: Add the red devil's armpits and wait until little red bubbles
appear. Then stir clockwise as quickly as possible.
Step 4: Sprinkle the stag beetle antler powder into the potion. When
the potion turns blue for the third time, immediately add the bone
worms.
Step 5: Then add the asthmatic transfat maggots and stir the potion
clockwise four times, anti-clockwise twice, and then clockwise three
times.
Step 6: Finish it off with the peppermint leaves for that fresh, minty
flavor. Add a few leaves and stir until the potion turns a golden
yellow colour.
Use the Map in inventory to return to the swamp
Exit into the shipwreck
Click on the skeleton twice
Select any of the three responses
Select any of the three responses
But you are DEATH! Can't you just go and deliver someone over to the
other side?
I... err, have to get on.
Look at the Book of the Dead
Use the Pigeon feather in inventory to Write in the book
Select any of the three responses
Use the Map in inventory to return to the lower town
The merchant is now rummaging around his stall
Talk to the merchant
...or else you won't be my friend anymore!
In inventory, Open the sack
Firework shells have been added to Wilbur's inventory
Use the Map in inventory to return to the swamp
Enter the shipwreck
Timed sequence:
Place the firework shells in the stove
Use the Pigeon feather in inventory to Write in the book
Speak to Death
Couldn't you just write a few names in the Book of the Dead?
My name's in the Book of the Dead!
As a ghost (without inventory), Leave Death's ship
Go through the mirror
Go back to Death's ship
Speak to Death
I've... err, done a bit of editing in the Book of the Dead.
You're going to revive me right away?
Select any of the three responses
A powerful magical amulet has been added to Wilbur's inventory
Speak to Death
I'm sorry if my death might cause you some trouble.
You could look for another profession!
Maybe you could become a contract killer?
Select either of the two responses
Use the Map in inventory to return to the showman
Look at the carrot
Look at (take) the carrot
Speak to the showman
I've got a business idea I'd like to suggest...
I have to carry on...
Go back into the town
Knot the thin rope to the tree
Lay the carrot in the snare as bait
A rabbit has been added to Wilbur's inventory
Go to the Swamp of Death
Scroll right and Speak to Death
Select any of the three responses
And you will have the honour of being the first to be buried!
A top hat has been added to Wilbur's inventory
Use the Map in inventory to return to the showman
Speak to the showman
I've got a rabbit here!
And here's the top hat for the spell!
Use the Map in inventory to return to the lower town
Enter the mage school
Talk to Master Markus
Master Markus, I've brewed up the power elixir!
I've got the Amulet of Baltasar!
I am now going to cast my spell for you...
Select any of the three responses
A mage diploma has been added to Wilbur's inventory
Enter the street in front of the mage school
Scroll right and Go to the gate to the upper town
Show the town guard the diploma
The playable demo of the game ends at this point
{Cutscene}
Upper Town
Speak to the prisoner
Select any of the three responses
I still have to err... do something...
Speak to the prisoner
My name's Wilbur. Who are you?
So you're something like a pirate?
You're a treasure hunter? Then you can help me!
If I show you a small island on the map, could you fly me there?
Use the Map in inventory to return to the lower town
Enter the mage school
Look at the note
Magic spectacles have been added to Wilbur's inventory
Enter the street in front of the mage school
Scroll right and Go to the gate to the upper town
Speak to the elf
Who are you?
What do you want from the Arch-Mage?
In that book that you have there, I believe it tells where a very
powerful artefact lies hidden.
Don't you want to help me find the island and rescue the artefact?
Go up into the upper town
Look at the net
Take the net
Look at the rope
Take the rope
Scroll right and Tie the rope to the pillar
Speak to Ivo
Let's take a look in the book!
How would it be if you took over from here?
Look at papers on the cupboard
Take at papers from the cupboard
Play with Wilbur
Look at the large map on the wall
Use the Magic spectacles in inventory to Read the Encylopaedia Fantastica
KrunPak.
Wilbur learns that KrunPak is now known as Redstonebury
Look at the large map on the wall
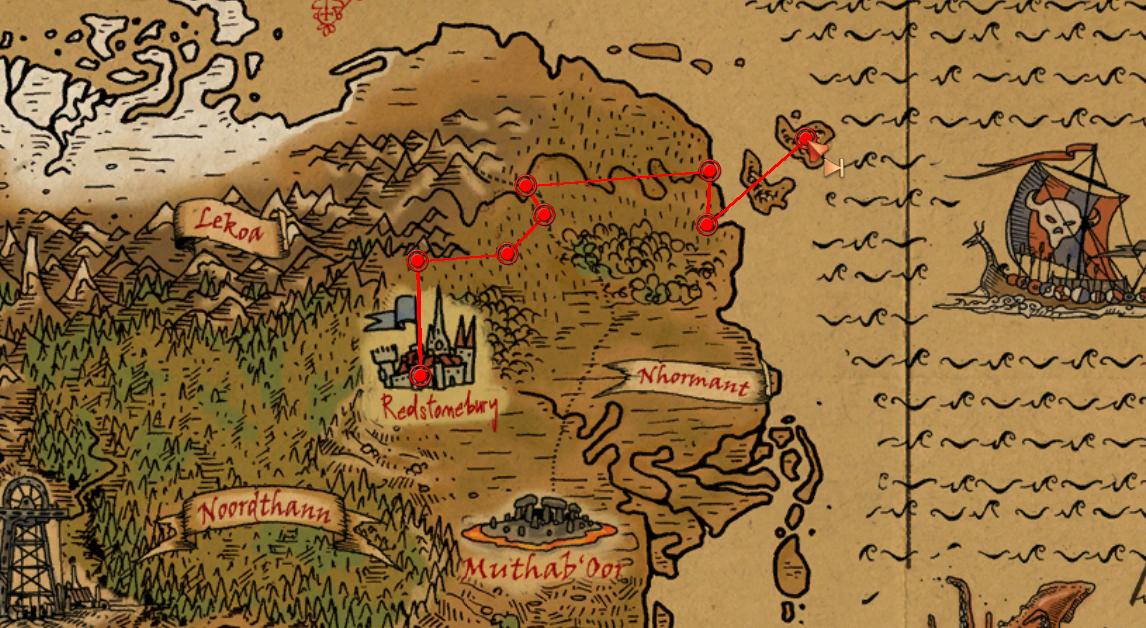
Move the mouse to the margins of the screen to scroll to the upper left corner
of the map (where The Book of Unwritten Tales is written)
Scroll slightly right until the Lekoa region label can be seen
Just to the lower right of the Lekoa label is the town of Redstonebury
Click on Redstonebury
Follow Ivo's instructions to mark a path:
1. Two days' march north to the foot of the mountains.
2. One day's march eastwards. The place has to be somewhere on a large
plain.
3. Go northeastwards, until you reach a road.
4. Follow the road in a northerly direction until you reach a river.
5. Follow the river to its mouth.
6. Head south. Follow down the coast until you reach a large bay. East
of the bay there should be islands.
7. From there head north-east. It is the second island along.
Finding some of the landmarks, particularly the misleading "large bay", can be
challenging since there is no scale on the map. However, some leeway is
allowed as long as the correct final island destination is found:
Go out into the main square
Scroll right and Take the rope
Give Ivo the power elixir
Play with Ivo
Look at the bounty hunter
Talk to the bounty hunter
So how does a contest sound?
Arm wrestling!
There's a funny but harmless bug in the game here. Look at the human's
companion, and Wilbur's voice will be heard instead of Ivo's.
Click on Power elixir in inventory
Talk to the bounty hunter
Shall we try another round of arm wrestling?
Gameplay automatically switches to Wilbur
Throw the net over the plank
Knot the rope to the net
Look at the net with the rope
Knot the rope to the transport bales
Play with Ivo
Gameplay automatically switches to Wilbur
Push the transport bales into the chasm
Speak to the prisoner
It's about... no... I can't tell you...
Loading...
Now playing as Ivo, with no inventory
If you missed (or can't remember) the intro to this chapter, the tan-colored
oblong shape at upper right is a blade of the airship propeller
Look at the line
Pick up the line
Look at the water bucket
Pick up the water bucket
Although it is not shown as a hotspot, move the mouse to the upper right and
Talk to Captain Nate
A glass jar has been added to Ivo's inventory
Use the Water bucket on the dry earth to Pour water onto the dry area
Look at the damp earth
Worms have been added to Ivo's inventory
Look at the branch
Take the branch
Look at the fish bones
Pick up the fish bones
Combine Branch & Line in inventory
Combine Fishbone & Stick with line in inventory
Combine Worms & fishing rod in inventory
Use the Fishing rod with the Ocean to Catch a fish, which is put into the
bucket
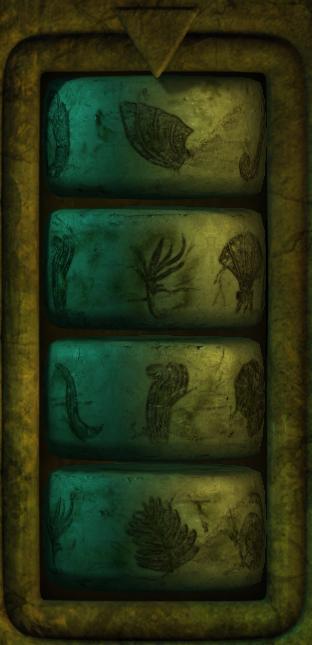
Look at the little alcoves at upper left: Creature of the Air
Look at the little alcoves at lower left: Creature of the Earth
Look at the little alcoves at upper right: Creature of Fire
Look at the little alcoves at lower right: Creature of Water
Put the water bucket into the Alcove at lower right
Put the worms into the Earth Alcove at lower left
Look at the beehive
Scroll down and Talk to Tschiep-Tschiep
I could do with your help...
Timed sequence: Pick up a little honey
Put the glass jar onto the ledge to catch a fire fairy
Put the glass jar into the Alcove at upper right
Scroll down and Talk to Tschiep-Tschiep
About those Alcoves... there's just a Creature of the Air missing.
The annoying bird survives the opening of the temple door, but you won't need
him any more anyhow
Look at the door
{Cutscene}
Inside the temple, you can now play with Wilbur, Ivo or Nate (to W.I.N. the
game!)
As Ivo, Go deeper into the temple
Examine the failed adventurer
Pick up the machete
Leave the entrance room
Scroll right and use the Machete to Cut a root off
Swing to the other (right) side
Exit the temple
Look at the little alcoves at lower right twice
The water bucket is returned to Ivo's inventory
Combine the Water bucket & fishing rod in inventory
Look at the little alcoves at upper right
Look at the door
Swing to the other (left) side
Go deeper into the temple
Use the Glass jar to Catch a jellyglowfish
Combine the Glowing glass jar & Fishing rod with bucket in inventory
Leave the entrance room
Scroll right and Pass the jellyglowfish down to Wilbur.
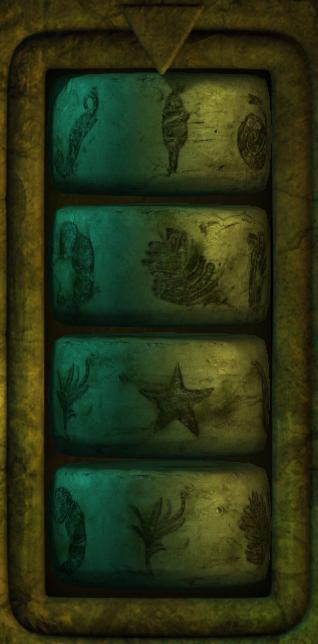
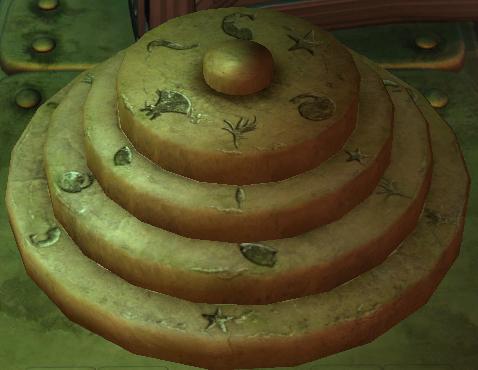
Wilbur describes symbols:
Something that looks like a snail with a long neck,
a fish without a head,
a sort of branch
and a star.
Look at the rings
Save your game at this point
Use the rings
From the initial ring positions:
Click the right side of the top ring 3 times
Click the right side of the second ring once
Click the right side of the bottom ring 3 times
to produce the pattern

Press the hotspot button at right to open Wilbur's door
Play with Wilbur
Walk through the door
Step onto the platform
Look at the roots
Climb up the roots
Step onto the platform
Climb up the roots
Play with Nate
Step onto the platform
Play with Wilbur
Look at the stone
Push the stone onto the platform
Play with Nate
Open the hatch
Step onto the platform
Play with Wilbur
Climb up the roots
Crawl through the hatch
Climb up the ladder
Look at the passageway
Climb further up the ladder
Wilbur gives Ivo a crystal
Look at the stone tablet
Pick up the stone tablet
Leave the gallery
Climb out
Scroll right and Show Ivo the stone tablet
Play with Ivo
Use the rings to produce the middle sequence of symbols shown on the stone
tablet
From the previous ring positions, click the right side of each ring 3 times to
produce the pattern
Press the hotspot button at right to release the catch to a water wheel
Play with Nate
Walk through the door
Use the wheel
Play with Ivo
Use the rings to produce the right-hand sequence of symbols shown on the stone
tablet
From the previous ring positions:
Click the right side of the top ring twice
Click the left side of the second ring twice
Click the left side of the third ring twice
Click the left side of the bottom ring once
to produce the pattern
Press the hotspot button at right to flood the chamber that Nate's in and allow
him to reach the second level
Use the rings to produce the left-hand sequence of symbols shown on the stone
tablet
From the previous ring positions:
Click the right side of the top ring once
Click the right side of the second ring 3 times
Click the right side of the third ring once
Click the left side of the bottom ring once
to produce the pattern
Press the hotspot button at right to open hatches on the lower two levels
Play with Wilbur
Scroll left and Climb into the tunnel
Climb down the ladder
Crawl through the hatch
Look at the passageway
Crawl into the passageway
Wilbur gives Ivo a second crystal
Leave the gallery
Step onto the platform
Examine the head
Press the head
Water begins to flow from the stone faces on the second level to operate the
platforms alternately every few seconds
Step onto the platform
Crawl through the hatch
Climb up the ladder
Climb out
Go deeper into the temple
Play with Nate
Climb up the ladder
Climb out
Go deeper into the temple
Play with Ivo
Go deeper into the temple
Put the crystal into the figure
Put the crystal into the figure
One of the three characters (your choice) will be the protagonist for the next
part of the chapter, while the other two will wait.
Play with one of the two characters who will be waiting
Touch the figure
Play with the other character who will be waiting
Touch the figure
Play with the character you've selected to proceed
Look at the entrance
Touch the crystal
Touch the crystal
Jump through the entrance
Loading...
Who keeps the torches lit?
If you're playing as Wilbur, his magic wand has mysteriously appeared in his
inventory, wonder where that was before?
If you're playing as Ivo or Nate, there is no inventory
Scroll down and Look at the board/paddle
Take the board/paddle
Look at the little stones
Pick up some little stones
Search the bowl twice
Sardines in oil and a stone disc have been added to the inventory
If playing as Wilbur:
Put the magic wand into the hole
Enter the machine room
If playing as Ivo:
Look at the opening
Climb through the opening
If playing as Nate:
Look at the iron bar
Pick up the iron bar
Use the Iron bar to Break down the door (but it just gently opens)
Enter the machine room
Search the drawer
Put the stone disc with the larger areola onto the stack of two on top of the
machine
Put the other stone disc on top of the stack
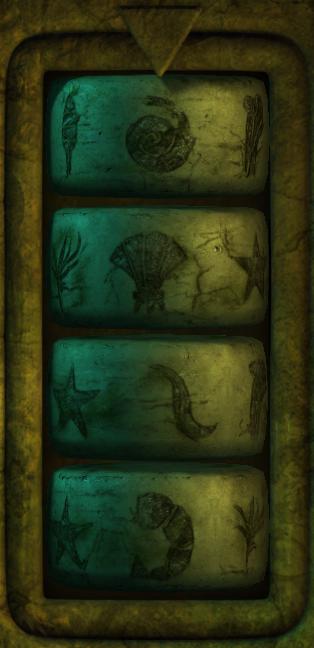
Save your game at this point
Turn the stone discs
In this Mastermind-style game, you orient four rings, each with six symbols,
then press the central nipple to test your answers. The four rectangular
indicators at the bottom show how you fared: a green indicator for each
correct symbol in the correct position, a yellow indicator for each correct
symbol in an incorrect position, and a red indicator otherwise. The game is
not true Mastermind because the four sequences of ring symbols are not all
the same. Left-clicking on a ring rotates it counterclockwise, and that move
may be undone by right-clicking. Be careful to notice any extraneous or
accidental movements of other rings, and be sure to undo them before
continuing. Since an unlimited number of guesses is apparently allowed, the
puzzle can be solved by trial and error starting from a state with no green
indicators by turning one ring at a time until each additional green
indicator is displayed.
From the initial position of the disks, the shortest solution is:
Left-click the top ring 3 times
Left-click the second ring 3 times
Left-click the third ring 4 times
Left-click the bottom ring twice
to produce the pattern
Press the button at the top of the stack of discs
Press the (red) button on the machine at left to open the door from the
temple
If playing as Ivo, Turn the wheel
Leave the machine room
Walk out
Leave the middle entrance room
Scroll right
{Cutscene}
Go to the middle entrance room
Enter the inner entrance room
Enter the machine room
Open the drawer
Use Sardines in oil to Smear the floor with oil
Put the paddle (board) into the machine
Look at the cylinder
Pick up the cylinder
Leave the machine room
Use the Little stones to Lure the sorcerer over to you
Timed sequence: Insert the tube mail cylinder into the slot at far
right
{Fanfare}
Search the bowl
A mirror has been added to the inventory
Walk out
Leave the middle entrance room
Look at the fishing rod
Pick up the fishing rod
If playing as Wilbur, Look at the root
Swing to the other side
Leave the temple
Blind the troll with the mirror
Leave the temple
Note that there is a new hotspot for the club next to the troll (but it doesn't
show up with the [spacebar] function)
Use the Fishing rod to Tie the line to the club
Give (your two companions) a sign
Timed sequence: Use the Fishing rod to Tie the line to the club
Blind the troll with the mirror
Loading...
{Cutscene}
Now playing as Wilbur and Ivo
Examine the nothingness
Take the box
Try it there
Take the thing made from metal and glass
Fill the container with liquid
Open the box in inventory
Examine the boxes in inventory
Combine Container & Dried instant-jellyglowfish in inventory
Play with Ivo
Use the wooden barrel
Look at the board
Take the board
Use the wooden barrel
Give the wooden board to Wilbur
Play with Wilbur
Use the wooden barrel
Look at the hole
Climb down into the smelly hole
{Cutscene}
A wooden lid and a rope have been added to Wilbur's inventory
Use the wooden barrel
Use the wooden lid to Close the wooden barrel
Give the rope to Ivo
Play with Ivo
Knot the rope to the treasure chest
Pull the treasure chest out of the wall with the rope
Play with Wilbur
Look at the treasure chest
Open the treasure chest
Search the box
Take the cone
Look at the machine
Pick the machine up
A scratchloudner has been added to Wilbur's inventory
Put the scratchloudner into the horn
Put the cone into the scratchloudner
Blow into the horn
Wilbur is my name. I am an adventurer.
{Cutscene}
Loading...
Playing as Nate
Select any of the three responses
Select any of the three responses
Look at the piece of clothing
Take the piece of clothing
Speak to the water corpse
Where's it hurt then?
Err?
I need to get on...
Enter the front part of the crypt
Look at the yellow paint
Take the yellow paint
Look at the string
Take the string
Look at the little pot
Take the glue
Speak to the Chief Zombie.
Why are you stuck in this magical penitent's pillory?
Can't you get out from it somehow?
Goodbye!
Leave the crypt
Go in the direction of the Orc camp
Look at the boards
Take the boards
Look at the flowers twice
Pick a few blossoms
Look at the poster
Take the poster
Click on the Orc gate to "Leave the mountains"
What have you done with Wilbur?
I want Wilbur back!
What is a warrior contest?
Can anyone take part in the contest?
Select any of the three responses
I'll be back!
Go out into the wide world
Look at the hard red earth
Take some of the red earth
Look at the mushrooms
Take the mushrooms
Look at the piece of paper
Take the map
Look at the pennant
Look at the travel chest
Open the travel chest
A pom-pom has been added to Nate's inventory
Look at the Paladin
Talk to the Paladin
I've spoken to the zombie that you'd stuck in the penitent's
pillory...
I need to get on...
Enter the crypt
Talk to Gulliver
Wilbur's the prize in the warrior contest!
How am I going to get Wilbur out of there if I can't find a warrior?
Tell me now, where is there an unbeatable warrior set around here?
Doesn't all that wailing from the water corpse drive you nuts?
I have to get on. Catch you later.
You'll need to find a Helmet, Shield, and the Sword of Power in order to enter
the Orc camp
For help finding the sword, you'll need to provide Gulliver with a lung, a
heart, and a bolt of lightning
Speak to the Chief Zombie.
The orcs treat my friend as if he's a kind of piglet.
Gulliver told me about a warrior set. Do you know anything about
it?
The way it looks, the Paladin's never going to forgive you.
Goodbye!
Leave the crypt
Enter the teepee
Look at the metal container
Take the copper bowl
Look at the bellows
Take the bellows
Look at the feather head dress
Take the feather head dress
Look at the chest
Look at the make-up set
Take the make-up
Indian ink has been added to Nate's inventory
Combine Scrap of leather & Glue in inventory
Combine Broken bellows & A piece of leather smeared with glue in inventory
Crush the red earth in the mortar to get Red powder
Crush the blue blossoms in the mortar to get Blue paint
Look at the minotaur
Speak to the minotaur
How can you get a Paladin to forgive someone against his own will?
My friend absolutely regrets what he did. But the Paladin won't hear
any of it!
I've got a piece of the Paladin's clothing here. At least something
like it.
I need to get going. See you!
Leave the teepee
Place the bowl on the ground
Talk to the Paladin
About your fight with the zombie...
Which beings do you hate the most out of all of them?
An undead being in six letters... hmmm...
Enough about zombies!
Your hair doesn't look too good.
Can I have a look at the comb?
Look at the spittoon
Take the spittoon
Enter the crypt
Enter the rear part of the crypt
Look at the urns
Take some of the remains out of the Paladin's urn
Use the Red powder in inventory to Mix the powder with the liquid
Red paint has been added to Nate's inventory
Speak to the jilted maiden.
Gulliver has told me something about a warrior set. Do you know
anything about it?
I need to get on...
Combine Feather & Sheet of paper in inventory
High-born Miss,
...the Russians
...fate kicked in, in a brutal fashion.
...deep under the ocean as a living water corpse.
...a malign curse binds me to these waters.
Enter the front part of the crypt
Drop wax onto the letter
Enter the rear part of the crypt
Look at the sarcophagus twice
Press the letter onto the seal
Give the jilted maiden the letter
You learn that the shield is with the ogres
{Fanfare}
Enter the front part of the crypt
Leave the crypt
Enter the teepee
Speak to the minotaur
I've got some real Paladin hair here!
I've got some Paladin spit here! Still warm!
I've got something from one of the Paladin's ancestors here...
I'm outa here!
Leave the teepee
Give the Paladin the potion
It's got zero calories!
Select any of the three responses
Can you perhaps give me a few power spells?
Enter the crypt
{Cutscene}
Take Esther's head
Enter the crypt
You learn that the helmet is with the earth pixies
{Fanfare}
Talk to Gulliver
{Cutscene}
Talk to Gulliver
I've got a first class lung for you!
I just can't find a heart anywhere.
Leave the crypt
Enter the teepee
Speak to the minotaur
Select any of the three responses
Speak to the minotaur
What kind of mushrooms should I get for you?
I'm outa here!
Leave the teepee
Enter the crypt
Speak to the Chief Zombie.
I'm looking for ghost mushrooms. You know where I can find any around
here?
Goodbye!
Combine Blue paint & Red paint in inventory to get Light purple paint
Combine Yellow paint & Blue paint in inventory to get Green paint
(You can also make orange paint, but it's not needed in the game)
Combine White mushrooms & Light purple paint in inventory
Combine Green paint & Lilac mushrooms in inventory
Leave the crypt
Talk to Gulliver
And what now?
These mushrooms ought to smell mouldy and rotten...
I have to get on. Catch you later.
Enter the teepee
Speak to the minotaur
I've got some ghost mushrooms!
You're a rainmaker... Can't you arrange for a storm over there at the
crypt?
I'm outa here!
Leave the teepee
Look at the aerial
Use the inventory item to Dance the rain dance
Timed sequence: This mini-game involves hand-eye coordination in pressing
a sequence of various keyboard arrow key pairs just when they pass through
the brackets at the bottom of the scrolling region. It can be very
challenging to complete, but after some amount of "trying", the game engine
may allow you to move on. However, even that point may be difficult to
reach. For those wishing to skip this frustration, one of the game files can
be edited to complete the dance without keyboard input. To make this change,
exit the game, then copy the file
minigame_dance.kad into the subfolder
\kagedata\chapter4_1\landschaft\ of the game installation folder,
overwriting the file that is there. For example, if the default folder
C:\Program Files\The Book of Unwritten Tales was selected during
installation, the file to be replaced with the one in the preceding link is
C:\Program Files\The Book of Unwritten Tales\kagedata\chapter4_1\
landschaft\minigame_dance.kad
If you wish to restore the original game file with the default rain dance
behavior, a link is here.
Enter the crypt
{Fanfare}
Ogre Cave
Use the Map in inventory to travel to the ogres' cave at upper left
Scroll right and Look at the two-headed ogre
Talk to the two-headed ogre
Who are... you... Eh?!
I need to get on...
Talk to Blout
Do you want to scoff the whole meal off the plate?
Can't you make Zloff stop reading?
How would you like it if I made you guys an ogre cocktail?
What do you need for an ogre cocktail?
I need to go.
Look at the hose twice
Take the piece of hose
Look at the sack
Open the sack
Take the sack
Look at the glass
Take the cocktail glass
Look at the cupboard
Open the cupboard
A cocktail umbrella has been added to Nate's inventory
Use the Map in inventory to travel to the crypt area in the center
Go in the direction of the Orc camp
Tip the apples into the press
Press out the apples
A container with fermented apple juice has been added to Nate's inventory
Go out into the wide world
Enter the teepee
Connect the hose to the opening in the lid
Pour the juice into the pot 3 times
Combine Cocktail glass & Container with alcohol (ogre strength) in inventory
Combine umbrella & cocktail glass in inventory
Use the Map in inventory to travel to the ogres' cave at upper left
Scroll right and Give the cocktail to Zloff
Cover over the gap with boards
Combine Unbreakable string & Pom-pom in inventory
Use Pom-pom on a string to Lure Blout with the bait
Scroll right and Take the Shield of Power
{Fanfare}
Dragon's Lair Visit #1
Use the Map in inventory to travel to the dragon's mountain at right
Look at the stone bowl
Take the stone bowl
Look at the hammer
Take the blacksmith's hammer
Look at the pliers
Take the pliers
Scroll left and Look at the stones
Take a stone
Lay the stone on the anvil
Hammer about on the anvil (but should be on the stone)
A stone with crystals (geode) has been added to Nate's inventory
Pixie Mine Visit #1
Use the Map in inventory to travel to the pixies' mine at lower left
Do you by any chance belong to a powerful warrior set?
I need you and the other parts of the set...
Wuzaaa!
Move into the mine past a 4-way intersection to a
T-intersection with a green light at left and a yellow one at right
Follow the pathway to the right into an unoccupied room that lights up when you
approach it
Take the key
Look at the sticks of dynamite
Take some dynamite
Return to the 4-way intersection and take the passage to the right. Stop when
the room lights up.
Take the Earth Pixie teddy
Sit teddy on the chair
After the pixies disappear into the hole, move forward into the room and into a
smaller room at upper right that lights up when you enter it
Use the Key in inventory to Unlock the chest
Examine the contents of the box
A magnetic stone has been added to Nate's inventory
Return to the T-intersection
Follow the left pathway and stop at the green light
Look at the hose
Timed sequence: Nate needs to retrieve this object without being seen by
the pixies. Note that the rightmost of the two pixies in view keeps walking
back and forth between the wall and the fire. As soon as this pixie twirls
around and starts walking away from the fire, Take the water skin, then
quickly move Nate back into the tunnel at right before the pixie comes back
to the fire and he's detected and ejected.
An empty water skin has been added to Nate's inventory
Return to the 4-way intersection
Fill the water skin with water
Return to the T-intersection, then move slightly into the passageway leading to
the top of the screen
Throw the water bomb at the burning torch
Take the torch
Return to the T-intersection (no amount of trying will get the pixie in the dark
to react)
Follow the left pathway and stop at the green light
Timed sequence: Look at the camp fire to position Nate close to the fire.
Quickly move about half the distance towards the shadowy barrels at upper
right. This is a safe location where Nate won't be detected and ejected.
Wait for the walking pixie to be about 3/4 of the distance towards the wall
and Light the torch. If Nate complains, reposition and try again. After the
torch is lit, Nate will automatically move away from the pixies.
Go back to the darkened area where Nate found the torch
Place the dynamite in the rubbish heap
Look at the piece of wood
Take the wooden handle
Light the dynamite
Move back to the rubbish heap area
Use the hotspot at the top of the screen to Go into the brightly lit cave
Combine the Unbreakable string & Magnetic stone in inventory
Use the Magnet on a string to Catch the helmet with the magnet
{Cutscene}
The pixies are now placated
Go down
Look at the dragon's head
Speak to the Earth Pixie
Nate gives the pixie the stone with crystals and it leaves
Take the stone head
Steal a few offerings
Gold nuggets have been added to Nate's inventory
Dragon's Lair Visit #2
Use the Map in inventory to travel to the dragon's mountain at right
Fasten the (dragon) head to the body
Look at the hatch
Open the hatch
Combine the Gold nuggets & Stone bowl in inventory
Place the stone bowl in the furnace
Use the Pliers to Take the bowl out of the furnace
Pour the gold into the press
Look at the coin press
Scroll right to the dragon
Bug alert: Even though you can Give the dragon the gold coin at this
point, doing so will prevent progress in the game later when you need the
dragon's help
Instead, Talk to the dragon
I'm looking for a magical sword... You seen anything like that lying
around here?
Select either of the two responses
I've got a gold coin here!
I need to get on...
A broken sword has been added to Nate's inventory
Take a look in the smithying book
Combine Wooden handle & Pickaxe head in inventory
Pixie Mine Visit #2
Use the Map in inventory to travel to the pixies' mine at lower left
Look at the yellow helmet just below Nate (no hotspot shown with spacebar)
Take the helmet
{Fanfare}
Move through the passages to the location of the rubbish pile
Use the Pickaxe in inventory to Dig out the copper at upper left
Dragon's Lair Visit #3
Use the Map in inventory to travel to the dragon's mountain at right
Combine Stone bowl & Copper ore in inventory
Place the stone bowl in the furnace
Use the Pliers to Take the bowl out of the furnace
Cool down the copper in the stone trough
Work the piece of copper on the anvil
Use the Broken sword on the anvil to Re-forge the Sword of Power
Talk to the dragon
Could you just spit some fire onto the sword?
You're stupid.
Dragons like you shouldn't go in for monster training.
I need your help...
{Fanfare}
Orc Camp
Use the Map in inventory to travel to the crypt area in the center
Go in the direction of the Orc camp
Speak to the Orc chieftain over the gate
Just have a look at what I've got! A warrior's helmet!
Here! My new shield, cool eh?
Quake before the Sword of Power!
Loading...
{Cutscene}
Mortroga's Castle
Speak to the Critter
We have to escape. Can you help me?
Now playing as Critter
Look at the bar
Take the bar
Critter stores his inventory by swallowing it
Examine the skeleton
Take some of the clothing
Combine Bar & Bits of material in inventory
Leave the dungeon
Look at the chicken
Take the rubber chicken
Go up the stairs
Look at the velvet cushion
Take the cushion
Look at the container
Use the Bar in inventory to Stick the slat with the cloth into the liquid
Examine the barrel
Look at another picture twice
Go down to the street
Light the torch
Lay the velvet cushion on the board
Scroll right and Go up the stairs
Scroll left and Pick up a cannonball
Scroll right and Go down to the street
Look at the pipe
Push on the stove pipe
Turn the stove pipe a little 3 times, so that its far end is sticking into the
hole
Roll the cannonball off the cushion
Set fire to the troll's trousers
Take the bunch of keys
{Fanfare}
Enter the dungeon
Use the Keys to Unlock the chains
Give Ivo the rubber chicken
Give the elf the picture
Give Ivo the torch
Play with Ivo
Jam the picture into the viewing window
Fasten the rubber chicken to the torture device
Take the cannonball
Use the cannonball with the rubber chicken
Play with Critter
Leave the dungeon
Look at the troll
{Fanfare}
Leave the dungeon
Go up the stairs
Look at the vase
Climb into the vase
Play with Ivo
Leave the dungeon
Look at the hammer
Take the hammer
Set fire to the banner
Now playing as Critter
Examine the parchments twice
Climb into the vase
Click outside the vase to exit it
Go down to the street
Enter the dungeon
Play with Ivo
Examine the cell
Speak with the something
Wake up the something
I need to get on...
Play with Critter
Use the Frost spell to Freeze the bars
Play with Ivo
Use Blacksmith's hammer to Smash the bars
{Fanfare}
Pull the torch holder at left
Examine the hole
A strange book has been added to Ivo's inventory
Speak to MacGuffin
Your universal lock pick... I need it.
Catch you later!
A universal lock pick has been added to Ivo's inventory
Leave the dungeon
Go up the stairs
Pick the lock
Take a few gold coins
Go down to the street
Enter the dungeon
Look at the large box
Search the inside of the large box
Speak to MacGuffin
Could you decode that writing in the box?
I think I've got the book with the machine numbers!
I've got some gold coins here!
{Fanfare}
Loading...
{Cutscene}
Orc Contest
Now playing as Nate
Look at the tree
Break a branch off
Combine Feather & Shaft in inventory
Talk to the Orc chieftain
{Cutscene}
Look at the termite mound
Speaking Termites?!
Could you help me with the dwarf throwing?
See you soon.
Scroll right and Go (to) the back of the camp
Look at the tent
Enter the tent
Will be back in a tick.
Look at the wooden board
A wooden board has been added to Nate's inventory
Look at the skull twice
An arrowhead made of stone has been added to Nate's inventory
Combine Shaft with feathers & Arrowhead made of stone in inventory to get
Home-made arrow
Leave the tent
Go to the front of the camp
Scroll left and Give the termites the board
Use the Wooden board with termites to Put the termites onto the trunk
Hit it a second time
Return to the back of the camp
The (armour) plate should be in the (default) middle position of 3
Look at the pan
Turn the pan
The pan should now have its left edge pushed as far as possible, to maximize the
visible bottom area of the pan
Look at the shield (next to the tent entrance)
Turn the shield
The shield should now be in the middle position of 3
Look at the wok
Turn the wok twice
The wok should now have its left edge pushed as far as possible towards the
chieftain's tent, to maximize the visible inside area of the wok
Talk to the Orc chieftain
Go to the front of the camp
Talk to the figure
Who are you?
Do you have a bow for me?
Byeee.
Scroll right and Look at strange fellow
Talk to the strange fellow
I need copper pots.
Enough talk.
Talk to the figure
I asked the merchant about copper pots...
Return to the back of the camp, then Go to the front of the camp
A Bow made of bone has been added to Nate's inventory
Scroll right and Go (to) the back of the camp
Talk to the Orc chieftain
I am ready to shoot!
'til later.
Go to the front of the camp
Talk to the Merchant
Do you sell bows and arrows?
Why do you never have anything that I need?
How much is the magic stone?
What would you say to playing for the stone?
Enough talk.
Talk to the figure
Do you have any idea how I can get the Orc warrior to not consistently
hit the bullseye?
Right-click on the Crumpled note in inventory
Scroll right and Talk to the Merchant
About the magic stone...
Enough talk.
A magic stone has been added to Nate's inventory
Go (to) the back of the camp
Scroll right and Attach the magnet to the target
Talk to the Orc chieftain
I want to try again!
Go to the front of the camp
{Cutscene}
Loading...
Now playing as Wilbur
Look at the basket
Thread has been added to Wilbur's inventory
Leave the tent
Look at the target twice
A magic stone has been added to Wilbur's inventory
Talk to the Orc chieftain
What's with the magic circle in the tent then?
See you later
A magic circle package has been added to Wilbur's inventory
Examine the magic circle package
Instructions and Mithril foil have been added to Wilbur's inventory
Right-click Instructions in inventory
Go to the front of the camp
Combine Thread & Magic stone in inventory
Use Thread with magic stone to Get the wire down
Combine Wire & Mithril foil in inventory
Return to the tent
Put on the head protection
Return to the front of the camp
Scroll left and Look at the termite mound
Talk to the termite mound
Termites have been added to Wilbur's inventory
Return to the tent
{Cutscene}
Loading...
{Cutscene}
Enter the Orc camp
Look at the display board and measuring tape
Take the measuring tape
Use the Map in inventory to travel to the dragon's mountain at right
Look at the copper kettles
Take the copper kettles
Use the Map in inventory to travel to the crypt area in the center
Enter the teepee
Boil the socks
Look at the Minotaur Shaman
Talk to the Minotaur
I am looking for a bone bow...
I have to go. See you!
Leave the teepee
Go in the direction of the orc camp
Look at the heap of rubbish
A Gnome hot air balloon has been added to Nate's inventory
Enter the Orc camp
Hang the tape measure onto the board
Use the exit-door icon at right
Enter the tent
Look at the cushion
Use the Map in inventory to travel to the crypt area in the center
Talk to the undead ghost jester
I am looking for a specific board.
Have fun!
Look at all 3 of the graves
Talk to the undead ghost jester
I can't find any grave dating from the year 1784!
Have fun!
Go in the direction of the orc camp
Enter the Orc camp
Scroll right and use the exit-door icon at right
Enter the tent
Put the board onto the cushion
Leave he tent
Go (to) the front of the camp
Go (to) the front of the camp
{Cutscene}
Enter the Orc camp
Scroll right and Give the merchant the copper kettles
Firewater has been added to Nate's inventory
Use the Map in inventory to travel to the crypt area in the center
Enter the teepee
Give the Minotaur the firewater
Antlers have been added to Nate's inventory
Use the Map in inventory to travel to the ogres' cave at upper left
Look into the rock crevice.
My name is... Ma'Zaz!
Scroll right and Search the cupboard
Sinew has been added to Nate's inventory
Combine Sinew & Antlers in inventory
Use the Map in inventory to travel to the crypt area in the center
Go in the direction of the orc camp
Enter the Orc camp
After giving up the bow, use the Map in inventory to travel to the ogres' cave
at upper left
Talk to Zloff and Blout
Fill the balloon with hot air
Use the Map in inventory to travel to the crypt area in the center
Go in the direction of the orc camp
Enter the Orc camp
Scroll right and use the exit-door icon at right
Go (to) the front of the camp
Talk to the merchant
A shrinking ring? Why not?
Use the Map in inventory to travel to the ogres' cave at upper left
Throw the shrinking ring down to Zloff and Blout
Use the Map in inventory to travel to the crypt area in the center
Go in the direction of the orc camp
Enter the Orc camp
{Cutscene}
Now playing as Wilbur
Use Ivo's cloth in inventory to Swap the artefact
{Cutscene}
Loading...
Now playing as Ivo
Go to the road
Go to the fairground
{Cutscene}
In the endgame sequence, it's kind of hard to hear the characters' voices over
the music, but it's pretty clear they were planning a sequel (The Book of
Unwritten Tales 2)
Press [Esc] to skip credits
Final scene with the rabbit over Death's grave
Press [Esc] to return to the Main Menu
- Wilbur Weathervane: Gnome, one of the three central characters
- Ivo: Ivodora Eleonora Clarissa, Princess of Silverwood, an elf who is one of
the three central characters
- Nate: Human, one of the three central characters
- Mortimer MacGuffin: Gremlin
- Beetle: MacGuffin's servant
- Mortroga: Arch-Witch
- Munkus: Sorcerer, Matroga's son
- Morderd Michael Mechtild Alastair: Arch-Mage in Seastone
- Bartholomew Anton Shieldhand: Royal Town Guard of Seastone
- Master Markus Maria Alistair: Local Mage teacher in Seastone
- Bill: Merchant in Seastone and Wild Lands orc camp
- Willy Wuppermann: Showman near Seastone (based on the actor Frank Morgan)
- Gorruck: Orc chieftain
- Ma'Zaz: Female orc bounty hunter
- Blout: Right half-brother of two-headed ogre
- Zloff: Left half-brother of two-headed ogre
- Artefact of Divine Fate: Created by the Goddess of Destiny and Providence,
principal objective of the game
Aventasia Map
Mine Passages

Table of Contents
Home
Copyright © 2017 Balmoral Software (http://www.balmoralsoftware.com).
Portions copyright © 2011 by KING Art GmbH. All rights reserved.
Republication, redistribution or conversion is expressly prohibited without the
prior written consent of Balmoral Software.