Copyright © 2020 Balmoral Software (http://www.balmoralsoftware.com). Portions copyright © 2014 by Revolution Software Limited. All rights reserved. Republication, redistribution or conversion is expressly prohibited without the prior written consent of Balmoral Software.
Broken Sword 5: The Serpent's Curse is a 2014 release from Revolution Software that is the fifth installment in the series of games that started in 1996 with the original Broken Sword: Shadow of the Templars/Circle of Blood game. Once again, George Stobbart and Nicole Collard team up for a variety of adventures, this time taking place mostly in Paris and Spain, and involving various spiritual and historical themes. In this third-person game, you're playing as George about 90% of the time, but there are a few key points where Nico is needed to complete key objectives. As in the previous games in the series, the hand-drawn graphics are detailed and immersive, and information is easy to find. In the Paris scenes, street names are actual places, except for Rue le Chèvre (Goat Street :). Thankfully, the game presents these locations as mostly-upscale depictions rather than the reality of far more narrow and graffiti-covered places.
Gameplay is without significant faults. The game startup is fast, requiring none of the usual clicking through logos. About 5 seconds after startup, the main menu is displayed and an in-progress or previously-saved game can be loaded. There are a handful of puzzles throughout the game, most of which are relatively easy. Several tongue-in-cheek references are made to the infamous goat puzzle from the first game, and there are some tie-ins to other characters seen in the earlier games. A convenient menu selection provides backgrounds on characters as they are encountered in the game. Most gameplay challenges involve information-gathering from other characters. As a result, there are many long dialog sequences, which can be skipped on replay by repeatedly clicking the mouse. Verbal asides from the main characters are easily distinguished by text at the bottom rather than the top of the screen. Several timed sequences are encountered, but none are difficult.
Gameplay controls are easily accessed by moving the cursor to the top of the screen, and an inventory bar is at the bottom. There are a few cutscenes at key points in the game, and on replay they can be skipped by pressing the [Esc] key or a button at the lower right of the screen. There is no way to pause the game, even if Alt-Tab in Windows is used. An optional in-game feature offers a variety of hints throughout the game. Saved games are file-based, but have the unusual design of being identified within the game by elapsed playing time, rather than by the actual timestamp of the saved-game file. The biggest drawback is that only 8 saved-game slots are available, so manual effort may be needed to maintain and identify groups of saved-game files to be restored in order to revisit an earlier point in the game. The game must be exited in order for the list of saved games to be refreshed from a new group of files.
Voice acting, music and sound effects are all excellent, and individual volume controls for each are provided. Subtitles can optionally be displayed.
Broken Sword 5 shows a continuing refinement of game design by Revolution, and provides several hours of enjoyable adventure-gaming experience. This walkthrough describes a minimal solution path and dialog choices only; other details and backstory plot elements are left to the player to discover.
Gallery
New Game
{Cutscene}
Playing as George, zoom in on the Stolen Painting at far left
Open the Door of the alarm device and examine the Cut Wire inside
Achievement: Oh my God it's a Mirage!
Back out and try to open the Door marked Prive (Private)
Talk to the Priest
Zoom in on Henri's Body and take the Eau de Toilette "Bret" from his vest
pocket
Back out and exit through the Door to the street
Scan left and talk to the Waiter
- Galleryand get Laine's Drink Bill
- Laine
- Exit Conversation
- KeypadTalk to Laine again
- Laine's Drinks Billand get the code for the locked door
- Nail Clippers
- NavetWalk to the left and show the Press Card to the Waiter
- Navet
- Tiredness
- Exit Conversation
- CoffeeWalk to the right and give the Takeaway Coffee to Moue
- Takeaway Coffee
- Exit Conversation
- Blood StainNow back to playing as George, examine the Waste Basket to the left of the desk to get Henri's home address
- Truth (or Lies)In the conversation with Nico:
- Vera Security
- CCTV
- TheftOn the Map of Paris, select Vera Security
- Waterloo Motors
- Father Simeon
Vera Security
Enter the Door to Vera Security at left
(The "Stretch Goal" at far left is a red herring)
Exit and talk to the Stallholder
- MigraineZoom in on the Neon Sign and take the Loose Wire
- Neon Sign
- Exit Conversation
- Neon Signand he makes a reference to a genie from a magic lamp
- Exit Conversation
Move the letter in position 3 to the open spaceto spell "Aladdin". Bassam then says the sign hits every one of his USPs (Unique Selling Points).
Move the letter in position 6 to the open space
Move the letter in position 2 to the open space
Move the letter in position 12 to the open space
Move the letter in position 10 to the open space
Move the letter in position 11 to the open space
Move the letter in position 9 to the open space
Move the letter in position 8 to the open space
Move the letter in position 4 to the open space
- Cockroachand get a Rich Tea Biscuit
- Exit Conversation
- Vera SecurityTimed sequences: While Annette is on the phone, you have about 18 seconds to touch the Radio (which may be occluded by George). When she hangs up the phone and moves away to reset the radio, you have about 8 seconds to touch Annette's Black Book to get a Photograph of Annette and Laine.
- Vera Security Completion NoteExit twice to the Map of Paris
- Photograph of Annette and Laine
- Vera Owner
- Henri
Henri's Apartment
On the Map of Paris, select Henri's Apartment
Use the Intercom
- AnnetteEnter Henri's Apartment
- Theft
- Exit Conversation
- Photograph of Annette and LaineTalk to Bijou
- Vera Owner
- Annette
- HenriExit the apartment
- Gallery
- Theft
- Exit Conversation
Vera Security (nighttime)
Move the Box, then click on the Girder
Use the Electrical Box
Use the Switch to turn off the fan
Use the Nail Clippers on the upper Wire
Use the Nail Clippers on the lower Wire
Put the Wire from inventory onto the Wire from the Shutter Motor at lower
left
Turn the Switch on
Achievement: Roll 'em Up
Enter the Door to Vera Security
Open the Drawer at left and pick up a Q-Tip
Open the Door to the back room
Combine the Safety Matches & Matchbox containing Cockroach in inventory to
disclose a Light Switch hotspot immediately to the right of the doorway
Use the Light Switch
Put the Q-Tip into the Patch of Oil on the floor
Zoom in on the Shredder (may be partially occluded by George)
Open the Lid and use the Oily Q-Tip on the Gears
Press the green power Button
Take the Paper Clip
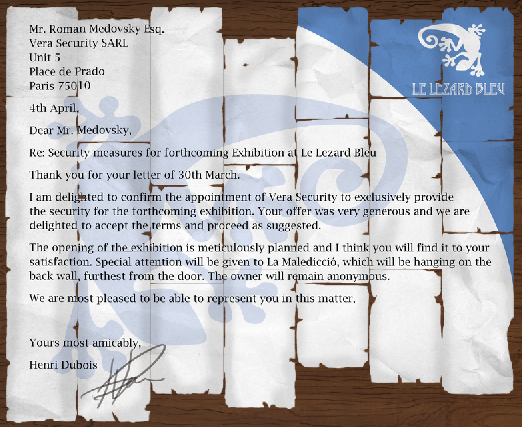
Assemble the shredded-letter jigsaw:
and learn that the owner of Vera Security is named Medovsky
Nico's Apartment
Playing as Nico, talk to the Elderly Man
- 'La Malediccio'Click on the photo of the Thief at lower left
- Help
Gallery
Talk to Laine
- 'La Malediccio' OwnerUse the Sofa, then Talk to Laine
- Manifest
- Gallery
- Yes
- Glass of ChampagneTake the Glass and Talk to Laine
- ChampagneAchievement: Suited and Fluted
Nico's Apartment
Now playing as George, in the photo close-up, click on:
- 'La Malediccio'Talk to Nico
- Man
- Woman
- Child
- Medallion
- ThiefUse Phone
- Tattoo
- Waterloo Motors
- Waterloo Motors
- Waterloo Motors Helmet
- Tattoo
London: Medovsky
Achievement: Russian Evolution
George and Nico are now at a mansion on "Duchy Street" in London (but probably
closer to the London Aquarium)
Examine the Large Topiary
Talk to the Gardener
- TopiaryIn the conversation with Medovsky, select either Soft or Hard, then exhaust all of the remaining seven dialog choices
- Bad
- Medovsky
Back out and zoom in on the Cigarette Box
London: Hobbs
Open the Van Cab and take the Whiskey from the glove box
Use the Bonnet Catch next to the foot pedals
Back out and zoom in on the Van Bonnet
Back out and open the Letterbox next to the blue door
Take the Letter
Right-click the Unopened Letter in inventory
Examine the Junk at lower right
After a phone call from Navet, pick up two Long Wires from the Junk area
Use the Nail Clippers on one of the Long Wires to make two Short Wires
Zoom in on the Van Bonnet again
Connect a Short Wire to the Wiring Loom at upper left
Connect the Long Wire to the Horn at lower left
Connect the remaining Short Wire to the Loose Wire at lower right
Open the Van Cab and operate the Horn to initiate a conversation with Hobbs:
- Modeling Agency LetterUse the blue Door
- LiftUse the Lift Buttons again
- HenriOn the Map of Paris, select the Gallery
- Soft (or Hard)
- Medovsky
Gallery
Enter the Gallery Door
Talk to Laine
- ProvenanceTry to exit the gallery
- Exit Conversation
- MachineScan left and pull the Plug out of the wall socket under the missing painting
- Exit Conversation
- MachineIn the close-up of the forensic machine, each of the five switches reverses the On/Off state of itself and one other. The objective is to get all five switches On (green). Numbering the switches from 1 to 5 left to right, there are two solutions after pressing the white Reset Button:
Press switches 1, 2, 3 and 5, orthen press the red Power switch
Press switches 1, 3, 4 and 5
- 'La Malediccio'On the Map of Paris, select Bijou's Apartment
- Ouroboros
- Hobbs' Sketch
Bijou's Apartment
Use the Intercom, then enter Bijou's Apartment
Talk to Bijou
- SongExit the apartment and street
- Exit Conversation
Vera Security
Examine the Stall and the Musical Greeting Cards
Talk to Bassam
- Songand get a Musical Card
- Exit Conversation
Bijou's Apartment
Use the Intercom, then enter Bijou's Apartment
Scan left and give the Musical Card to Bijou
Zoom in on the Dressing Table and pick up a Wax Strip
Back out and use the Wax Strip on the Stuffed Dog at far right
Take the White Flower from the Coffin
Scan left and zoom in on the Dressing Table again
Use the Waxed Dog Hairs from inventory on George's Neck
Use the Brown Eyeshadow
Use the Glasses from inventory on the Eyes
Use the White Flower from inventory on the Button Hole
Use the Eau de Toilette from inventory on the Neck
{Cutscene}
Bijou's Keys are added to the inventory
Achievement: Boogie Nights
Exhaust the five dialog choices with the priest
Use Bijou's Keys to open the Gallery Door
Enter Henri's office at left
Examine the Statue and its Fig Leaf
Zoom in on the Safe at the base of the statue
Use Bijou's Keys in the Keyhole
Take the Diamond Ring, the Note and the Paperwork
Put Hobbs' Sketch on the table next to the Provenance
Click twice on the Provenance to rotate it upside down and match it with the
Sketch
Use the Diamond Ring on the Window
Achievement: Diamond Geezer
Enter the Gallery Door
Take the Papers from Simeon
Back out
Adam's Apartment
Examine the Overturned Chair to get the Medallion
Examine the Mess on the floor to get Marques' Family Photograph
Examine the Sofa to get Marques' Scribbled Photograph
Back out and examine the Blood on the floor
Flower Shop
Get some Yarn from Fleur, the flower shop owner
Give the Coin to Adam
Zoom in on the CD Player and press its Stop and Eject Buttons
Take the Compact Disc
Open the Battery Compartment and take the Battery
Back out and put the Compact Disc into the Stereo on the counter
Examine the Boxes at right, then pick up a Manneken Pis statue
Combine Whiskey & Manneken Pis in inventory
Combine Battery & Manneken Pis in inventory
Put the Manneken Pis into the Trolley
Push the Manneken in a Trolley
Achievement: Fountain of Youth
Bijou's Apartment
Use the Intercom, then enter Bijou's Apartment
Talk to Bijou
- Hobbs' Note
- Hobbs
- Provenance
- Henri
- Hobbs
- Gallery
- Medovsky
London: Hobbs
Back at Hobbs' place, you now have a Chain from the gate
Pick up the Crowbar behind the van
Zoom in on the Van and honk the Horn
Climb the Drainpipe in the right corner
Talk to Nico
- Van HornTimed sequence: Once Nico honks the horn, you have about 10 seconds to use the Crowbar from inventory on the Crane overhead
Castell dels Sants
{Cutscene}
Now playing as Nico, pick up a Helmet from the grass
Combine Mop & Helmet in inventory
Use Mop with Helmet on the Crumbled Wall
Timed sequence: Playing as George, use the Apple Tree, then quickly click
on the Dodge hotspot as soon as it appears to the left of the tree trunk
Pick up the fallen Apples and throw them toward the Bottles at right
Move the tire
Take the Side Mirror from the car
Achievement: Order of the Goat
Use the Wing Mirror with the Sun at upper left
Talk to the Old man
- FriendIn the conversation with Eva:
- Marques
- EvaExit through the double Door at right
- Marques
- La Malediccio
Achievement: Bons Hommes
The fully-decrypted telegram is here.
Black encoded letter Keypad Rationale L s See above U t H o A p G a See above P i I h 21st word T_IS → THIS T u 6th word O_T → OUT W e 1st word TH_ → THE C v 19th word HA_E → HAVE M r 3rd word VE_ITATIS → VERITATIS V b 2nd word TA_U_A → TABULA E l Q w 4th word _AS → WAS Y g 13th word _ROUP → GROUP N y 11th and 25th words are BE or BY, but 29th word is unlikely to start with EE B f 7th and 14th words O_ → OF F m 22nd word FRO_ → FROM R d 5th word SMUGGLE_ → SMUGGLED S c 20th word _O_FIRMED → CONFIRMED X n D x 24th word E_TRACTED → EXTRACTED O q 28th word IN_UISITOR → INQUISITOR
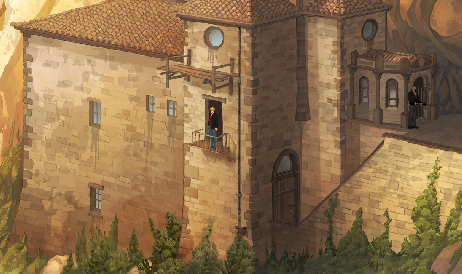
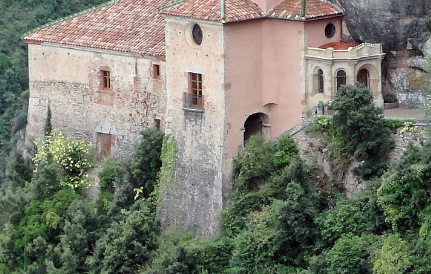
Montserrat
On arrival at Monserrat, you can see the game's faithful rendition of the monastery as compared to reality:


Use the Stairs at lower right
Use the Door
Scan left and use the Telescope
In the close-up, scan slightly left from the station to the mountain, then scan
upward until a Rock Face hotspot appears and you can click on it
Use the Telescope again
Scan all the way right to the cable car, then use the Wing Mirror from inventory
on the Glint hotspot to learn the door code
Use the Door to enter the cable car station
Pick up the Lunch Box next to the counter and put it into the Cogs at lower
right
Use the Lever on the console at left
Use the Paper Clip on the Jam on the cogs
Pick up the Lunch Box to get a Radio
Use the Radio on the Cupboard behind the counter
After a little Pirates of Penzance, Kat will show you how to fix the
cable car console
Zoom in on the Hatch
Combine Matchbox containing Cockroach & Sticky Paper Clip in inventory
Put the Piece of Rich Tea Biscuit on the Prongs in the foreground
Put the Matchbox containing Cockroach onto the Front
Achievement: Hot Wire
Santa Cova Chapel
Enter the Santa Cova (Holy Cave) Chapel Door
Scan right and wait until you can see the tune that Duane is whistling:
which is the sequence of notes G F# G B A G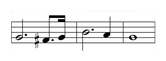
- Pearland Nico describes "smells, bells, and heavenly lights"
- Santa Cova
- Spiritual Experience
- Exit Conversation
Oil DrumPick up the Wood Shavings from the floor
Right-hand Paint Tin
Oil Drum
Fire Extinguisher
Left-hand Paint Tin
Oil Drum
- La MalediccioScan all the way right and pick up a Candle
Here is one methodology: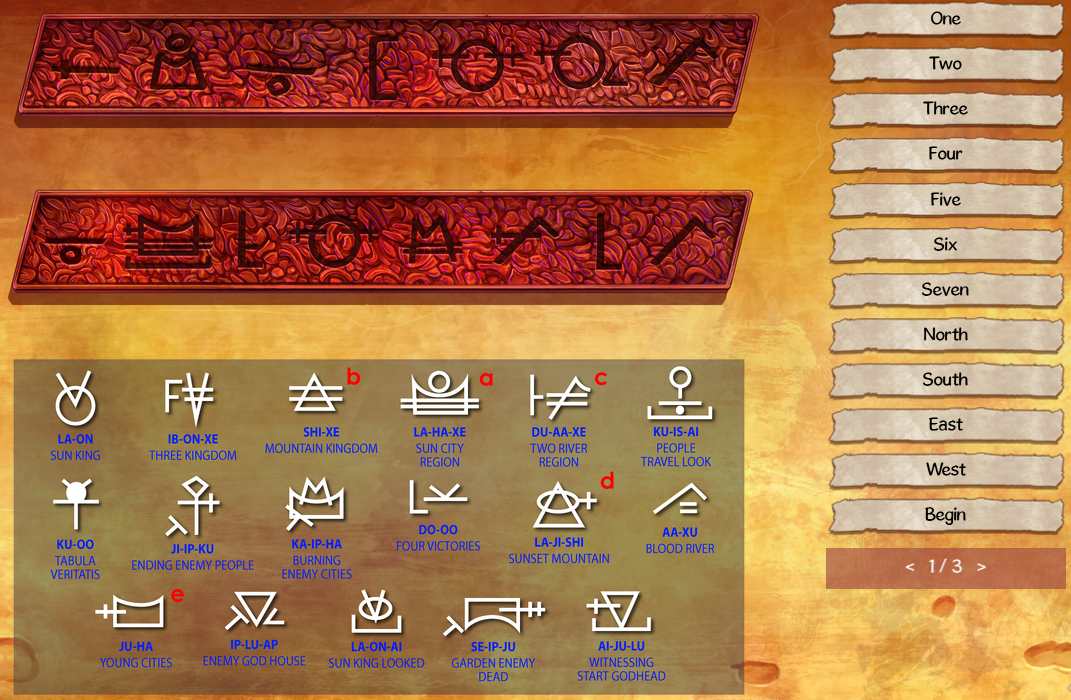
At this point, all but the second glyph on Line 2 have been translated, so each of the 25 remaining answers can be tried for it until George announces the solution
Glyph Combination Meaning Line(s) Three Kingdom Three Two River Region Two Four Victories Four 2 Three - Two One Four + One Five 1 Four + Two Six 2 Ending Enemy People ∩ Burning Enemy Cities ∩ Enemy God House Enemy Sun King ∩ Sun City Region Sun Sun King Looked - Sun King Look People Travel Look ∩ Ending Enemy People People People Travel Look - People - Look Travel 1 & 2 Ending Enemy People - Enemy - People End Enemy God House ∩ Witnessing Start Godhead God Witnessing Start Godhead - Look - God Begin 1 Begin + Sun + End Day 1 & 2 Enemy God House - Enemy - God House Begin + Sun + House East 1 Two River Region ∩ Blood River River 1 & 2 Begin + River Source 2 Sun City Region ∩ Young Cities City Sun + City Sun City 1 Burning Enemy Cities - Enemy - City Burning Sun City Region ∩ Two River Region Region Burning + Region Desert 2
- TruthScan right and exit to the Balcony
Put the Radio in the Drain at the bottom of the drainpipe
Timed sequence: After Nico is heard over the radio and the Guard reaches
the bottom of the steps, you have about 15 seconds to use the Mason's Hammer
on him
Achievement: Gravity Depravity
Go to the Entrance
Scan left and exit through the Door
Use the Yarn on the Door of the cable car, then use the Door
Use the Window Catch
Now playing as Nico, talk to Shears
- ShearsAchievement: Philosophy 101
- Shears
- Free Will
- Determinism
- Chelsea
- Henri
- Redemption
Eden
After he has a dream sequence, George is in 86°F northern Iraq with Nico and Spears
Achievement: Balance
Take Figs from the tree twice
Scan all the way left
Note the two Assyrian shedu here, then scan right
Examine the Back of Truck
Take the Knapsack from the Back of Truck
Throw a Handful of Figs to the Bottom of Path under the columns at far left
Give the Knapsack to Shears
Take Duct Tape, Petrol Lighter, TNT, mottled Dynamite at center, and Fuse
Wire
Combine Sausage & Fuse Wire in inventory
Back out and throw a Handful of Figs to Langham's Henchmen
Scan right and put the Primed Sausage onto the Goat
Use the Lighter on the Goat
Throw a Handful of Figs to the Path near the truck
Achievement: Cry Havoc!
Use the Lighter on the Dark Hole twice
Use the Lighter on the Dead Bush
Use the Eau de Toilette on the Dead Bush
Use the Ladder
In the conversation with Langham:
- EdenNow playing as Nico, use the Ladder
- Tabula Veritatis
- Deicide
Copyright © 2020 Balmoral Software (http://www.balmoralsoftware.com). Portions copyright © 2014 by Revolution Software Limited. All rights reserved. Republication, redistribution or conversion is expressly prohibited without the prior written consent of Balmoral Software.


