 Alien Skeleton
Copyright © 1997 Balmoral Software (http://www.balmoralsoftware.com). Portions copyright © 1995 LucasArts Entertainment Company. All rights reserved. Republication, redistribution or conversion is expressly prohibited without the prior written consent of Balmoral Software. Contents subject to change! For the latest information, see http://www.balmoralsoftware.com.
The Dig is an interesting 1995 sci-fi adventure game that can now be obtained at discount. It has excellent background music that really sets the atmosphere for the alien world your character explores. Ambient sounds are particularly noteworthy; they include, for example, realistic whistling wind, ocean waves, and footsteps that are suitably gritty and echoing. The voice acting is quite good, sounding authentic and professional, with some enjoyable humor popping up occasionally in the banter between the characters.
Graphics are in the low-res, hand-painted style of Monkey Island, but their limitations don't really detract from the overall enjoyment of the game. The overall plot, attributed to Steven Spielberg, is quite engrossing and retains consistency throughout the game. Many of the tasks your character must perform involve finding and using inventory items, so much of the game activity centers on clicking on well-identified hotspots to see what happens. Gameplay is rather single-threaded throughout, with progress often halted until a particular trigger event occurs. The game would have been more enjoyable and complex if alternatives for solving problems were available.
With its top-notch soundtrack and acting, The Dig will be an enjoyable gaming experience, especially for science fiction fans.
Quick Start:
P at Main Menu ("Play The DIG")To talk to someone, either click on them (if present) or use the PenUltimate communicator. Icons representing various dialogue choices will appear at the bottom of the screen. Click on one of them to discuss the subject. A dialogue icon will "blue out" when no further dialogue on that subject is possible. To repeat dialogue, re-initiate the conversation.
Esc after cloud background appears
F1 for game control menu
Click on the "i" logo at lower left to bring up inventory (or simply right-click the mouse). Additional details on inventory items can be obtained by using the Examine tool in the upper-left corner of the inventory display.
On the maps, screens requiring scrolling are indicated by double borders. Light bridges are identified by dots, and trams by dashes.
The Esc key can be used to skip some animations and character dialogues.
Not all details are shown in the walkthrough - just the essential ones. Lots of hotspots and dialogue options provide interesting backstory items and add to the atmosphere and character development.
Use the PenUltimate in inventory and click on the right-hand "Comm" button (the left-hand "asteroid lander" button brings up an optional arcade-style game)
Click on Payload Specialist Miles' picture and talk to her about the "Flying Pig" (a freefall tool chest)
Click on the Flying Pig to take it down to Quadrant 1 of the asteroid
Open the Flying Pig and take a closer look at it
Pick up the zero-G digger, the shovel, and explosive units Alpha and Beta
Return to the asteroid
Communicate with Borden about the nuclear explosive, and he'll tell you to plant the Alpha charge on a level surface in Quadrant 2 of the asteroid
Return to space and click on quadrant 2 (upper right) when you're viewing the whole asteroid
Use the zero-G digger to smooth out the target surface at upper center
Use explosive unit Alpha with the dirt on the asteroid surface, then use the arming key in your inventory (it looks like a safety razor) with the explosive
Communicate with Borden again about the nuclear explosive, and he'll tell you to plant the Beta charge on a level surface in Quadrant 3 of the asteroid
Return to space and click on quadrant 3 (lower left) of the asteroid
Use the shovel to remove the boulder, then place explosive unit Beta on the exposed asteroid surface and arm it with your arming key
Return to space (asteroid view), then click on the left edge of the screen to return to the shuttle
Talk to Borden about the nuclear explosive
After Attila's orbit is stabilized, you'll go back to its surface for a closer look
Push the metallic plate at right, and you'll learn about Low's secret orders to look for any sign of alien presence on Attila
Use the zero-G digger on each of the odd projections and push the metal plates exposed underneath them
Enter the dark tunnel formed at left when the largest metal plate sinks into the rock
Enter the interior of the asteroid and click on the pentagonal pedestal at right
Arrange the four plates in the square indentation in the pedestal (the proper arrangement can be seen in the logo at lower left of your PenUltimate)
When all four plates have been placed, the square rearranges itself into a triangle and the asteroid turns into a dodecahedron-shaped starship that takes you to planet Cocytus
On landing, you'll find yourself in a large canyon on an island surrounded by five tall spires
After spacesuits are removed (and voices improve), move into the clearing
Head for the unknown area (wreck) at left
Enter the alien spaceship wreck and pick up the alien device from inside the chest
Touch the hanging wire and pick up a yellow engraved rod dropped by the alien apparition
Take the wire and return to the clearing
Go to the unknown area (grave) at top and use the shovel to dig up the grave
Pick up a jaw bone and tusk from the grave
Return to the clearing and head for the unknown area (dirt ramp) at upper right
Use the alien device in your inventory, then use the shovel to excavate the small mound
Take the bracelet and return to the dais in the center of the clearing
Use the shovel to dig in the small hole into which the alien ghost disappears
After Brink dies in a fall and Maggie deserts you, you'll find yourself in the Nexus, which is a circular subterranean chamber in the central Cocytus island
Pick up the plate at your feet and use it in the alcove to the right of the rockfall
Walk to the right past a column and pick up a purple engraved rod
Continue to the right and descend a ramp in front of a dark tunnel
Looking over the platform edge, you'll see three energy beams, one of which appears to be misdirected due to a fallen lens
Returning your view back up to the platform, click on the control panel
The buttons on the panel are used to program the movements of a robot device:
Upper White: Erase last commandThe following program can be used to pick up the unattached lens:
Blue: Move robot up
Purple: Move robot left
Red: Use robot manipulator
Green: Move robot right
Lower White: Clear entire program
Yellow: Move robot down
4 PurpleAfter the program is entered, exit the control panel and activate the robot by pressing the triangular button on the console at the left edge of the platform
2 Yellow
Red
Use the following program to reattach the lens:
Lower White (erases previous program)and again use the triangular button to activate the robot
5 Purple
4 Blue
Red
Before leaving the power plant, remove the loose plate at the base of the ramp and take the blue crystal
Go back up the ramp to the Nexus, then walk left
Stopping in front of the column, you'll see that it is now flowing with energy
Using the tusk, remove the door panel to the right of the column
Attach one end of the wire to the uncovered door panel, then connect the other end to the sparking power conduit on the floor
The door panel is now activated; you'll return to open it later
For now, move one door to the right (to the door immediately left of the dark tunnel)
Zoom in on its door panel and you'll find that it is a four-element combination lock, each element of which is one of the five shapes
Tetrahedronin one of the three colors
Cube
Square
Ball
Hexagon
RedRather than trying all 50,625 combinations, enter the solution found by applying the Examine tool to the purple engraving rod (solutions on engraving rods randomize with each game)
Green
Blue
Enter through the open door and descend to a "tram stop"
Call the tram using the unknown button in the center of the platform
Scroll left and enter the tram, taking it to the Museum Spire
Referring to the Museum Spire map, make your way outside and up the spire path
At the top of the path, zoom in on the strange device
Hold down the pentagonal button at left until a line is formed from one of the circular spires on the map to the center pentagon
If a line does not form, try backing out from the device and orienting the lens below it once or twice
If a line still does not form, back out from the device and open its side panel
Zoom in on the exposed panel, then:
Rotate the center prism until its white line is pointing to the prism at lower leftWhen the line appears on the device panel, an aerial light bridge appears from the lens location to a central crystal form suspended over the nexus island (see map)
Rotate the lower-left prism until its green line is pointing to the prism at upper left
Rotate the upper-left prism until its green line is pointing to the green crystal at the top
If necessary, rotate the lower-right prism until its orange line is pointing to the orange crystal at left
Rotate the upper-right prism until its blue line is pointing to the blue crystal at the bottom
Retry the strange device and lens
Once two or more of these light bridges have been formed, they can be used to move between spires more quickly than with underwater trams
When you've finished exploring the light bridge and crystal form, return to the Museum Spire and enter the triangular door into the museum
Pick up the tablet near the entrance door, glowing life crystals on the floor and a red engraved rod at far left
For information about the aliens that used to inhabit Cocytus and about the glowing life crystals you found, check out the displays on the museum walls
When finished, enter the door at the left of the museum, into the library
Talk to Maggie, then return to the Nexus via the Museum Spire tram you used earlier
Move right, to Brink's body
Use one of the glowing life crystals to resuscitate Brink
Return to the tram station in the base of the Museum Spire, accompanied by Brink
With his help, open the weakened door at the bottom of the tram steps
Pick up some more life crystals and a canister
Exit the room and go outside
At the bottom of the spire path, note the fossil
Proceed toward the water at right
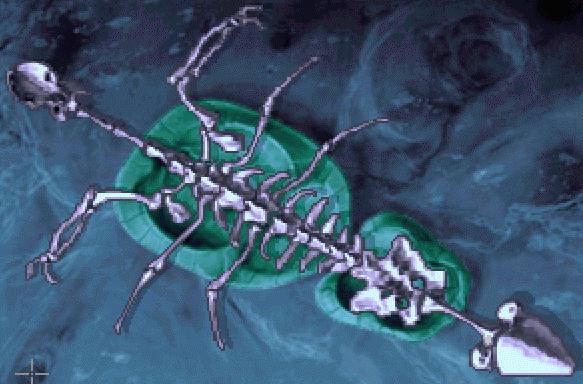
After the turtle-like animal is consumed by the sea monster and Brink is scared off, zoom in on the loose turtle bones
Here is probably the most difficult puzzle in the game - you must correctly rearrange the bones according to the fossil you saw earlier:
Right-click the individual bones to rotate them
When the skeleton has been properly reassembled and you've zoomed back out, the screen hotspot will identify it as "dead creature" rather than "loose bones" (fortunately, the bone positions you changed are remembered after you zoom out)
Use the canister with the dead creature, then reanimate it with a life crystal
Dive into the water and swim to that underwater cave
Enter the chamber and pick up the plate and the orange engraved rod
Return to the Nexus via the Museum Spire tram
After Examining the orange engraved rod, use its combination to open the door to the right of the dark tunnel
Enter through the open door and descend to another tram stop
Call the tram using the button at the left of the platform
Enter the tram, taking it to the Planetarium Spire
Referring to the Planetarium Spire map, make your way outside and up the pathway
To cross the gap in the path, synchronize your click on the "far side" hotspot with the surf and it will conveniently float you over (otherwise, you'll take a swim and will have to retry it)
When you've crossed the gap, fix it by pushing over a boulder with the shovel
Continue up the spire into the clearing and cross the waterfall bridge into the crevice
Pick up the blue rod, then return outside to the clearing
As before, activate a light bridge using the strange device and lens
Head for the plateau at the back of the clearing and watch a rat-like creature steal a device necessary for accessing a door in the back wall
Pick up the dowel immediately below the door panel and insert it into the hole in one of the wheel-like designs flanking the pathway
Pull out the pole beneath the wheel design, then pick it up and use it with the dowel pin
Pick up the rib cage in front of the back door and attach it to the hook at the end of the elevated pole
To complete your rat trap, pick up the rod below the wheel design and use it with the cage
To scare the thief into your trap, investigate the various holes in the back wall until the animal appears
Wait for him to come out, then move toward him
When he runs off to the lower right, go and stand just to the left of the space between the two wheel designs (the screen will scroll left)
If he comes onto the pathway between the wheels, quickly move toward him and run him into the trap (otherwise, repeat the procedure)
Put the bracelet on the critter, then click on the trap to release him
Return the ribcage to the hook, but take the rod
Use the shovel to dig out the cave entrance to the left of the wheel designs
Enter the cave and use the alien tracking device in your inventory
Dig with the shovel at the tracker spot, then pick up the machine part
Exit the cave and use the machine part in the back door panel
Complete the panel by reinstalling the cover that has fallen off it
Use the panel to open the door in the back wall
Enter into a dodecahedron-shaped planetarium
Pick up the green engraved rod, the plate and the twin scepters
Activate the planetarium by using the gold scepter with the faint light in the ceiling
Click the gold scepter on the planet
Move the gold scepter to the two o'clock position (with respect to the planet) and click it
The large moon will rotate to that position and stop
Click the right mouse button twice and take the silver scepter from inventory
Move the silver scepter to the seven o'clock position (with respect to the large moon) and click it
When the large and small moons have been correctly oriented, an animation will automatically play and the critter will try to lock you inside the planetarium
Return the silver scepter to inventory and click on the wall button to open the door and exit the planetarium
Return to the Museum Spire via the light bridges, then to the Nexus via the Museum Spire tram
After Examining the green engraved rod, use its combination to open the door immediately to the right of the energy column
Enter through the open door and descend to a tram stop
Call the tram using the button at the right of the platform
Enter the tram, taking it to the Map Spire
Referring to the Map Spire map, head for the map room
After Examining the red engraved rod, enter its combination into the map room panel
You'll then see a visual indication of a crypt passage
Exit the map room through the opening at top left
As before, activate a light bridge using the strange device and lens
Return to the Museum Spire via the light bridges, then to the Nexus via the Museum Spire tram
Head down the dark tunnel and watch one of the best rendered animations in the game
Move to the left of the crystalline room and click on the exterior green button to open the airlock door
Enter the airlock and press the interior green button twice; proceed left into the Nexus command center
Zoom in on the glowing panel in the foreground
Put the blue rod from your inventory into one of the three holes at right
Click on the dark crystal at far left
Starting with all blue rods fully depressed, slowly drag each one up until the far-left crystal reaches maximum whiteness (the optimum rod positions randomize with each game)
When the left crystal looks like the other four, the Tomb Spire tram has been activated
Return through the airlock and dark tunnel to the Nexus
Use the combination from the red engraved rod to open the door to the left of the energy column
Enter through the open door and descend to a tram stop
Call the tram using the button at the right of the platform
Scroll left and enter the tram, taking it to the Tomb Spire
Referring to the Tomb Spire map, head up to the plateau edge, then continue on the path
As before, activate a light bridge using the strange device and lens
Here, an engraving on the wall gives some clue as to the moon orientations that were required in the planetarium
Return to the plateau edge and move the stone plate with the shovel
Go through the hole and into the tomb
Light up the tomb by using the blue crystal in the hole in the wall
Stand on the floor tile in the foreground marked with two crescent moons and an overhead light shutter will open
Use the rod with the loose stone you're standing on to block the shutter open
Exit the tomb and push away dirt covering the lens in the tomb ceiling
A light beam from the eclipsing moons now activates an elevator to the tomb crypt
When you've reentered the tomb, click on the alien statue and it will dissolve
Click on the front face of the platform to descend into the crypt
Move left from the triangular levitating platform and click on the triangular door
After the right-hand "guard dog" is reanimated, bring the left-hand pile of bones to life using a glowing crystal and the two beasts will annihilate each other
Evaporate the door by using the ghost's engraved rod with the slot next to the door
Proceed through the doorway to a pyramidal tomb
Use the ghost's engraved rod with the pyramid panel and animate the alien with a life crystal
Stop talking to the alien since you can't understand him (yet)
After Maggie is abducted by a big alien spider, you'll need to coerce Brink into helping you
Retrace your steps out of the tomb, then follow the path past the light bridge into Brink's cave
Use the flashlight on the bat creatures on the ceiling to scare Brink out of the cave
Move forward to the platform where Brink was working and take his stash of crystals
You'll then bargain with Brink to help you find Maggie
Exit the cave and go to the Map Spire via the light bridges
Head for the nest via the map room, pit and chamber
Talk to Brink about the monster, then head for the falls source
Push the rock to permanently divert the waterfall into the grate
Return to the nest and talk to Brink about the grate near Maggie
After the spider is washed away and Brink runs off again, go to the strange field using a small opening near the doorway to the tram station
Show the tablet to Robbins, then enter the opening in the island and pick up the last plate
Head for the Planetarium Spire crevice via the light bridges
Use the jaw bone on Brink
Put the remaining plates into the alcove, and the Cathedral Spire door will open
Enter through the open door and descend to a tram stop
Call the tram using the button at the edge of the platform
Enter the tram, taking it to the Cathedral Spire
Referring to the Cathedral Spire map, enter the alien lab and zoom in on the console at the bottom
Look at the gap in the machinery, then zoom out and talk to Robbins about the alien device
Scroll up and exit the lab at the top of the spiral walkway
Scroll left and remove the bird's nest from the light bridge lens
As before, activate the light bridge using the strange device and lens
Go to the Museum Spire via the light bridges, then head for its tram station
In the small room near the tram station, pick up one or more life crystals to replace the ones Brink stole from you
Use the light bridges to take Maggie to the alien's pyramid in the Tomb Spire
Again use the ghost's engraved rod with the pyramid panel and animate the alien with a life crystal
Talk to the alien four times about the alien device, then twice about the eye part (note that if you stop talking to the alien, you'll have to use another life crystal to talk to him again)
The creator's engraved rod will appear at your feet; pick it up
Go to the map room in the Map Spire via the light bridges
After Examining the creator's engraving, enter its combination into the map room panel and you'll see a visual indication of a beach area
Head for the beach via the pit, chamber, nest and waterfalls
Pick up the eye part between the two grey stones in the foreground
Return via the light bridges to the alien lab in the Cathedral Spire
After Brink robs you again of any life crystals you're carrying, return via the light bridges to Brink's cave platform in the Tomb Spire
Show Brink the eye part, then use it in the slot in the relic
After two life crystals are formed, remove the eye part from the alien machine and Brink will go skydiving
You have enough life crystals for the eye machine console, but to explore the alternate ending, replace the eye part in the relic slot and pick up more life crystals and the eye part
Use the light bridges to go to the alien lab in the Cathedral Spire
Put two life crystals and the eye part into the console at the bottom of the lab
Zoom out and go back up the spiral walkway to talk to Robbins about the alien device
After Maggie is killed, go up the walkway and exit the alien lab at the top
Use the light bridge
When the guard dog blocks you, immediately use the switch in the strange device to dissolve the light bridge and dispose of the guard dog with a real TIE Fighter sound
Reactivate the light bridge and use it to enter the Eye
Touch the portal into SpaceTime 6, then watch the aliens return (some to areas not seen before)
It's not clear what happened to Maggie's and Brink's corpses, but they reappear alive with the aliens
After the mutual admiration is finished, watch the endgame sequence depicting your return to Earth
At the end of the credits, you can hear the spider monster
Alternate Ending
For less hugging and more slapping, try using a life crystal on Maggie before leaving the alien lab
After she takes a high dive, continue as above
Copyright © 1997 Balmoral Software (http://www.balmoralsoftware.com). Portions copyright © 1995 LucasArts Entertainment Company. All rights reserved. Republication, redistribution or conversion is expressly prohibited without the prior written consent of Balmoral Software. Contents subject to change! For the latest information, see http://www.balmoralsoftware.com.