Entombed V1.5 Walkthrough
13 August 1995
Copyright © 1995 Balmoral Software
(http://www.balmoralsoftware.com). All rights reserved.
Republication, redistribution or conversion is expressly prohibited without the
prior written consent of Balmoral Software. Contents subject to
change! For the latest information, see
http://www.balmoralsoftware.com.
To turn lights on in a room, click 4-arrows cursor on light panel. Click earth
until its light side is at the same orientation as the darkened ray of the sun,
then click moon.
For item description, place next to eye symbol.
To wield item, place next to hand symbol.
Pick up stone from debris on floor.
Go to set of steps.
Press second pressure switch from the right.
Go to morning puzzle.
Swap piece in Row 3, Column 1 with empty space until the piece changes into a
moon.
Rotate the outer ring of 12 pieces clockwise until there are 4 suns along the
top row.
Rotate outer ring of lower three rows (10 pieces) clockwise until there are 4
suns in the second row.
Swap piece in Row 4, Column 1 with empty space until the piece changes into a
bar.
Move the piece in Row 4, Column 1 up.
Puzzle now has top half all suns, bottom half all bars (earth symbol).
Solution of morning puzzle opens north door.
Go north to day room.
Solve floor tile puzzle per Henry Who's diary:
Some puzzles top to bottom, left to right
Other puzzles bottom to top, right to left
Go east to star chamber.
Solve right-hand floor tile puzzle (east).
Go east to evening chamber.
Go to evening puzzle on the right.
Place paper template of strips numbered 1 (bottom) to 7 (top) next to
rectangular shore symbol.
Click on sky symbol.
Write down sequence of 7 numbers.
Remove template.
Press points of wave shape in correct order (1 at left, 7 at right).
Solution of evening puzzle opens south door.
Go south to night room.
Go to night puzzle.
Sequentially click moon and stars in bottom row until a completed star is
made.
Then alternate moon & sun until completed star is moved out of the leftmost
position.
Repeat procedure until no stars remain in bottom row.
When puzzle completes, click on sun symbol, then on item area to retrieve
Missing Day Piece.
Return to morning room via 2 floor-tile puzzles.
Press in all 4 pressure switches.
Go to day room.
Click on Missing Day Piece in Item Area (cursor changes to pointing hand).
Click on hole in day puzzle.
Assuming north-pointing triangle is numbered 1, press triangles 16, 12, 8, 4
(corresponding to longer rays of four corners in morning puzzle).
Return to star chamber via floor-tile puzzle.
          Sun   Sun   Sun   Moon   Moon   Moon
Clicks:    2     4    14      2      4     14
by rote enumeration of all 4,194,304 possibilities (16 solutions):
                    Piece
Button   M3   M2   M1   S1   S2   S3     Period
Sun A                    8        -1       16
Sun B               4        -2   -2        8
Sun C                   -4        -1       16
Moon A   -1        -4                      16
Moon B   -2   -2         4                  8
Moon C   -1         8                      16
Each piece must be changed by 8 (modulo 16).
Entombed Level 2.
         Laser Sculpting   Impact Crushing   Furnace
                |                 |             |
                |                 |             |
                +---------- Stair Chamber ------+      Tunnel
                                  |                      |
                                  |                      |
                                  +----- Great Hall -----+
                                             |
                                             |
                         Day Room ----- Star Chamber ----- Evening Room
                            |                                   |
                            |                                   |
                       Morning Room ---- Acid Moat -------- Night Room
To activate Level 2 light switches, click on moon then each wave, bottom to
top.
Repeat procedure if necessary.
Wield Stone.
Click forward through double doors, then immediately click forward again to
enter the Great Hall.
If desired, click on altar for animation.
Go right to prism puzzle.
Click bottom row of six triangles once each, left to right.
Solution to puzzle opens door to the north.
Use left and right movement buttons to exchange positions of red and white
balls.
Use of vertical and random movement buttons may also be necessary.
Puzzle solution opens door to the north (Stair Chamber).
Worm hole symbol opens and closes door to staircase.
Three-position energy phases switch opens doors on next level (one at a time,
and only when staircase door is closed).
Set up next-level doors left to right (top to bottom on wall symbol).
Set power levels at 1 2 3 3 (left to right), then press chisel symbol (second
from right).
Note: other crystals can be created using power levels 3 1 2 2 (Chunk #2) and
2 3 1 1 (Chunk #3), but these cannot be used in the furnace described below.
Pick up Chunk #1.
Return to Stair Chamber to gain access to next room.
Place crystal on machine.
Set power levels at 3 1 2 3 (left to right), then press pincers symbol at far
left.
Note that this power level sequence is a rotation of that used for the laser
sculpting machine.
Pick up Crushed Rock Grade 1.
Return to Stair Chamber to gain access to next room.
Place crushed rock in upper hopper.
Set power levels at 2 3 1 3 (left to right), then press flames symbol (second
from left).
Note that this power level sequence is a rotation of that used for the impact
crushing machine.
Pick up Dull Crystal.
Return to Night Room via floor tile puzzle.
Pick stellar pointer from south wall.
Go to set of steps.
Press far-left triangular pressure switch (pointing northeast).
Go to island.
Put Dull Crystal in central square hole.
Put Stellar Pointer in position corresponding to pressure switch.
Use lower square button to restore walkway to Night Room.
Repeat for other three pressure switches (in order left to right).
Pick up Energized Crystal.
Return to Tunnel Room via floor tile puzzle and electrified doorway (wait for
all clear).
Pick up loose torch from wall to the left of hole, put next to hand symbol.
Click on Energized Crystal, then on loose torch to make Torch with Crystal.
Enter tunnel.
Bear right at cave-in.
Entombed Level 3.
Floor     Crystal Color     Light Rings Color

  4       Dark Purple       Blue
  3       Light Purple      Medium Purple
  2       Yellow            Gold
  1       Light Blue        Medium Green
  0       Light Blue        Light Green


Stairs     Direction

  A        From Floor 2 up to Floor 3
  B        From Floor 3 up to Floor 4
  C        From Floor 4 down to Floor 3
  D        From Floor 3 down to Floor 2
  E        From Floor 2 down to Floor 1
  F        From Floor 1 up to Floor 2
  G        From Floor 2 up to Floor 3
  H        From Floor 3 down to Floor 2
  I        From Floor 2 down to Floor 1
  J        From Floor 1 down to Floor 0
  K        From Floor 0 up to Floor 1
  L        From Floor 1 down to Floor 0
  M        From Floor 0 up to Floor 1
  N        From Floor 1 up to Floor 2
  O        From Floor 2 up to Floor 3
  P        From Floor 3 down to Floor 2
  Q        From Floor 2 up to Floor 3
  R        From Floor 3 up to Floor 4
  S        From Floor 4 down to Floor 3
  T        From Floor 3 up to Floor 4
  U        From Floor 4 down to Floor 3
  V        From Floor 3 down to Floor 2
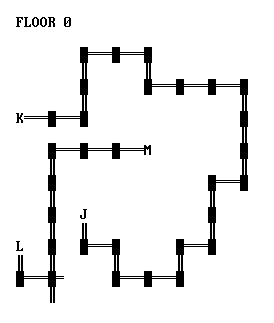 Maze Floor 0
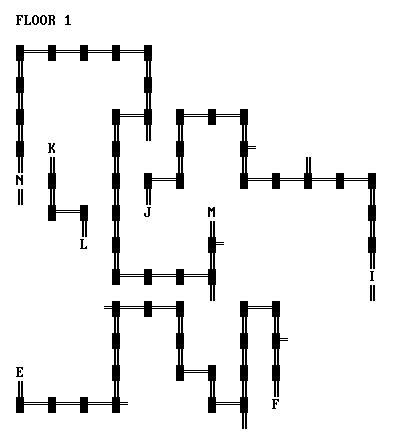 Maze Floor 1
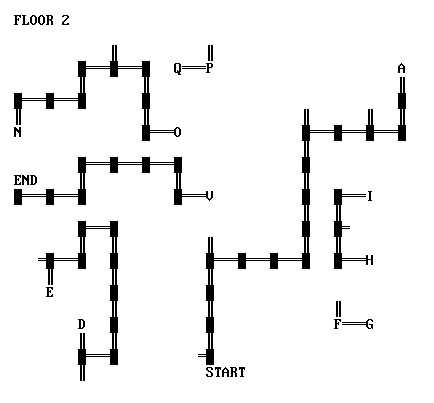 Maze Floor 2 (Start Here)
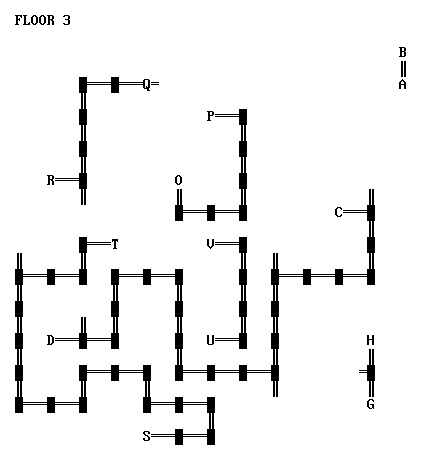 Maze Floor 3
 Maze Floor 4
Go through energy portal.
Entombed Level 4.
Go right to west puzzles.
Zoom in on block of ice (third archway from the right).
Use sequence:
	3  2  -
	1  -  -
Click on harmonic sequence generate button.
Pick up Teleportation Key.
Zoom in on altar.
Put key on altar screen.
For each symbol left to right, synchronize click with appearance of triangular
icon at right/upper-right of symbol (see description of Teleportation Key).
Altar is then activated with rotating red light.
Pick up Teleportation Key and zoom back out to teleport to the Great Hall.
Follow procedure above to create an energized crystal.
Pick up Energized Crystal.
Return to Great Hall via floor tile puzzle and electrified doorway (wait for all
clear).
Go to altar in Great Hall.
Follow procedure above to teleport back to final chamber.
Go right to west puzzles.
Zoom in on cryogenic nuclear furnace (first archway on the left).
Click on door to open it.
Put Energized Crystal in to furnace.
Close door.
Zoom in on radioactive control rods rack (second archway from the left).
Pick up Cryolon Gloves.
Put next to hand icon in User Area.
Click on top control rod.
Zoom back to furnace.
Put in lower-left hole.
Repeat procedure for other two control rods.
Other three control rods then pop out.
Move them back to the rack (must click on shaft center of rod to remove it).
Removal of third rod activates furnace.
Go to east puzzles.
Zoom in on stellar map (second archway from the right).
Exchange blocks to form outer circle.
Zoom in on timer circuit puzzle (first archway on the right).
Make six connections shown in completed stellar map grid:
		4
		5
	1		 8
	2		 9
	3		10
		6	11
		7
Connect 1&2, 1&7, 3&4, 6&8, 6&11, 9&10.
Go to sarcophagus behind altar.
Open sarcophagus.
Entombed Level 5.
Will awaken in year 2062 (next opening of portal).
Go to third puzzle from the left, east side.
Use sequence:
	-  -  1
	-  2  3
Click on harmonic sequence generate button, pick up Mind Link Spectacles.
Put spectacles next to hand icon.
Go to third puzzle from the right, east side (stone pedestal with glass
case).
Click on white square.
Henry Who's diary icon then changes -- click on it to read instructions.
Remove spectacles.
Go to second puzzle from the right, west side.
Use sequence:
	6  8  7  4
	2  3  1  5
Go to puzzle on far right, west side.
Use sequence:
	6  3  8  5
	1  7  4  2
Go to puzzle on far left, east side.
Use sequence:
	7  3  5  1
	-  4  2  6
Go to second puzzle from the left, east side.
Use sequence:
	3  1  4  5
	6  2  -  7
Go to moat, four crystals and ghost skiff appear.
For crystals numbered 1 2 3 4, only valid multiple-crystal combinations are 1 3
and 2 4 and one crystal is needed to return to dock from temple.
Click on 1 3.
Go to temple.
Click on 3.
Return to moat.
Click on 1 to remove it from boat.
Click on 2 4.
Go to temple.
Click on 2 4.
Enter temple.
Click on 3.
Zoom out.
Return to moat.
Click on 1.
Go to temple.
Click on 1 3.
Enter temple.
Minimizing and restoring game changes color of top crystal -- its color is
apparently irrelevant.
Try different two-crystal combinations until endgame starts.
Score 189/183.
Table of Contents
Home
Copyright © 1995 Balmoral Software
(http://www.balmoralsoftware.com). All rights reserved.
Republication, redistribution or conversion is expressly prohibited without the
prior written consent of Balmoral Software. Contents subject to
change! For the latest information, see
http://www.balmoralsoftware.com.