 Sun Map
Copyright © 1998 Balmoral Software (http://www.balmoralsoftware.com). Portions copyright © 1989 Cliff Johnson. All rights reserved. Republication, redistribution or conversion is expressly prohibited without the prior written consent of Balmoral Software. Contents subject to change! For the latest information, see http://www.balmoralsoftware.com.
Saved-game files are more like status files - they get updated with the progress of the game - so be sure to exit the program and copy the appropriate .TFE saved-game file if you want to return to a fixed point in the game.
Recheck the Sun map after each new scroll section is displayed.
The File | About selection shows your current progress in the game.
Switching between keyboard and mouse control is accomplished with the INSTALL program.
Gameplay consists of disclosing various scroll sections; if a section contains a ? icon at the bottom, it has an associated puzzle that can be accessed by pressing Enter. Unsolved puzzles are identified in the pull-down menus by icons to the left of the puzzle name. Greyed-out scroll sections are not accessible until a precursor puzzle is solved.
In keyboard mode, press Esc to access the upper pulldown menus. Press N for No to cancel saving a game.
In either keyboard or mouse mode, press PgDn to go to the most recent saved games at the bottom of the load-game list. There is a handy game-overwrite warning.
Cursor movement (keyboard arrow key) abbreviations:
L: Left (Ln for n repetitions)
R: Right
U: Up
D: Down
Thanks to Fredrik Ström, Marc Sira, Matthew Daly, and especially Stefan Bendt.
Corrected aspect ratio images courtesy of Cliff Johnson.
Other Puzzles
Scroll puzzles are accessed from the pull-down menus arranged along the top of the screen.
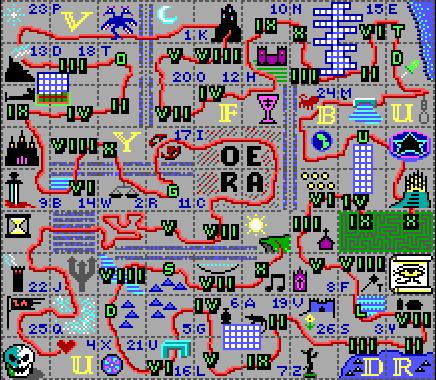
The Sun puzzle consists of a map in which 21 locations are initially displayed; turn them all over so that new locations can be easily identified. Reading the scroll sections from the pull-down menus will identify many of the initial map locations; for example, a reference to a lion in Strength (II) and to a strange bird in The Emperor (IV). The main objective of the first part of the game is to first uncover and then descramble the Sun map locations. Noting that there are 80 scroll sections in the pull-down menus and 81 Sun map locations, it should be obvious that there is a one-to-one relationship between scroll sections (whether or not they have an associated puzzle) and Sun map locations. It is therefore imperative that you revisit the Sun map every time a new scroll section is uncovered, and make a written note describing the newly-uncovered map location (unless you want to use the sun map solution given below).
After all puzzles have been solved and all sun map pieces displayed, the Sun puzzle can be solved. A continuous path through all scroll sections in order must be created:
On completion of the sun map, the Treasure Puzzles are available.
The Singer is a mask puzzle with solution
	a r e Y O U R e y e s B L I N D
	^           ^ ^   ^     ^   ^ ^
disclosing the three letters
B O W
The Page of Wands is a hidden-phrase puzzle in which hidden text may be found at the bottom of the screen:
TO THE EAST
The Knight of Wands is a decryption puzzle in which the initial clue
FBUMSFF = SADNESSgets you started toward the solution:
	       WELL
	     HE BEGAN
	   I MET A PAGE
	  IN MY TRAVELS
	AND HE WAS SEEKING
	   THE PYRAMIDS
This puzzle, actually a card game using a simplified Thoth tarot deck, requires you to beat the "Old Man" computer opponent by accumulating 700 points before he does. At the beginning of every turn, you're allowed to pick one of three dealt cards to add to your existing two-card hand:
	Old Man's     Dealt      Dealt      Dealt      Your
	Hand          Card 1     Card 2     Card 3     Hand

	Hand                                           Hand
	Card 1                                         Card 1

	Hand                                           Hand
	Card 2                                         Card 2
	(hidden)
We found the game to be too sensitive to mouse clicks, and recommend using the arrow keys to select cards after configuring the game for keyboard mode. A general strategy is to choose the dealt card that will maximize the value of your own hand while preventing the possibility of a high hand being created by your opponent. A "pass" or yield option is available by pressing the Y key if you feel more would be lost by allowing your opponent to take any of the dealt cards. The best combinations for each card (ranked from best to worst) are:
	Card		combined with			makes

	Death		High Priestess,Devil		Dark Pair
	Magician	Fool				High Pair
	High Priestess	Death,Devil			Dark Pair
	Hierophant	Justice,Judgement,Temperance	Council Pair
			Emperor,Empress,Hanged Man	Royal Pair
	Devil		Death,High Priestess		Dark Pair
	World		Moon,Star			Astral Pair
	Moon		World,Star			Astral Pair
	Star		World,Moon			Astral Pair
	Justice		Hierophant,Judgement,Temperance	Council Pair
	Judgement	Hierophant,Justice,Temperance	Council Pair
	Strength	Hanged Man,Hermit,Chariot	Mortal Pair
	Emperor		Hierophant,Empress,Hanged Man	Royal Pair
	Empress		Hierophant,Emperor,Hanged Man	Royal Pair
	Hanged Man	Strength,Hermit,Chariot		Mortal Pair
			Fortune Wheel,Lovers,Fool	Lucky Pair
	Hermit		Hierophant,Emperor,Empress	Royal Pair
			Strength,Hanged Man,Chariot	Mortal Pair
	Fortune Wheel	Hanged Man,Lovers,Fool		Lucky Pair
	Temperance	Hierophant,Justice,Judgement	Council Pair
	Tower		Chariot,Lovers,Fool		Low Pair
	Chariot		Strength,Hanged Man,Hermit	Mortal Pair
			Tower,Lovers,Fool		Low Pair
	Lovers		Hanged Man,Fortune Wheel,Fool	Lucky Pair
			Tower,Chariot,Fool		Low Pair
	Fool		Magician			High Pair
			Hanged Man,Fortune Wheel,Lovers	Lucky Pair
			Tower,Chariot,Lovers		Low Pair
The rankings of the pairs are:
Pair		Cards						Score

High Pair	Magician,Fool					81
Dark Pair	Death,High Priestess,Devil			72
Astral Pair	World,Moon,Star					63
Council Pair	Hierophant,Justice,Judgement,Temperance		54
Royal Pair	Hierophant,Emperor,Empress,Hermit		45
Mortal Pair	Strength,Hanged Man,Hermit,Chariot		36
Lucky Pair	Hanged Man,Fortune Wheel,Lovers,Fool		27
Low Pair	Tower,Chariot,Lovers,Fool			18
A triplet of cards from the same pair group beats any pair. Likewise, a pair beats any single card. A winning high card scores 9 points. A winning pair gains the score shown above. Triplets (all three cards from the same pair group) score an additional 72 points beyond the pair score. Tying pairs or triplets are ranked by the highest card they contain, using the basic card ranking in the first table above.
Armed with the tables above, you should be able to win a game relatively quickly. However, you will eventually win a game no matter what choices you make, so if you want to get on with the rest of The Fool's Errand without playing the Wheel of Fortune, you can hold down the Enter key for a few minutes until you win.
The Archway is a maze puzzle in which secret doors and panels may open or close unexpectedly as you try to maneuver the white dot to the exit at right. To traverse the maze, you can use the map
or the move sequence
U R3 U2 R2 U2 R U3 L U3 L2 D R D L D L D6 L2 U R U L U R U L U R U L U R U L U3 R8 D L D R D L D4 R D3 L D2 L2 D R3 U2 R2 U2 L U R U L U R U6 R D2 R2 U L U R3 D R U R2 D4 R U4 R2 D R U R D2 L3 D3 L D2 L2 U L4 U L D5 R D R D L D R2 U2 R2 D L D R2 U2 R U R D2 L D R2 U R D R U5 L2 U4 R2 D L D R2
The Canopy is a word search puzzle in which you must find the names of 23 delicious vegetables:
	. R . . C . L . . P . P . . . . . . . A . . . L
	C A B B A G E . T O M A T O . C E L E R Y . . E
	. D . . R . E . . T . R . . . . . . . T . . . T
	. I . . R . K . P A R S N I P . . O N I O N . T
	. S . . O . . A . T . L . . . . . . . C . . . U
	. H . . T . . S . O . E . B . . . . . H . C . C
	S . . . . . . P . . . Y . E . . . B . O . U . E
	C . . . . . . A . . . . . A . . . R . K . C . .
	A . R H U B A R B . . . . N . T . O . E . U . L
	L . . . . . . A . . . . . S . U . C . . . M . E
	L . . . . E G G P L A N T . . R . C . . . B . N
	I . . . . . . U . . . . . . . N . O . . . E . T
	O . . S Q U A S H . . C A U L I F L O W E R . I
	N . . . . . . . . . . . . . . P . I . . . . . L
The Fighting Boys is a word formula puzzle with solution
NEW GNUderived from the sequence
3 2 1 4 5
The Stone Wall is a letter-search puzzle with solution
R A T I V Y
The Queen of Wands is a word square puzzle with solution:
	S A D
	I C E
	N E W
In the Three Ships puzzle, you must click on the "?" icon, but if your mouse cursor gets too close to it, it jumps away! Using the clue in the solution to the Devil puzzle, note that typing in N, E, S or W on the keyboard causes the icon to move in the corresponding compass direction, without moving your mouse cursor. Exploit this trick to solve the puzzle by moving the icon to the cursor (rather than the other way around) using the keyboard keys for the compass directions.
The 1st Key of Thoth. On completion of the Three Ships puzzle, you'll momentarily see the message "Behold the 1st Key of Thoth", and your mouse cursor will change from a white arrow into a golden key. At this point you can complete the unfinished High Priestess puzzle.
The Juggler is a decryption puzzle in which the initial clue
PUGR OQUFEZ = MANY DEATHSgets you started toward the solution:
	I AM AFRAID THAT I AM
	NOT THE MESSENGER YOU
	  EXPECT  BUT I WAS
	TOLD TO WARN YOU THAT
	  TWO SHIPS APPROACH
	    FROM THE SOUTH
The Farmer is a polyomino puzzle with solution
The Blacksmith is a crossword puzzle based on similar-sounding word pairs:
MERRY / SORRYBROWN / CROWN
QUICK / QUILL
BLISS / AMISS
GROWL / SCOWL
WORTH / NORTH
GHOUL / GHOST
THROB / THREE
STILL / CHILL
The Cathedral is a jigsaw puzzle containing a large three-letter word:
In The Chapel puzzle, find the correct combination of the three letters missing from the picture:
FIE
The Humbug is a maze puzzle in which you must carefully retrace the overlapping path of the eye symbol. From the beginning, use the move sequence
U4 L6 U12 R5 D3 L6 U6 R7 D7 L8 D3 R6 D4 L6 D8 R12 U6 L5 U9 R5 D6 R3 D9 R22 U6 L2 D4 L16 U6 R5 D5 L7 U9 R8 D8 R7 U13 L5 U4 R9 D5 L4 U6 L9 D6 R6 U2 R5 D6 R2 U3 L3 D4 L4 U3 L14 D7 L5 D2 L11 U5 R11 U11 R5 D4 L5 U3 L6 D6 R11 U3 R4 U3 R9 D12 L15 D5The 2nd Key of Thoth. On completion of the Humbug maze, you'll encounter one of the animated or arcade-like puzzles in the game. Here, the object is to successfully click on each of four stationary pink squares against a randomly-changing background. In keyboard mode, a reliable way of solving the puzzle is to move the arrow cursor to the extreme upper right-hand corner and then use the move sequence
L17 D10 [Enter] U8 R11 [Enter] R4 D10 [Enter] U6 L9 [Enter]at which point the target areas are displayed on a static screen:
The Maze of Hedges is a maze puzzle in which some of the walls have yet to be discovered and many locations contain sources of "whispering winds" that will randomly reposition your white dot before you can maneuver it to the exit at right. To traverse the maze, you can use the map
which shows all hidden walls. Avoid locations indicated with a "W". If you are starting the maze from the beginning, you can also use the move sequence
R2 U L U R2 D2 R6 U3 L2 U R U L U L U R U L2 D2 L D2 L U L2 U L U2 L D L4 D R D L6 D L D2 L U3 R U L U R2 D R U2 L2 U2 L U2 R2 D2 R2 D4 R2 U L U2 R D R3 U L2 U L U L2 U2 R2 D R D R D R2 U L U L U R2 D R U R D R U R D2 R2 U2 R D R2 U R3 D3 R D2 L D2 R U R
The Queen of Pentacles is a word square puzzle with solution:
	A T E
	R O B
	M O B
The Pentacle is a two-color polyomino puzzle with solution
The World is a word search puzzle in which you must find the names of 23 European countries:
	. A . . F . . . C . . F R A N C E . . . A . . .
	R U S S I A . . Z . G . . . . . S C O T L A N D
	. S . . N . S W E D E N . . . S . . . . B . . .
	. T . . L . . . C . R . N O R W A Y . . A . . .
	I R E L A N D . H . M . . . . I . . . . N . Y .
	. I . . N . . P O L A N D . I T A L Y . I . U .
	. A . . D . . . S . N . . . . Z . . . . A . G .
	. . G . . . T . L . Y . . I C E L A N D . . O .
	. . R . . . U . O . . . . . . R . . . . . . S .
	. . E . . . R . V . . . E N G L A N D . . . L .
	. N E T H E R L A N D S . . . A . . . . . . A .
	. . C . . . E . K . . R U M A N I A . . . . V .
	. . E . . . Y . I . . . . . . D . . . . . . I .
	. . . . . . . . A . S P A I N . P O R T U G A L
Strength is a jigsaw puzzle with a pyramids and Eye of Horus theme:
Temperance is a crossword puzzle based on (non-traditional) anniversary gifts:
	P A P E R
	      L E A T H E R
	  W O O D
	  T U R Q U O I S E
	S I L V E R
	    B R O N Z E
The Hanged Man is a jigsaw puzzle with a chase theme:
The Page of Cups is a crossword puzzle based on a fish theme:
	S A R D I N E
	      T R O U T
	G O L D F I S H
	            H A L I B U T
	          M I N N O W
	            P E R C H
The Knight of Cups is a decryption puzzle in which the initial clue
GPHVI AFPJJ = DEATH KNELLgets you started toward the solution:
	ALAS I DO HE SIGHED
	 YOUR KNIGHT SAYS
	       THAT
	NO SHIP HAS LANDED
	  UPON YOUR SHORE
The Children is a word formula puzzle with solution
WE ARE THE LAST OF THOSE WHO CAREderived from the sequence
2 5 4 6 1 3
The Couple is a hidden-phrase puzzle in which the hidden text
LEAP FOR JOYis found by using the first letters of the sentence shown on the screen:
"Ladies enjoy and perhaps favor odd
rowdy jigs of yore!" thought the fool.
The Dancers is a polyomino puzzle with solution
The Family is a word search puzzle in which you must find the names of 26 colors:
	. V . . . . T . . . B . . . . B . . . . . . . .
	. E . . . P U R P L E . . M . R . . . . . . L .
	. R . . . . R . . . I . M A R O O N . G . . A .
	A M B E R . Q . Y . G . . G . W . . . R . . V .
	. I . . . . U . E . E . . E . N . S C A R L E T
	B L U E . . O . L . . . . N . . . . . Y . . N .
	. L . . . V I O L E T . . T . . . . . . . . D .
	P I N K . . S . O . . O R A N G E . A Z U R E .
	. O . . . . E . W . . . . . . . . . . . . . R .
	I N D I G O . . . G . . . W . B L A C K . . . .
	. . . . . . . . . R . . . H . . . . . . . . . .
	C H A R T R E U S E . C R I M S O N . H A Z E L
	. . . . . . . . . E . . . T . . . . . . . . . .
	. A Q U A M A R I N E . . E . . . . . O C H R E
The Queen of Cups is a word square puzzle with solution:
	T W O
	O I L
	E N D
The Cloud is a jigsaw puzzle with a number words theme:
The Vision is a polyomino puzzle with solution
Enchantment is a word formula puzzle with solution
SIXTEEN-SIXTEENderived from the sequence
1 4 6 7 5 2 3
The Hierophant is a crossword puzzle based on number word pairs:
FOURTEEN / THREETWELVE / TWO
NINETEEN / ONE
SEVENTEEN / FIVE
THIRTEEN / SIX
The Moon is a mask puzzle with solution
	M U C H t o A C C O M P L I S H
	    ^ ^   ^ ^   ^ ^   ^ ^ ^ ^ ^
disclosing the three letters
A I H
The Emperor is a word search puzzle in which you must find the names of 26 birds:
	. . G . . . . . . . C . . . F . S . R . S . B .
	. W O O D P E C K E R . W H I P P O O R W I L L
	. . O . . . . . . . O . . . N . A . B . A . U .
	T . S . . . . . W . W . . . C . R . I . L . E .
	H . E . . . B . R . . . . . H . R . N . L . J .
	R . . . . D O V E . P . . . . . O . . . O . A .
	U . . . . . B . N . A . C . H A W K . . W . Y .
	S . . . V . O . . . R . A . . . . . . . . C . .
	H . E . U . L . . . A . R . M E A D O W L A R K
	. . A . L . I . . . K . D . . . . . . . . N . .
	N I G H T I N G A L E . I . D . . . . . . A . .
	. . L . U . K . . . E . N . U . B U Z Z A R D .
	. . E . R . . . N U T H A T C H . . . . . Y . .
	. . . H E R O N . . . . L . K . C R A N E . . .
The Empress is a dual crossword puzzle of scrambled four-letter words:
	M I S S
	      T W I G
	I D E A
	      R O O T

	W E E P
	      Y O U R
	H A I R
	      A R E A
	W O R M
	      I R O N
	L A R D
	      S O U P
The Star is a polyomino puzzle with solution
To solve the first High Priestess puzzle ("The 99 Enchantments"), click on each of the numbers 99,...,1 in descending order. The number you're currently looking for will be shown in the "Enchantments" title at upper right. When you get down to 32, the numbers will start to reposition randomly on the screen, with the dwell time decreasing as you approach 1. The last number is particularly difficult to click on, but with vigorous mouse clicking in previously-visited regions, you'll eventually get it.
On completion of the 99 Enchantments, you'll be viewing a large Eye of Horus with the cursor rubberbanded to the center of the eye. To complete this puzzle, you'll need the 1st Key of Thoth from the Three Ships puzzle.
The Book of Thoth. When you've completed the Three Ships puzzle and your mouse cursor has changed into a golden key, move the cursor to the center of the Eye of Horus symbol in the High Priestess puzzle to display the Book of Thoth animated puzzle. Switch to keyboard mode. Follow the same solution sequence you used to solve the 2nd Key of Thoth part of the Humbug puzzle, but here the stationary pink squares are now invisible: Move the arrow cursor to the extreme upper right-hand corner and then use the move sequence
L17 D10 [Enter] U8 R11 [Enter] R4 D10 [Enter] U6 L9 [Enter]Next, switch back to mouse mode and follow the solution sequence for the 3rd Key of Thoth part of the Justice puzzle: Drag the left side of the display to the right, painting the screen purple. Continue by dragging from right to left (blue), top to bottom (red) and bottom to top (gray).
Finally, switch to keyboard mode and follow the solution sequence for the Last Key of Thoth part of the Hermit puzzle: Position the point of the cursor in the extreme lower-left corner of the blinking grid, then move
R6 U1 [Enter] R3 U2 L2 U2 R2 U3 L3 U4 R7 D4 L3 D3 R2 D2 L2 D2 R3You'll then see the Treasure Puzzle, but won't be able to access it until later. Press [Enter] a couple of times to return to the scroll.
The Sentry is a hidden-phrase puzzle in which hidden text may be determined from simple subtraction problems for each letter; for example, ABOUT - BOAT = U:
DO NOT TRY TO STOP US
The Knight of Swords is a decryption puzzle in which the initial clue
LSIG HARUY = GRIM TALESgets you started toward the solution:
	I BRING A MESSAGE
	 FROM YOUR KNIGHT
	     HE TELLS
	   OF AN ATTACK
	        BY
	EIGHT MAGICAL WANDS
The Chant is a decryption puzzle with no initial clue; you're on your own to find the solution
	A GIANT WHEEL STOOD
	 NEAR THE PYRAMIDS
	     AND I SAW
	THREE MYSTICAL WORDS
	 ONE ATOP THE OTHER
The Dream is a word formula puzzle with solution
HE SANG THIS HAUNTING SONGderived from the sequence
6 1 7 4 3 2 8 5
The Queen of Swords is a word square puzzle with solution:
	R O B
	A W E
	W E E
The Boat is a crossword puzzle of numerous five-letter words, displayed a few at at time. Letters in each new group may be exchanged between words, but there is initially no need to do so. After the first six words are found, clues are provided and letters must be exchanged between words to derive the solution:
	C H A O S       T A R O T       C R I S P
	H   V   L E E C H       R O U G H   D   E
	A R O M A       R       I       A L I G N
	I   I   T O R S O       C R O S S   O   N
	N U D G E       W R E C K       E N T R Y
	                    M
	              D E S P A I R
	C R A C K     I     T     O     W R O N G
	R   R   N     T     Y     A     O   U   R
	A L I B I     C           S     R A N G E
	S   S   F I G H T       U T T E R   C   E
	S I E G E                       Y I E L D
A final seven-letter word completes the puzzle.
Despair is a mask puzzle with solution
	T E N g l o w i n g S W O R D S
	  ^   ^ ^ ^ ^   ^ ^ ^ ^ ^   ^ ^
disclosing the three letters
P U S
The objective of the Justice puzzle is to activate all twenty-five squares. Each square changes the state (on or off) of other squares and possibly also of itself. One solution is to click on the squares in the sequence A-M shown below:
then complete the diagram by clicking on position J again.
The 3rd Key of Thoth. On completion of the Justice puzzle, you'll encounter another of the animated puzzles in the game. Using the mouse, drag the flashing vertical bar from left to right, painting the screen purple. Continue by dragging from right to left (blue), top to bottom (red) and bottom to top (gray).
The Chariot is a polyomino puzzle with solution
The Thief is a hidden-phrase puzzle in which hidden text may be found near the top of the screen:
I TAKE NO CREDIT FOR THIS
The Hermit is an animated maze puzzle in which several separate maze paths are individually explored, then combined together. To traverse the maze, you can use the map
Starting from the beginning position in the fifth row (from the top) and tenth column, you can also use the move sequence
[Enter] U4 R10 D2 L8 D2 R8 D [Enter] D8 L2 U7 L2 D7 L2 U3 L2 D3 L2 U3 L2 D3 L [Enter] L U5 R8 U2 L10 D7 L3 U2 R U2 L U [Enter] U R U2 L U5 R2 D3 R D R2 U4 R2 D4 R2 [Enter] U4 R10 D2 L8 D2 R8 D9 L2 U7 L2 D7 L2 U3 L2 D3 L2 U3 L2 D3 L2 U5 R8 U2 L10 D7 L3 U2 R U2 L U2 R U2 L U5 R2 D3 R D R2 U4 R2 D4 RThe Last Key of Thoth. On completion of the Hermit maze (twice), you'll encounter another maze challenge. To traverse the maze, you can use the map
or, from the end of the move sequence above, move D8 L2 to the lower-left of the blinking squares, then use the following move sequence:
[Enter] R3 U2 L2 U2 R2 U3 L3 U4 R7 D4 L3 D3 R2 D2 L2 D2 R3
Judgement is a mask puzzle with solution
	g a z e I N T O t h e S A N D S
	^ ^       ^ ^ ^ ^ ^ ^       ^ ^
disclosing the three letters
E Z C
The Tower is a jigsaw puzzle containing a nighttime scene:
The Devil is a decryption puzzle with no initial clue; you're on your own to find the solution
	TO SECURE THAT WHICH
	 CANNOT BE GOTTEN
	YOU MUST INVOKE THE
	POINTS OF A COMPASS
	  AND CONVINCE IT
	   TO COME TO YOU
Death is an animated puzzle the object of which is to click on the white eye symbol without being "hit" by the red eye symbol. On a reasonably-fast PC, this is virtually impossible without halting the animation in some way. To solve the puzzle, move the mouse cursor to the menu bar at the top of the screen. Click and hold on the "-I-" item to pull down its menu. Drag the mouse cursor down to the white eye symbol at the bottom left of the screen. Release the mouse button, then click the mouse without moving it. The timing is a little sensitive, so this procedure may have to be repeated a few times until the puzzle is solved.
The Magician is a jigsaw puzzle with a seashore theme:
The Lovers is a word search puzzle in which you must find the names of 22 tarot cards (including the Sun) in the game:
	. . H . W . . . . . . H . . . . . . . . . . M .
	. H I G H P R I E S T E S S . H A N G E D M A N
	. . E . E . . . . . . R . . T . . . . . . . G .
	. . R . E . . J . . E M P R E S S . . D E V I L
	. W O R L D . U . . . I . . M . . . . . . . C .
	. . P . O . . D . . . T . . P . . . . . . . I .
	J . H . F . . G . . . . . . E . . . . . S T A R
	U . A . F . . E . D . . . . R . . . . T . . N .
	S . N . O . E M P E R O R . A . . F O O L . . .
	T . T . R . . E . A . . . . N . . . . W . . . .
	I . . S T R E N G T H . . . C . . . . E . M . .
	C . . . U . . T . H . . . . E . C H A R I O T .
	E . S U N . . . . . . . . . . . . . . . . O . .
	. . . . E . . . . . L O V E R S . . . . . N . .
All treasure puzzles (except the Maze of Thorns) are best played in mouse mode. When the Sun puzzle has been completed, fourteen treasures must be identified and entered in the Book of Thoth crossword puzzle displayed by clicking on the scroll icon above the lower-right corner of the sun map. Each of these treasures is identified by a clue that gives some idea of where to discover the treasure. Some of these clues contain "code words" indicating the disposition of letters in the crossword solutions:
Confused: Letters must be unscrambledNote that some treasures are both scrambled and encrypted. Web-based anagram generators, particularly Inge's in which the number and length of words can be specified, are helpful in unscrambling phrases. Decryption can be performed using one of four decoders available on the sun map where there are double borders bracketing the map square boundaries vertically or horizontally; to use one, enter the text to be decoded or press the space bar to restart. Four secondary crossword puzzles are accessible on the sun map where grids of blue-and-white squares are shown. Additional secondary puzzles are found in the Straight Path, Maze of Thorns and Wheel of Fortune map locations.
Within: The treasure will be found in a secondary crossword puzzle on the sun map
Disguised: Letters must be decrypted
The name of the scroll section corresponding to any sun map location is displayed by pressing the Shift key when the cursor is on the square. Other new game control features are described by clicking on "The Sun" menu item at the top of the screen.
The game is completed when all fourteen treasures have been entered into the Book of Thoth crossword puzzle; disclosing a final treasure for the Fool. These treasures can be entered into the puzzle as soon as they are known; it is not strictly necessary to first solve an associated secondary puzzle.
Some of the secondary puzzles are themselves interesting challenges, but frankly, some of the treasures and the arrangements of their supporting puzzles seem to be derived in rather arbitrary ways from the clues given in the scroll sections and on the sun map; several solutions or combinations different from the "right" one are sometimes equally consistent and logical. For those needing an "easy way out" for the Treasure Puzzles, all solutions may be found within the main game executable file immediately after a record containing "SOUP". Also, visual indications of the treasures are displayed by the separate "FINALE" program.
From the sun map, collect the letters O, E, A and R from the locations for the Kings of Swords, Pentacles, Cups and Wands. In the corresponding scroll sections in menu V, obtain the red letters N, Z, T and U. In the scroll sections for the kingdoms themselves (The Wand, The Pentacle, The Cup and The Sword), get the red letters S, B, T and E. Unscramble the twelve letters to derive the name of the treasure:
BRONZE STATUE
The treasure can be found by solving the secondary crossword puzzle located at the boundaries of The Page of Pentacles and The Merchant map locations. Eight 3-letter words are entered using information in the The World, Strength, Temperance, The Hanged Man, The Blacksmith, The Cathedral, The Chapel and The Humbug scroll sections:
	Y E S
	E R A
	S I P
	T O P
	A I H
	R O I
	M Y R
	F I E
The highlighted letters give the name of the treasure:
STAR SAPPHIRE
From the scroll sections for The Queens of Wands, Pentacles, Cups and Swords, obtain the four magic words CLAC, TRSC, YNAL and EKE. Unscramble the fifteen letters to derive the name of the treasure:
CRYSTAL NECKLACE
The treasure can be found by solving the secondary crossword puzzle located at the boundaries of The Canopy, The Watchtower, The Fighting Boys and The Stone Wall map locations. Sixteen 3-letter words are entered using information in the four corresponding scroll sections:
	R E D | R A T
	U R N | I V Y
	------+------
	B A D | N E W
	Y A M | G N U
The highlighted letters give the name of the treasure:
RUBY RING
Solving this puzzle requires careful reading of the scroll sections. In the Three Ships section, note the highlighted reference to "the first of six", obtain the letters RW and note the reference to chasing a fish. In the Page of Cups section describing a fish chase, get the letters KD and note the reference to a woman holding two swords. In the Chant section describing a woman with two rusty swords, obtain the letters EZC and note the reference to a family departing by boat. In the corresponding Boat section, pick up the letters YH and note the reference to a broken wheel. In the Chariot scroll section describing a broken chariot wheel, obtain the letters HA and note the reference to a thief stealing seven. Finally, in the Thief section, pick up the letters RW and note the highlighted reference to "the last of its kind". This phrase indicates that you have found all necessary letters:
R W K D E Z C Y H H A R WProcess these letters through the decoder on the sun map between The Dead Warrior and Justice locations to obtain the name of the treasure:
ONYX MEDALLION
In The Stream scroll text may be found a reference to a mystical chant:
N Z S L T Z M B H G Z U UProcess these letters through the decoder on the sun map between The Madness and The Page of Wands locations to obtain the name of the treasure:
MAHOGANY STAFF
Collect eight green capital letters on the sun map locations corresponding to the Knights and Pages of Wands, Pentacles, Cups and Swords:
D S L U T D O GThis doesn't sound like a treasure! Unscramble the eight letters to derive the name of the real treasure:
GOLD DUST
Change to keyboard mode and select The Maze of Thorns sun map location. To traverse this Rogue-like maze, you'll need to find various inventory items (amongst some red herrings) to pass various entities blocking your passage, and eventually make your way to the exit at right. You can use the map
The first inventory item, a four-leaf clover, is inaccessible until "eleven are seen"; that is, until all eleven blocks are first identified. From the initial white dot location, follow the move sequence
D5 to identify the TrollSwitch back to mouse mode and process the above fifteen letters through the decoder on the sun map between The Knight of Swords and The Enchantment locations to obtain the name of the treasure:
U6 L2 U R2 U R D3 R to identify the Elf
L U3 L U R U2 R2 D2 to identify the Leprechaun
U2 R D R D2 R2 U to identify the Pixie
D L2 U2 L U L3 D2 L U2 L3 D to identify the Genie
U R3 D4 L2 D L2 U5 to identify the Spirit
D4 L3 U L to identify the Nymph
R D R2 D L5 U2 L2 U to identify the Banshee
D R2 D2 R3 D3 L U L4 D2 L to identify the Witch
R U2 R4 D R U R D2 R to identify the Dwarf
L3 to identify the VampireR D L3 D3 L2 to find a shamrock (1)
R2 U L U L U to find a coin (2)
D R D R U2 R3 U R U4 R4 U R2 U2 R U2 R2 D3 R D L past the Leprechaun to find a ginger root (3)
R U L2 U2 to find a pearl (4)
D2 R U3 L2 D2 L D2 L2 D L5 D3 L U L4 D2 L3 D4 R past the Witch to find a knife (5)
L U4 R3 U2 R4 D R U3 L3 U2 L2 U2 L2 U L D2 R past the Banshee to find a lamp (6)
L U2 R D R2 D2 R2 D2 R8 U R2 U4 L3 D2 R D L D past the Genie to find a copper key (7)
U R U L U2 R3 D4 L2 D3 L D R D2 R D L D2 R U R D R4 through a copper door to find the spell of Prowess (8)
L4 U L D L U2 R U3 R2 U R D2 R U past the ogre to find another pearl (4)
D L D L U to find another coin (2)
D R2 D L to find a crystal (9)
R U L U3 L D L U3 L2 U R2 U R D3 R7 U L U R U past the Elf to find a silver cross (10)
D L D R D L7 U3 L D L2 D L4 D4 L5 D past the Vampire to find parsley (11)
U R5 U4 R2 U5 L D L D L2 U past the Spirit to find a third pearl (4)
D R2 U R U R D5 L2 D4 R D L D R2 D past the Dwarf to find a third coin (2)
U L3 D L U to find a silver key (12)
D R U R U R U L U3 L5 U2 L3 D R2 D L2 D L U4 R2 U through a silver door to find the spell of Silence (13)
D L2 D4 R U R2 U L2 U R3 D R11 D3 R U R5 D R D L2 past the sprite to find a fourth coin (2)
R2 U R D2 L D R to find a daisy (14)
L U R U2 L2 U L5 D L U3 L2 U R2 U2 R U2 R3 D R D2 R2 U2 L U R2 D2 past the Pixie to find some bark (15)
U2 L2 D R D2 L2 U2 L U L3 D2 L D2 L2 D L2 U L3 U L2 U2 L U R2 past the Nymph to find the fifth and last coin (2)
L2 D R D2 R2 D R2 D3 R5 D4 R D R3 U R2 D R2 D L3 U past the Troll to find a gold key (16)
D R3 U L2 U L2 D L3 U L U4 L5 D R D R D4 L2 U L D L3 to find the spell of Disruption (17)U3 R2 U R U4 R4 U R to dispatch the Fire Demon (@) blocking access to the right
L D3 R2 D R U R5 to disclose the secret lettersX L P F Y V XR3 to exit the maze
E N P A Z G Z J
DIAMOND BRACELET
In The Hierophant scroll text, note the reference to four others coming before. From The Hierophant and the preceding four scroll sections (The Cloud, The Vision, The Enchantment and The Abandoned Cups), obtain the numbers
6 13 15 2 20 14 8 15 16 16 15 24 2Use the dark-blue text in the corners of the sun map squares to decode these numbers into letters:
A D E R O W F E L L E M RUnscramble the thirteen letters to derive the name of the treasure:
EMERALD FLOWER
In the Justice scroll section, note the reference to the Emperor taking what is his from what is hers. Could this mean some sort of letter subtraction? In the Emperor scroll section are the letters
WIF DOVEand in the Empress scroll section are
VILE SHADOW FIVE CIRCLERemoving the seven Emperor letters from the twenty Empress letters leaves
V I L E S H A C I R C L Ewhich can be unscrambled to derive the name of the treasure:
SILVER CHALICE
The treasure can be found by solving the secondary crossword puzzle located at the boundaries of The Book of Thoth (High Priestess), The Sentry, The Dream and The Nightmare sun map locations. Twenty-five letters are entered using information in The Tower, Death, The Dead Warrior, The Warrior and The Singer scroll sections, as well as the nine letters displayed when the Wheel of Fortune location is selected on the sun map:
	Q M | P U S
	Z A | B O W
	----+------
	E G | O N O
	L I | R O R
	O C | D N D
The highlighted letters give the name of the treasure:
MAGIC SWORD
In The Hermit scroll section preceding The Straight Path section, note the reference to starting with the letter J. In the Judgement scroll section following The Straight Path section, note the directions
4 NorthIf this information is plotted out on a grid, you'll see that the covered area extends 10 rows above and 15 columns to the left of the starting point. Select The Straight Path sun map location. In the array of letters, the only "J" that has the required area above it and to its left is located in the second row from the bottom and the fourth column from the right. Select this letter, then follow the compass directions above to derive the name of the treasure:
7 West
3 North
8 West
6 South
5 East
9 North
JADE IDOL
The treasure can be found by solving the secondary crossword puzzle located at the boundaries of The Family, The Children, The Couple and The Dancers map locations. Twelve words are entered using information in The Dancers, Despair, The Knight of Pentacles (scrambled words), The Pyramids, The Page of Wands, The Knight of Wands, The Devil, The Couple, The Star, The Family and The Not-A-Merchant sun map locations:
	      J O Y
	G R I E F
	      W H E A T
	R I C E
	      L E A P
	    H E X
	D E A D
	      C A R E
	    E R R
	    C O R N
	      W I S H
	  N I N E
The highlighted letters give the name of the treasure:
JEWELED CROWN
The "eight" here refers to the eight large yellow letters on the sun map. In path order, they are:
D R B U F V Y UProcess the eight letters through the decoder on the sun map between The King of Pentacles and The World locations to obtain the name of the treasure:
AMETHYST
After the names of all fourteen treasures have been entered into The Book of Thoth crossword, the final treasure is disclosed:
THE GIFT OF WISDOMTo view the endgame sequence, type FINALE at the DOS prompt. The Fool must confront The High Priestess one last time, and solve the final riddle
Although the Fool gives the answer as
THE BOOK OF THOTHanother interpretation is obtained by converting the capital letters in the High Priestess's riddle:
	B -> D
	H -> A (once)
	K -> L
	O -> E (once)
The resulting letter sequence
T A E D E O L O F T H O T Hcan be descrambled into
DEATH TO THE FOOLwhich is a "death sentence" the Fool wisely avoided!
Puzzles in this walkthrough were played in the following order. Saved games were created after completion of the corresponding puzzle.
| Puzzle | Saved game |
|---|---|
| Wheel of Fortune | WHEEL |
| The Archway | ARCHWAY |
| The World | WORLD |
| The Maze of Hedges | HEDGES |
| Strength | STRENGTH |
| The Page of Wands | PAGEWAND |
| The Knight of Wands | KNIWAND |
| The Queen of Wands | QUEWAND |
| Temperance | TEMPER |
| The Canopy | CANOPY |
| The Fighting Boys | BOYS |
| The Stone Wall | WALL |
| The Hanged Man | HANGED |
| The Page of Cups | PAGECUP |
| The Knight of Cups | KNICUP |
| The Queen of Cups | QUECUP |
| The Hierophant | HIEROPH |
| The Cloud | CLOUD |
| The Vision | VISION |
| The Enchantment | ENCHANT |
| The Moon | MOON |
| The Blacksmith | BLACK |
| The Cathedral | CATHDRAL |
| The Chapel | CHAPEL |
| The Humbug | HUMBUG |
| The Emperor | EMPEROR |
| The Farmer | FARMER |
| The Empress | EMPRESS |
| The Children | CHILDREN |
| The Couple | COUPLE |
| The Dancers | DANCERS |
| The Family | FAMILY |
| The Star | STAR |
| The High Priestess, Part 1 | PRIEST1 |
| Justice | JUSTICE |
| The Chariot | CHARIOT |
| The Hermit | HERMIT |
| Judgement | JUDGEMEN |
| The Chant | CHANT |
| The Dream | DREAM |
| The Tower | TOWER |
| The Thief | THIEF |
| The Devil | DEVIL |
| Death | DEATH |
| The Knight of Swords | KNISWORD |
| The Queen of Swords | QUESWORD |
| The Magician | MAGICIAN |
| Three Ships | 3SHIPS |
| The High Priestess, Part 2 | PRIEST2 |
| The Juggler | JUGGLER |
| The Queen of Pentacles | QUEPENT |
| The Pentacle | PENTACLE |
| The Sentry | SENTRY |
| The Boat | BOAT |
| Despair | DESPAIR |
| The Lovers | LOVERS |
| The Singer | SINGER |
| The Sun | SUN |
| The Kings are confused | TREAS01 |
| Within the Kingdom of the Pentacles | TREAS02 |
| The Queens are confused | TREAS03 |
| Within the Kingdom of the Wands | TREAS04 |
| The Path of Six is disguised | TREAS05 |
| The mystic chant is disguised | TREAS06 |
| The Knights and Pages are confused | TREAS07 |
| The Maze of Thorns is disguised | TREAS08 |
| The Hierophant is disguised and confused | TREAS09 |
| If justice be done | TREAS10 |
| Within the Kingdom of the Swords | TREAS11 |
| Follow the straight path | TREAS12 |
| Within the Kingdom of the Cups | TREAS13 |
Copyright © 1998 Balmoral Software (http://www.balmoralsoftware.com). Portions copyright © 1989 Cliff Johnson. All rights reserved. Republication, redistribution or conversion is expressly prohibited without the prior written consent of Balmoral Software. Contents subject to change! For the latest information, see http://www.balmoralsoftware.com.