Copyright © 2018 Balmoral Software (http://www.balmoralsoftware.com). Portions copyright © 2006 by Wicked Studios Inc. All rights reserved. Republication, redistribution or conversion is expressly prohibited without the prior written consent of Balmoral Software.
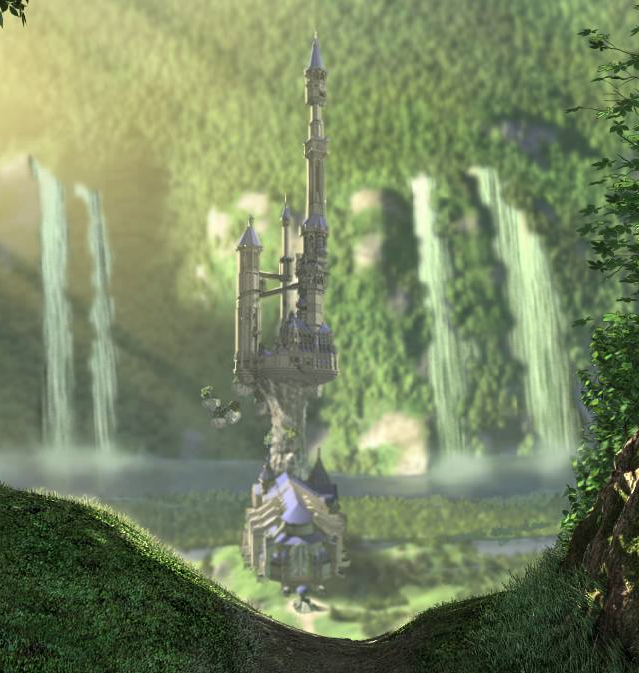
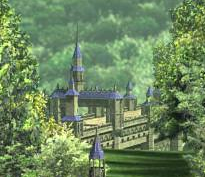
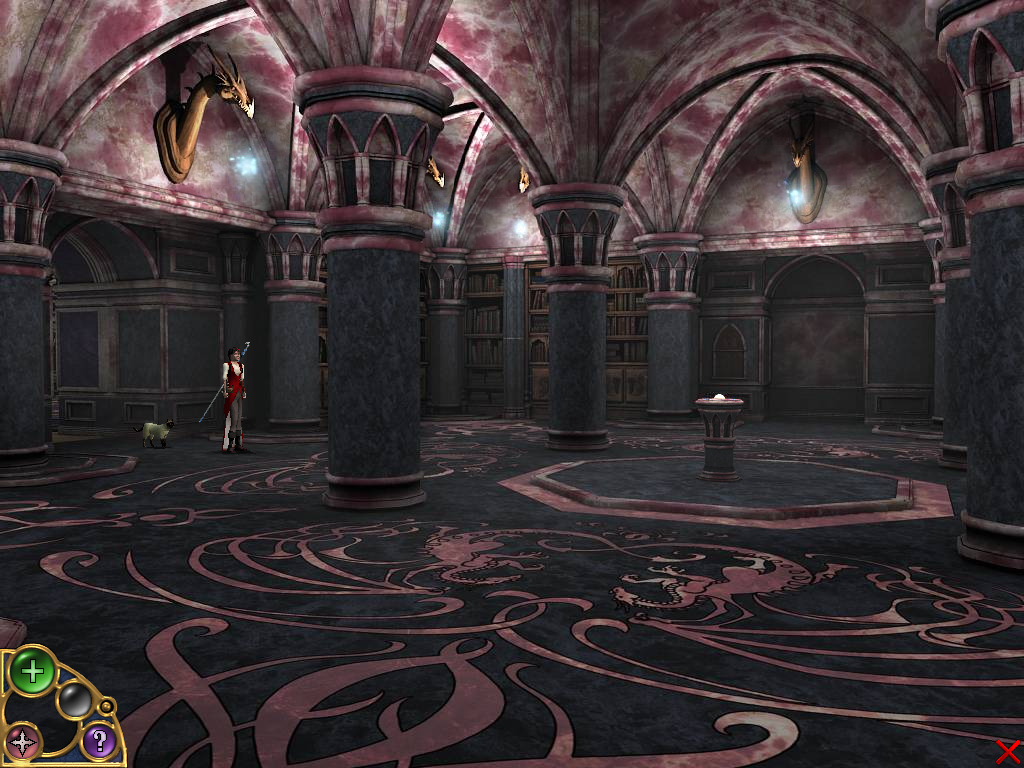
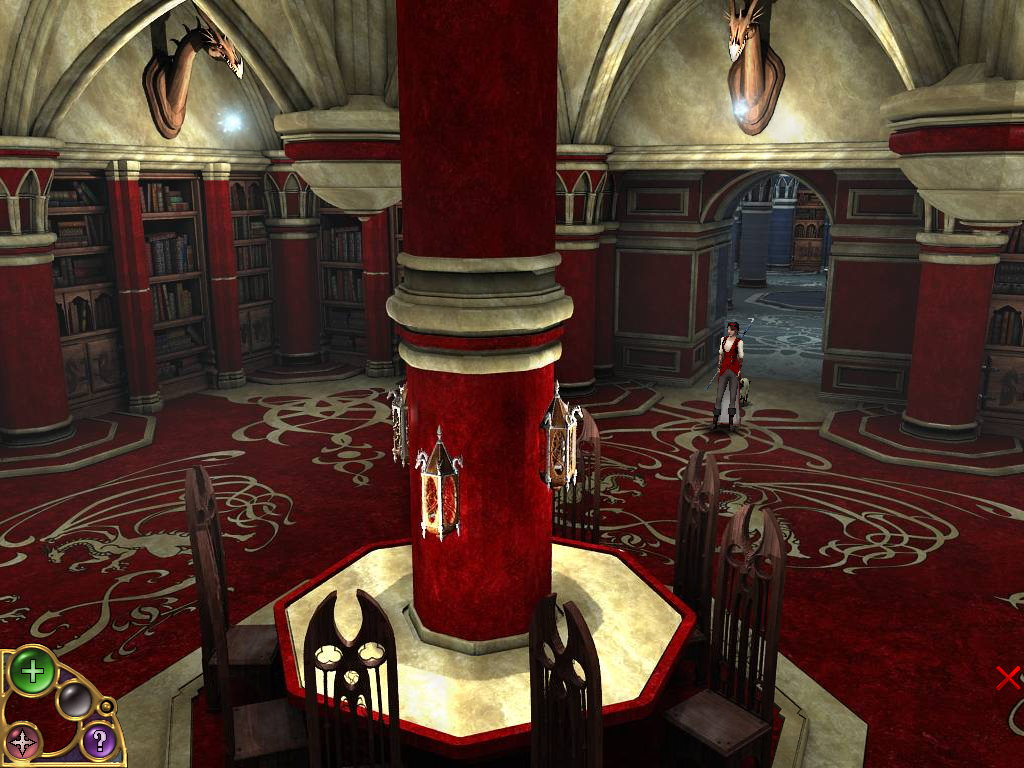
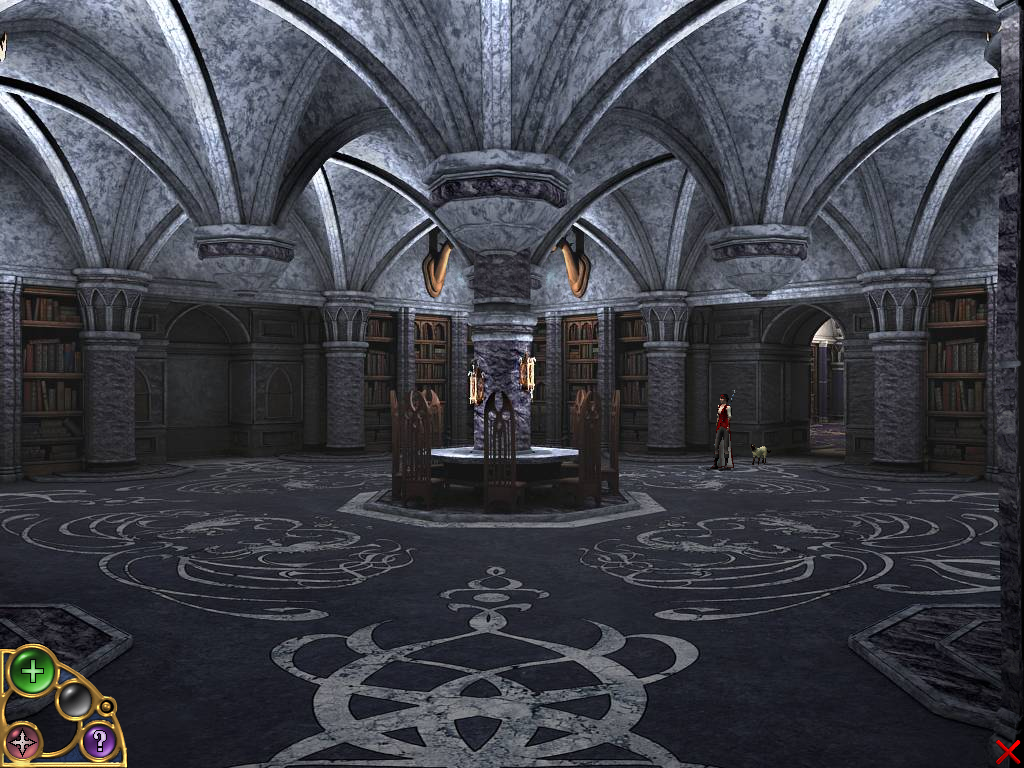
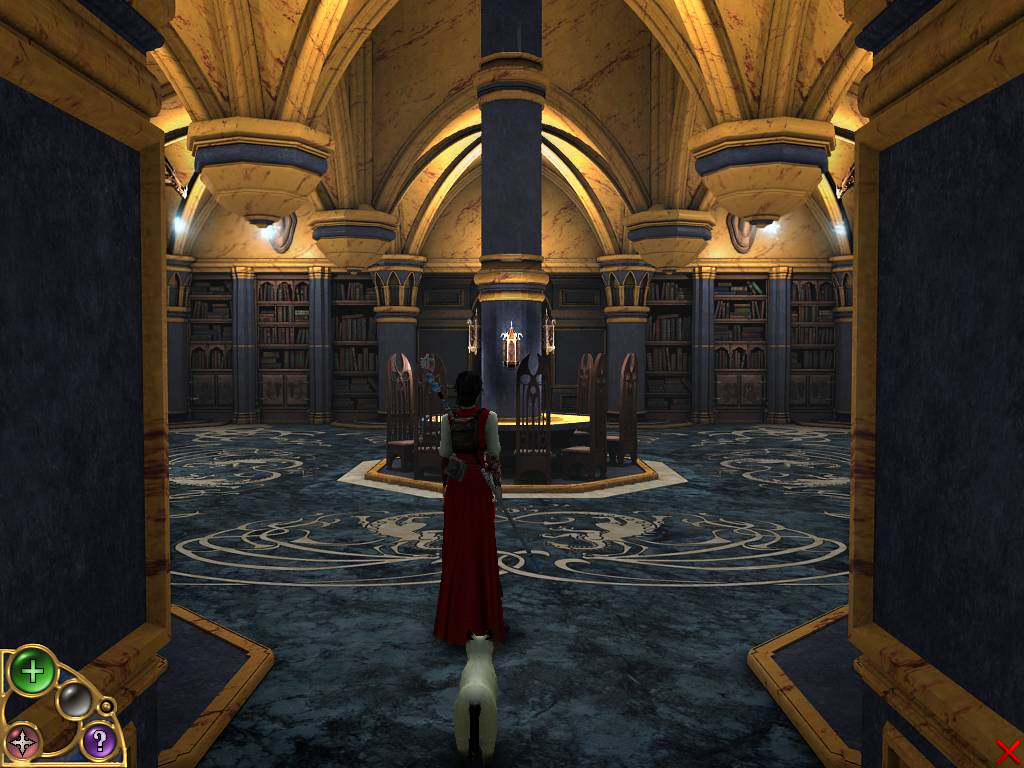
Arguably the best parts of this game are the excellent graphics and detail in the Dragonvale Academy that you get to explore in the third person. There is a wealth of dimensionality and complexity in the environment that simulate a realistic, although largely uninhabited, school of wizardry. Navigation can be a bit tricky at times, particularly as a result of abruptly-changing viewpoints as your character Lydia moves through different areas, so maps of the Academy are essential.
Many of the functions in the user interface need significant improvement. There is a lot of walking and spoken dialog in this game, but no way to speed that up. There's an icon to skip through the dialog, but it's replaced with frequent periods of inaction waiting for an hourglass to disappear, so it's as if the software has to wait for the skipped dialog to be spoken anyway. An unusual font has been used for the written dialog text which sometimes makes it hard to read, especially when the capital letter "I" or text with all capitals is present.
In Part 2 of the game, numerous locations are reached by using teleport pads. Every teleportation is accompanied by a mandatory transition video. The videos were enjoyable the first few times as a way to showcase the well-done graphics of the brick and stone Academy, but became tiresome before the game was completed. The interface desperately needs a way to skip these animations and to have the character exit the current screen without all the interminable walking required (double-clicking would have been nice). There are also about a dozen rather lengthy video cutscenes throughout the game which provide a lot of the backstory, but again, if you're replaying some of the game, it would be nice not to be forced to sit through them every time.
There is essentially a single saved-game slot, and you must exit the game in order to restore a saved game. The whole process is very awkward, and we've presented some details in a separate section below that hopefully will be of some help. We've also provided some pointers on getting through the mandatory tutorial that plays every time you start a new game.
Voice acting is generally good, and the dialog text has only occasional errors, except for the repeated use of the misspelled word "woah" in the first half of the game.
Puzzles are fairly original in their design (with a few exceptions), but are probably more accessible and enjoyable in the first half of the game than in the second. In the upper levels of the Academy, several puzzles seemed to intentionally ignore legitimate or logical solutions, as if they were made intentionally obscure (even with the in-game hints). A number of them were more of an exercise in tedium and trial-and-error than a stimulating intellectual challenge.
With its touchy-feely plot, awesome gothic architecture, and more stairs than you know what to do with, Keepsake is an immersive game with some serious shortcomings, but overall a fairly enjoyable gameplaying experience.
This walkthrough provides a shortest path through the game that minimizes backtracking; other gameplay sequences and dialog choices can provide additional backstory elements.
Saving a game
Use the following procedure to make a record of your position in the game:
Select the green [+] symbol in the menu at lower leftRestoring a saved game
Select the logo immediately above the red [-] symbol
Click on the [~] symbol next to Save
Outside of the game (e.g., with blind Alt-Tab under Windows), copy the following 3 files from the \Keepsake\res\save subfolder of the game installation folder to a unique saved-game folder on your hard drive:savegame1.tcl
savegame1-info.tcl
ss1-1024x768.tga
Exit the game:Select the green [+] symbol in the menu at lower leftCopy the 3 files in your saved-game folder to the \Keepsake\res\save subfolder of the game installation folder (overwriting any existing files)
Select the logo immediately above the red [-] symbol
Click on the [~] symbol next to Quit
Restart the game
Double-click through The Adventure Company and Wicked Studios logos
Select [Continue]
Select the green [+] button at top with a corresponding image at left
{Cutscene}
You are forced to complete a tedious and unskippable tutorial as if you're too stupid to figure out the simple game controls. To make matters worse, using Alt-Tab (under Windows) to do something else while the interminable dialog drones on can cause the game video to lock up or display incorrectly. As soon as this punishment is over, save your game using the procedure above so that you don't have to sit through the tutorial again if you happen to want to start a new game.
On the positive side, you are rewarded with an interesting view of both levels of the Academy when you've completed the tutorial.
The fastest way through the tutorial is:
Click through dialog
Click at far left to exit frame
Click through dialog
Click on wagon
Click through dialog
Zoom in on cabinet between wagon wheels
Open cabinet
Take bottle
Back out of description window
Back out
Click through dialog
Move twice toward castle
Click through dialog
Entrance Door Puzzle
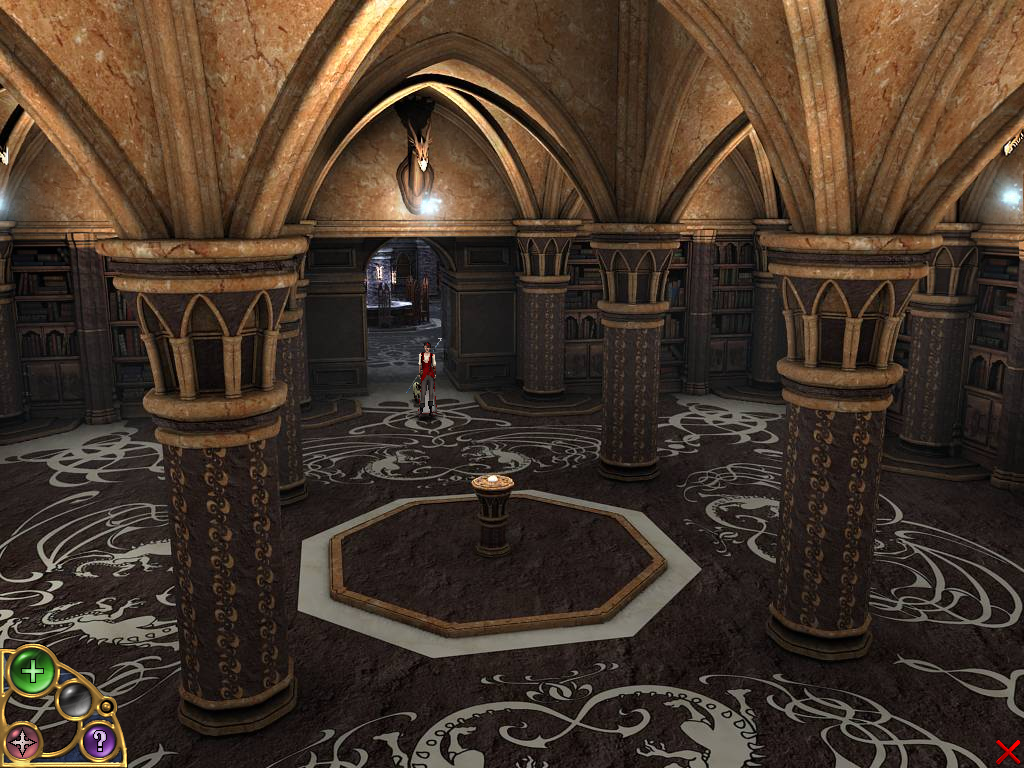
Go to the fountain in front of the main Academy entrance. Note that the water in the fountain is flowing. Zoom in on the device in the gazebo above the fountain.
Click on the circular symbol.
Click on the Minotaur figures in the following order so that their hammers
connect with the door chimes:
	3	1

	2	4
The main Academy doors open. Enter through these doors into the Grand Hall.
If Lydia turns around at this point, there is an interesting view of what appears to be an elaborate bridge in the distance, although this structure is not accessible in the game.
Using the map of the Academy lower level, navigate to a walkway to the right and behind the right-hand large staircase (look for greenery in the distance). The viewpoint can shift abruptly as you move through the building.
Climb some steps when you see a waterfall, and enter the storeroom through the open doorway at the end of the colonnade.
Move into the room so that the viewpoint is from behind Lydia.
Speak to the occupant of the lower locker:
Who are you!?Terminate the conversation and zoom in on the light above the locker.
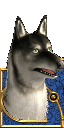
Press the lighted blue button to release Zak the wolf.
Come back into the room and open the locker next to Zak's.
Take the ring of keys hanging there.
Return to the Grand Hall, with Zak now your constant companion.
Climb the large staircase to the right of the dragon statue (the cursor positioning here may be a little tricky).
Climb a second set of stairs up to some wooden bookcases.
At the top of the stairs, exit right.
Go up some more stairs that are ahead of you, just left of a green tapestry. Climb all the way to a wooden door at the top, next to a large circular window. Go through this door to the "Academy facade" (exterior balcony).
Follow the balcony to the left until you reach the next wooden door (you'll be interrupted by an acrophobic Zak).
Go through this door into the "Enchanted Crossway", which is an elevated walkway terminating at a single closed stone doorway. Along the way, pick up some ripped pages (Part 2).
Go back the way you came to the bottom of the stairs by the green tapestry.
Before you reach the wooden bookcases you passed by earlier, descend a side stairway down to a lower level. At the bottom of these stairs is a tapestry of two white dragons, and more stairs here in a darker tone of brick lead down to the aqueduct area, which we'll visit later.
Turn around and head away from the dragon tapestry. There's a fairly large alcove to the right with bookcases and chairs that we'll also visit later. For now, continue in a straight line toward some steps in the distance. Continue forward through an area with a green marble floor. This area of the academy is known as the "Enchanted Hallway". When you first see an exterior window ahead (right before crossing an elevated walkway), pick up a torn notebook lying on the floor, in front of a bookcase (the notebook may be occluded by Zak).
Move forward across the elevated walkway to the windows beyond, an area known as the Garden Watch (see map). There is pew-like seating here, and in the corner you can zoom in on a mini-game known as the Minotaur Maze (more about that later).
Exit right and go up the first stairs you see, on the right against the wall. Open the door at the top and enter the Dining Hall.
Proceed left through the Dining Hall and go down some wide wooden steps to an area with wavy wooden flooring. From the table at lower left, pick up some ripped pages (Part 1).
Exit the Dining Hall the way you came in. At the bottom of the stone stairs, make a U-turn and cross a bridge over some multicolored fish. Take the next stairs down. At the bottom of those stairs, take another U-turn and follow the cobblestone pathway through the Garden.
Zak sniffs out Celeste's doll, which gets added to your inventory.
{Cutscene}
You're magically transported to the back of the Grand Hall, where there is a large locked gate.
Return through the Enchanted Hallway to the Garden area where Celeste's doll was found.
To the right are some steps down to a side door; enter the Basement through this door.
Using the Basement map as reference, go down one flight of steps next to a bright light when you first enter, then move forward and descend a second flight of steps next to a white wall. Scroll left and go through a low arch. Proceed to the left behind three large crates.
Zoom in on Mustavio's crates.
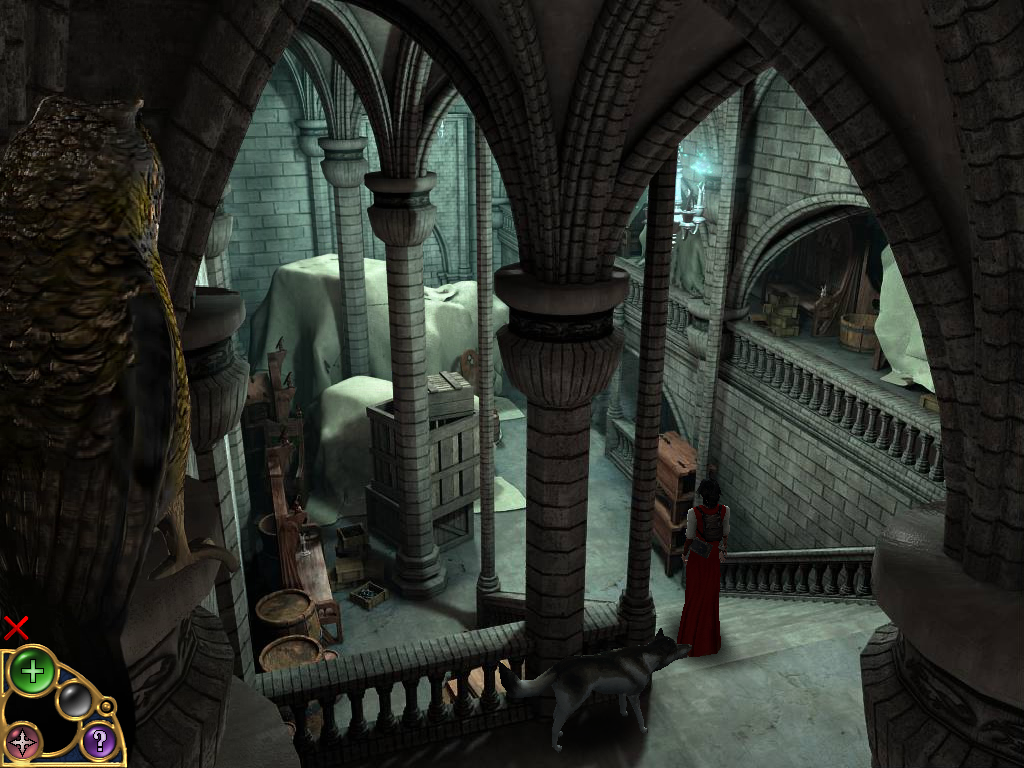
Return to the bottom of the last steps you descended, then continue down the next flight into an area of several fluted columns. Note the owl that is keeping an eye on you here. Just beyond two stacked brown desks at right, there is a stone railing under an arch and more steps down; take these into the lowest area of the basement. Continue moving forward past a couple of large stacked crates to an area with light coming in from the right. This is a junction point where you can move left, down or right. Continue moving toward the light. Use the large wall crack to leave the basement and enter the Academy's waterway. Celeste's pendant gets broken in the process.
Continue forward underneath a large skylight and toward some moving waterwheels ahead. Right before descending some stairs, there are flowers that will be picked later.
When you reach the moving waterwheel, move toward the bottom of the screen, which will take you outside.
Zoom in on the mechanism next to the mossy archway.
Waterwheel Puzzle
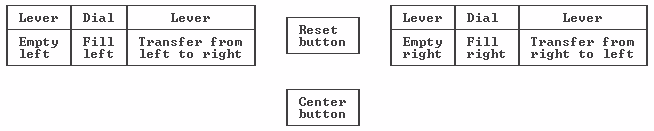
The object of this puzzle is to raise the left weight three levels to activate the two lights on either side of it, and to raise the right weight four levels to do the same. This is a traditional "fluid transfer" type of puzzle in which the differences in capacities of each side are combined to achieve the required combination of quantities. Puzzle controls include emptying or filling each side, and transferring water from either side to the other:
A solution in ten moves using only three of the above controls is:
	Move	Action				Left	Right
						level	level

		Start				  0	  0
	 1	Fill left			  3	  0
	 2	Transfer left to right		  0	  3
	 3	Fill left			  3	  3
	 4	Transfer left to right		  1	  5
	 5	Empty right			  1	  0
	 6	Transfer left to right		  0	  1
	 7	Fill left			  3	  1
	 8	Transfer left to right		  0	  4
	 9	Fill left			  3	  4
	10	Press button at lower center
Solving the puzzle activates power to devices in the Machine Room.
Re-enter the building and return to the location of the turning waterwheel.
After moving some tools blocking the way, go through the wooden door into the Machine Room (shown as the green (1) on the Academy map).
Machine Room Puzzle
There are eight control panels on pedestals in this three-level room, and they must be set correctly in order to channel power from the newly-activated waterwheel to four machines in the room. These control panels are labeled A-H in the map below:
The control panel in each location contains a symbolic map describing the network of unseen power connections between the panels. The panels at locations A, D, F and G each control a machine nearby. The panels at the other locations serve to route power to the machine locations. The objective is to channel power to each of the eight nodes A-H by tracing a route through the network that visits each node exactly once, starting at H and ending at G. Which path is taken at each node is determined by the control panel setting (1, 2 or 3 in Roman numerals). Although only the settings for that one node are shown at each location, the information may be consolidated into a single diagram for ease in determining a solution: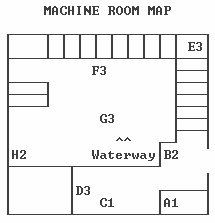
Each setting lies between two of the lines connected to that node, and a valid setting associates the input path with one of the two possible exit paths from the node. For example, the setting for control panel H should either be 1 to associate the input line coming from the left with the path to node D, or it should be 2 to associate it with the path to node A. The setting 3 would not be used at H since it associates the two output lines and excludes the input coming from the left. The paths may be easier to visualize by thinking of a three-node sequence in which power from an input node (first node) passes through the controlled node (second node) and on to the destination node (third node). If you arrive at node C from node D, for example, the path D - C - A is selected by setting 1 at node C and the path D - C - F by setting 2. At every node, there is always one setting which breaks the chain from the input node, in this example, Setting 3.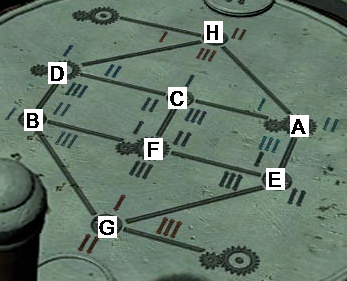
One way through the network is to visit the upper row of nodes D, C, A left to
right, then move down and visit the lower row right to left in the order E,
F, B, exiting at G as required. Alternatively, the meandering path D, B, F,
C, A, E can be followed, which also allows an exit to G. Since the network
is left-right symmetric, there are mirror-image solutions to these two. No
other solutions are possible, so altogether there are four solutions:
	G3  F3  H2  E3  A1  B2  C1  D3

	G2  F2  H2  E1  A2  B1  C2  D3

	G3  F1  H1  E2  A3  B2  C3  D1

	G2  F3  H1  E1  A3  B3  C1  D2
The control panel settings throughout the room may be made in any order, a
convenient sequence on entry from the waterway is G, F, H, E, A, B, C, D, or
alphabetically on entry from the storeroom.
After all eight control panels have been properly set, three machines will have been activated. From the upper level of the Machine Room, exit through the open doorway between control panels A and B into the Storeroom where you freed Zak earlier. Make your way to the locked gate behind the huge dragon statue in the Grand Hall.
Use the lever to unlock the gate and access more areas in the academy. Go through the open gate and climb a wide flight of stairs.
{Cutscene}
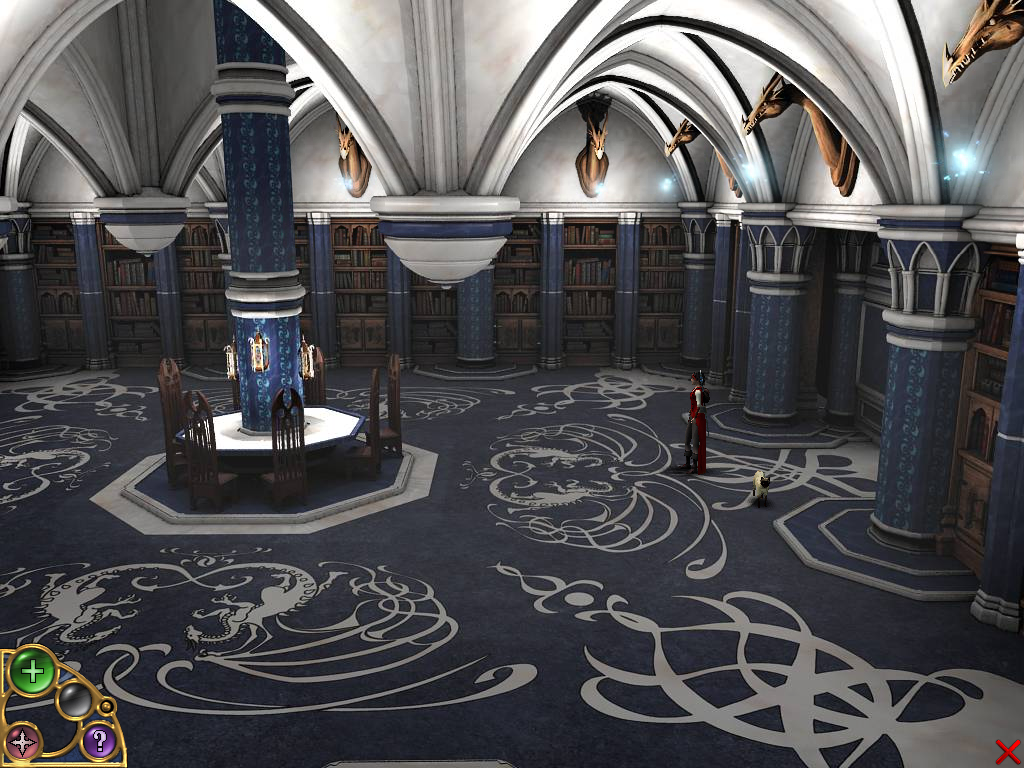
Lydia is magically transported up the Whispering Stairway, outside the entrance to Trial Room #3, which will be opened later.
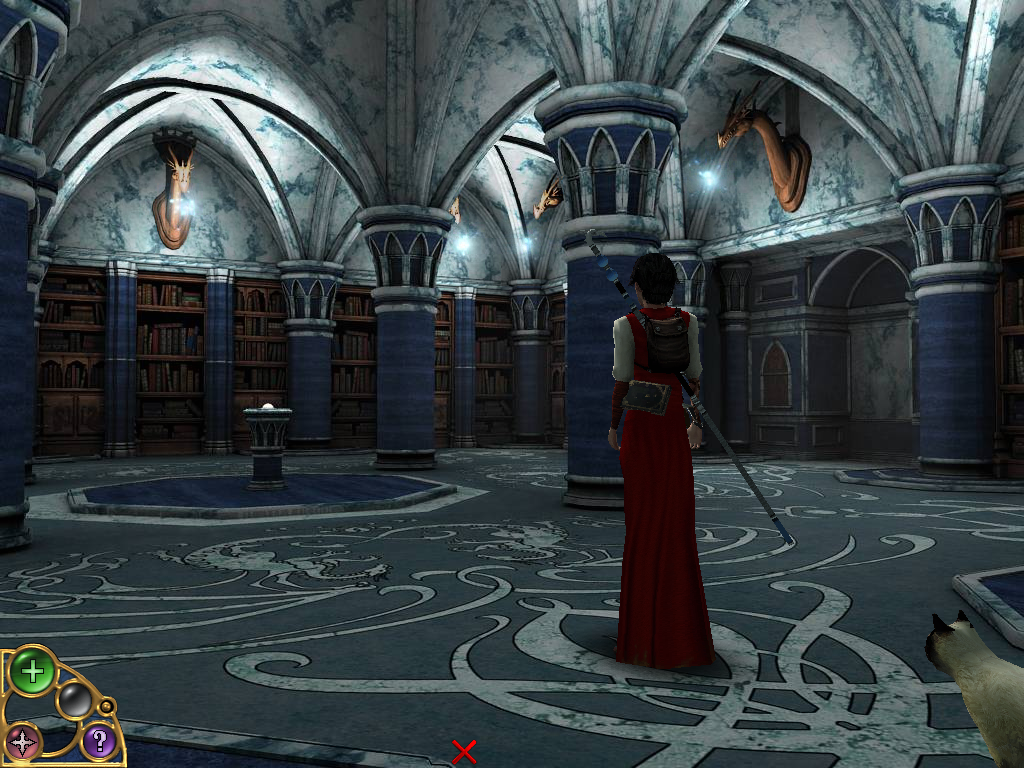
Continue up the stairs and open the large blue doors at the top. Enter through these into the Hall of Guardians.
Talk to the stone golems (Guardians of Allegiance, Wisdom and Triumph):
What can I do to access the upper section of the academy?Terminate the conversation, in which you've heard the following riddle-like poem from the Guardians:
Where can I find these trials?
Scattered in the academy stand three magical doorwaysExit the room and go down the steps. After the dialog with Zak finishes, you'll be standing outside a stone door in the Whispering Stairway. Try to open the door.
Which to open no magical words you must say.
Fully made of stone, no handles or locks do they wear.
Behind the first one, Allegiance we will make you swear.
Impossible by brute strength to break through,
The second one will test the wisdom held in you.
Finally opened by the student's wooden spear,
The last door protects you from your worst fear.
Return back up the stairway and speak to the Guardians again:
How can I open the doors protecting the Trial Room?The Guardians respond with another riddle:
Scattered throughout the academy there are three magical doorways.Terminate the conversation and leave the room.
They are opened by the student's wooden spear.
The equal number of times there are trials you will turn your key.
And on the floor you will knock firmly.
Then at the big gem your spear you will point.
Go down three flights of steps, pass by the windows of the Dining Room, and then go down a fourth set of steps.
Pick up the Caretaker's brass key from the floor here.
Continue down another flight of steps and the wide stairs to the gate in the Grand Hall.
Climb the stairs to the left of the dragon statue and enter the Caretaker's office at the top. The entrance is across from some high-backed wooden benches.
Pick up an old parchment and a caretaker's note from the desk.
Take Lydia's student staff leaning against the furniture in the left rear corner.
Safe Puzzle
Zoom in on the safe in the right rear bookshelf.
Examining the caretaker's key in inventory, the password 24345 can be seen, so it's a good bet that a five-digit number will need to be entered to open the safe. Each of the digit controls on the safe increments the selected digit by 1 and also increments another digit by 2:
Dial 1 also affects Dial 4The dials wrap around from 5 to 1. The shortest solution is in 11 moves:
Dial 2 also affects Dial 3
Dial 3 also affects Dial 5
Dial 4 also affects Dial 2
Dial 5 also affects Dial 1
Move the second tumbler from the left twicewhich can be entered in any order. When the correct combination 2 4 3 4 5 is displayed, click on the separate key at upper right to open the safe and take a circlet that will help translate some of the magical writing found in the Academy.
Move each of the rightmost three tumblers thrice each
Exit the caretaker's office and return down the stairs to the front of the large dragon statue in the Grand Hall.
Read the metal plate at the base of the statue and learn about the academy's ideals: Wisdom, Power and Balance.
Go up the stairs to the right of the statue and return to the Enchanted Hallway area. At the bottom of the stairs at the tapestry of the two white dragons, use the stairs in a darker tone of brick. Open the door at the bottom of several flights of stairs and enter the aqueduct area.
Open the brown box at the bottom of the short flight of stairs.
Water Pump Puzzle
The objective of the gears puzzle is to swap the squares so that all of the light-colored gears are engaged with each other and with the drive gear at the bottom. Numbering the squares
the shortest possible solution is with 9 swaps: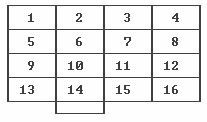
Return up the stairs to the Enchanted Hallway, and proceed through it and the Garden back to the basement door.
Using the Basement map as reference, go down three flights of steps to the area of several fluted columns where you previously saw an owl. Instead of returning to the lowest area of the basement, move forward twice past a chair and barrel to a wall decoration showing the letters "m s k".
Wine Cave Puzzle
On the Old parchment you picked up in the Caretaker's office, the combination
m b _ f _ x
can be seen, where _ refers to a missing letter. By trial and error, the
correct combination can be entered by clicking on the appropriate bricks
on the basement wall. Other combinations eventually result in a required
letter being unavailable when needed in the sequence. The correct six
letters can be entered in only one way:
Climb the steps to the right and walk to the right past some large casks with dragon's-head spigots. Zoom in on Mustavio's wine barrels in the corner.
Exit the wine cave and move forward to the area with the chair and barrel. Go down the steps here and move forward twice past the two large crates. Exit right into the light and return through the wall crack to the waterway area. Move forward four times to a stone arch next to the waterway. Here are some flowers you saw earlier; pick them (any color) to get yewlock leaves added to your inventory. Continue forward down the steps and outside to the platform with wheels turning. Go down the steps onto the grass. Move into the forest until you get close to the river running on the right.
{Cutscene}
Lydia automatically moves deeper into the forest to a glade with a large tree in the background having a man's bearded face made out of leaves. Move forward to the bottom of the screen to where Zak is waiting. Cross the footbridge over the stream and continue to the right back to the river. Zoom in on what looks like an empty signpost here and touch the green vine on it, causing an organic bridge to grow across the river.
Cross the bridge and talk to Mustavio, the man in the green-striped pants:
Who are you?Talk to Mustavio again:
Do you happen to know where everyone is?
Why didn't you go into the school to try to find someone?
How do you expect me to help you...
I broke my pendant earlier, could you repair it?
I haven't found the Caretaker yet...
I found the wine barrels you wanted, Mustavio!
Mustavio! I found the crates you were looking for!Get Minotaur Maze Figurines.
Move towards the bottom of the screen and follow the path with the river on Lydia's right. At the place with two waterfalls in the background, move towards the bottom of the screen back to the academy entrance.
Return through the Enchanted Hallway to the location of the Minotaur Maze game you saw earlier.
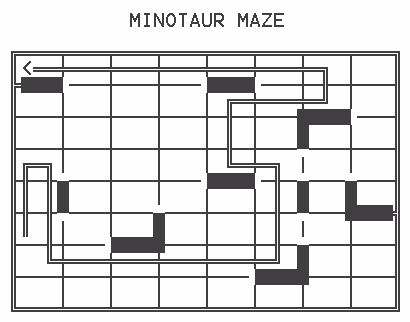
Minotaur Maze
Zoom in on the game. The object is to move the gnome to the exit at upper left before being captured by the minotaur. The minotaur moves twice as fast as the gnome, but can be trapped behind the interior walls. A solution in 25 moves is given below:
Move up twice to get the Minotaur out of his lair at rightGet a Nigilis seed.
Move down thrice
Move right five times; the Minotaur is trapped behind the lower left L-shaped wall
Move up thrice
Move left to block the Minotaur on the other side of the horizontal wall
Move up twice
Move right twice to trap the Minotaur behind the upper right L-shaped wall
Move up
Move left 6 times to the exit
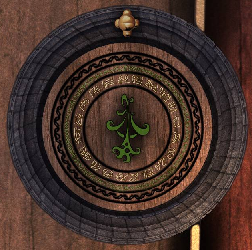
Exit right and go down to the Garden area. At the bottom of the stairs by the fish pool, follow the path to the left around the base of a dragon statue. Proceed past the flowerbeds and cross a footbridge to a stone circle on the ground.
You can zoom in on the perimeter of the circle to see the green Nature Rune, tan Earth Rune, and blue Water Rune.
Click on the center of this circle to plant the Nigilis seed.
Go back over the footbridge and zoom in on the lever at the end of the footbridge. Use the lever to fill the moat surrounding the seed you planted.
Climb the steps to the dragon statue. Approach the wall of the statue at upper left.
Dragon Light Puzzle
Zoom in on the device in the statue wall. To display the complete Nature Rune on the growing area and generate magical light from the dragon statue, move the following levers to the right; all others should stay left:
Lydia recites the spell Trishinare vitaeria, insulfilas Nigilis Arboretan and a blue Nigilis tree grows.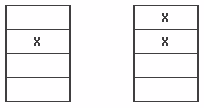
Re-enter the academy building and pass through the Enchanted Hallway to the stairs leading up to the Academy Facade (next to the green dragon tapestry). Climb the stairs and go outside to the balcony.
Follow the balcony all the way to the left and go through an open arch into the first of two study areas. Zoom in on the metal plate on the floor and learn some of the history of the academy:
For years, Nightingale learned how to control every single aspect of the arcane art, and from this knowledge and hard work he gained Wisdom.Scroll left and zoom in on the magic lock on the door.
Study Door Puzzle
Click on the closed door.
The object of this puzzle is to move the pieces so that the three green dragons change places with the three white dragons. Dragon pieces can move into an open space or jump over a dragon of a different color. (This is the same as Round 1 of the beehive puzzle in The Secrets of Atlantis: Sacred Legacy). Here is a solution in 15 moves:
Green dragon moves rightThe doorway opens and an owl flies out.
White dragon jumps left
White dragon moves left
Green dragon jumps right
Green dragon jumps right
Green dragon moves right
White dragon jumps left
White dragon jumps left
White dragon jumps left
Green dragon moves right
Green dragon jumps right
Green dragon jumps right
White dragon moves left
White dragon jumps left
Green dragon moves right
Note: Some gameplay may let you pass through this door even if you haven't solved the Door Puzzle.
Go through the doorway and follow the hallway leading to the upper right of the screen. Once outside the building, follow the balcony around to the blue Nigilis tree. Zoom in on the tree and take a Nigilis fruit.
Go through the open archway at right into a second study. Zoom in on the metal plate on the floor and learn more of the history of the academy:
Because of this incident, the two friends agreed thatZoom in on one of the tables here and pick up some ripped pages (Part 3).
magic holds great Power, but has to be taught with the
Wisdom of how to use it well.
Retrace your steps back to the first study. As you cross over and above the wide steps leading to the upper part of the academy, you can see Mustavio leaving the area of the Minotaur Maze and heading for the Enchanted Hallway.
Exit the study and follow the balcony to the first wooden door. Open this door and walk across the Enchanted Crossway. Click on the stone door at the end of the bridge to open it. Enter Trial Room #2 and learn about accessing the Trial of Wisdom through a broken window.
Go back to the outside balcony (facade) and continue to the right. Use the last wooden door to reach the Enchanted Hallway, where Mustavio can be seen waiting for you in the alcove below.
Go down the steps leading to the two white dragons, make a U-turn and talk to Mustavio:
You still haven't told me why you were looking for me.Terminate the conversation and return to the Grand Hall. Go to the top of the wide stairs behind the opened gate. Open the magically-sealed door at right, and enter Trial Room #1.
Zoom in on the three-headed statue. After a spat with Zak, talk to the statue. The antelope head asks:
The foundation of Dragonvale Academy rests on 3 specific values.Using the information gathered from the metal plate on the dragon statue in the Grand Hall, the answer is
Each student should follow the path of the founders and remain
true to those values. What are they?
Wisdom, Power and BalanceNext, the lion head asks:
The path that one must follow to become a great wizard is veryReferencing the metal plate in the first study you visited, the answer is
difficult... what would you be willing to sacrifice to become one?
TimeFinally, the snake's head asks:
What happened to the mage Nightingale after he masteredUsing the information gathered from the metal plate in the second study, the answer is
wizardry?
He learned that absolute power without proper wisdom has no true value.Leave the room and return down the steps to the Grand Hall. Retrace your steps back to the Storeroom you visited when you first entered the academy. Retrieve the Caretaker's tools which you are now allowed to pick up from the shelf at left.
Go back to the alcove in the Enchanted Hallway and talk to Mustavio:
Will these tools do?Celeste's pendant is returned to you.
Exit the academy building through the front entrance and navigate through the forest and over the organic bridge. Turn right at the vine signpost and cross the footbridge to reach the glade you visited earlier.
Talk to Elvandar the man-tree:
Is this the talking tree I saw in my last vision?A Headen flower is added to your inventory.
Could the song from my pendant wake this tree?
Where can I find a Headen flower?
You now have all the ingredients in inventory necessary for the shapeshifting potion: Yewlock leaves, Headen flower and Nigilis fruit. (You could also use a new pair of boots as there's lots of walking ahead.)
Navigate along the forest path to the academy's waterway, then through the wall crack back into the basement. Travel through the basement, garden and dining hall to the kitchen.
Click on the floating fireball in the corner fireplace. The quest is now to find a cauldron.
Go through the arch at upper right into the pantry. In the back of the room, operate the blue control button of the dumbwaiter to send it down.
Return via the kitchen, dining hall, garden and basement to the wine cave.
Move into the rear of the room, behind the staircase. Go down a few steps and open a wooden door with a silver metal frame into a small machinery room. Use the lever to operate the mechanism to bring the lift down to this level.
Go back into the main room and click on the cauldron to drag it to the lift. Return to the machinery room and use the lever to raise the cauldron.
Return to the main room and climb the stairs to the upper level with the wine casks. Click on the cauldron there to move it into the dumbwaiter you lowered from the pantry. Operate the dumbwaiter control to raise the cauldron.
A cutscene would have been useful here, but instead you're going to have to manually retrace laborious steps through the basement, garden, dining hall and kitchen back to the pantry.
Click on the cauldron in the pantry, and again in the kitchen. Zak is fed the potion with the incantation
Shapus infinitis headea yewlockus nigilis tanaestusand keels over.
{Cutscene}
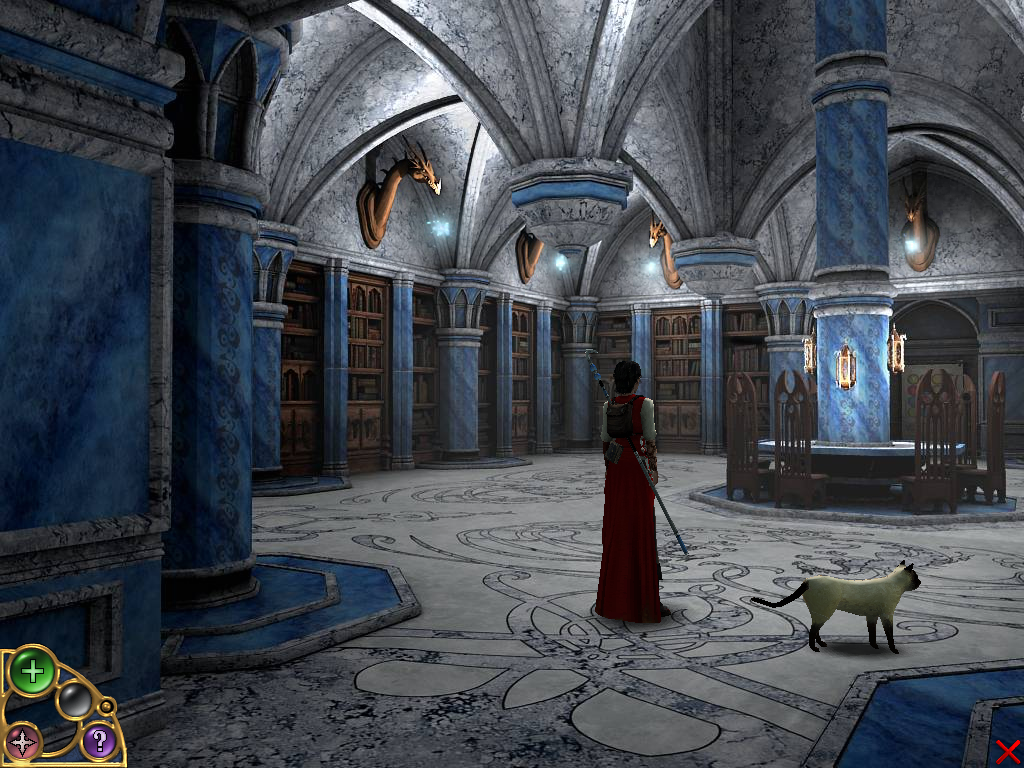
Lydia is magically transported to the Enchanted Crossway, where she meets Zak who has been transformed into a cat.
Return via the facade, Enchanted Hallway, Garden Watch, dining hall and kitchen to the pantry.
Click on the sunlit table at left and look out the window.
Zak climbs along a high ledge of the academy through a broken window into Trial Room #2, where you'll meet him.
Magic Bridge Puzzle
The objective of this puzzle is to allow Lydia to cross over from the balcony where she is standing to the Trial of Wisdom on the opposite side of the gap. The Trial Room contains two levels on each side of the gap, for a total of four balcony locations. A lever exists at each balcony. The levers control a magical bridge that connects two of the four balconies. To solve the puzzle, Lydia and Zak will alternate being the active character. As Lydia or Zak change locations, there are inconsistent viewpoints of the balconies shown, but the bridge transformation videos are always shown from the same angle.
Lydia and Zak cannot occupy the same location until the puzzle is solved. The initial state of the puzzle is that Lydia and Zak are on opposite sides and at different levels in the Trial Room, as can be seen briefly near the end of the preceding cutscene. Due to the restrictions in the movement of the bridge by the levers, Lydia cannot cross to her desired objective directly across the gap; she must first climb to the upper level and then cross there. Even more complicated movements are required for Zak so that he can manipulate the bridge levers appropriately. Under some circumstances, pressing a lever a second time does not undo the first action. Here is a table of possible bridge movements, from the perspective seen in the bridge videos:
Here's a solution in 21 moves. To switch characters, use the following steps:
Bridge
stateBalcony lever Upper left Upper right Lower left Lower right Up / \ No effect / Down / No effect \ / \ No effect Up Up Down / Up Down Up Down
Click on the closest leverFor example, since the puzzle starts out with Lydia active, the first move listed below ("Z lever") means
2. Let's have <other's name> try something
Click on the leverOf course, "cross", "up" or "down" refer to moving the character without using a lever.
2. Let's have Zak try something
Click on the lever
1. I'll try this lever
Click on the lever
Read down, left to right:
Click on the mechanism on this balcony.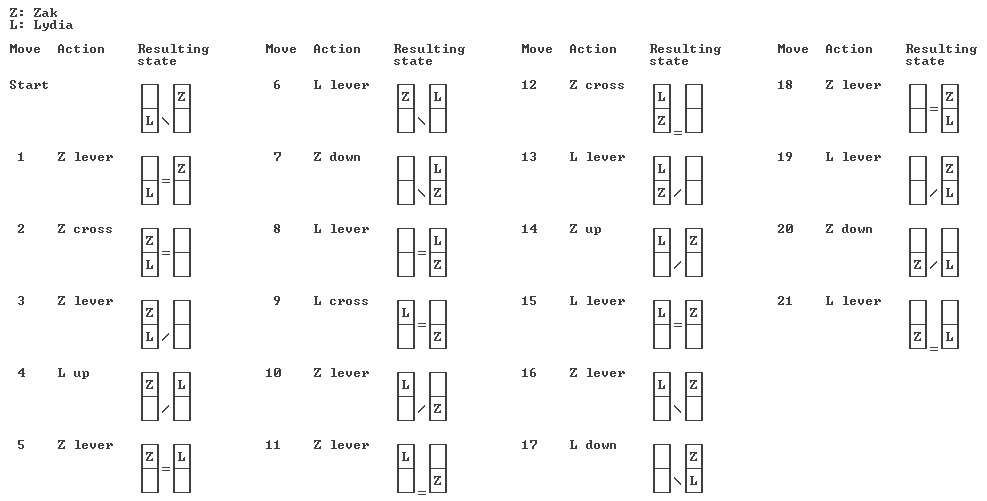
Select any of four poems by using the left-hand lever. For each poem, select the corresponding rune book from the eight possibilities by using the right-hand lever. Move the correct rune book to the poem using the blue button below each book.
From the default starting position, the shortest solution is in 18 moves:
Runes Slund Spirit Undar Water Aetern Celestial Dria Nature Gradion Energy Kyros Fire Nexan Movement Orlos Earth
Poem Rune Howling out of sight
Caress without a touch
Whispers in the night
That doesn't say muchCelestial When around me,
You're never alone
But when I hide,
Your friend is goneFire Hard as rock or soft as moss
I am a source of life but kill as well
And when your last dance comes
In my welcoming arms you'll dwellNature It's everywhere, but can't grab it
It's in your possession, but it own you
If by misfortune you lose it,
Surely, it'll be the end of youSpirit
Use the left lever 3 times to bring up the fourth poemThe four runes used in the solution are important in Part 2 of the game:
Click on the button below the Spirit Rune book
Use the left lever once to bring up the first poem
Use the right lever twice
Click on the button below the Celestial Rune book
Use the left lever twice to bring up the third poem
Use the right lever once
Click on the button below the Nature Rune book
Use the left lever thrice to bring up the second poem
Use the right lever twice
Click on the button below the Fire Rune book
Cross the bridge and return via the Enchanted Crossway, facade, Enchanted Hallway and Grand Hall to the Whispering Stairway. Climb the circular stairway until you reach the entrance to Trial Room #3 on the left.
Celestial Fire Nature Spirit
Open the magically-sealed door and enter Trial Room #3.
After the cutscene, click on the little girl in the window, then click on the door
Repeat this pattern three more times, for a total of 8 clicks.
Exit the room and ascend the stairs to the Hall of Guardians.
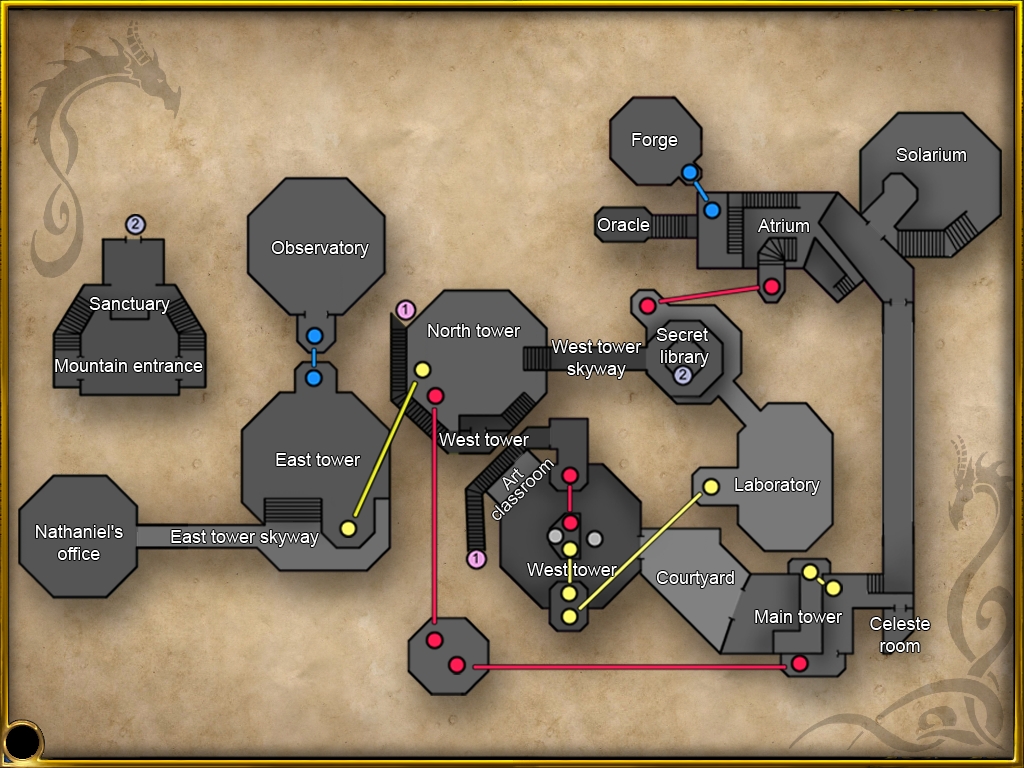
You start out in the Main tower with all 10 inventory items gathered in Part 1 (there are 14 more to collect in Part 2).
Move toward the collection of high-backed chairs at upper left.
Go to the top of the stairs at upper left and continue down the other side towards the balcony overlooking the countryside.
Follow the balcony to the left and into a shaded courtyard.
Exit toward the upper right where the sun is streaming in.
Enter the Solarium (herbalism classroom).
Just to the left of the entrance arch, zoom in on the wall symbol; this is the Nature Rune associated with this classroom.
Click on the rune to light it up.
Back out and retrace your steps along the balcony with a blue-and-yellow floor.
Climb the first set of steps and enter Celeste's room at the top of the stairs at right.
Click on the bed to go all the way into the room.
After some dialog, Zak is locked up.
{Cutscene}
You are then magically transported to a balcony outside the Laboratory (there is no access to the library from here).
Cross the footbridge to the Laboratory, and an owl flies overhead.
Enter the Laboratory.
In the dialog with the now-freed Zak, select the last choice each time:
Honestly Zak, who -- or what -- are you?Read the plate on the wall at left.
Why didn't you tell me you knew Celeste?
Now will you tell me what happened in this forsaken place?
We better keep going...
Go through the doorway at left and use the yellow teleport pad.
At the next location, use the yellow teleport pad in shadow.
Click on the black teleport pad to descend to the floor of the West Tower.
Teleport Activation Puzzle
Save your game here.
The objective of this puzzle is to rotate the controls at each of the four cardinal compass points in the room (slightly offset in the clockwise direction) in order to illuminate all 9 colored teleport circles on the floor.
Starting from the initial configuration with 3 yellow circles lit, there are two solutions, each with 6 moves:
Rotate North thrice so that the floor shows one yellow and one blue circleor
Rotate East once so that the floor shows two red and one blue circle
Rotate South once so that the floor shows three red and three blue circles
Rotate West once so that the floor shows all nine circles lit
Rotate North once so that the floor shows one yellow and one red circleIf it's necessary to reset the puzzle to its initial configuration with only 3 yellow circles lit, rotate the stone pyramids at the north, east and south directions to the position where dual dragons (no colored circles) are shown, then rotate the pyramid at the west direction to show all three yellow circles lit.
Rotate East thrice so that the floor shows two red and one blue circle
Rotate South once so that the floor shows three red and three blue circles
Rotate West once so that the floor shows all nine circles lit
Use the tri-colored teleport pad to return to the upper location in the tower.
Use the red teleport pad.
Proceed through the hallway that has the same decoration on its walls and floor, then pass through the swirling energy portal.
From the sideways stairs, click on the doorway at upper right to enter the Art classroom.
Light up the Spirit Rune on the classroom wall.
Exit the classroom and follow the sideways steps around the tower to the lower right.
At the end of the steps, go through another swirling portal, shown as (1) on the Academy map, back to a "normal" orientation.
Climb several flights of interior steps up to the North Tower (watchtower).
Use the yellow teleport pad to travel to the East Tower.
Follow the east tower skyway at left into Nathaniel's office; the hydrocarbon venting below Nathaniel's office is from the Forge.
Pick up the papers from Nathaniel's desk; a Magical parchment shows up in the Documents section of the in-game menu.
Exit Nathaniel's office and learn that the owl is Nathaniel's familiar.
Return across the footbridge.
In the East Tower, go to the far side of the supplicating statues and use the blue teleport pad to reach the Observatory classroom.
Light up the Celestial Rune on the classroom wall.
Back out and retrace your steps via blue and yellow teleport pads to the North Tower.
Exit left via the West Tower skyway.
The owl steals the circlet and you are automatically transported to the Mountain entrance.
Walk forward to get the circlet.
Talk to the Ghost of Grandmaster Nightingale, selecting the last dialog choice each time:
Who-who or what are you, exactly?You'll learn about the needs for Zak to become human and for four magical items from the classrooms in order to access the Sanctuary, as well as the "Dragonus Enferinis" spell.
You said earlier that you were in dire need of help...
Do you have any idea where Nathaniel is?
Do you know how we can change Zak back to human?
You spoke of a portal activation spell earlier...
Do you know where the teachers hid the items?
Use the swirling portal to return to the blank wall on the side of the Library (shown as (2) on the Academy map).
Go around to the other side of the tower and climb the steps into the Library.
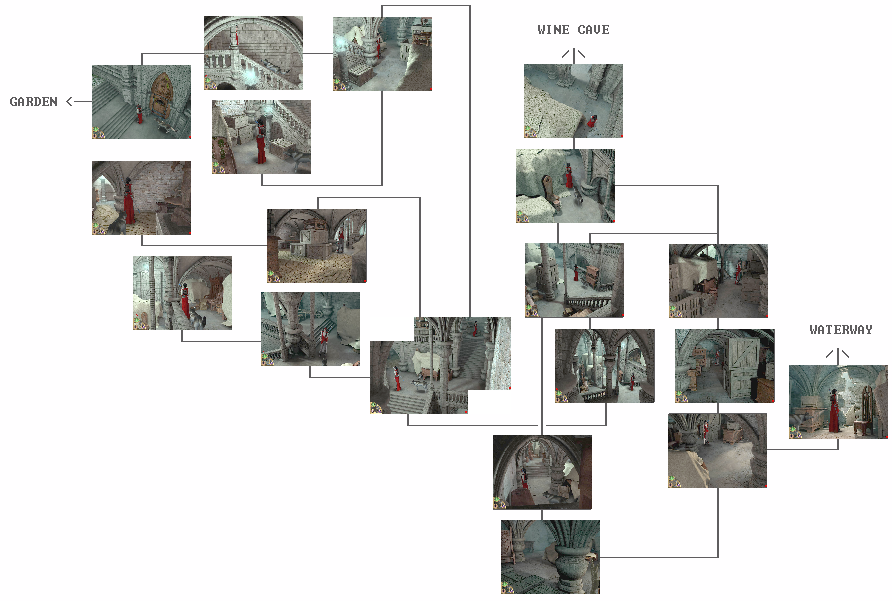
The object of this maze-like puzzle is to gain access to deeper chambers in the secret library and find four tapestries that contain vital clues to other puzzles in the game. To access these chambers, you will need several Library Balls that you will find along the way. You can always check your current supply of balls by accessing your inventory. Navigation may be easier using the map below with compass directions, along with a reference table. The convention used in the map is that the viewpoint of the game is facing north when Lydia enters the library. When she reaches the top of the stairs, she's facing west. Each square on the map represents a chamber identified by a letter A-I, with the number of Library Balls required to reach it shown at upper right. At upper left is the ceiling color, and at lower left is the color of the floor and columns.
Main room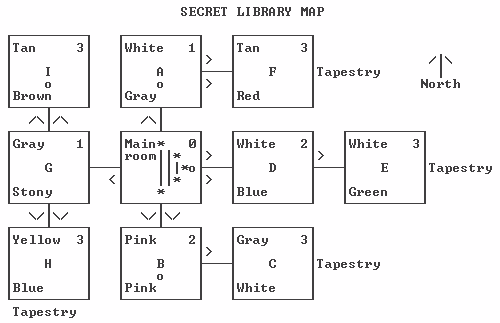
Take the white Library Ball that is atop the railing surrounding the entrance stairs. If this ball is red, you won't be able to pick it up until you've turned on the rune on the wall in the Solarium. The ball shows up in position 3 (left to right) in inventory. Having this ball in inventory allows you to reach the only other accessible destination, chamber A to the north.
Chamber A
Open the wooden hatch to the left of the blank wall to the north, under the dragon's head. Click on the dish inside to insert the Library Ball and open the door to the next chamber. Enter Chamber A and take another Library Ball from the pedestal in the center of the room. If this ball is red, you won't be able to pick it up until you've turned on the rune on the wall in the Art Classroom. The ball shows up in position 1 in inventory. The only other exit from this room has two alcove hotspots and will require two Library Balls to open; since you've used one to open chamber A, you'll need to return later with another ball. For now, exit the way you came to the lower right. Back in the main room, retrieve the Library Ball from the north alcove where you placed it.
Chamber B
Now that you have two Library Balls, place both of them in the hatches flanking the wall to the south. Enter Chamber B, which is predominantly pink and gray. Take the third Library Ball from the pedestal in the center of the room. If this ball is red, you won't be able to pick it up until you've turned on the rune on the wall in the Observatory. The ball shows up in position 4 in inventory.
Chamber C
Use this ball to enter Chamber C to the east. Zoom in twice on the tapestry on the far wall, which shows a large Spirit rune. The Third Tapestry shows up in the Documents section of the in-game menu. Exit the room and retrieve the single Library Ball that you used to enter it. Exit north back to the main room and retrieve the two previously-used Library Balls.
Chambers D and E
Use two Library Balls to enter Chamber D to the east, which has an all-white ceiling. Use the third ball to enter Chamber E to the east, which is predominantly green. Zoom in twice on the Fourth Tapestry on the far wall, which shows a Nature rune. Exit back to the main room, retrieving three Library Balls along the way.
Chambers A and F
Use one Library Ball to re-enter Chamber A to the north. Use the second and third balls to enter Chamber F to the east, which is predominantly red. Zoom in twice on the Second Tapestry on the far wall, which shows a Fire rune. Exit back to the main room, retrieving three Library Balls along the way.
Chambers G and H
Use one Library Ball to enter Chamber G to the west, which has stony gray columns. Use the second and third balls to enter Chamber H to the south, which is blue and yellow. Zoom in twice on the First Tapestry on the far wall, which shows a Celestial rune. Exit back to Chamber G. Retrieve the two previously-used Library Balls, if desired.
Chamber I (optional)
If desired, you can use two Library Balls to reach the brown Chamber I to the north of Chamber G. Take the fourth and last Library Ball from the pedestal in the center of the room. If this ball is red, you won't be able to pick it up until you've turned on the rune on the wall in the Forge. The ball shows up in position 2 in inventory. The fourth Library Ball is not needed in the game.
Once you have all four tapestries in the Documents section of the in-game menu, make your way back to the main room, leaving the Library Balls where they are if desired. Exit down the stairs and use the skyway to return to the North Tower (watchtower).
North Tower Puzzle
Zoom in on the ball with two rings to the right of the yellow teleport pad. Deactivate the protection spell using Dragonus Enferinis, which causes the rings to spin. Back out and zoom in on the stone device in the center of the floor.
Click on the cells in the 4 x 4 grid the following numbers of times to display an array of 4 symbols (Saturn, Star, Sun, Moon), none of which is repeated in any row, column or diagonal:
As each row, column and diagonal is completed, there is a slight delay as lights fade in around the perimeter of the grid.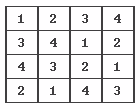
(This is the same as the coins puzzle in Secret Files - Tunguska).
An array of two-digit numbers is displayed, providing information that will be used later.
Use the yellow teleport pad and footbridge to return to Nathaniel's office.
Deactivate the protection spell on Nathaniel's desk.
Zoom in twice on the glass bottle on the desk to transfer inside it.
Ship in a Bottle Puzzle
Click on the door underneath the ship's bridge.
Use the following move sequence to traverse the maze:
Zoom in on the desk drawer at lower right.
Turn the crank to unlock the drawer.
Back out and click twice on the bottle on the desk to return to Nathaniel's "real" office.
Zoom in on the desk drawer at lower right.
Open the drawer and take Celeste's portrait.
Zoom in on the desk drawer again.
Open the drawer and press the blue button at the top.
Use the tri-color teleport pad that is now disclosed.
Nathaniel's Secret Room
Zoom in on the desk and take the scroll (handwritten note) lying there.
Try to deactivate the protection spell on the desk -- Dragonus Enferinis does not work and Lydia makes a comment about the ghost of Grandmaster Nightingale.
Important: Zoom in on the ghostly bookshelf in the rear.
Lydia makes another comment about the ghost of Grandmaster Nightingale.
Use the tri-color teleport pad to return to Nathaniel's office.
Return to the Observatory via the footbridge and East Tower blue teleport pad.
Telescope (Observatory) Puzzle
Climb the stairs to the middle floor.
Lydia tells Zak about the Tale of the Shooting Stars:
The tale relates that if you look at the sky the sameZoom in on the pedestal at the railing.
night someone dear to you died, you will see a shooting
star.If you stare at it until it stops moving, you will see a
big flash of light and then a new star will glow brightly
at the location where it stopped.When this happens, you'll understand that the soul of
the person you lost found peace.Then every time those who know where to find it look at
this star, they will be filled with hope, comfort, and
peace of mind.
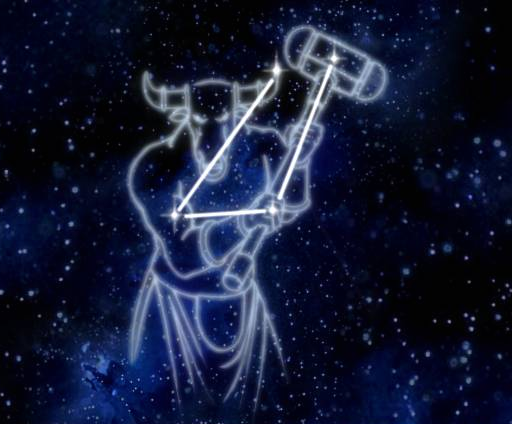
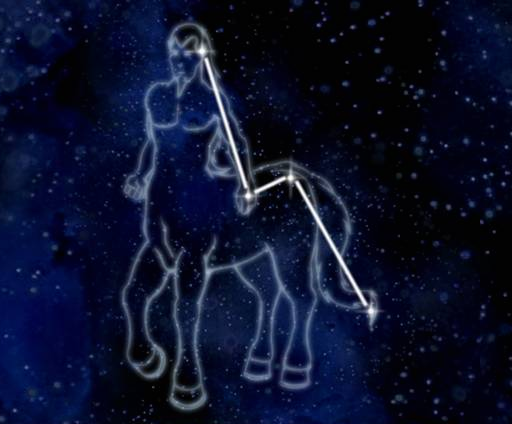
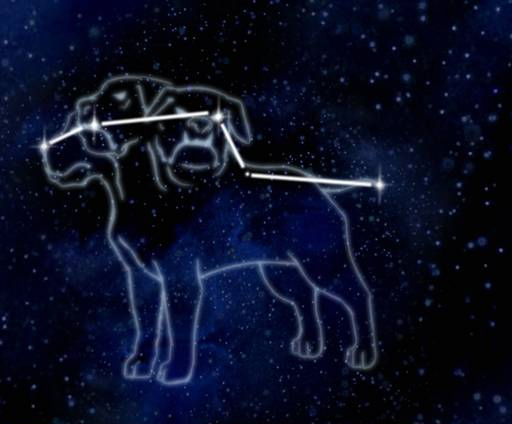
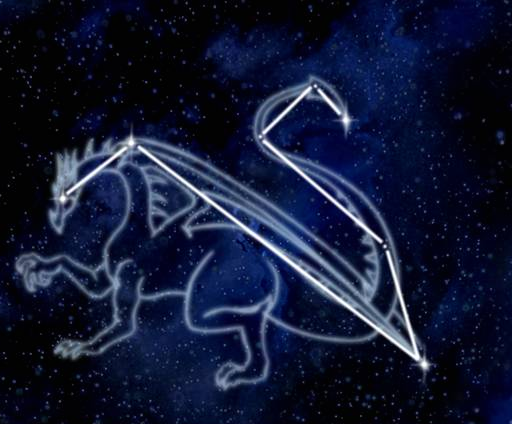
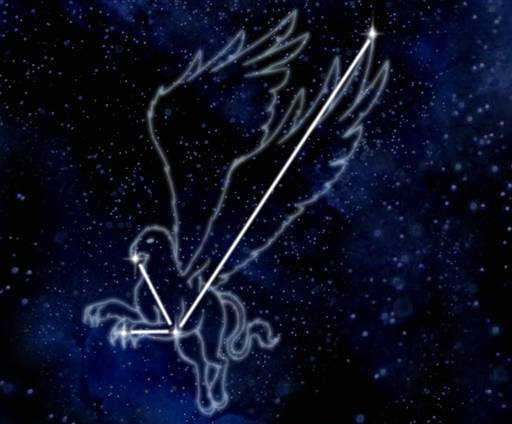
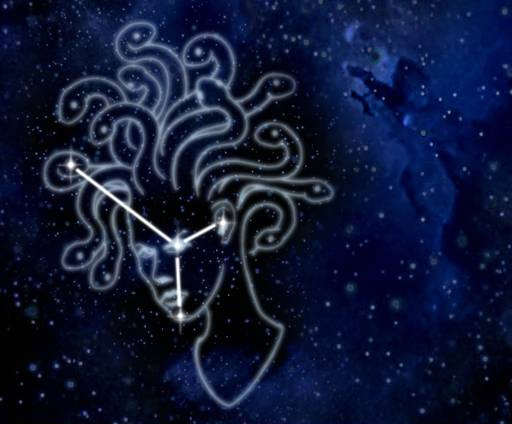
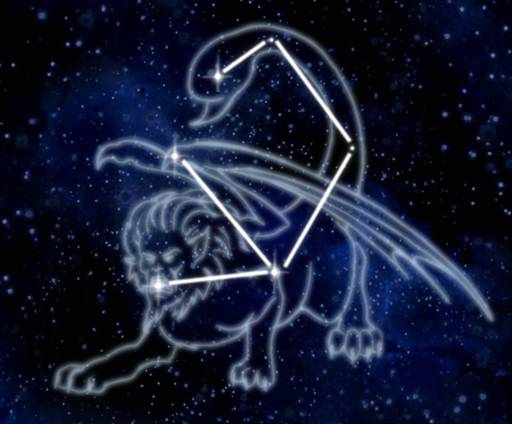
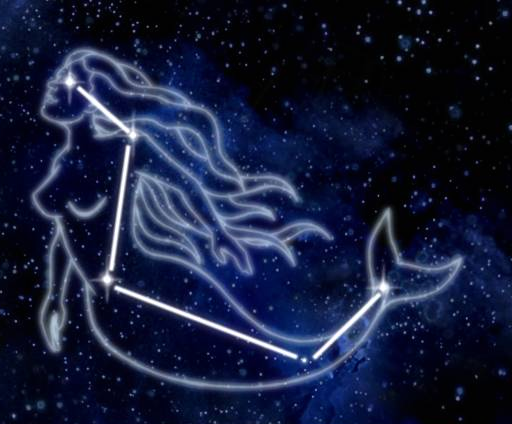
Click on the astronomy device to display eight constellations of mythical creatures:
Note that each Constellation consists of exactly four bright stars, sometimes with dimmer stars (dots) included.
Continue climbing stairs to the top floor of the Observatory, where there is a large telescope.
Click on the Moon floor rug at far right to make nighttime appear.
Save your game here as there is no way to reset the upcoming puzzle!
Zoom in on the telescope.
The concentric rings device at right is used to dial in a previously-seen constellation.
The 4 x 4 array of numbers seen earlier in the North Tower is displayed here. Each of the 4 rows and 4 columns of this array contains four numbers that represent one of the eight constellations identified earlier. This can be verified once the dialing mechanism is understood.
In the rings device, a constellation is identified by one of the four groups of 4 numbers each that radiates outwards from the center of the dial. The particular group of four numbers is identified by the compass position of the gold ball outside of the concentric rings. These numbers don't have to be in the same order as they are displayed in the 4 x 4 array at left. When the correct four numbers are selected, you can click on the telescope eyepiece at top center to view the constellation. If the four numbers are incorrect, nothing is seen in the eyepiece.
For example, the starting state of the puzzle has the number set {95,73,33,24} selected:
Unfortunately, this particular set does not correspond to one of the eight constellations, so nothing is initially seen in the eyepiece.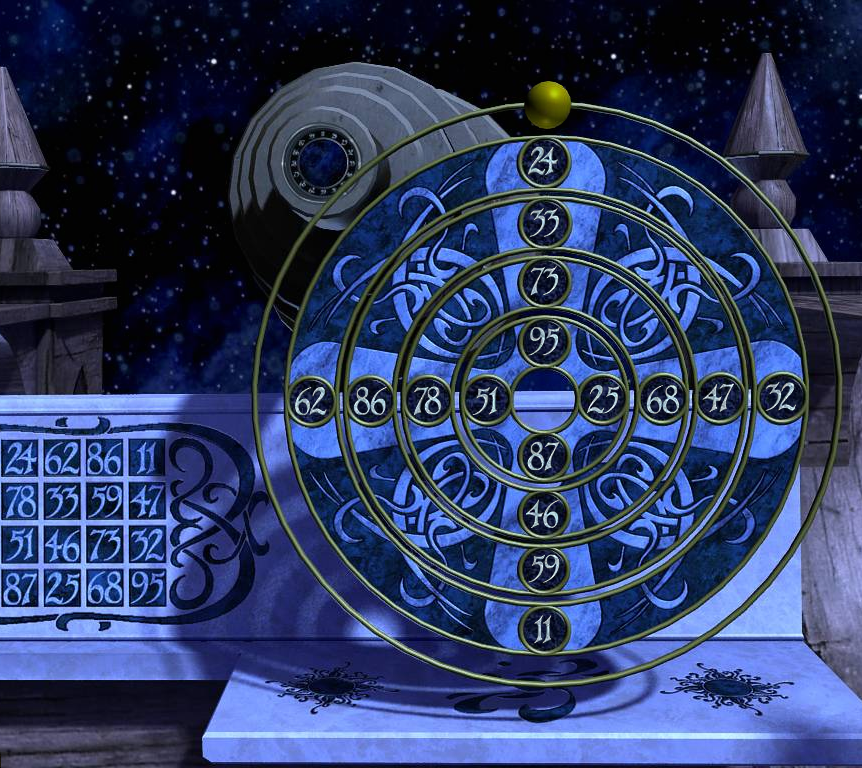
Some experimentation with the rings identifies the rearrangement of displayed numbers that takes place when you click on that ring:
The periodicity of each ring operation is also shown, since it may be helpful to undo an accidental ring operation. For example, if a Ring 2 operation needs to be undone, perform three more Ring 2 operations. To undo a Ring 1 or Ring 3 operation, you'll need to click 7 more times, so restoring a saved game may be faster and easier.
Ring Operation Period 1 (inside) Shift horizontal numbers to the right 8 2 Rotate numbers in Ring 2 counterclockwise 4 3 Shift vertical numbers down 8 4 (outside) Rotate numbers in Ring 4 clockwise 4
The ring codes for the eight mythical creatures can be found in the 4 x 4 matrix of numbers as follows:
Reading the horizontal codes top to bottom and then the vertical codes left to right results in constellations in the same order as displayed by the astronomy device on the middle floor of the Observatory.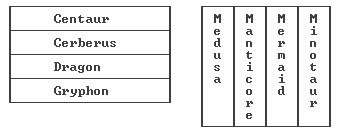
The simplest constellation to display is the first one, the Centaur. Beginning with the starting puzzle configuration from your saved game above, perform the following steps:
Due to the complexity of the ring movements, this puzzle would be fairly challenging if it were simply a matter of dialing in the eight constellations. However, the actual puzzle is considerably more difficult because the solution requires knowing which four of the eight constellations should be displayed, and then a particular star from each one of them, corresponding to a body part in the constellation. The only clues to these answers are in the poem shown on the First Tapestry:
Once the gift of life has been taken for grantedAfter a lengthy process of trial and error, the following keyword associations can be identified in the poem:Even the heart of the strongest one ends up wounded
The mind then becomes poisoned by grief and pain
Until feathery soft memories let only happiness remains
Line 1: A being that can provide the gift of life (birth). This is the abdomen of the Mermaid, which is the only full-body female figure shown.If you could get three of the four stars guessed correctly, along with the specific constellation for the fourth, you could simply try each of the four stars (body parts) in that constellation until the puzzle solution video started playing.Line 2: Heart or Strongest. Based on appearances, this could be the Manticore's chest or possibly the Minotaur's bicep. The latter one is correct.
Line 3: Mind or Poisoned. Several possibilities exist, including the Centaur's head, the presumably-poisonous snakes of the Medusa, or the scorpion stinger of the Manticore. The last is the only one accepted.
Line 4: Feather or Memory. Most likely the tip of the Gryphon's wing since that's the only feathered creature shown.
Solution. For rings numbered from 1 (inside) to 4 (outside), the shortest solution from the default starting position consists of 19 ring rotations:
After dialing each ring sequence and ball position, zoom in on the telescope eyepiece at top center to see the resulting constellation. The corresponding magical figure can be confirmed using the screenshots above. Click on the indicated star and confirm that the appropriate index lights up in the perimeter of the eyepiece. Back out and repeat the process for the next constellation. When all have been entered, Lydia gets a Star fragment in a magical container.
Ring sequence Ball Constellation Star Index Body part 2 2 3 3 4 1 West Mermaid Lower left 73 Belly 1 2 3 3 4 East Gryphon Top 87 Feather 2 North Minotaur Lower left 47 Arm 1 1 4 1 3 2 3 North Manticore Top 33 Stinger
Descend the Observatory stairs and return to the North Tower via blue and yellow teleport pads.
Return to the Art Classroom via the stairs behind the teleport pads, a swirling portal and the sideways stairs.
It's easy to miss, but right after Zak is done talking and Lydia moves a little bit, Celeste's portrait appears at the upper left in the second alcove from the right, and Lydia says "What the...!"
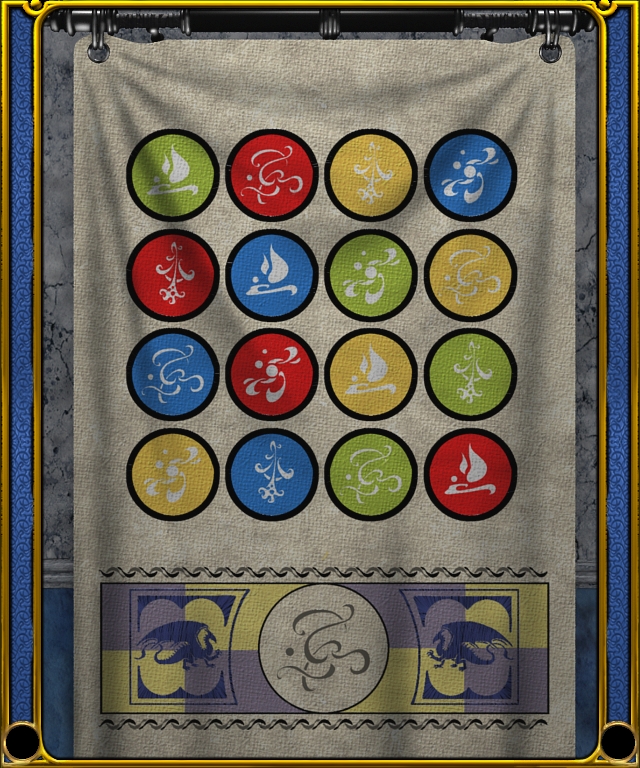
Look at the Third Tapestry having a large white Spirit Rune at the bottom like the glowing one on the classroom wall.
Referring only to the colored circles on the tapestry that contain this rune, note that they occur in the following color order, top to bottom:
Redalthough one could make alternative arguments listing them left to right or in some other arbitrary order in the 4 x 4 matrix on the tapestry (or even in rainbow spectrum order).
Yellow
Blue
Green
Zoom in on the blank canvas and apply colors in the order above.
A landscape canvas is created and mounted in an empty frame in the leftmost of the five wall alcoves.
Zoom in on the two-paintings device in front of the rightmost wall alcove.
The objective of this puzzle is to combine certain pairs of paintings from the alcove to create new pairs of paintings and ultimately end up with the correct pair. Here is a solution in the minimum number of moves:
Click on the dimmed alcoves at upper rightOther paintings that can be created in this puzzle are the Celestial Rune and a Comet (or shooting star).
In the second alcove from the left, click on the Fire Rune at lower left
Click on the Fire Rune to remove it from its frame
Back out and click on the dimmed device at upper right
Click on one of the empty frames to place the Fire Rune there
Click on the dimmed alcoves at upper right
Click on the Blue Dragon in the center of the middle alcove
Click on the Blue Dragon to remove it from its frame
Back out and click on the dimmed device at upper right
Click on the remaining empty frame to place the Blue Dragon there
The Fire Rune & Blue Dragon paintings turn into another pair: Nature Rune & Flying DragonClick on the dimmed alcoves at upper right
Click on your canvas at the top of the far-left alcove
Click on the landscape to remove it from its frame
Back out and click on the dimmed device at upper right
Click on the Nature Rune painting to replace it with the landscape canvas you made
The canvas & Flying Dragon paintings turn into another pair: Blue Academy & Dragon CombatClick on the dimmed alcoves at upper right
Click on the silhouette in the center of the far-right alcove
Click on the silhouette to remove it from its frame
Back out and click on the dimmed device at upper right
Click on the Dragon Combat painting to replace it with the silhouette
The Blue Academy & silhouette paintings turn into another pair: Vale & ElannaClick on the dimmed alcoves at upper right
Click on the painting of Celeste at the upper left of the second alcove from the right
Click on the portrait of Celeste to remove it from its frame
Back out and click on the dimmed device at upper right
Click on the Vale painting to replace it with Celeste's portrait
The Celeste & Elanna paintings turn into a magical container containing Soul Dust.
Exit the classroom and use the swirling portal immediately to the left to return to the West Tower.
Follow the hallway to the left and use the red teleport pad to reach the middle part of the tower.
Use the yellow teleport pads to reach the Laboratory.
Exit to the library tower and use the red teleport pad to reach the Atrium.
Navigate to the Oracle, down some steps from the Atrium area.
Oracle Puzzle
On arrival at the Oracle, zoom in on the giant stone and deactivate the protection spell.
Note the three vertical bars on the stone:
Off On On
This is interpreted to mean that starting with this stone, the next three
stones should have their dragon symbols turned on or off according to this
pattern. This should be done until the specified sequence has been
completed, regardless of any further "instructions" received along the
way.
After checking that the dragon symbol on the stone at the bottom of the stairs is off, exit right to the next stone. Turn on the second stone's dragon symbol (pulsing white) and exit right. In the shady area, turn on the third stone and exit right.
The next stone has the pattern
On On Off
Since the pattern starts with this stone itself, turn on its dragon symbol and
exit right. The next stone should be on and the one following that should
be off (even though these stones look familiar).
The next stone encountered has the four-element pattern
On On Off Off
Turn on its dragon, then exit back to the foot of the stairs. Turn on the
stone's symbol (ignoring its own pattern which is "premature" at this
point). The next two stones should be off.
The next stone encountered has the pattern
On Off On Off
Repeat the process for this stone and the next three, and you'll exit to a wall
with a large dragon fossil on it.
Examine the fossil and get some purple Oracle moss in your inventory.
Exit to the lower right.
The stones no longer have hotspots, so you can just keep moving to the right until you get back to the stairs.
Head to the Laboratory via the red teleport pad in the Atrium.
Click on the workbench to brew a potion.
To turn Zak into a dragon, select:
Brew a potion using Oracle Moss, Headen flower and Nigilis fruit.Return via the red teleport pad to the Atrium, then use the blue teleport pad to reach the Forge.
There are three puzzles in the Forge that must be solved in order to obtain a magic container.
Floor Tiles Puzzle
It's best to save your game on first entry to the Forge, as the state of the floor-tiles puzzle here is retained even after teleporting away or exiting the game. However, certain controls (described below) can restore the default initial state of the puzzle to 3 red tiles and 3 yellow tiles lit. The object is to light up all 6 yellow and all 6 red floor tiles. Only the quantity of lit tiles is important, not their specific locations on the floor. The control at each brazier performs the following function:
Upper right (-1Y) : Turns off one yellow tile. Using this control when no yellow tiles are lit restores the initial puzzle state.Here is a solution strategy:Upper left (-1R +2Y): Turns off one red tile and turns on two yellow tiles. Using this control when no red tiles are lit or when five or more yellow tiles are lit restores the initial puzzle state.
Lower right (+2R): Turns on two red tiles. Using this control when five or more red tiles are lit restores the initial puzzle state.
Lower left: Merely shuffles the red tiles that are lit. Does not change the number of lit tiles of either color. Not used in the solution.
Flames Puzzle
To solve this puzzle, Zak needs to be a dragon.
Move to the right side of the room.
Zoom in on the circle of 8 shelves at the top of the wall:
Sure Zak, go check it out, but be careful.The objective is to turn on all eight flames. The solution is to click on
Top Upper right Lower right Bottomor its inverse
Right Lower left Left Upper left
Central Pedestal Puzzle
Examine the Second Tapestry, having a Fire Rune at lower left that matches the glowing one on the forge wall. This tapestry contains a symbolic translation of the word "fire":
Zoom in on the central pedestal at the intersection of the red and yellow floor tiles. Clicking on any of the 9 circles toggles the visibility of its symbol along with any others that are adjacent to it in the four cardinal directions. In addition, the central circle is always toggled no matter what circle is pressed. The symbols above for the word "fire" can be displayed by clicking on the following tiles: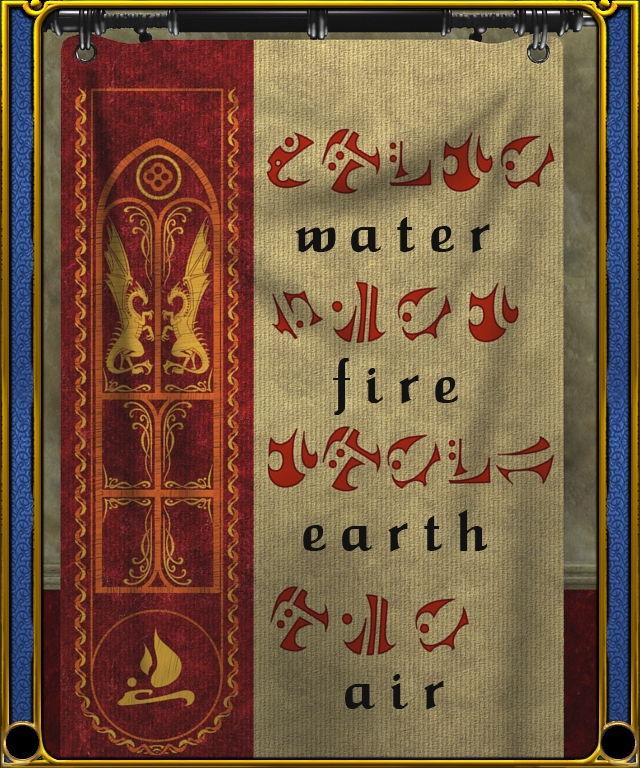
This clearly produces the correct symbols when read in the usual way, left to right, top to bottom: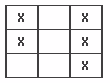
However, this inexplicably does not solve the puzzle! Instead, you must click on the symbols themselves in the order corresponding to f, i, r and e. A circle must be pressed initially to make the first letter ("f") available, so in essence you must spell out a five-letter nonsense word that ends in "fire". Some experimentation will show that 8 of the circles match the letter translations shown on the Second Tapestry: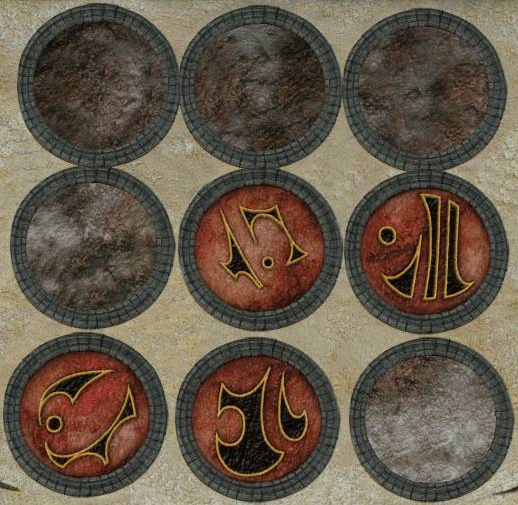
The only sequences ending in "fire" that can be entered are: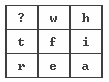
r f i r eWritten in the order the circles are pressed, the two solutions are
e f i r e
Either of these sequences solves the puzzle and you can no longer zoom in on the central pedestal.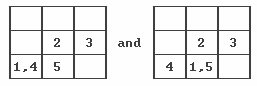
Once all three puzzles in the Forge are solved, you get an Eternal Flame in a magical container. Note that the 3 x 3 array of circles shown on the pedestal is actually the solution shown above, rather than the strange version that is required to solve the puzzle.
Exit the Forge.
{Cutscene}
From the Mountain entrance, use the swirling portal to reach the library tower.
Navigate to the Main Tower via the footbridge and red teleport pads.
Return to the high-backed chairs area and converse with the Ghost of Grandmaster Nightingale:
Have you found a way to change Zak back...Obtain the password Nitarius Anoretum for the ghost library in Nathaniel's secret room. No further dialog with the ghost is needed at this time.
I found a strange library in a secret room...
Come on! You have to remember the password...
Return to the Solarium
On entry to the Solarium, note if the large tree at the entrance has leaves. If it does, or if the Seasons puzzle in the East Tower has never been used, it is Summertime in the Solarium.
Descend the stairs and zoom in on the flowerpots in the structure under the large tree.
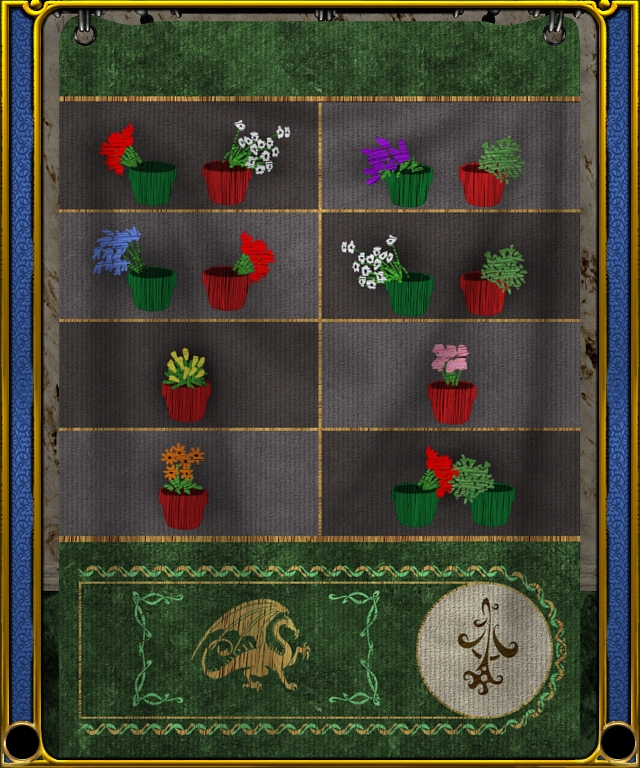
The object of this puzzle is to grow the correct three flower colors.
Examine the Fourth Tapestry, containing several representations of one or two flower pots. It's pretty obvious that the top four of these show combinations of flower colors that "don't like each other" and shouldn't be selected together. Three of the tapestry sections show single flower pots, so one might think that these would be perfectly valid selections. But no, that's not what the single flower pots mean. They mean flower colors that should NOT be selected, regardless of what colors the other pots are. If there's a big red diagonal line across these three pots, it must be very faint.
Some experimentation with the flowerpots shows that, at least in Summer, the following flower colors are available:
RedThese three colors won't work because they violate several of the two-color restrictions on the tapestry.
Purple
(light) Green
As the second built-in clue indicates, there are eight flower colors altogether, and colors can be made available by changing the season in the Solarium. We can determine what these eight colors are by examining the tapestry:
Red, White, Purple, Green, Blue, Yellow, Pink, OrangeThere are 56 possible ways of selecting three different colors from this set. Any of the sets of three can be selected by changing only those flower color(s) in different seasons that need to be changed, and leaving the others unmodified. The restrictions in the tapestry are:
Purple, White, BlueThe only one of these colors that is available in Summer is Purple, so for now, leave at least one of the flowerpots purple (two clicks on an empty flowerpot). To change the season and access other flower colors, you will need to make a trek to a faraway part of the Academy.
Leave the Solarium and head for the Main Tower.
Cross over the up-and-down stairs by Celeste's room and exit to the right of the grouping of high-backed chairs.
On the balcony with the fire-breathing dragon on the floor, use the red teleport pad.
At the pointless junction with two red teleport pads, use the one in back that Lydia is facing.
In the North Tower, use the yellow teleport pad.
Deactivate the protection spell near the destination teleport pad.
Access the Solarium season device behind one of the columns at left.
If the tree in the sphere has leaves and the tower in the background shows two suns on a green checkerboard background, it is summer in the Solarium.
Click on the sphere twice to change the tower ring to two snowflakes on a blue checkerboard background, which sets up winter in the Solarium.
Return to Nathaniel's office via the footbridge.
Enter his secret room via the tri-color teleport pad in his office.
Deactivate the protection spell on the desk using Nitarius Anoretum.
Back out and zoom in on the ghost library in the rear.
Ghost Library Puzzle
Zooming out from the puzzle resets it. As the built-in clues indicate, clicking on a red book moves the blue book to another shelf. Numbered top (1) to bottom (8), the sequence of shelves reached with red books is 8, 1, 6, 3, 4, 7, 2, 5, and back to 8. Since the white book is on Shelf 2, each solution must include at least six transfers via red books. The shortest solutions use lateral moves only if a red book is not available. The shortest solution is the following ten moves:
Return to the Main Tower and talk to the ghost:
I have your spellbook, Master Nightingale!After he disappears, move left and use the yellow teleport pad.
Enter the Student Lounge with the green floor.
Zoom in on the device next to the bench and deactivate the protection spell.
The objective of this vaguely chess- and Stratego-like game is to move the Dragon from the upper-right corner to its lair in the lower-left corner. Backing out or resetting the puzzle with the blue button causes a rather tedious flipping of all 16 tiles. Aside from the immovable walls, adjacent pieces on the 4 x 4 playing board can be swapped with each other according to rules presented symbolically at the bottom of the board:
The green Dragon and the blue Mage can be swappedThe following 64-move computer-generated solution is near-optimal. The following board locations are used:
The blue Mage and the purple Gnome can be swapped
The purple Gnome and the red Soldier can be swapped
The red Soldier and the white Knight can be swapped
Positions 8, 9, 13 and 15 are not used in the solution. Read down, left to right: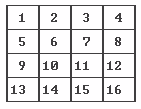
	Move   Swap        Move   Swap        Move   Swap        Move   Swap
	  1    10 & 11      17    6 & 7        33    10 & 14      49    6 & 10
	  2    6 & 10       18    5 & 6        34    10 & 11      50*   7 & 11
	  3    5 & 6        19    11 & 12      35    7 & 11       51    10 & 11
	  4    2 & 6        20    7 & 11       36    3 & 4        52*   3 & 7
	  5    1 & 2        21    6 & 7        37    1 & 5        53    10 & 14
	  6    2 & 3        22    10 & 11      38    1 & 2        54    7 & 11
	  7    1 & 5        23    6 & 10       39    3 & 7        55    10 & 11
	  8    1 & 2        24    11 & 12      40    2 & 3        56    6 & 7
	  9    5 & 6        25    10 & 14      41    3 & 4        57    7 & 11
	 10    2 & 6        26    5 & 6        42*   6 & 7        58*   2 & 3
	 11    2 & 3        27    6 & 10       43*   7 & 11       59    3 & 7
	 12    6 & 10       28    10 & 11      44    2 & 6        60    6 & 7
	 13    10 & 11      29*   3 & 7        45    6 & 10       61*   2 & 6
	 14    3 & 7        30*   6 & 7        46    10 & 14      62*   6 & 10
	 15    2 & 6        31    7 & 11       47    3 & 7        63*   10 & 14
	 16*   3 & 4        32    3 & 7        48    6 & 7        64*   13 & 14

	*: Dragon moves
The payoff of winning the game is the (fictitious) aleunder's root.
Solarium Puzzle, Part 2
Return to the Solarium and see an awesome change in the environment.
Zoom in on the flowerpots.
Leaving the purple flowers untouched, change the other two pots to white and blue (one click and three clicks on an empty flowerpot, respectively).
Get a Huge pearl in a magical container.
For reference, the flower colors available in each season are:
Return to the Laboratory via the red transport pad in the Atrium.
Summer Fall Winter Spring Red Orange White Pink Purple White Red Blue Green Yellow Blue Yellow
Click on the workbench and the owl is caught by Zak the dragon.
All dialog with the owl is optional and not required to advance the gameplay.
Click on the workbench and get a dragon's claw.
Click on the workbench to brew a potion:
Brew a potion using Yewlock leaves, Headen flower and Nigilis fruit.Get some cat hair.
Click on the workbench to brew a potion:
Brew a potion using Aleunder root, Nigilis fruit and Yewlock leaves.Get some wolf drool.
Click on the workbench to brew a potion:
Brew a potion using wolf dribble, cat hair and dragon claws.Navigate to the Mountain entrance via the hidden portal in the side of the library tower at the end of the west tower skyway.
Move forward and click at the top of the left-hand steps.
Playing temporarily as Zak, enter the Sanctuary.
Sanctuary Puzzle
Read the inscription above the four alcoves:
From the highest sky to the bottom of the sea,This inscription contains keywords matching the four magical containers you have in inventory. Left to right in inventory, these are:
mankind manages to bend the elements to its will
Soul dustThe corresponding inscription keywords and magical containers are:
Huge pearl
Eternal flame
Star fragment
Moving through the alcoves from left to right, click once, once, twice and once. This activates the
Keyword: Sky Sea Mankind Elements Magical
container:Star
fragmentHuge
pearlSoul
dustEternal
flame
Sanctuary Portal Puzzle
Back to playing as Lydia, click on the circular pattern on the wall.
The objective of this puzzle is to rotate the 10 four-pointed stars such that both of the following criteria are satisfied:
Each inward-pointing arrow has the same shade (light or dark) as that of the arrow on the opposite side of the circle, which causes the corresponding interior symbol to light up.The initial puzzle arrangementEach pair of arrows pointing to each other along the perimeter of the circle has the same shade, which causes that part of the arc of the circle to be lit up.
has none of the interior symbols and outer arcs lit up. The puzzle is reset by backing out from it.
There are 44 possible solutions to this puzzle; the shortest one has 12 counterclockwise rotations of the stars (using approximate clock references):
12:00: 2 rotationsEnter the swirling circular portal.
2:30: 2 rotations
5:00: 2 rotations
6:00: 3 rotations
7:00: 1 rotation
9:30: 2 rotations
Memory Orbs Puzzle
Click on the table.
To solve this puzzle, click twice on each of six memory orbs in the correct order. There are 720 possible orderings of the orbs, but any mistake allows you to continue a partially-completed puzzle. Selecting available orbs at random and assuming selections are not repeated unnecessarily, the puzzle can be solved using an average of 13.5 guesses, with 6 in the best case and 21 in the worst.
If the orbs are numbered #1 to #6 from left to right, click on them in the
following sequence:
#3 #6 #2 #1 #4 #5
Each correct selection is followed by its own cutscene.
{Endgame cutscene showing a shooting star}
Credits roll (cannot be skipped).
Part 1 Inventory
Classroom Rune Tapestry Library
ChamberPuzzle Magical container Art Spirit Third C Painting Soul dust Solarium Nature Fourth E Flowers Huge pearl Forge Fire Second F Pedestal Eternal flame Observatory Celestial First H Telescope Star fragment
Part 2 Inventory
Item Location Yewlock leaves Academy's waterway Pendant (from Celeste) Included at start of game Circlet Caretaker office Key ring Storeroom Headen flower Elvandar glade Caretaker's tools Storeroom (after a certain discussion with Mustavio) Lydia's student staff Caretaker office Brass key Whispering stairway Nigilis fruit Garden Minotaur Maze figurines Elvandar forest
Celeste vs. Elanna
Item Location Yewlock leaves Academy's waterway Library Ball 1 Secret library Chamber A Soul dust Art classroom Dragon claw Laboratory Celeste's portrait Nathaniel's office Library Ball 2 Secret library Chamber I Huge pearl Solarium Wolf drool Laboratory Aleunder's root Student lounge Library Ball 3 Secret library main room Eternal flame Forge Cat whiskers Laboratory Oracle moss Oracle Library Ball 4 Secret library Chamber B Star fragment Observatory
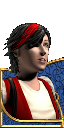
If you're having trouble distinguishing between the daughter Celeste and her mother Elanna, especially as Celeste gets older in the various cutscenes, Celeste is the one with a dark beauty spot/mole on her left cheek, and she often wears a metal headband across her forehead. However, the beauty spot is not visible in the portrait you will have in inventory.
Lydia
Zak as
a wolf
Guardians
Mustavio
Elvandar
Zak as
a cat
Master
Nightingale
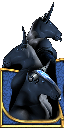
Zak as
a dragon
Owl
Zak
Nathaniel
Lower Academy
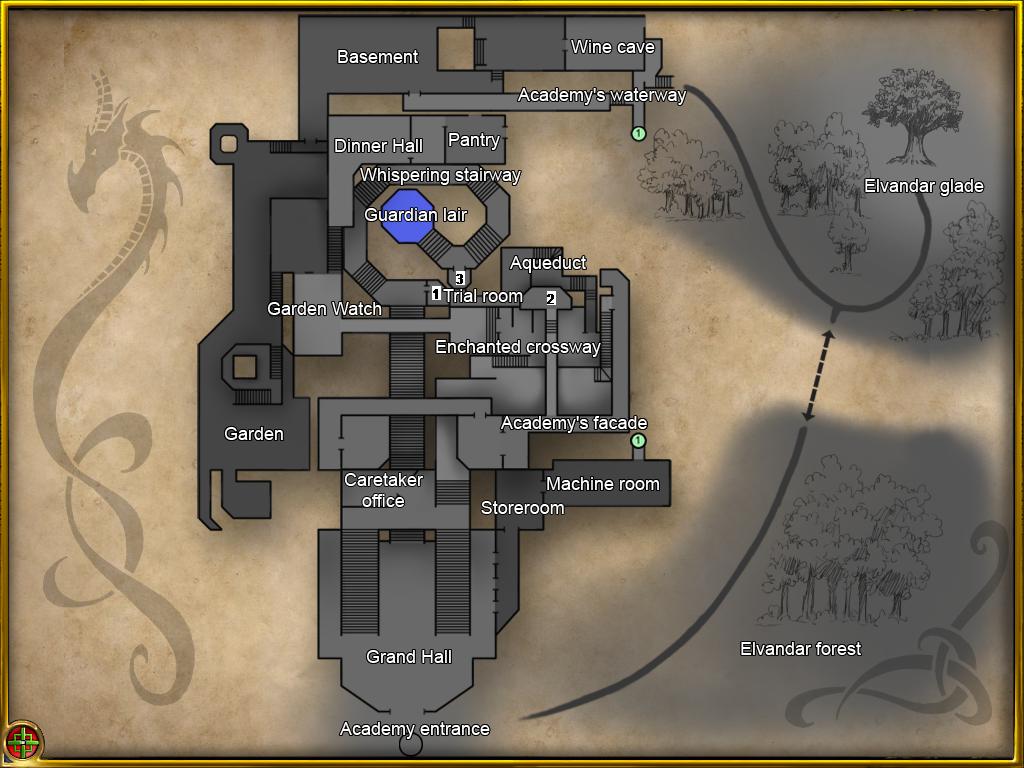
The light-colored smear at the right of the lower academy map represents the river.
Upper Academy
Basement
Copyright © 2018 Balmoral Software (http://www.balmoralsoftware.com). Portions copyright © 2006 by Wicked Studios Inc. All rights reserved. Republication, redistribution or conversion is expressly prohibited without the prior written consent of Balmoral Software.
