
Copyright © 2020 Balmoral Software (http://www.balmoralsoftware.com). Portions copyright © 1998 by Soap Bubble Productions, Inc. All rights reserved. Republication, redistribution or conversion is expressly prohibited without the prior written consent of Balmoral Software.
This walkthrough provides a minimum path through the main areas and clues of the game; other gameplay sequences and exploration can provide additional backstory elements.
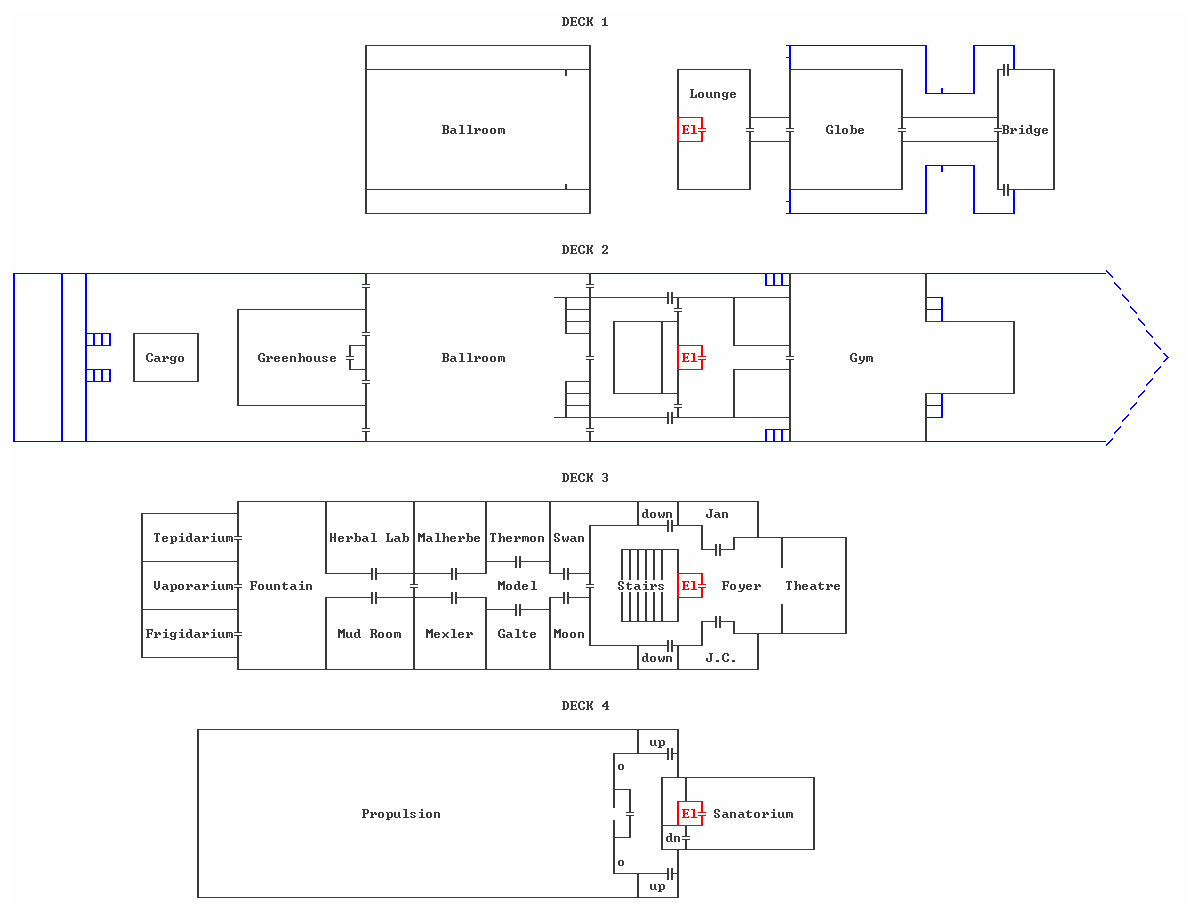
Facing a closed cargo hatch, climb the stairs to the right to reach a raised platform (skybridge). Turn around and zoom in on the device to the right of the helm. Drag down the cargo release lever until a clunk is heard and an animation plays. Back out, go down the stairs and enter the walkway on top of the cargo hatch. Rotate left and move forward toward the stern of the ship to fall into the cargo hold. Move forward toward the corpse, then rotate left until control levers are seen, which indicate you're on an open cargo elevator. Zoom in and drag down the right-hand lever to descend one level. Back out and rotate right until you can approach an oval hatch. Use the wheel on the hatch to open the airlock, allowing access to the ship's interior.
Turn around and return to the cargo elevator control levers. You can't escape the cargo hold the way you came, so use the right lever to descend to the lowest level. Back out and rotate left until you are facing a closed cargo door. Move forward, turn right and exit through the oval hatch. After a short animation, you'll be back outside underneath the skybridge. Using the Deck 2 map as a reference, walk around the cargo hatch and along either side of the ship to reach a doorway, which can be entered since the airlock has been disabled. Exit through the door dimly seen ahead, experiencing the first of many ghostly encounters on the ship. Enter the side door facing the lifeboat to reach the darkened Grand Staircase. Move forward once, then turn to the side and descend the stairs toward a doorway dimly outlined in white. Turn around and zoom in on the device on the central handrail. Click on the device to illuminate the ship's interior.
Rotate to the side and go around the stairs until you are standing in a marble-floored foyer facing a movie theatre. There are four light-blue devices here that play short movie clips circa 1928. Zoom in on each one and drag down its lever to learn important details of the game's backstory, including the central characters J. C. Pharris and his adopted, disfigured son Jan. The ship's six guests are:
A reference is also made to 3-digit combinations needed to open the guest staterooms.
Return to the green wall on either side of the Grand Staircase and enter the adjacent door. Go down the industrial stairs and enter the door into Deck 4. Go through the door between the two glowing tubes to reach a control room facing some large tanks and a tram car. Rotate left or right, zoom in on the control panel and press the plunger to summon the tram. Enter the tram car and press the right-hand (raised) striped plunger to bring up a ladder. Go down the ladder, then rotate slightly right and approach a control panel between the two tanks at right. Zoom in on the work order:
This document contains some important clues that will be used later. Return to the tram car and press the left-hand striped plunger to stow the ladder. Note the line of five light-green indicators that show the tram car's position; number these from 1 to 5, left to right. Use the red-handled lever at right to move from position 1 to position 2. Press the right plunger to raise a device that looks like a small tire. Drag its red knob to the left to activate the ATRIUM screen. Press the left plunger to lower the device, then use the right lever to move to position 3. Press the right plunger to raise a device with 8 tubes; click on any of them to illuminate the INJECTORS screen. Send the device down with the left plunger. Use the right lever, then the left lever to move to position 4. Repeat the procedure you used at position 2 to activate the VENTRICLE screen. Use the right lever twice, then the left lever twice to return to the control room.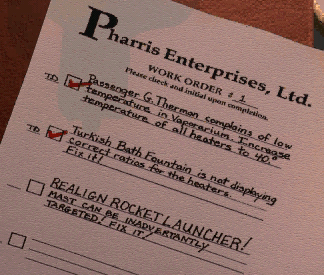
Exit the tram car and zoom in on the control panel at right. If the tram procedure was completed correctly, all three of the red A I V lights should be on. Drag down the lever at right to illuminate the red circle around the atomic symbol, and so unlock a number of doors throughout the ship. After a cutscene involving an argument between J.C. and Jan, return up one of the side stairwells and on to the theatre foyer. Turn around and enter the blue elevator door marked with an atomic symbol. Turn around and select (top) Deck 1. In the Lounge, zoom in on the placard on one of the tables to identify the musical instruments used in Belle Swan's performance:
Zoom in on the ashtray on the green/white counter, then back out to see a ghostly video of the cigar-loving Billy Mexler. Exit through the doors opposite the elevator into a dining salon containing a large spinning globe. Rotate left and zoom in on the wooden rack on the closest table. Zoom in on the stack of Cuban cigars in the top center compartment. Back out from the cigar, then zoom in on the business card now visible in the compartment to learn that Billy Mexler sells fountains. Return to the elevator and take it down to Deck 2. Go through the doors ahead into the gymnasium.
harp drum oboe
Rotate 1/8 turn right and approach the rack of dumbbells. Zoom in on the open space in the rack to see that it once contained two 10-pound weights. Turn around and approach the gymnasium door, then turn right and examine the black weights lying on the floor next to the scale. Watch the ghostly cutscene carefully to see that Leo Galte's current weight is at the top end of the green scale, and that he would be in the heavyweight class if he weighed 20 pounds more. Zoom in on the dial of the scale to see that Galte's current weight is 155 pounds, which may be a good candidate for his 3-digit stateroom code:
Exit the gymnasium, then go to the Grand Staircase through one of the two doors flanking the blue elevator. Zoom in on the purple/white poster on the easel next to the ballroom door. Here you can learn that Belle Swan's performance is Salome and the Seven Veils. Enter the ballroom and go left around the Masked Ball announcement toward a jukebox in the center of the room. Zoom in on the device and select the musical instruments identified above. Drag one of the black knobs until the song "Salome's Seven Veils" is selected. Click on the Play Selection button to learn Belle's stateroom combination:
Galte: 1 5 5
Back out, turn left and exit through either multicolored door into the greenhouse. Move forward, then turn around and approach a set of double louvered doors jutting into the room. Enter the doors into the pump room and zoom in on the greenhouse map on the wall:
Swan: 5 6 8
The right edge of this map leads to the ballroom. Wander the greenhouse examining the placards identifying the plants until you come across the Black Orchid and Valley Orchid described previously. Using the map above, those flowers are associated with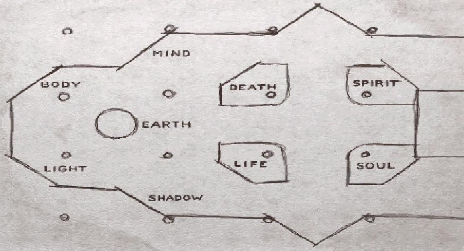
Black Orchid = DeathSimilarly, there is an Amphibian (frog) Tank in the center of the greenhouse that is associated on the map with
Valley Orchid = Soul
EarthExit the greenhouse, pass through the ballroom and descend the Grand Staircase. Enter the passenger stateroom corridor immediately below the ballroom. Go around the Herculania ship model and enter the door with the atomic symbol into a fountain chamber. Zoom in on the fountain for a cutscene, then examine another of Billy Mexler's business cards, this one advertising toilets. Back out, turn left and enter the Mud Room. Move to the shower in the far right corner, then turn left and zoom in on the toilet or bidet for an unpleasant cutscene. Pick up a key from the bidet. Rotate left until Mexler's locker is visible, then use the key you're carrying to open it. Inside, there is a reference to a circus fat lady whose weight could very well be Mexler's stateroom combination:
Exit the room and enter the Herbal Lab opposite. Zoom in on the green chair to see that Dr. Malherbe uses this room to create his serums. Turn left and zoom in on a multicolored device built into the wall. Select the buttons next to the three elixir associations identified previously in the greenhouse: Death, Soul, Earth to produce Malherbe's stateroom combination:
Mexler: 3 8 6
Exit the room, turn right and go around to the far side of the fountain. Note the colors associated with the three doors here:
Malherbe: 4 1 1
Zooming in on a door and pressing the button on its hatch shows that its lock is controlled by a temperature that is a multiple of 10 between 0 and 140 (ostensibly in degrees Fahrenheit). Turn around and zoom in on the fountain. Here, the same colors are displayed on three buttons, and pressing each of them creates a certain number of fountain streams:
Blue: Frigidarium (cold) Orange: Vaporarium (hot) Purple: Tepidarium (lukewarm)
Referring to one of the completed tasks on the work order seen previously, the repaired fountain displays the thermal lock ratios. Another completed task on the work order indicates that all thermal lock settings are at least 40°. Therefore, the three door settings are between 40 and 140, inclusive, and in the ratios 1:3:2, left to right.
Blue: 1 stream Orange: 3 streams Purple: 2 streams
Let F represent the Frigidarium temperature setting, which we know is at least 40 (F ≥ 40). The Vaporarium temperature 3F is no more than 140, so F ≤ 46.7, or F ≤ 40 since the temperature is a multiple of 10. Therefore, F = 40, and the thermal lock settings
will unlock the three doors simultaneously. Since the first item on the work order refers to Grace Thermon and the Vaporarium, enter the center door. Move into the sauna in back and operate any of the wall spigots to increase the steam level in the room. Back out, turn around and zoom in on the glass door of the sauna to disclose Thermon's stateroom combination:
40 120 80
Exit the Vaporarium and return to the passenger stateroom corridor. Zoom in on Malherbe's door (the first one on the left). Press either button at the top to display the initial door combination 0 0 0. Click on the digits to enter his code 4 1 1, then press one of the top buttons to open the door. Zoom in on the desk at left. Open the wooden box and zoom in on the instructions in the lid to learn that 3 1 8 is the pod retraction code. Zoom out and examine the black book. Zoom in on the top page to see Moon's stateroom combination:
Thermon: 2 4 4
At this point, you have all stateroom combinations except the Pharrises. Exit the cabin, turn left and zoom in on Moon's door at the far end and opposite side of the corridor. Enter the code 3 2 4 and move to the far end of the room. Zoom in on the mirror at left and examine the diary. Click the magnifying-glass icon three times to see a letter from Jan in which he refers to the mirror image of Claire's pendant:
Moon: 3 2 4
Exit the cabin and zoom in on Swan's door opposite, then enter her code 5 6 8. Move forward and zoom in on the table at right. Open the wooden box with the Feather symbol on top and pick up a vial of red serum. Now carrying the serum, exit the cabin, turn left and return to the elevator on the far side of the Grand Staircase. Take the elevator down to the Sanatorium on Deck 4.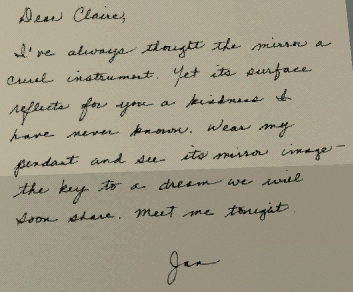
Turn right and zoom in on the small device against the wall. Drag the number wheels to enter the pod retraction code 3 1 8, then drag down the silver lever at upper right. This deposits an empty pod belowdecks. After a cutscene discloses a secret door, enter it to descend a spiral staircase to the large Neurographicon machine. Turn right and enter the open pod. Click the serum cursor on the Feather symbol to enter Swan's dream world.
Zoom in on each alcove and retrieve a picture inside, which becomes part of your invisible inventory (a couple of the alcoves are missing a picture). Click on each of the five hookahs to disclose a unique symbol in its smoke plume. After all pictures have been retrieved from the alcoves, exit through the right-hand blue door. Proceed directly across the courtyard and enter the right-hand blue door opposite into a similar room: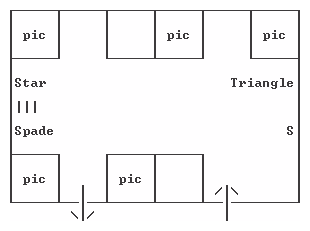
Turn right and zoom in on the pyramid next to the cut watermelon. The top of the pyramid frame shows a transition from a full moon at left to a crescent moon at right (this must be a Turkish palace since the writing is from left to right). Drag the hand cursor to rotate the pyramid until a full circle (moon) can be seen at the top of one of the faces. Trace the connecting line around the faces of the pyramid through a sequence of symbols, each enclosed within a trapezoid and previously seen in the hookah smoke clouds: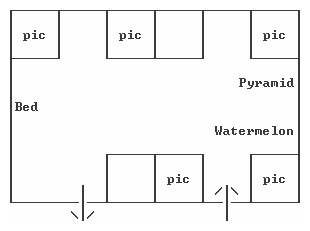
(Full moon) → Triangle → ||| → Star → S → Spade → (Crescent)Retrieve all of the pictures from the alcoves in this room (a couple of them are missing a picture). Return across the courtyard and enter the first room. Click on the hookahs in the order give above, and receive a feather. Click the feather on the golden shroud to disclose a white bird.
Back out from the birdcage, turn right and go down the stairs as before. Enter the red-framed door to the right of the fountain in the open courtyard. If you've collected all the pictures from the rooms visited previously, there shouldn't be any empty spaces in the circle of 11 pictures in this room. The objective of this puzzle is to recorder the pictures so that their left and right margins match up. The first picture (1) to the right of the doorway is fixed, but the remaining ten can be swapped with each other to put them in order. Click on an arrow to see the adjacent pair of pictures and how their margins line up:
(Door) 1 ↔ 2 ↔ 3 ↔ 4 ↔ 5 ↔ 6 ↔ 7 ↔ 8 ↔ 9 ↔ 10 ↔ 11 (Door)When the puzzle is completed, the aggregate picture is scrolled and a feather is earned. Click the feather on the golden shroud, and the caged bird gains color.
Back out from the birdcage and go down the stairs as before. Turn left and move forward into a courtyard with spiral columns. Continue moving forward over the checkerboard floor and through a door flanked by palm trees. Move forward once into the town, then turn left and zoom in on the stall of musical instruments. Save your game at this point.
Click on the flute at far right, and its music will start playing in the background. (There is a bug in the software that crashes the game if the drum is touched.) Back out and move forward. Rotate right slightly and zoom in on the basket to perform some snake-charming and receive a feather. Click the feather on the golden shroud to free the caged bird and return to the ship.
Back out from Swan's pod and turn right. Take the spiral staircase back to the Sanatorium. Return via the elevator to the passenger stateroom corridor on Deck 3. Zoom in on Mexler's door at far left and enter his code 3 8 6. Move forward and zoom in on the table at right. Examine the wooden box at left and note the Spade symbol on its cover. Open the box and pick up the red serum. Return to the open pod in the Neurographicon and click the serum on the Spade symbol to enter Mexler's dream world.
Back out twice and zoom in on the two trashcans next to the King Colossus banner at left. Enter the trailer with the clown face at left. Zoom in on the middle stand of three to learn that a Tahoopie coin weighs 4 ounces (1/4 pound). Back out from the trailer and read the handbill that was lying on the ground to learn: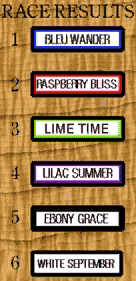
Therefore, King Colossus weighs 4 x 75 = 300 pounds. Back out and observe the banner at left, which shows that the Fat Lady weighs as much as King Colossus (300 pounds) plus his bag of ransom coins (125 pounds), or 425 pounds total. Turn around and approach the Guess the Weight booth next to the clown-face trailer. Zoom in on the machine and drag the three red knobs to the right to enter 425: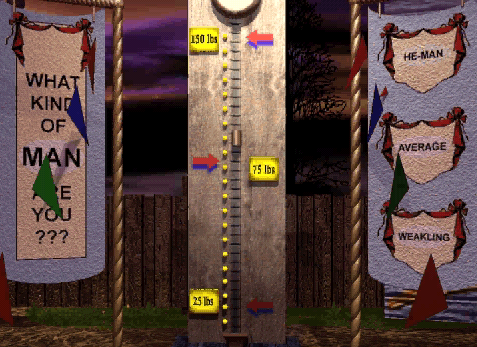
Use 100 knob four timesfor a total of 11 tedious ball drops. If you accidentally back out from the machine, your progress is thankfully saved. The 6 lights on each side of the machine have no purpose or bearing on the solution, although it would have been more interesting to have them represent the number of balls that needed to be dropped. When 425 is shown by the digits at the top of the machine, drag down the black lever at upper right. You are rewarded with a Queen of Diamonds playing card, with which you can click on the fortune teller.
Use 10 knob twice
Use 1 knob five times
Back out and zoom in on the calliope. Drag out the organ stops according to the colors and numbers in the horse race results above:
Press any key on the organ keyboard to earn an endless ride on the carousel. Click to exit and receive the Queen of Hearts card, with which you can click on the fortune teller.
Color: Purple Green White Blue Red Black Setting: 4 3 6 1 2 5
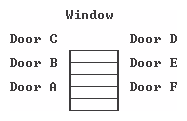
Back out and return to the location of the two trashcans at the King Colossus banner to the left of the Horse Racing booth. Move forward past the trashcans into a backstage area behind the fence. Turn right, move forward and enter the stage door of the Fun House. Drag down the House Lights lever until a clunk is heard. Fully pull down the ropes in the order needed to recreate the five parts of the miniature play, as seen behind the curtain at left:
You'll get a Queen of Clubs card for your efforts, with which you can click on the fortune teller. Back out from the fortune teller to complete the side quest and return to the ship.
Pull
thirdPull
fourthPull
secondPull
lastPull
first
Take the spiral staircase back to the Sanatorium. Return via the elevator to the passenger stateroom corridor on Deck 3. Zoom in on Thermon's door on the right facing the ship model. Enter her code 2 4 4. Turn right and zoom in on the wooden box on the table. Note the Flame symbol on top. Open the box and pick up the red serum. Return to the open pod in the Neurographicon and click the serum on the Flame symbol to enter Thermon's dream world.
Back out of the hut, turn around and follow the path across a bridge and up a dirt path to some rocks overlooking the ocean. Turn left and go along the cliff to a tall structure facing a cemetery. Enter the structure through its double doors. There are six cave entrances from this location. Repeatedly enter a cave five times until you are startled by a screeching monkey and a toy appears in closeup. Drag the hand cursor to rotate the toy so you can zoom in on the inscription on its reverse side:
Back out and you'll be facing the cemetery. Click the monkey icon on the gravestones until you discover the correct one:
To my darling son,
who would have been 7
May the angels continue
to watch over you
This is the gravestone farthest to the right. Click the monkey icon on the receptacle on the gravestone, then repeat the previous procedure in the hut.
STEPHEN
SPEER
TAKEN FROM HIS
MOTHER AT AGE 6
Return to the rocks overlooking the ocean. Turn right and enter the cave flanked by monkey-head statues (this must really be Monkey Island). Approach the large firelit monkey statues facing a hemisphere surrounded by three hanging seats. Get into the left-hand seat and pull the handle at upper right to ascend to the cave ceiling. Pull the decorated wooden lever on the wall and a mechanical sound is heard. Pull the handle again to descend to the cave floor and see that the hemisphere has flipped over, showing a flat face. Leave the seat and use the center seat on the far side of the hemisphere. Repeat the procedure to see that the hemisphere is now illuminated by sunlight. Next, use the right-hand seat in a similar way, but this time pull the decorated wall lever twice to rotate the hemisphere's base into its correct position. Finally, use the left-hand seat again to ascend to the cave ceiling. Instead of touching the wall lever, rotate the viewpoint until red markings on the rock ceiling can be seen and you can move forward over a lattice of poles. Continue through the passage and exit the cave through a circular hole behind a waterfall. Repeat the process with the flame icon to complete the side quest and return to the ship.
Take the spiral staircase back to the Sanatorium. Return via the elevator to the passenger stateroom corridor on Deck 3. Zoom in on Galte's door on the left facing the ship model. Enter his code 1 5 5. Move forward and zoom in on the wooden box on the table at right. Note the Rose symbol on its cover. Open the box and pick up the red serum. Return to the open pod in the Neurographicon and click the serum on the Rose symbol to enter Galte's dream world.
Return to the row of cells and view each one's interior to identify an object on the cot or table:
Cell: 1 2 3 4 5 6 Name: Tess Ophelia Molly Lulu Kitty Ingred
Correlating the above two tables with the information obtained from upstairs in Mrs. Pettibone's boarding house, we have some probable whereabouts for the six female fugitives:
Cell: 1 2 3 4 5 6 Object: Blue glove Ball of yarn Flute Blue bowl Flowered hat Blue jewelry
Exit back into the morgue, then turn around and examine the body lying under a sheet. Zoom in on Mrs. Pettibone and pick up a rose. Click the rose cursor on the flower stand at the waterfront.
Name: Tess Ophelia Molly Lulu Kitty Ingred Location: Paris London New York Hong Kong Rome Egypt
Re-enter the police station, turn right and move toward the wall maps. Rotate right slightly and zoom in on the last desk in front of the double doors. Pick up Ophelia's red pin and back out. According to the table above, insert the pin at the location of London on the third wall map from the right. Repeat the process for the other five colored pins as follows:
After backing out from the last pin placement, you'll move into a back office where you can pick up another rose. Click the rose cursor on the flower stand at the waterfront.
Wall map (L-R): Egypt Paris Hong Kong London Rome New York Name: Ingred Tess Lulu Ophelia Kitty Molly Pin color: Yellow Purple Dark blue Red Light blue Green
Turn around from the flower stand and move along the waterfront. Enter Smedley's Pub on the street corner beyond the boarding house. Zoom in on the bar and note the distinctive patterns of six beer taps:
Back out, turn left and move toward the dartboard on the far wall. Zoom in on the red-upholstered booth closest to the dartboard. Select the dart third from the top that matches the beer tap second from left. Your correct choice and aim are confirmed by a dart sticking in the dartboard, and one pull of the corresponding beer tap. Repeat the dart selection process corresponding to the other five beer taps: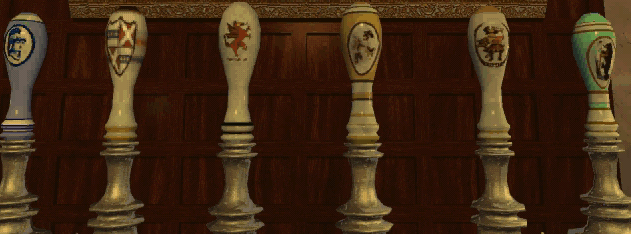
When the sixth dart is successfully thrown, all of the beer taps tilt in sequence and you exit the pub through a secret door behind the fireplace. Enter the green door into a warehouse. Rotate right and approach a boxing ring. Pick up a third rose from a stool in the boxing ring. Click the rose cursor on the flower stand at the waterfront to complete this side quest and return to the ship.
Location: Booth Booth Booth Door Booth Booth Booth Dart: Third from bottom Second from top Bottom Second from bottom Top Third from top Tap: Third from right Third from left Second from right Leftmost Rightmost Second from left
Take the spiral staircase back to the Sanatorium. Return via the elevator to the foyer of the movie theatre on Deck 3. Facing the theatre, turn left and zoom in on Jan's stateroom door. If necessary, operate the buttons on the left to reset the squares on the right to their initial all-yellow state, then create the mirror image of Claire's pendant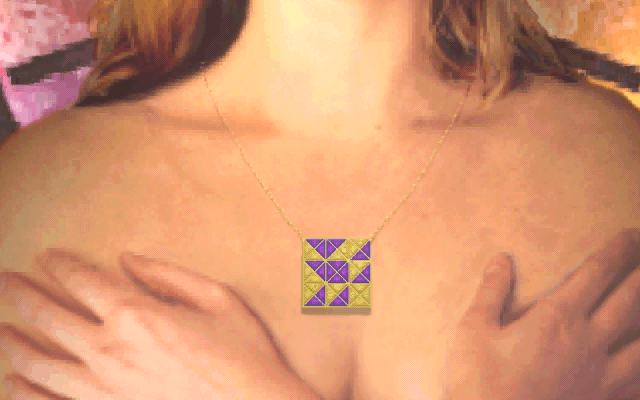
by clicking the left-hand buttons the number of times shown in the following diagram (20 clicks total):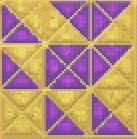
Click on the left-hand button at the top to enter Jan's cabin. Move forward and zoom in on the mirror. After a cutscene showing the real Jan, the mirror is shattered and discloses a door symbol resembling a stylized letter "P":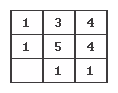
Exit the cabin and zoom in on J. C. Pharris's stateroom door opposite. If necessary, operate the buttons on the left to reset the squares on the right to their initial all-yellow state, then create the pattern above by clicking the left-hand buttons the number of times shown in the following diagram (30 clicks total):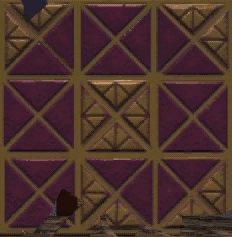
Click on the left-hand button at the top to enter the cabin.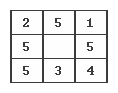
Rotate left and zoom in on the table. Allow J.C. to finish reading aloud his letter, after which the endgame sequence plays. Was it all a hypothermic dream?
Copyright © 2020 Balmoral Software (http://www.balmoralsoftware.com). Portions copyright © 1998 by Soap Bubble Productions, Inc. All rights reserved. Republication, redistribution or conversion is expressly prohibited without the prior written consent of Balmoral Software.