Copyright © 2017 Balmoral Software (http://www.balmoralsoftware.com). Portions copyright © 2005 The Adventure Company. All rights reserved. Republication, redistribution or conversion is expressly prohibited without the prior written consent of Balmoral Software.
Nibiru: Age of Secrets is a 2005 game from The Adventure Company that provides an engrossing story, good dialog writing, and crisp graphics and background effects such as weather and incidental sprites. Puzzles in the first 80% of the game involve inventory manipulation mostly, while a few standalone puzzles appear in the last chapter. Some of these puzzles are moderately difficult to solve. There are some timed sequences in the game, but all are easy, and if you run out of time, you have a chance to try again. On the other hand, there is at least one area where the game is unforgiving about the exact sequence of steps that must be followed. There is also no way to repeat dialog or hotspot information once it's displayed or spoken, so save often. Be careful when overwriting a previously-saved game slot as no confirmation is provided. There are a maximum of 99 saved-game slots. The inventory is accessed by right-clicking the mouse. When an inventory item is selected, it is shown as a cursor which pulsates when it is ready to be used on a hotspot or other inventory item. You can click the mouse to skip through dialog or double-click to quickly exit a scene, but there is no way to speed up the main character's walking.
This walkthrough provides a minimum path through the game; other gameplay sequences and dialog choices can provide additional backstory elements.
Charles Bridge
Talk to painter
Click on pedestal
Talk to painter
BarboraGet portrait
Barbora
Right-click pedestal, get message from Barbora
Right-click message in inventory to read it
Right-click cell phone in inventory to call the professor and find out Barbora's address and last name Kanska
Barbora's Apartment
Try to enter the building
Use the door
Ring the B. Kanska button (third from the bottom in the left column) twice
Ring five of the other buttons to have someone else let you in
In the building lobby, right-click the left-hand letter boxes to find out Barbora's apartment location
Take the elevator upstairs
Use the door bell twice
Knock on the door twice
Try to use the attic stairs next to the elevator
Return to the lobby and right-click the notice board at right
Use the elevator
Click on the sign to the right of the fire extinguisher to get the attic key
Take the stairs up to the attic
Click on the unlabeled hotspot under Martin's arm
Take a rag below the light switch, and a rope near the spoked wheel on the wall
Remove the bricks underneath the wardrobe at right
Use the hole in the floor to get a marble
Use the rag on the window
Use the rag to remove the pieces of broken glass from the window
Use the rope on the beam
Click on the window
Time passes...
Enter the bathroom door at right
Right-click on the sleeping white cat on the laundry basket at right to find out his name is Felix
Exit the bathroom
Use the computer
Type in the password: felix
Take the purse from the floor
Right-click the purse in inventory to get an ID card
Exit the lobby
Central City
After some dialog with De Wilde, exit right from a park to the Bureau building (see map)
Exit left to a kiosk
Click on the subway area behind the kiosk, and a girl will throw a firecracker at Martin
Give the marble to the little girl and get some firecrackers in return
Exit right and talk to the beggar next to the Bureau building
Return to the kiosk and talk to the saleswoman
buy cigarettesExit right and give the cigarettes to the beggar
buy matches
Exit right and enter the Archive building
Try to move to the middle of the lobby
ID cardExit the building and talk to the pensioner twice
Throw the firecrackers at the pensioner to scare away the birds
Central ArchiveReturn to the kiosk and talk to the saleswoman
buy wineExit right and talk to the beggar
wineTake the rightmost bottle from the building ledge
Combine table wine & bottle in inventory
Return to the Archive entrance and give the bottle of wine to the pensioner to get a permit
Enter the Archive building and give the permit to the doorman
Go to the middle of the lobby and use the elevator
In the basement, use the ID card on the card reader to the left of the closed door
Right-click the sunlit flower pot near the floor fan to get a small key
Zoom in on the table
Right-click on the photograph of an upside-down white cat and take the pencil sharpener
Click on the pencil holder to get a pencil
Combine pencil sharpener & pencil in inventory
Use the sharpened pencil on the notepad to the left of the keyboard
Take a piece of paper from the notepad
Use the small key to open the drawer and take a stamp
Back out and use the computer
Password: xilef (felix reversed)
Use the printer to get a report
Combine stamp & report in inventory
Exit the office
Use the ID card on the "mechanical elevator" (tube post) device on the wall
Before the green light turns out in about 10 seconds, use the piece of paper on the mechanical elevator
Take the documents from the device
These are the Nibiru project documents from 1943
Exit the building, then go to the Bureau and enter it
Talk to the secretary twice
call cardIf another dialog choice does not appear, exit and re-enter the building and talk to the secretary again
validationExit the building and talk to the beggar
secretaryRight-click on the new Mercedes hotspot at far right
Combine call card & cell phone in inventory
Enter the Bureau building
Go into the office at right
{Cutscene}
Camp
The playable demo of the game starts at this point.
Talk to the Major twice
Exit right to the bridge, then exit left back to the gate (see map)
Talk to the soldier by the gate
just soExit right three times to the mine guard
Talk to the soldier twice
mineTalk to the soldier a third time
permitExit to the trailers and then to the cabin in the rear to find it locked
Talk to the civilian (Stasek) twice
minesExit right to the mine entrance, then exit back to the trailers
trailers
cabin
major
mine
Talk to Stasek
mineExit right to the mine entrance and you'll be forced back
Exit left twice to the gate area
lightsExit right to the bridge, then exit left to the gate, and the soldier will ask for food
cabin
exit
exitExit right to the bridge
Take the mushrooms near the bridge
Exit right to the trailers
Enter the trailer
Take the can opener on the table
Take the canned beans from the sink area
Right-click on the coat to the left of the stove to get a piece of paper
Combine can opener & canned beans in inventory
Combine mushrooms & opened can with beans in inventory
Use matches on the stove
Put the canned beans with mushrooms on the stove
Time passes...
Exit the trailer and return to the gate
Give the heated can to the soldier
exitGo to the trailer area and then return to the gate
exitEnter the tent
Right-click the uniform to get some keys
Take the radio
Exit the tent and go back to the trailer area
Use the keys on the cabin at rear
Take the rope
Take the tool bag
Right-click the tool bag in inventory to get a hand oiler, string, a screwdriver, a flashlight and a wrench
Take the hammer from the workbench
Use the screwdriver on the lid of the green generator
Use the hammer on the lock of the locker
Open the locker
Click on the locker
Right-click on the body of a man
Click on the lid of the generator twice
{Cutscene}
The playable demo of the game ends at this point.
Mine
Click twice on a rod sticking out of a barrel
Use the wrench to take the iron rod from the barrel
Move into the left-hand corridor
Click twice on the cave-in
Use the iron rod on the cave-in
Click on the crevice
Use the flashlight on the crevice
Take the pin from the skeleton
Right-click on the pocket to get a small set of keys
Back out and return to the mine entrance
Move forward through the right-hand passage to a junction of mine passages (see map)
Click twice to take a cramp(on) from the wall at left
Move into the corridor at left
Click on the opening in the machinery at right
Use the cramp on the heap of earth underneath the opening to get a valve control wheel
Use the valve control wheel on the opening in the machinery
Turn the valve control to lower the load
Take a hook from the top of the load
Return to the junction of corridors
Move forward into the right-hand corridor to a flooded area
Click twice on the murky water, then use the flashlight on it
Combine rope & hook in inventory
Use the anchor with the can in the water to get a can with oil
Return to the junction of corridors
Move forward into the central corridor
Note the swastika above the big steel door
Zoom in on the mechanism in the middle of the door
Open the center cover and insert the keys into the receptacle
Turn the four outer knobs to simulate the hooked cross of the swastika seen earlier:
Move the top knob so that its opening is to the right
Leave the right knob with its opening pointing down
Move the bottom knob so that its opening is to the left
Click twice on the left knob and it won't budge
Use the hand oiler on the left knob
Combine hand oiler & can with oil in inventory
Use the full hand oiler on the left knob
Move the left knob so that its opening points upward
Nazi Tunnels
Click twice on the greenish hotspot (lamp) directly to Martin's left
Use the matches on the lamp
Click on the machinery to zoom in on a generator
Turn the left valve control
Click twice on the right valve control to see that it's stuck
Use the full hand oiler on the right valve control, then use the wrench to tighten its connection
Click on the right valve control once more
Just around the corner on the dark side of the generator, move the lever shaped like an upside-down U to turn on the lights
Move forward into the tunnel to a junction of four corridors (see map)
Note the rat hole in the bottom of the right-hand wall
Take the right-hand corridor
Use the keys on the steel door, and a key breaks off in the lock
Return to the junction and take the left-hand corridor
Try opening the door to find out it's locked
Use the keys to open the door
Enter the storeroom
In the right-hand cage opening, take a can
Click on the box to get a light bulb
Use the cramp to open one of the crates in the center of the room, and take a stick of dynamite
From the shelves in the back of the room, take a test tube
Click on the battery on the floor at left
Use the test tube with the battery to get some acid
Exit the storeroom, return to the junction and take the right-hand corridor
Use the acid on the steel door
Enter the archive
Zoom in on the archive at left
Use the piece of paper with the drawers
Click on the documents to get a small metal box
Right-click the small metal box in inventory to get several magnets
Back out and continue on to the archive (radio room)
Zoom in on the table
Take a magnifying glass from the shelves
Also take a wooden box and a ruler from the table
Back out and right-click on the light in the darkened area of the room at right to discover that its bulb is missing
Put the light bulb into the light
Click on the groove in the floor, then on the iron cabinet
Click on the secret wall, then use the cramp on it
Use the dynamit(e) on the crevice
Try to light the dynamite with the matches to find out that its fuse is too short
Exit the archive and return to the storeroom (repository)
Take another stick of dynamite from the crate
Right-click the dynamite in inventory to remove its fuse
Exit the storeroom and return to the radio room
Put the fuse on the dynamite
Light the dynamite with the matches
Return to the radio room and click on the crevice
You can now combine box & ruler in inventory to make a rat trap
Open the can of beans with the can opener in inventory
Combine opened can & rat trap in inventory
Return to the junction and use the baited rat trap with the rat hole
Return to the storeroom using the corridor at left
Take another stick of dynamite from the crate
Exit the storeroom and return to the junction
Take the trap with a rat inside it
Right-click the box in inventory to get a rat
Combine dynamit(e) & rat in inventory
Return to the radio room via the corridor at right
Use the live charge with the crevice
Enter the secret room
Use the switch to the right of the arch
Take the journal from the table
Right-click the journal for a lengthy reading, including a reference on the last set of pages to a safe key hidden in a drain in the lab
Back out and combine magnifying glass & journal in inventory to activate a hotspot on its last page
Take the iron from the table
Return to the junction and follow the corridor to the rear
Zoom in on the hotspot at left to open the Magnet Puzzle
Put the magnets on the device
The objective is to fill the triangular space with the polygonal magnets
Magnets can be selected and moved by left-clicking
Right-click a magnet to rotate it
One solution to the puzzle is
Press the red button to activate the elevator
Exit into the elevator
After listing to an intercepted radio call in the lab, click twice on the table to get a magnet
Click on the burner, then use the can (of kerosene) on it
Light the burner with the matches
Use the iron with the burner
Time passes...
Right-click on the journal in inventory
Use the hot iron on the suspicious spot to disclose the number sequence 4 7 9 2 2
Back out and click on the drain near the elevator
Combine piece of string & magnet in inventory
Use the magnet on a string with the drain to get a small key
Return via the elevator and right-hand corridor to the secret room
Use the small key on the iron cover behind the table
Zoom in on the safe
From the initial arrow position pointing upward at 0, enter the combination discovered earlier on the last page of the journal:
Left-click the center knob 4 times to move the pointer clockwise to 4You can also open the safe by moving counterclockwise to the first number and then alternating directions
Right-click 7 times to move counterclockwise to 7
Left-click twice to move clockwise to 9
Right-click 7 times to move counterclockwise to 2
Left-click 10 times to move clockwise to 2
Take the red statue
Back out and save your game before exiting the secret room, as a timed sequence follows
Exit the secret room and encounter Stasek
After throwing the statue at Stasek and a couple of more lines of dialog from him, you have about 12 seconds to click on the levers to the upper right of the light bulb you replaced earlier; otherwise, Stasek shoots you and you are returned to the secret room to try again
{Cutscene}
Enter the hotel
Talk to the guest
Ring the bell to talk to the desk clerk
Click on the ashtray on the reception desk and get some matches
Right-click on the matches in inventory to get the hotel phone number
Exit the hotel and use the telephone booth
Re-enter the hotel and get a key for Room 24
Climb one flight of stairs and open the first door on the left
Time passes...
Go back down to the lobby to get De Wilde's phone number from the desk clerk
Use the telephone on the reception desk
Exit the hotel and go to the docks at left
Talk to the fisherman three times
yes{Cutscene}
Arriving at De Wilde's mansion later that night, ring the doorbell
Enter the mansion
After some dialog with De Wilde, get an envelope from him
Return to the pier, and you'll find yourself captured by Raumhart, his son (Stasek) and a henchman
After some dialog, you'll have a 60-second timer to avoid being killed (in which case, the timer resets so you can try again)
Click on the knife on the floor
Use the knife on the red button at left
Use the pin on the handcuffs
Use the ladder
It's now the next day, and at De Wilde's mansion, you learn that he is dead
Right-click the envelope in inventory to get a letter from the professor
Talk to the detective, then give him the professor's letter
Enter the mansion
Take the pyramid from the desk
Move to the bookcase in the back of the room
Note that the old poster above the fireplace says "tikal"
Click on the telephone answering machine in the corner
Note the association of letters and numbers as on any telephone keypad
Press the red button to replay messages
Back out and turn the bust on the fireplace mantel to disclose a wall safe at right
Zoom in on the safe and note that the number keypad is laid out like a telephone (not like a calculator keypad)
Enter the numeric telephone code associated with the letters "tikal": 8 4 5 2 5
Both statues are gone, but you still needed to open the safe in order to permit your leaving the mansion
Back out and begin a timed sequence by clicking on the hourglass on the bookshelf
Move Martin a little to the right so you can see the hourglass
After about 45 seconds, the appearance of the hourglass will abruptly change so that all of the white sand is in the bottom half
At this point, you can take the hourglass from the shelf and put it in your inventory
Combine knife & hourglass in inventory to get a small key
Combine small key & pyramid in inventory to get an old Mayan map
Exit the mansion
After some more dialog with the detective, exit left to the gate
After talking to the gendarme, return to the hotel lobby
Note that Stasek is booked into Room 32
Enter the alley at right
Click on the emergency staircase
Click on the walking stick next to the beggar woman
Talk to the beggar
walking stickExit the alley and talk to the buffet
buy a hot dogReturn to the alley and give the hot dog to the beggar
Return to the buffet and buy a nudist hot dog
Enter the hotel and take the ketchup from the reception desk
Combine hot dog & "catch-up" in inventory
Return to the alley and give the hot dog to the beggar
Take the walking stick
Use the walking stick with the emergency staircase
Go down one flight of stairs to the 2nd floor
Enter Room 24
Take the vase from the table
Remove the lamp plug from the wall outlet at left
Use the vase with the outlet to douse the lights
Exit the room
Click on the locked door at the end of the hallway
Talk to the repairman twice
Take the keys from the ladder
Use the keys on the storeroom door at rear
Take a white rag lying on the floor at right
Take an orange bottle of diluter from the cabinet at left
Take a broom next to the cabinet
Combine rag & broom in inventory
Combine diluter & broom with rag in inventory
Combine matches & broom in inventory
Return downstairs to the lobby
Zoom in on the reception desk array of keys
Right-click the key for Room 32
Back out and return up two flights of stairs to the 3rd floor
Use the villains' key on the second door from the left
Right-click on the bed, then open the briefcase
You have three minutes to enter the correct combination to open the briefcase
A slight click and blink of the cursor occurs when each number is in the correct position (it may help to lower the music volume in the game settings)
The combination (top to bottom) is 3 7 1
You've recovered two missing statues, but unfortunately you don't get to see them in closeup
{Cutscene}
Talk to the bouncer at the pub entrance
Return to the square and talk to the door of the yellow house
Take a bowl from in front of the fountain and fill it with water from the fountain
Return to the pub entrance and give the bowl of water to the hobo sleeping on the bench
Return to the square and talk to Isabella's mother
Return to the pub entrance and talk to the bouncer
Talk to the hobo to get a token
Give the token to the bouncer
Enter the pub
Talk to the bartender
GeorgeTalk to George
exit
Next morning, talk to George in his shop
JaguarTalk to George again
Temple of DawnExit the shop
Talk to the stallkeeper to get a colorless stone statue
Re-enter the shop and talk to George again
jeepExit the shop and use the jeep at upper left
In front of the arched ruin, talk to the tourist and get a camera (see map)
Exit left to the Temple of Dawn
Put the stone statue into the right-hand statue at the temple entrance
Click twice on the left-hand statue at the entrance to get a stone cylinder
Enter the temple
After some dialog with Paul the archeologist, talk to him about taking a picture
Use the camera on the stone relief
Note the stone pedestal at this location
Return to the arched ruin
Talk to the tourist and get another stone cylinder
Enter the ruin
Put the two stone cylinders into the two openings on each side of a red stone disc in the wall carving
Press the red stone disc to raise a large platform from the floor opening
Save your game at this point
Ring Puzzle
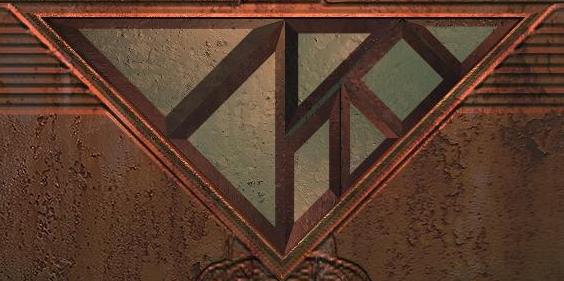
Click on the stone platform to access the Ring Puzzle, probably the most challenging puzzle in the game. In this puzzle, there are five concentric stone rings occupied by 16 balls in four colors. Number the rings from 1 to 5, starting on the inside. In the starting arrangement of the puzzle, each compass direction consists of four balls in four colors. These balls are all in the same color order radially outward from the center, so that each ring has four balls of the same color. The puzzle is solved by arranging the balls so that each compass direction contains only those balls of the associated color shown in the small triangle outside the outer ring; for example, the vertical line of four balls at the top of the puzzle (North) should all be red. The arrangement of balls can be changed by moving a ball into an open space, or by rotating any of the five concentric rings clockwise or counterclockwise. The outermost Ring 5 contains only one position for a ball. In the solution below, the Ring number and compass direction are used to specify which ball to move into the open space; for example, at the start of the puzzle, the only possible move (other than a ring rotation) is to move the Yellow ball located in the West direction at Ring 4.
A 50-move solution is given below.
Starting puzzle arrangement:
Step 1 (4 moves): Create a space in Ring 1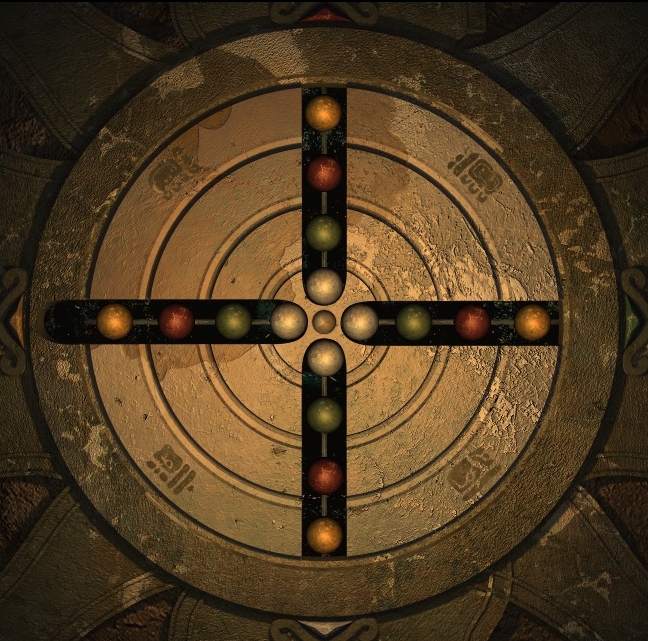
1. Click on West ball at Ring 4Resulting arrangement:
2. Click on West ball at Ring 3
3. Click on West ball at Ring 2
4. Click on West ball at Ring 1
Step 2 (4 moves): Place two balls of each color in their final directions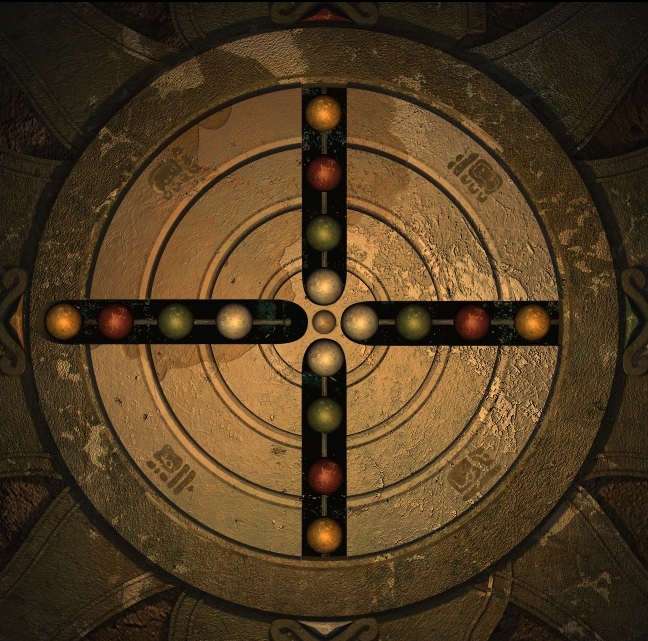
5. Left-click on Ring 4 to rotate it clockwiseResulting arrangement:
6. Left-click on Ring 3 to rotate it clockwise
7. Left-click on Ring 3 to rotate it clockwise
8. Right-click on Ring 2 to rotate it counterclockwise
Step 3 (4 moves): Vacate Ring 5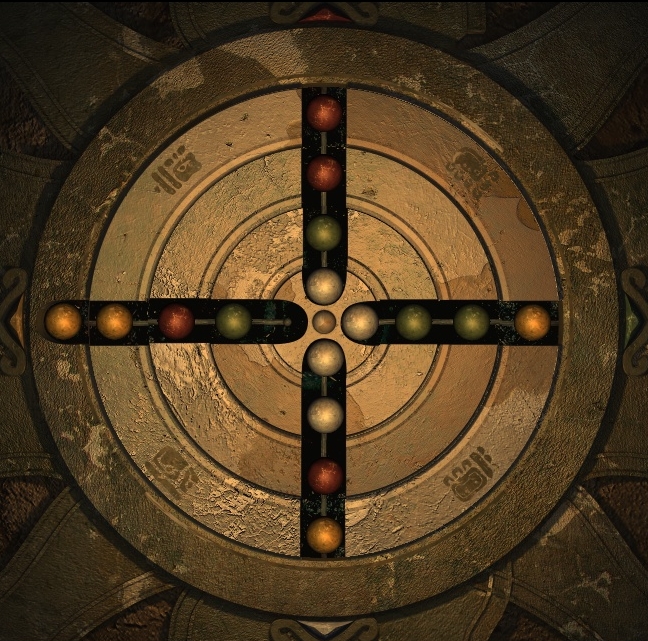
9. Click on West ball at Ring 2Resulting arrangement:
10. Click on West ball at Ring 3
11. Click on West ball at Ring 4
12. Click on West ball at Ring 5
Step 4 (6 moves): Move third White ball into South line
13. Right-click on Ring 5 to rotate it counterclockwiseResulting arrangement:
14. Click on South ball at Ring 4
15. Click on South ball at Ring 3
16. Click on South ball at Ring 2
17. Click on South ball at Ring 1
18. Left-click on Ring 1 to rotate it clockwise
Step 5 (5 moves): Move third Yellow ball into West line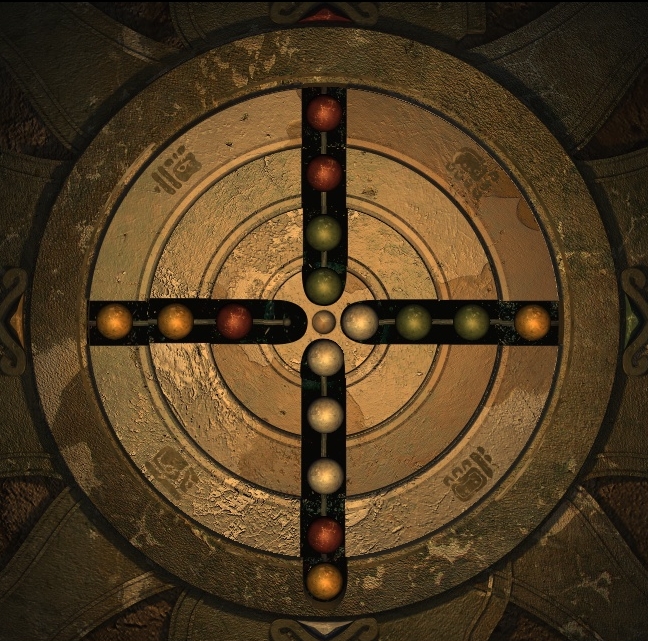
19. Left-click on Ring 5 to rotate it clockwiseResulting arrangement:
20. Click on West ball at Ring 2
21. Click on West ball at Ring 3
22. Click on West ball at Ring 4
23. Click on West ball at Ring 5
Step 6 (6 moves): Move fourth White ball into South line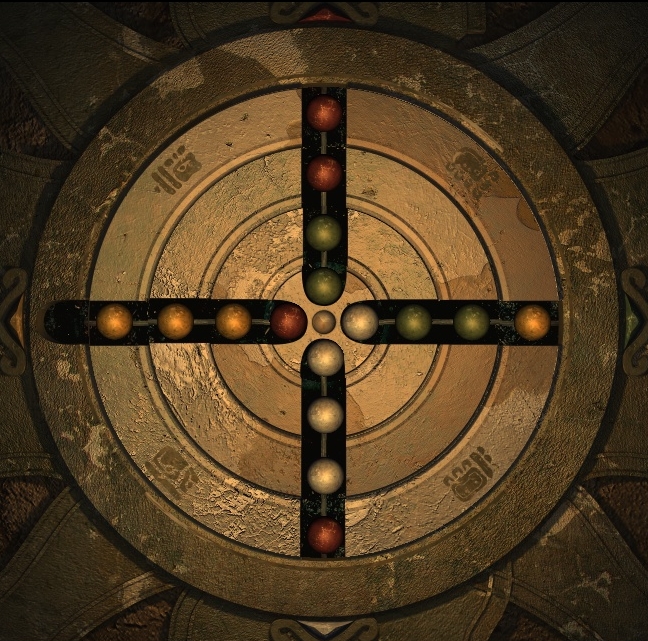
24. Right-click on Ring 5 to rotate it counterclockwiseResulting arrangement:
25. Click on South ball at Ring 4
26. Click on South ball at Ring 3
27. Click on South ball at Ring 2
28. Click on South ball at Ring 1
29. Left-click on Ring 1 to rotate it clockwise
Step 7 (7 moves): Move next Red ball into North line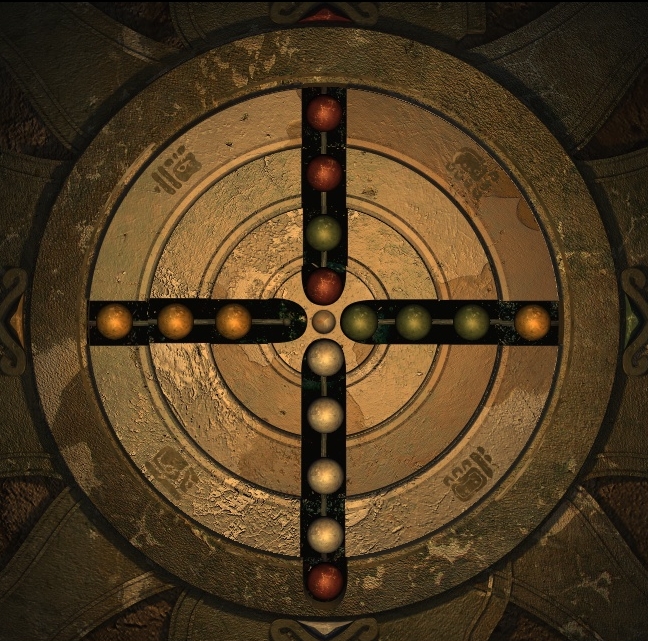
30. Left-click on Ring 5 to rotate it clockwiseResulting arrangement:
31. Left-click on Ring 5 to rotate it clockwise
32. Left-click on Ring 1 to rotate it clockwise
33. Click on North ball at Ring 2
34. Click on North ball at Ring 3
35. Click on North ball at Ring 4
36. Click on North ball at Ring 5
Step 8 (8 moves): Move third and fourth Green balls into East line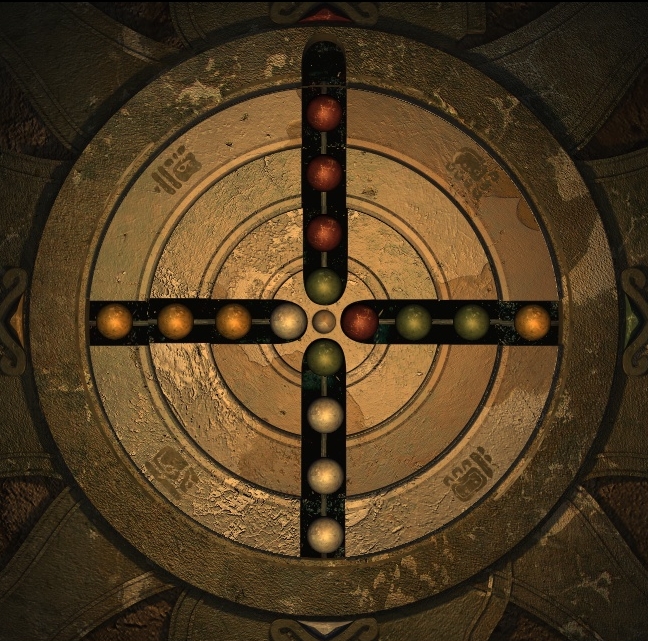
37. Left-click on Ring 1 to rotate it clockwiseResulting arrangement:
38. Left-click on Ring 5 to rotate it clockwise
39. Click on East ball at Ring 4
40. Click on East ball at Ring 3
41. Click on East ball at Ring 2
42. Click on East ball at Ring 1
43. Left-click on Ring 1 to rotate it clockwise
44. Left-click on Ring 1 to rotate it clockwise
Step 9 (6 moves): Complete puzzle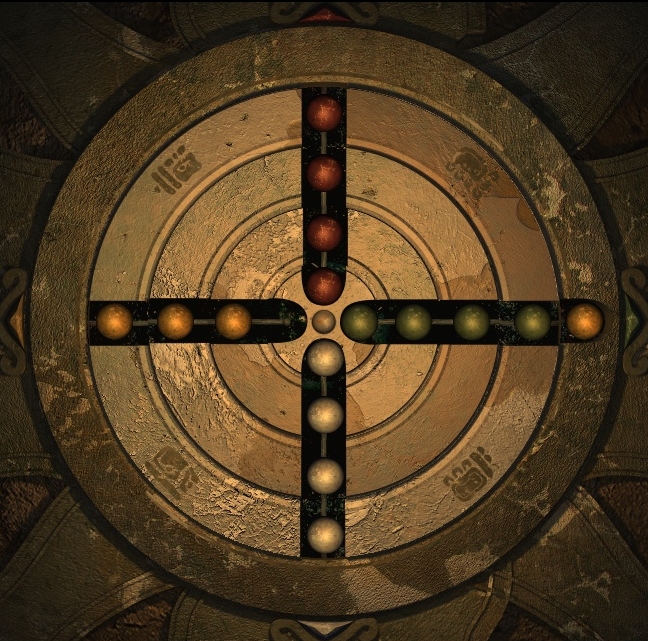
45. Left-click on Ring 5 to rotate it clockwiseFinal arrangement:
46. Left-click on Ring 5 to rotate it clockwise
47. Click on West ball at Ring 2
48. Click on West ball at Ring 3
49. Click on West ball at Ring 4
50. Click on West ball at Ring 5
Take the green prism from the opening in the wall, and save your game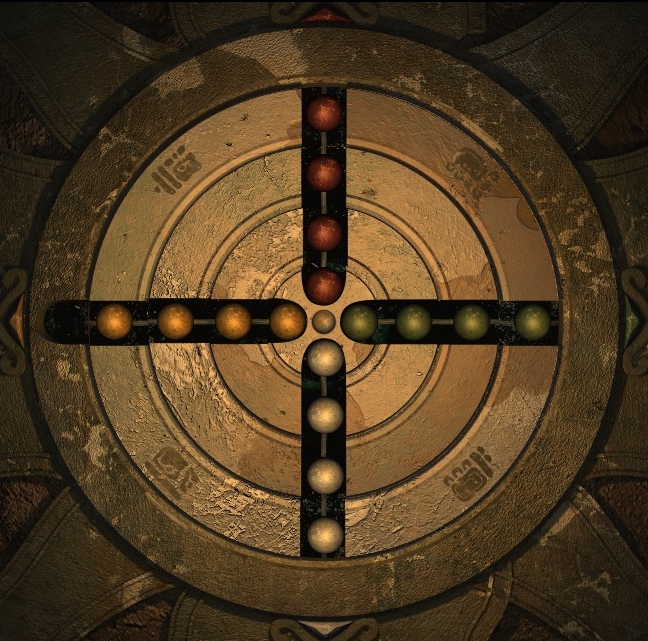
Note: Do not place the prism onto the stone pedestal in the Temple of Dawn at this time. Although the game logic allows you to do that, it can result in a dead-end game. Depending on your dialog choices in the following scene, you may be unable to proceed in the game, due to a software bug in the game design.
Archeological Site
Leave the ruin and exit right to the archeological site
Talk to the archeologist sitting on the stone steps
scrapsClick on the vases under the awning, then click on a box with scraps
Talk to the man (Pedro) working in the pit at left
workNote: If you talk to Pedro before talking to the sitting archeologist, you may reach a dead-end point in the game and will need to recover from an earlier saved-game position
Talk to the sitting archeologist again
PedroReturn inside the Temple of Dawn and give the box to Paul the archeologist
Note: Do not put the prism on the stone pedestal, even though its icon pulsates when placed in that position
Return to the archeological site and talk to Pedro in the pit
{Cutscene}
Temporarily back in the village, you'll get a message from a young boy about going to Rosie's pub
Go up the side street and make two attempts to enter the pub
Raumhart will tell you that you need to visit an old Mayan called White Bear
Exit the pub and return to the village square
Use the jeep to visit White Bear
Back in the village, enter George's shop and talk to him
equipmentAfter a rest, the Mexican night descends
Take the bag from the counter in George's shop
Right-click on the bag in inventory to get rope, a lamp, a lighter and a hammer
Exit the shop and use the jeep to return to the Temple of Dawn
After some dialog with Pedro, put the prism on the stone pedestal
Click on the opening in the wall relief to illuminate three squares on the floor grid
Pick up the stone near the center column of the entrance and put it on either of the two hotspots on the floor grid
Stand on the other hotspot to disclose a secret passageway
Attach the rope to the statue
Click on the dark opening to descend
Combine lamp & lighter in inventory
Zoom in on the Warehouse Puzzle on the wall
Warehouse Puzzle
In this puzzle, the objective is to move the stone pieces to allow the gold piece to be moved into the dragon's mouth at right. Left-clicking moves a piece right or down, and right-clicking moves it left or up. The starting arrangement is
A solution in 50 moves is: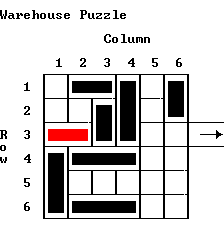
Row 4 right 2Solving the Warehouse Puzzle causes steps to extend, allowing access further into the temple
Row 6 right 2
Column 3 down 3
Row 3 (gold) right
Column 1 up 3
Row 4 left 3
Column 4 down
Column 6 down
Row 1 right 3
Column 4 up
Row 4 right 3
Column 1 down 3
Row 3 (gold) left
Column 4 up 4
Row 3 (gold) right
Column 1 up 3
Row 4 left 3
Row 6 left 3
Column 4 down 3
Row 1 left
Column 6 up
Row 3 (gold) right 4
Follow the stairs down
Use the lighter to ignite the stone torch at right
Click on the stone head on the left wall
Go back up and talk to Pedro
waterTime passes...
Take the bucket with water
Go back downstairs and put the bucket of water into the stone sink
Put the hammer into the opening to the left of the stone sink
Pull the lever
Click on the crack in the wall where the water leaked out
Go and talk to Pedro
plasterTime passes...
water
Take the bucket with water
Right-click on the can of plaster in inventory
Combine bucket of water & can of plaster in inventory
Go back downstairs and use the stirred plaster on the wall crack
Put the bucket of water into the stone sink
Pull the lever
Talk to Pedro
waterTime passes...
Take the bucket with water and pour it into the stone sink downstairs
Pull the lever
Move through the open doorway
Right-click on the old Mayan map in inventory and click on the white arrow at upper right to show its reverse side. The base-20 Mayan numbering system is shown (they must have been barefoot most of the time). Using this notation, the glowing number on the left pedestal is (3,2,12), and that on the right pedestal is (1,17,12). In the Mayan system, these numbers have the decimal equivalents
Left pedestal = (3 x 400) + (2 x 20) + 12 = 1252Adding these together produces 1252 + 752 = 2004 decimal, which has the Mayan equivalent (5,0,4):
Right pedestal = (1 x 400) + (17 x 20) + 12 = 752
2004 = (5 x 400) + (0 x 20) + 4The associated Mayan symbols (top to bottom) are
Straight line (5)Enter these symbols into the combination lock on the front of the stone table. From the initial display of all flattened ovals,
Flattened oval (0)
Four dots (4)
Left-click the upper dial 5 timesThe stone dragon heads turn away and you are able to take the artefacts and little statue from the stone table
Leave the middle dial unchanged
Left-click the lower dial 4 times
Failure to enter the correct combination before gathering these items results in Martin being rubbed out by poison gas, after which you can try again
Exit the room with your booty
Go back upstairs and talk to Pedro
climb upAfter some dialog with White Bear, you'll get an amulet and make your way to the Temple of Gods
Temple of Gods
Climb the steps into the temple
Zoom in on a 3 x 3 slider puzzle on the temple entrance door
If you move pieces to expose the center spot, you can optionally insert the amulet there, which has the effect of showing the desired piece for each location (with the space ending up in the center). Although the starting arrangement of the puzzle is randomized for each gameplay, the desired final layout is always the same:
A slider puzzle of this size can usually be solved fairly quickly by a little trial and error, but if you are truly stuck, you can refer to the Balmoral Software solver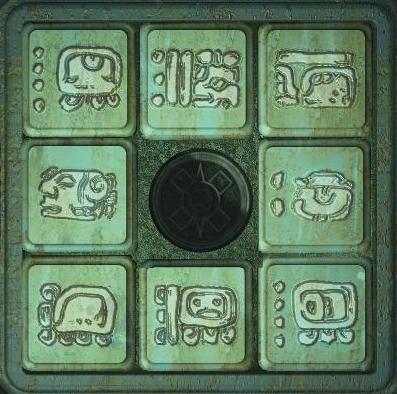
Enter the temple
Put the statues on the pedestals in the following order, left to right: red statue, white statue, green statue
{Endgame cutscene}
Copyright © 2017 Balmoral Software (http://www.balmoralsoftware.com). Portions copyright © 2005 The Adventure Company. All rights reserved. Republication, redistribution or conversion is expressly prohibited without the prior written consent of Balmoral Software.