


Copyright © 2001 Balmoral Software (http://www.balmoralsoftware.com). Portions copyright © 1998 Team17 Software Ltd. All rights reserved. Republication or redistribution is expressly prohibited without the prior written consent of Balmoral Software.
Nightlong: Union City Conspiracy is a well-written, medium-sized adventure from Italy's Team 17 Software. It is predominantly an inventory management type of game, with a few puzzles thrown in for good measure. The game has excellent backgrounds that appear to be a mixture of texture-mapped and hand-drawn graphics. The game is played mostly from the third-person perspective, and game characters are fairly well-done cyberpuppets. Voice acting is very good, and background music and sound effects are unobtrusive. The navigation interface is quite simple: left-click to examine an object, right-click to use, interact with or combine objects in the game or in inventory. Hotspots are indicated with on-screen text. Since many of the game's plot elements rely on finding a single object, be sure to examine and interact with everything in each scene. For this amount of pixel hunting, a large-screen monitor is recommended. An inventory bar is accessible at the bottom of the screen, and the Escape key is used for the game control menu. The Escape key can also be used to skip video and dialog sequences, and right-clicking on screen exits avoids waiting for character walking. Useful "Go to..." text indicates previously-unexplored exits. A handy instant-navigation feature is also available for part of the game.
Although there is a restore-game feature from the game startup menu, starting the game always requires that CD #1 be loaded. A lot of retracing may be necessary in the game. However, no CD swapping is required except to start the game. The game is actually somewhat non-linear since some tasks can be solved in a different order, with the gameplay periodically simplified by one-way plot elements. There are only twelve saved-game slots, which may be too few for some players. However, multiple sets of saved games can be retained by manually copying SAVEGAME.* files from the game installation directory. An audible indication of the main character's shrug is needed so you have a better idea when nothing can be done with an inventory item or hotspot. Fortunately, there are few inventory red herrings since most of the stuff gets used at some point or other. Strong language appears at a few points in the game.
The following walkthrough presents a shortest-path solution to the game. Many details are left to be discovered by the player.
In Nightlong: Union City Conspiracy, you play Joshua Reev, who is asked to infiltrate a terrorist organization by Hugh Martens, the Union City Governor. You owe a debt to Martens since he once saved your life. A predecessor, Simon Ruby, has turned up missing. All you have to start with are some credits (all in tens), a minicom for contacting Martens, and some stuff Martens gave you from Simon Ruby: an elevator card, a magnetic pen and a small key.
Starting on the roof of Simon Ruby's apartment building, pick up the piece of aluminum foil lying on the ground between the two cars. Open the door in the rooftop entrance to the apartment block. Look at the map at far right to learn about a subway entrance in the basement of the apartment building. Use the elevator button and it will fall apart. Take the fuse from above the elevator panel and wrap it with the foil paper in your inventory. Return the repaired fuse to the elevator panel and press the button. Use the elevator card in your inventory with the slot inside the elevator. The elevator "thinks" you're Ruby and "knows" which floor is his. Tell the elevator to go to Ruby's apartment. Exit the elevator and examine the door at left to find that Apartment 17 is Ruby's. Use your credit notes in the vending machine and pick up both a can of beer and a 5-credit coin from the coin return slot. Use the elevator to return to the rooftop auto-park. Use the small key in your inventory to open Ruby's own letter box, second from the left in the fourth row from the top. Use the elevator to return to Ruby's apartment floor, then use Ruby's letter with the pen pad outside the apartment. Use the magnetic pen with the letter to gain access to the apartment.
Pick up the notepaper lying on the table in front of the aquarium to learn about Ruby's appointment at Rotmall 17. Open the refrigerator at the end of the counter and collect its contents, a bottle of vodka. Pick up the photo on the counter above the refrigerator to get a picture of Ruby. Pick up a subway card from the trashcan at right. Open the door at right to enter the bedroom. To the left of the closed window at right, press the bottom of the two switches to lower the roller shutter inside the window. Open the window and remove a piece of tape from the top of the shutter, disclosing a key. Open the wardrobe at left and move the clothes inside to reveal a wall safe. Use the key to open the safe and obtain a pistol, a tube of acid and a report from Ruby to Martens describing a deserted underground tunnel as the terrorists' headquarters. Exit the apartment and call the elevator by using its button. Return via the elevator to the rooftop, exit outside and examine the broken railing barrier above the three green landing arrows at left. Use the tube of acid to remove the loose barrier railing. Pick up the barrier and you'll have a crowbar in your inventory. Return to the elevator and head for the subway. Look at the map above the ticket machine at far left, then put the 5-credit coin into the ticket machine. Use the scanner in the subway gate at right to go to the Rotmall 17 subway station.
Pick up the plastic plate beneath the graffiti and use it on the left-hand fax machine to identify its id number. Give the bottle of vodka and the can of beer to the bum, then show the photo of Ruby to him. When he asks you to buy his skate, agree by saying you "feel for the guy". Exit the station via the escalator at right. Talk to the doorman in front of the red entrance doors of the Free Climax club to learn of your need for a membership card. Enter the liquor store at right and learn that the storekeeper's wife has a fear of rats. Look at the pink Free Climax membership card in the glass case behind the storekeeper, then talk to him about it and he'll offer a swap for a bottle of Chateau Lafitte '85. Exit the store and climb the railings to its left. Open the manhole in back of the alley using the crowbar in your inventory. Climb down into the open manhole and pick up a dead rat at the far end of the tunnel.
Return to the alley via the ladder and use the remaining acid in the tube to unlock the padlock from the trapdoor. Open the trapdoor and enter it to descend under the liquor store. Combine the skate and rat in your inventory and use it on the storekeeper's wife. Open the case leaning against the front pillar and pick up the bottle inside. Return up the staircase to the alley. Climb the railings and learn of the subway closure. Re-enter the liquor store and give the bottle to the storekeeper to obtain the Free Climax membership card. Show the card to the club doorman, then talk to Eva Tompson about a deserted zoo. Leave the club and exit left to the subway station. Use the minicom in your inventory to contact Hugh Martens and he will fax you a map of the subway system. Pick it up from the fax machine at left (click on the lower "fax" hotspot for the paper, not the upper "fax" hotspot for the machine). Return to the alley and descend through the open manhole. Open the grating at the far end of the tunnel and change to CD #2.
In the deserted part of the Rotmall 17 station, use the pistol in your inventory to unlock the door at right. Open the door and enter a locker room. Open the middle cabinet and pick up leads, a screwdriver and a socket spanner from the bag inside. Open the right-hand cabinet and pick up a key inside (you may have to move Reev aside to see the key). Go back to the subway platform outside and use the screwdriver to pry off the letter S from the logo in the lower-right corner of the shoe advertisement, forming a makeshift hook. Use the "S" with the chain lying at the foot of the brown pipe. Use the makeshift grapnel with the pipe directly overhead of the subway tracks, allowing you to cross to the platform on the other side.
Proceed into the dark passageway at the far end of the platform. Use the socket spanner tool to open the panel and attach the leads to the switch contacts inside. Pull the switch lever down to send current through the leads. Pick up the leads and throw them into the magnetic field in the doorway. Go through the doorway into the deserted subway station. Move toward the end of the platform at the lower-left corner of the screen. Use the crowbar to knock down the loudspeaker from the wall and pick up a disk-shaped magnet from the ground after the loudspeaker falls apart. Pick up some orange-handled pliers from the open workman's closet. If desired, open the trapdoor in the floor of the closet and climb down into the passageway for a view of an area that will be visited later. Return to the deserted station and go to the large blue sign at the top of the bridge. Use the pliers to cut the cable suspending the sign from the roof. Go back down the staircase and use the debris passage to cross the station. Enter the zoo beneath the flickering sign.
Enter the bar immediately to the left of the zoo entrance (not the other exit at far left under the arrow). Open the yellow curtain and pick up a gas cylinder and broom from the storeroom. From the counter in the back of the bar, pick up an oilcan. Pick up an empty beer can from the table in the center of the room. Return to the zoo entrance at right, then follow the exit at far left underneath the arrow sign to the Egyptology exhibition. Right-click on the Sphinx and listen carefully to the control room access code:
Use graphic wheels according to standard procedure.Return through the zoo entrance to the deserted station and use the debris passage to cross to the other side. Return via the passageway at left to the Rotmall 17 subway station. Combine the magnet with the crowbar in your inventory. Use the resulting magnetic bar to capture the chain dangling from the ceiling and cross to the other side. Re-enter the locker room and use the oilcan on the hasp of the heavy door in the center of the room. Use the hasp to open the door and go inside the darkened room. Open the trapdoor in the floor and go down into the subterranean area you may have visited earlier from the trapdoor in the workman's closet. Open the door at the far end of the ledge using the key in your inventory. Enter the doorway and pass through a well into the zoo bookstore. Remove a light bulb from the lamp on the desk at lower left. Pull a book from the middle shelf in the section immediately to the left of the well. Use the book in your inventory to find symbols corresponding to the control room access code:
Today's code:
Under the supreme eye of the father of the gods
sits the solar protector of all men,
to the right of he who delights
in the eternal becoming of his being.
Return via the well and subterranean passage to the storeroom. Replace the broken light bulb in the ceiling fixture with the white one in your inventory, then turn on the light switch by the doorway. With the room now lighted, pick up a three-way adapter from the shelf at right.
Again using your magnetic crowbar to cross the Rotmall 17 station platform, return to the Sphinx in the zoo (see map). Zoom in on the wheels on the base of the Anubis (black dog) statue and set them to the control room access code symbols you found in the Egyptology book:
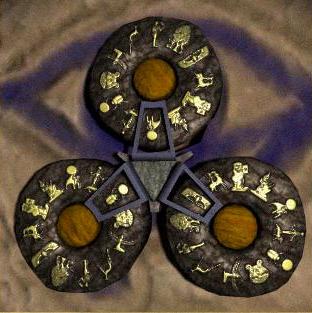
When the correct combination is set, right-click on the central triangular button to open the control room in the base of the Sphinx. Enter the control room and pick up the microwave gun at left. Click the left-hand red buttons on each of the right three video panels to turn them green and deactivate magnetic fields throughout the zoo.
Exit the control room and proceed left from the Sphinx to an area of volcanic fissures. Attempt to use the footbridge, then destroy the robotic dinosaur with the microwave gun in your inventory. Use the footbridge, then use the cave on the far side of the second footbridge. Pick up a flare from the table, then return to the bar at the left of the zoo entrance. Exit left from the bar and move the bush at the base of the Kali statue. Use the faucet to extinguish the fire in the brazier. Turn the faucet back on to fill the brazier with fuel. Use the empty beer can to obtain fuel from the brazier. Return through the bar to the zoo entrance, then exit right into a pond area. Use the panel on the sluice gate machinery at left to open its tank and knock out the kid playing with the electronics in the background. Put the gas cylinder, beer can and flare into the tank to drain the pond and turn your minicom into a broken mess of spitting sparks. Cross the now-visible bridge and pick up a remote control from the unconscious kid. Return to the cave beyond the fissures and use the remote control with the key on the wall to the left of the cage. Use the elevator at left to descend to a hangar in the terrorists' hideout.
Rummage twice through the crate at left to obtain a set of telescopic pincers and a hologram projector. Use the elevator in the back of the room to ascend to the hangar roof. Press the push-buttons to open the trapdoor in the roof and climb the staircase. Open the door to the rooftop building using the crowbar (magnetic bar) in your inventory. Enter the building and turn off the gas flow from the red mixer faucet tank by using the bright-red lever on top. Use the pliers to cut the flexible section of pipe immediately above the pressure gauge. Bend up the horizontal pipe, then restore gas flow using the red lever. Exit the building and disconnect the red hose from its faucet. Use the hose with the pipe in the window, then use the minicom with the lock next to the trapdoor in the roof. Use the hose with the lock to blowtorch open the trapdoor and set off an alarm.
Descend the stairs and take the elevator back down. If you find it necessary to return to the Rotmall 17 storeroom, you can use the telescopic pincers with the chain to cross the subway station platform since the magnetic crowbar was lost on the roof. In the hangar, pick up the tiny match dropped by the terrorist between the aircraft and the large hangar doors in back. Open the orange panel at right and unscrew the cover using the screwdriver in your inventory. Disconnect the ground wire terminal at upper center and move the wire to the contact at the right of the switch. Replace the cover and return via the elevator to the hangar roof. In your inventory, combine the broom and match to make a torch. Set off another alarm by using the torch with the roof sensor to the right of the staircase push-buttons. Exit into the hideout through the darkened doorway at left.
Combine the three-way adapter and hologram projector in your inventory, then connect the projector to the wall socket just below the room entrance. Turn on the projector to disable the terrorist. Check his pockets to obtain a laser gun and a small key. Use the elevator on the other side of the room to reach a deserted room. Use the key to open the drawer in the desk and pick up a security card inside. Move the picture on the wall in the background to obtain a piece of paper. Use the piece of paper in your inventory to disclose a vertical row of greyscale boxes. If these boxes were ranked from light to dark, they would be in the following order:
2Return via the elevator to the security office and use the laser to open the blue security panel. Insert the security card in your inventory into the security system, then press the vertical row of seven buttons in the order obtained with the greyscale boxes above. This turns all lights green and disables the retina-scanning door locks in the deserted room. Retrieve the security card and access the elevator again.
3
5
6
1
7
4
Open the door at right and touch the green panel on the partition wall to find out what happened to Simon Ruby. Open the white cabinet to the left of his bed and pick up a stethoscope, a syringe and a medical report on Ruby. Return to the deserted room and use the stethoscope on the closed door to learn about what's going on with Eva and the terrorists. Find out more of the backstory by exhausting all dialog choices with Eva Tompson and Al Prike, then change to CD #3.
On arrival in the virtual horror park, your inventory will be reduced to a "positioner" that makes it easy to renavigate areas in cyberspace. Enter the Labyrinth underneath the white flashing sign and navigate using the Labyrinth Map to the location of a water font. The point of view keeps changing in the labyrinth, so we have provided separate maps from a screen perspective and from Joshua Reev's perspective. Pick up a silver coin from the water font, then navigate to the location of a skeleton and pick up an abestos cloth from it. Before leaving the labyrinth, navigate to the location of a werewolf and store your location by right-clicking on the positioner in your inventory and then right-clicking on the red button. Move the mouse cursor over the newly-lit yellow button to see a thumbnail of your saved position, then move the cursor to the bottom of the screen and select Exit. Also navigate to the position of a lava pool and store that location. While the positioner is up, return to the location of the slot machine by right-clicking on the yellow button in the upper left corner. Exit left to the cablecar station and use the hammer standing in front of the totem/strength game. Pick up the hammer, then enter the hut at right. Descend the steps into the cellar and use the cloth in your inventory on the steam pipe handle to scare away the big spider. Pick up some melted-web gunk from the floor and some saltpetre from the mildew on the back wall.
Return to the location of the slot machine. Examine the slot machine and you'll learn that a profit can be made only by getting at least two skulls showing. To allow this to happen, use the hammer on the spider to bend its leg down and lock one of the slot machine's skulls. Put the silver coin into the slot machine's slot and use the slot machine. Pick up the coins from the payoff bowl and exit right. The targets in the shooting gallery ordinarily move too fast for you to win, so slow them down by putting the mud onto the runners in the back of the gallery. Insert your coins into the slot below the game rules, then use the gun and pick up the puppet prize underneath. Exit right and re-enter the cablecar hut. Open the left-hand drawer in the ticket office desk, look inside it and pick up a packet of matches. Open the right-hand drawer and put the puppet inside it. Exit the hut and use the cablecar cage. Right-click on the puppet's remote control in your inventory to reach the castle in the distance.
Exit the castle courtyard to the upper left into the church. Pick up a torch at the foot of the stairs and a skull from inside the pentacle painted on the floor. Open the brazier to the right of the pentacle and obtain some charcoal slack from the dust inside. Return to the castle courtyard and exit to the lower left into the alchemist's study. From the shelves at far right, pick up a bag containing the sleeping drug papaverine and a jar of sulphur powder. Read the parchments on the desk to learn how to make gunpowder from saltpetre, charcoal and sulphur. On the floor just beside the water fountain at left, pick up a sundial shaft. Put the skull onto the floor tile at the base of the fountain to stop the water flow. Put the torch into the hole in the top of the skull, then light the torch with the match from your inventory. Kick the torch to disclose secret writing on the fountain mirror: 7, 8, 4, 5. Return to the castle entrance and exit into the tower through the doorway towards the top of the screen. Attach the shaft to the meridian circle to zoom in on it. Right-click on the outer holes in the sequence shown in the mirror: VII, VIII, IV, V. Reev will then be able to read Moreau's diary and learn of Martens' betrayal.
Use the small bag of sleeping powder on the box of chocolates on the secretary's desk. Press the button on the secretary's desk to open the door at left. Exit left into the meeting room. Open the showcase at left to obtain a pistol and bullets. Pick up a club from the suit of armor at right. Combine the saltpetre and charcoal slack in your inventory, then combine the resulting powder with the jar of sulphur. Add the gunpowder to the pistol. Save your location in the positioner, then use it to return to the amusement park entrance by the slot machine. Exit left and use the club on the drum of the totem/strength game to knock off its bell. Pick up the bell and use the positioner to return to the location of the lava pool in the labyrinth. Put the bell into the lava pool, then apply the silver coin, one of the iron balls and the cloth to it. Pick up the shiny ball from the ground in front of the lava pool and combine it with the pistol in your inventory. Use the positioner to return to the location of the werewolf and shoot it with the pistol. Use the empty jar to collect some of the werewolf's blood.
Use the positioner to return to the virtual office meeting room. Use the jar of werewolf blood to dissolve the lock on the door at right. Open the door and enter Hugh Martens' virtual office. Open the desk drawer to obtain a slide. Go back into the meeting room and load the slide into the projector. This will disclose a code for accessing Hugh's computer. To decipher the code, note that all red bars on the blue squares are in the positions they might occupy if they were LED's on a numeric display:
	     --     --            --     --     --     --     --     --
	|      |      |   |  |   |      |         |   |  |   |  |   |  |
	     --     --     --     --     --            --     --
	|   |         |      |      |   |  |      |   |  |      |   |  |
	     --     --            --     --            --     --     --
By thinking about the LED bars that are missing from each blue square, the secret code is revealed:
5 6 2 3 9 6Return to Hugh's office and access the computer on his desk. Right-click on the digits of the access code above, and the story continues.
On the prison island of Rocas Perdida, your initial goals are to gain access to the prison and disable its security fence. On the beach, dig in the turtle tracks to obtain a turtle egg. Exit right and throw the egg at the snake beneath the fence. After the snake eats the egg, shoot it with your laser. Pick up a piece of the snake with the pincers. Return to the beach and exit behind the aircar to a piranha-infested pond. Shoot off the padlock of the pipe grating with your laser, then throw the snake section into the pond to draw off the piranhas and allow you access through the pipe into the laundry room. Move the sheets on the shelf at the back of the room and pick up a box of detergent. Use the detergent in the bucket of water beneath the shelves, then pour the bucket of soapy water into the conduit trapdoor. Click on the very small grating hotspot on the left side of the trapdoor to re-close the grating. Put the cans from your inventory into the open washing machine, then right-click on the washing machine to spring the trap for the guard. Take the guard's keys from the open laundry room door and exit into the corridor.
Use the keys to unlock the red isolation ward door at the end of the corridor. Open the window in the middle cell and talk to Moreau:
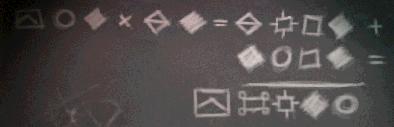
Using letters for symbols, an equivalent formulation of the relationships on the blackboard is:
	A B C x D C = D E F C +
	              C B F C =
	              -------
	            A G E C B
If each symbol represents a distinct digit, the only solution is:
	A = 1   Open box containing caret
	B = 0   Open circle
	C = 5   Closed diamond
	D = 8   Open split diamond
	E = 9   Open square with four segments
	F = 2   Plain open square
	G = 3   Square with corner loops
Exit from the blackboard closeup and pick up a tester and tubes from the table and a pair of green latex gloves from the chair. Exit the laboratory and use the screwdriver to open the panel below the barred window. After another cutscene with Al, use the tester with the box in the wall to identify the circuit for the perimeter fence. Use the parallel cutter on the box and watch a cutscene in which Eva discovers a door code and is captured.
Exit to the corridor and unlock the infirmary door beneath the yellow cross using the keys in your inventory. Go through the pockets of the white lab coat on the other side of the barrier to obtain a thermometer and some dental floss. Inflate the gloves by using them with the red ether gas cylinder on the other side of the barrier. In your inventory, combine the floss with the gloves, the tubes with the syringe, and the syringe with the gloves. Right-click on the window at right and use the syringe with the nearest window to the left. After two cutscenes with Eva (don't worry about me...), return to the infirmary from the window and exit left back to the corridor. Use the keys to unlock the red isolation ward door again, then open the first cell window to get the governor's door code from Eva. Right-click on the code in inventory and decipher the code using the solution above:
E C D G F Bor
9 5 8 3 2 0Right-click on the keypad by the door at left and enter this code. After a change back to CD #1, watch the endgame sequence. Incidentally, you get the same endgame sequence if you magically knew this code earlier and entered it when you first exited the laundry room, so maybe you could save Al's life that way, who knows?
The game credits can be skipped by pressing [Esc].
Copyright © 2001 Balmoral Software (http://www.balmoralsoftware.com). Portions copyright © 1998 Team17 Software Ltd. All rights reserved. Republication or redistribution is expressly prohibited without the prior written consent of Balmoral Software.