Safecracker: The Ultimate Puzzle Adventure
28 December 2019
Revised 2 April 2023
Copyright © 2019 Balmoral Software (http://www.balmoralsoftware.com).
Portions copyright © 2006 DreamCatcher Interactive Inc. All rights
reserved. Republication, redistribution or conversion is expressly prohibited
without the prior written consent of Balmoral Software.
Safecracker: The Ultimate Puzzle Adventure is a 2006 remake of the
original
Safecracker game from 1997, and seems to be a considerable
improvement overall. With the full effort of Kheops Studios and an intervening
decade of graphics advancements, the result is an immersive first-person game
with beautifully-rendered backgrounds and challenging, if not altogether
original, puzzle designs. Along with some very basic inventory manipulation,
the door locks and safes in the mansion you are exploring constitute all of the
gameplay, which is typical for a puzzle game. There is very little to interact
with in the sterile environment, apart from the puzzles and a few scattered
pieces of paper describing the backstory of the game. The puzzles themselves
are completely different than in the original Safecracker game.
Although spherical VR is active at each movement node, there are no cutscenes
or transitions, and no human interaction at all other than an occasional verbal
comment or interruption from the disembodied narrator from whose perspective
you are playing (the narrator is apparently a vampire, since you never see him
in a mirror). The uncredited voice actor does a good job of reacting
realistically to the various puzzles, delivered in an interesting British
accent. Several interface fixes have been introduced in comparison to the
original game; for example, safes that have been cracked are left open, so if
you neglect to pick up an item from inside the safe, you don't have to solve it
again. Analogously, doors that have been unlocked are left standing open. The
game is designed with inventory requirements and a limited amount of randomness
in puzzles, so that even if you knew safe and door combinations in advance,
you'd still need to play most of the game. It's much easier to keep your
bearings with the VR range of motion and the in-game maps,
so the need for the compass directions used in the original slideshow game is
thankfully avoided in nearly all situations.
Backing out of a puzzle resets it to its initial state. You can save a game
while zoomed in on a close-up. But intermediate progress in solving a puzzle
generally cannot be saved; when such a saved game is restored, the puzzle is
reset to its initial state. Saved-game slots are identified by timestamp and
thumbnail image, and are unlimited in quantity. Mouse movement was sluggish in
the menu screens, as has been seen in other Kheops games. You can hold down the
up and down triangle icons to scroll through the list of saved games. There is
inexplicably a mirror image of a map of Africa in the Main Menu screen.
Overall, Safecracker: The Ultimate Puzzle Adventure is an enjoyable
intellectual diversion with interesting puzzle designs. This walkthrough
provides a shortest path through the game, but other gameplay sequences are
possible.
Walkthrough Notes
Left-click the mouse to skip the introductory sequences on game startup, and
narrator monologues.
Right-click the mouse to display or hide the inventory window.
Movement Abbreviations:
F: Move forward (Fn for n repetitions)
L: Turn Left
R: Turn Right
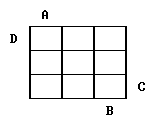
Small Corridor
New game
It's sometime in the year 1978, and as a "safe specialist", your goal is to
explore the mansion of deceased oil billionaire Duncan W. Adams to find his
will.
From the entrance Hall, move R F2 into the Small Corridor
and zoom in on the wooden puzzle box on top of the table
The objective of this puzzle is to orient the pairs of red, green and blue
marbles underneath their respective colored arrows. Pressing the arrow
buttons rotates only the closest circle of marbles. The single shortest
solution is the following 6 steps:
Press the right green button twice
Press the right blue button twice
Press the left red button
Press the right green button
Pick up a Resistor and a Paper marked 4298 (as can be seen by left-clicking the
item in inventory)
Turn around, move F2 R F and zoom in on the control panel to the right of the
double doors. Like most numeric keypads in this game, zero is excluded.
Enter the code 4 2 9 8 to open the doors.
Museum
Move F R F and open the decorative double doors, then move F R F and
zoom in on a sturdy-looking safe
To open this safe, a specific pattern must be restored by selectively rotating 4
tiles clockwise around any of the 16 control buttons at the tile
intersections of the 5 x 5 grid. You may recognize the desired dollar-sign
pattern from a piece of paper shown in the
game's Main Menu, or a
poker chip indicating your location on the
mansion maps. Note that 6 of the 25 tile pieces are
blank, and therefore interchangeable in the solution. Thankfully, the
starting position of the puzzle is not randomized, so a fixed solution is
possible. Start by identifying the 16 control buttons and 19 non-blank tiles
in the final solution as:
The jumbled starting arrangement is:
A 60-step solution is:
O N M2 I E A to move Tile 1 into position
D2 C B2 to move Tile 2 into position
H G2 C to move Tile 3 into position
D2 L H D to put two blank tiles in the upper-right corner
This completes the first row of the pattern
I2 M3 G F G F E2 to move Tiles 4, 8 and two blanks into position
This completes the first column of the pattern
F2 to move Tile 5 into position
K P2 L G2 P L H to complete the rest of the second row
N J O N2 to complete the second column
O2 L3 K O3 K P2 to complete the remainder of the puzzle
Shorter solutions may be possible
Pick up a Paper marked L = E and pull the lever inside the safe to activate the
tripartite device in the room
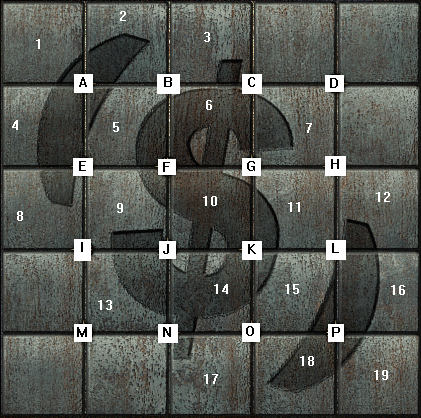
Zoom in on the control panel at right rear (in the northeast position on the
Ground Floor map)
Fill in the rest of the Latin
square so that each currency symbol appears once in every row and column
(and diagonal):
On completion of the puzzle, a telescoping device in the center of the room
extends upward
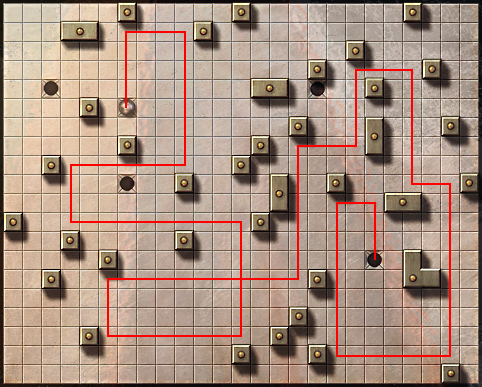
Zoom in on the next control panel to the right.
In this puzzle, each move must be made to a darkened square that is either 1
or 2 spaces away from the white square in any of the cardinal directions.
The darkened square is then replaced with the white square and the process
continues. The puzzle is completed when all darkened squares have been
removed. One solution is to click on the following 25 squares in sequence:
| | 3 | 4 | | 5 | |
| | | | 7 | 6 | |
| 1 | 2 | | | | |
| 20 | | | 8 | 9 | |
| 21 | | 22 | | | |
| 19 | | 23 | | 10 | |
| 17 | 18 | 14 | | 13 | 11 | 12 |
| 16 | | 15 | 24 | | 25 | |
There are 62 other feasible solutions
When the puzzle is completed, the telescoping device extends further upward
Move R F toward the safe, then zoom in on the closed door at right. Unlock the
door and enter the Small Corridor. Proceed through the Small Sitting Room,
Hall and Winter Garden. Open the doors and enter the Main Sitting Room.
Main Sitting Room
Zoom in on the cypher wheel at left
Referring to the L = E Paper in inventory, turn the inner alphabet wheel
(corresponding to the plaintext) counterclockwise ten times until its E is
aligned with the L in the outer circle (corresponding to the encrypted text).
The wheel is aligned correctly if the golden X at the top of the dials is
immediately above the white Q on the inner dial. The dials are now set up to
decrypt the code given at the bottom of the safe:
	Z P E M V B Y V U L A D V

	S I X F O U R O N E T W O
Open the safe by setting 6 4 1 2 on the four dials, then pick up a Photo and an
8 pin circuit
Enter the adjacent Study and zoom in on the safe with the red light
In this puzzle, you can magnetize one side of the board to move the silver ball
until it reaches an obstacle. The objective is to deposit the ball into any
of the three holes. If the silver ball falls off the board, the puzzle is
reset to the beginning. The only solution to this puzzle is the following
21-move sequence:
| Top | Right | Bottom | Left | Bottom | Right | Bottom |
| Left | Top | Right | Top | Right | Top | Right |
| Bottom | Right | Bottom | Left | Top | Right | Bottom |
The path taken by the ball is as follows:
When the safe drawer opens, pick up a 4 pin circuit
Go to the Office on the other side of the Museum
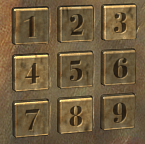
Move R F and zoom in on the device on top of a white pedestal
Using the arrow keys as a guide, click on the buttons in the following order:
| 8 | 10 | 9 | 5 |
| 7 | 2 | 1 | 6 |
| 15 | 11 | 12 | 16 |
| 14 | 3 | 13 | 4 |
When the red laser beam appears, look up and adjust the mirror near the ceiling.
Do the same for the mirror on the other side of the room. When the globe
opens, pick up a Transistor.
Turn around and zoom in on the control panel to the right of the closed door
Add the Resistor, 8 pin circuit, 4 pin circuit and Transistor in the indicated
positions
Go through the doorway into the Workshop
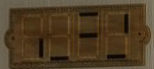
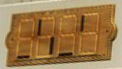
Zoom in on the red safe on the workbench in the far corner, which has a sticky
note with the code 5 8 4 1 that must be entered using a broken keypad.
Experimentation shows that repeatedly entering the same digit 4 times
(without resetting the puzzle) will produce a wrap-around display of 5
digits. Each time the same digit is entered 4 times, the rightmost digit of
the sequence falls off the display and the next digit in the sequence is
appended on the left. For example, the overall sequence for the digit 2 is
6 8 4 3 1, deduced as follows:
| Entered | Result displayed |
| 2 2 2 2 the first time | 6 8 4 3 |
| 2 2 2 2 the second time | 1 6 8 4 |
| 2 2 2 2 the third time | 3 1 6 8 |
| 2 2 2 2 the fourth time | 4 3 1 6 |
| 2 2 2 2 the fifth time | 8 4 3 1 |
| 2 2 2 2 the sixth time | 6 8 4 3 |
| etc. | |
Similarly, the overall sequence for the digit 8 is 9 7 6 5 4, which can actually
be derived by entering just the first five 8's on the keypad and then
resetting the puzzle for further work. Other experimentation shows that
repeatedly entering a sequence 2 a b c for digits a, b and c other than 2
consistently returns the same sequence 6 8 4 3 1 for the first digit
of the display. For example:
| Entered | Result displayed |
| 2 4 6 8 the first time | 6 2 7 9 |
| 2 4 6 8 the second time | 8 8 5 7 |
| 2 4 6 8 the third time | 4 9 1 6 |
| 2 4 6 8 the fourth time | 3 2 2 5 |
| 2 4 6 8 the fifth time | 1 7 9 4 |
| etc. |
Note that since the digit 8 is always the fourth keypad entry in this
experiment, the fourth digit of the display follows the previously-identified
sequence for 8.
Continuing this approach, we can identify the digits that each produce a
sequence ending in the digits of the desired display 5 8 4 1; these are
3 1 7 2, respectively:
| Keypad digit | Sequence |
| 3 | 7 5 5 2 5 |
| 1 | 2 7 9 4 8 |
| 7 | 3 6 5 2 4 |
| 2 | 6 8 4 3 1 |
Therefore, after a puzzle reset, the safe combination will be displayed when the
keypad sequence 3 1 7 2 is entered five times.
When the safe opens, pick up a Magnetic Card.
Return to the Study on the other side of the house, and zoom in on the control
panel to the right of the closed door
Insert the Magnetic Card into the slot. Only 3 digits are needed, but there are
no clues for which ones to enter. However, note that the three buttons 3, 4,
8 appear to be more rubbed than the others -- could this be a clue?
If so, we can try the 6 possible combinations of those 3 digits, and it turns
out that the correct answer is 8 3 4
Move F L and descend the steps into the Basement
Turn right and zoom in on the electrical switchbox on the wall:
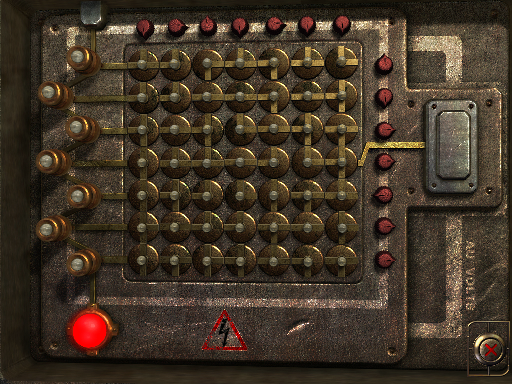
The object of this puzzle is to orient the 49 circular circuit segments so that
a continuous flow of electricity is provided between the single input on the
right and the seven output lamps at left. Each of the 7 knobs along the top
of the grid rotates all segments in that column clockwise one-quarter turn.
Similarly, each of the 7 knobs along the right edge of the grid rotates
segments in the corresponding row. It follows that the total number of turns
for each segment is equal to the sum of its row knob rotations and column
knob rotations (modulo 4), and the order in which knobs are turned is
immaterial. There are about 268 million (414) possible
arrangements of the knobs, but it can be shown that every solution has all
column knobs ending up facing in one direction and all row knobs facing in
another (possibly the same) direction. The only four solutions are:
| Column knobs | Row knobs | Number of clicks needed
from puzzle reset |
| All down | All down | 13 |
| All left | All right | 17 |
| All right | All left | 25 |
| All up | All up | 29 |
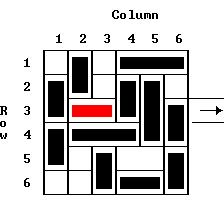
Move F R F and zoom in on the wall safe
To solve this puzzle, you must create a path from upper left to upper right by
selecting every second light in a straight line from the previous light.
Therefore, the path can change direction only at the position of a lit
marker. The solution is:
Pick up a GPS keycard and a Brass Key
Return upstairs and enter the Dining Room opposite the Study
On the wall opposite the windows, note the display of four paintings. Referring
to the Photo in inventory, correct the placement of these paintings using the
following positional notation:
The steps are:
Move the painting from position 1 to the empty slot at position 5
Move the painting from position 3 to the empty slot at position 1
Move the painting from position 2 to the empty slot at position 3
Move the painting from position 4 to the empty slot at position 2
Move the painting from position 3 to the empty slot at position 4
From the opened safe on the adjacent wall, pick up a Letter
Zoom in on the closed door in the corner and unlock it using the Brass Key, then
enter the Main Staircase. This provides access to most of the upstairs
rooms.
Climb the stairs, then move R F2 and zoom in on the closed door. Unlock the
door and enter the Kitchen.
Move R F and zoom in on the dumbwaiter to the right of the stairs down. To stop
the dumbwaiter in the correct position, the following 11 steps are the
shortest procedure:
Move up twice
Move down twice
Move up three times
Move down twice
Move up twice
Pick up a Special Pipe Key
Exit the Kitchen through the door, then move L F3 R and zoom in on the control
panel to the right of the laser-guarded doorway
Use the Special Pipe Key to open the control panel and disclose some wiggly
wiring inside:

In the absence of any other information about this keypad, does the shape of the
wiring look familiar when viewed from afar? In fact, it seems representative
of familiar digits superimposed in various colors:
2 - Green (layered on top)
4 - Yellow
9 - Blue
3 - Red (layered on the bottom)
This suggests the four digits to be used here; of the 24 possibilities, the
correct answer is 2 4 9 3, which seems to be based on the layering of wire
colors in the control box
Enter this code using the unmarked buttons in the usual layout
Enter the Yellow Room, then turn left and zoom in on the electrical device on
the table by the window
Again, there are no clues for the 4-digit code to open this safe, so instead use
the hotspot at upper left to turn off the power. This safe must be in a
"fail open" configuration since you can now retrieve a Magnetic Pass and
Snooker rules from inside the safe.
On your way out of the room, note the digital glyphs on the bathroom door:
Go to the East Corridor and notice some more digital glyphs on the door to the
Toilets:
Proceed to the Games Room and zoom in on the driving game on the far side of the
snooker table
Insert the GPS keycard and note the driving route shown on the screen. Activate
the game with the black ignition switch at lower left, then follow these
steps:
Click on right handle
Click on left handle
Click on right handle twice
Click on left handle
Click on right handle
Click on left handle twice
Click on right handle
Click on left handle
Pick up a Paper with the code 6 8 2 1 written on it
Turn around and observe the snooker table. Aside from the white cue ball, there
are single brown, blue and pink balls and 11 red balls on the table. Also, a
yellow ball can be seen in the receptacle for the right corner pocket.
Walking around the table, the other sunk balls are two more red ones, for a
total of 13. Referring to the Snooker rules in inventory, the diagram shows
single black, blue, yellow, brown and green balls as well as 15 red balls.
Therefore, some balls appear to be unaccounted for at the table:
Black ball
Green ball
2 red balls
Per the Snooker rules, the corresponding scores of these 4 balls are 7, 3, 1 and
1.
Zoom in on the wall safe between the windows
Insert the Magnetic Pass, then try various combinations of the preceding 4
digits (12 possibilities); the correct answer is in decreasing order: 7 3 1
1.
Pick up a Fountain Plug and a Lever
Go down the Main Staircase and unlock the door to the Hall
Return to the Museum and zoom in on the remaining unsolved control panel of the
tripartite device (the panel nearest the safe)
Enter the code from the driving game: 6 8 2 1
A disordered Magic Square is displayed; label the triangular shift buttons as
follows:
One solution is to press buttons A, B, C and D in order. There are 15 other
4-move solutions, but none shorter.
The mechanism completes its configuration to open a door off of the Games Room
Return to the Workshop and zoom in on the black safe on the workbench at
left
Referring to the Letter in inventory, a Buttercups (yellow) laser color is
needed to open this safe. The upper limit of the color yellow is about
590 nm and you need to be 8 nm
below that, so enter 580 into the laser control panel and increase it 1 nm at
a time until the safe opens (at 584 nm).
Pick up a T-shaped Key and a Small Gold Key
Return to the Small Sitting Room and open the large safe there with the T-shaped
Key
Pick up a Piston
Basement Revisited
Go back to the Service Stairs and descend into the Basement again
At the foot of the steps, move F L F R F and put the Piston into its place
Rotate right slightly and zoom in on the water tank control panel
The objective of this familiar puzzle is to get the level in the middle
receptacle to 4, as indicated by the arrow on the gauge. Identifying the
water tanks from left to right as A, B and C, the following 6 steps are the
shortest solution:
| Levels |
|---|
| Action | A | B | C |
| Start | 0 | 0 | 8 |
| Move C to B | 0 | 5 | 3 |
| Move B to A | 3 | 2 | 3 |
| Move A to C | 0 | 2 | 6 |
| Move B to A | 2 | 0 | 6 |
| Move C to B | 2 | 5 | 1 |
| Move B to A | 3 | 4 | 1 |
and the fountain in the Winter Garden is filled
Return via the Hall to the Winter Garden
From your position just behind a dark floor tile, put the Fountain Plug into the
receptacle on the floor
Each of the four fountain plugs (hydrants) is squirting into one of three holes
on its side of the fountain. If you move to an adjacent side of the
fountain, you ostensibly are stepping on another dark floor tile, which
causes the hydrant to change which hole it's targeting. The hole changes
occur in a round-robin manner: Left to Center to Right to Center and back to
Left, etc. You can identify the current hydrant targets by observing the
fountain from one of the three rooms surrounding it, without entering the
Winter Garden and changing the orientation of a hydrant by stepping on a
floor tile. This can be accomplished by navigating through the other rooms
on this floor (the stream of the hydrant closest to the windows may be a
little difficult to see).
When each hydrant is targeting a specific one of the three targets (which varies
by hydrant), a water flow inside the fountain is triggered and the water
level in the central glass container is raised. The objective of the puzzle
is to raise the water level four times, so that the key on the floating
platform inside the fountain can be retrieved. The puzzle is reset to its
initial state by exiting and re-entering the Winter Garden from another
room.
Some experimentation produces the following results from the initial puzzle
state, where North is defined as the side of the fountain closest to the
windows:
| Hydrant | Initial target | Desired target | # visits required * |
|---|
| South | Left | Right | 2 |
| East | Left | Right | 2 |
| North | Center (heading right) | Left | 3 |
| West | Left | Center | 1 or 3 |
*: Excluding entry point
All solutions require 10 steps after entering the Winter Garden from any of its
three entrance doorways. One of these is the following:
Enter Winter Garden from the South
East
North
West (water rises to level 1)
South
East (water rises to level 2)
North
West (water falls to level 1)
North (water rises to level 2)
West (water rises to level 3)
South (water rises to level 4)
There are a total of 300 solutions, evenly divided between the three entrance
doorways
Pick up a Double Key from the top of the fountain
Go up the Main Staircase, turn left and proceed to the closed door at the end of
the East Corridor
Zoom in on the lock, open the door using the Double Key, and enter the Violet
Bedroom
Move L F and observe the digital glyphs on the bathroom door:
Zoom in on the music box on the chest of drawers and open it using the Small
Gold Key
Pick up a Small Iron Key and a Screen and Keycard reader
Exit the bedroom and proceed through the Games Room into the Library
Zoom in on the freestanding safe at right
Insert the Screen and Keycard reader into the receptacle
The digital display shows a portion of the desired combination. The number of
digits in any guess that are in the correct position is indicated by the
number of metal rods moved at left. Based on the visible LED segments, there
are 144 possibilities:
| {2,3,8} | {3,5,6,7,8,9} | {4,7,8,9} | {6,8} |
| First digit | Second digit | Third digit | Fourth digit |
This is a variant of the
Jotto game, but with limited
choices for each digit. There isn't a limit on how many guesses you can
make. A correct digit can be identified by entering it four times; for
example, the code 6 6 6 6 produces a score of 1 bar, so one of the digits in
the answer is 6 (whereas 2 2 2 2 produces no bars, so there isn't a 2 in the
answer). The position of the digit in the answer can be found by entering
that digit along with three non-matching digits; for example,
| Code | Score |
|---|
| 6 2 2 2 | 0 |
| 2 6 2 2 | 0 |
| 2 2 6 2 | 0 |
| 2 2 2 6 | 1 |
so the fourth digit in the answer is 6.
Continuing in this way will identify the remaining digits in the answer: 8 7 9
6
Pick up a Triple Key from the safe
Zoom in on the wall safe at the other end of the room
There are 5 digits in the safe combination. Referring to the sticky note
mentioning SARAH, access the in-game menu. Note the nonstandard letter
associations with the numbers on the telephone keypad. The digits associated
with her name are 8 6 2 6 5. Return to the game and enter this code to
obtain a Steering Wheel.
Go back to the East Corridor and access the closed white door at right
Put the Steering Wheel into the receptacle on the door lock
Some experimentation shows that turning one of the five wheels affects exactly
two of the six rods at left. Each wheel has two states, so a turn of that
wheel alternates its effect between two different pairs of rods. For
example, the first time you use the top wheel, the first and fourth rods from
the top are affected, but the second time it's the bottom two rods that are
moved. The rods themselves have four distinct states, which vary between
three extensions in a round-robin manner like we saw earlier in the target
holes of the Winter Garden fountain: Fully Extended to Half Extended to Fully
Retracted to Half Extended and back to Fully Extended, etc. The effect of
turning a wheel is to increment the states of the corresponding rod pair by
one each. As might be expected, the door is unlocked by fully retracting all
the rods.
Since the rods in aggregate require a minimum of 6 x 2 = 12 state changes, and
each wheel provides 2 such changes, there must be at least 6 wheel turnings
to open the lock. In fact, there are 480 such solutions, and one with the
fewest number of different wheels is:
Turn top wheel 3 times
Turn bottom 3 wheels once each
Enter the Closet (laundry room), turn left and climb the ladder up to the
Loft
Move L F and zoom in on the freestanding safe
Click the squares the number of times shown in the following diagram (27 clicks
total) to establish a continuous green path connecting all 25 squares:
| 3 | | 2 | 2 | 1 |
| 1 | 2 | 2 | 3 | 1 |
| 1 | | 1 | 2 | 1 |
| 1 | | | 1 |
| | | 1 | 2 |
Pick up a Carved Stone Block
Turn around and zoom in on the wall safe
Insert the Lever into the receptacle at right
On the margins of the 6 x 6 chessboard, note the chess symbols referring to 6
Queens. The objective of this puzzle is to indicate the positions of 6
queens so that no queen threatens any other; that is, each queen is located
on a unique row, column and diagonal. This is a variant of the standard
Eight Queens
Puzzle, for which a general stair-stepped solution is known:
After opening the safe, pick up a second Triple Key
Revisit the West Corridor and enter the Dressing Room,
where more digital glyphs can be seen on the door:
Zoom in on the wall safe
Insert the Carved Stone Block and the narrator identifies it as a
Polybius Square, in
which consecutive pairs of digits in the cryptogram at the top of the safe
each refer to the row,column of the associated plaintext letter in the square
matrix. For example, the first pair of digits in the cryptogram is 34 and
the letter at row 3 and column 4 of the matrix is an O, so that is the first
letter of the plaintext. The full decryption is:
	34 33 15 44	52 34 43 24	53 21 24 51	15

	O  N  E  T	W  O  S  I	X  F  I  V	E
To open the safe, enter the combination 1 2 6 5 on the dials, then pick up a
third Triple Key
Enter the adjacent Blue Bedroom and zoom in on the safe between the windows.
Insert the Small Iron Key into the Off/On receptacle and turn on the device.
Click on the button at the bottom of the telephone keypad to activate its
speaker.
This puzzle is a version of the
Wordle game in which you try to
determine a secret sequence of numbers by making guesses. When a 4-digit guess
is entered using the keypad, the machine responds with a score for each digit in
the guess. The score consists of a solid green light for a digit in the correct
place in the sequence, a flashing green light to indicate that the specified
digit is in the solution but in a different position in the sequence, or a solid
red light if the corresponding digit doesn't exist at all in the solution. You
have only about 4 seconds to observe the resulting light pattern before it
disappears. Since score lights can each be in one of three states, it's easier
if you ignore the dim red lights and record the positions of the solid and
flashing green lights only. A shorthand notation for the symbols such as the
following may be helpful:
. Red
S Solid green
F Flashing green
As indicated by the red bars on the machine, you have up to 5 guesses to find
the correct 4-digit safe combination. If those guesses aren't enough, the
puzzle resets randomly to a different combination. Although a phone number can
obviously contain repeated digits, this seems never to occur in this puzzle.
Also, the secret pattern never seems to include a 0 (and that keypad button
produces no musical tone when pressed), so it can safely be excluded. The
remaining nine keypad digits are recognized as inputs, so there are
9 x 8 x 7 x 6 = 3,024 possible 4-digit secret patterns. This
puzzle randomizes each time it's played, so no fixed solution is possible but
you can usually win in 3 or 4 guesses with some simple note-taking since
positional information is included in the scores.
Begin by picking an arbitrary starting guess such as 1 2 3 4. If the score
light is red for any of those digits, they can be ruled out from the solution.
Similarly, if any score light is solid green for one of the digits, its final
position is known and that position can be used in subsequent guesses to rule
out other digits. A digit with a flashing green light has up to 3 position
possibilities, excluding its own position and any other positions that have
already been identified with solid green lights. For the second guess, pick
5 6 7 8 to cover most of the rest of the digits. Repeat the
aforementioned procedure to reduce the remaining possibilities. Using the
abbreviations above, and X for a digit that has been ruled out, we have the
following table of digit positions in an example play:
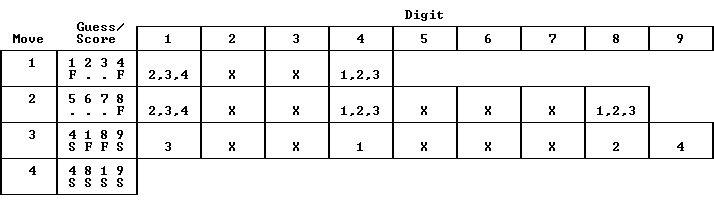
For the third guess, we picked valid positions for 1, 4 and 8 and added 9 since
it had not yet been entered. The two solid green lights confirmed that 4 was in
position 1, and 9 was in position 4. The 1 and 4 positions were then removed
from the list of possibilities for 1 and 8, leaving positions 2,3 for each of
them. But the flashing lights precluded the sequence 1 8, so the
only remaining possiblity was 8 1. The final answer was
4 8 1 9, which produced 4 solid green lights as confirmation.
When the puzzle is solved, the safe opens and you can pick up a Chip Card and a
Letter describing Duncan's middle name Walter.
Return downstairs to the Workshop and zoom in on the wall safe
Insert the Chip Card into the slot and use the dials to spell out the letters of
the name WALTER:
When the doorway opens, enter the Boudoir and zoom in on the safe in the corner
to access a typical warehouse puzzle:
Pick up the magnet at left in order to move pieces. A solution in 35 moves is:
- Lower Column 1 down
- Row 4 left
- Column 4 down twice
- Row 3 (key) right
- Column 2 down
- Row 1 left twice
- Column 5 up
- Upper Column 6 up twice
- Lower Column 6 up once
- Row 6 right
- Column 4 down
- Row 4 right twice
- Column 2 down three times
- Row 3 (key) left
- Row 4 left twice
- Column 4 up three times
- Row 6 left
- Lower Column 6 down
- Row 4 right 3 times
- Column 3 up
- Row 6 left
- Upper Column 1 up
- Row 3 (key) left
- Column 3 up twice
- Row 4 left 3 times
- Column 5 down 3 times
- Column 4 down twice
- Upper Column 6 down once
- Row 1 right twice
- Column 3 up
- Row 3 (key) right 3 times
- Column 3 down
- Row 1 left once
- Upper Column 6 up
- Row 3 (key) right twice to exit
Right-click to return the magnet, pick up a fourth Triple Key, and return to the
Violet Bedroom
After entering the room, move L F L and zoom in on the door lock
At this point, you should have four Triple Keys from the safes in the Library,
Loft, Dressing Room and Boudoir
Insert any two of the Triple Keys to open the first door
Zoom in again and insert the other two Triple Keys to open the second door
Enter the Secret Room
Zoom in on the safe to see that a 4-digit code is needed
Combine the digital glyphs from the Yellow Room,
Toilets, Violet Bedroom
and Dressing Room to create the aggregate
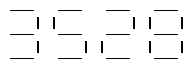
Enter 3 5 2 8
and retrieve the will inside
Select the beneficiary of the estate. The outcome of the game is displayed and
the credits roll:
| Margaret: | True to form, Margaret keeps careful watch over the money. It lies resting at the bottom of a bank vault. |
| James: | James divides the inheritance equitably in order not to create jealousy. He takes over his brother's safe business. |
| Edward: | Edward pays off his house. Under the influence of his sister, he gives part of his inheritance to her which she squanders in no time. |
| Elizabeth: | Elizabeth squanders the money in a matter of months through extravagant living. Once the money is gone she goes back to her normal life, more frustrated than ever. |
| Sarah: | Sarah erects a majestic tomb for her great uncle on which she regularly places flowers. She gives a part of her inheritance to each member of her family. Having completed her studies with highest honors, she takes charge of her beloved great uncle's business. |
| You: | You have been entrusted with a colossal fortune. Use it well. |
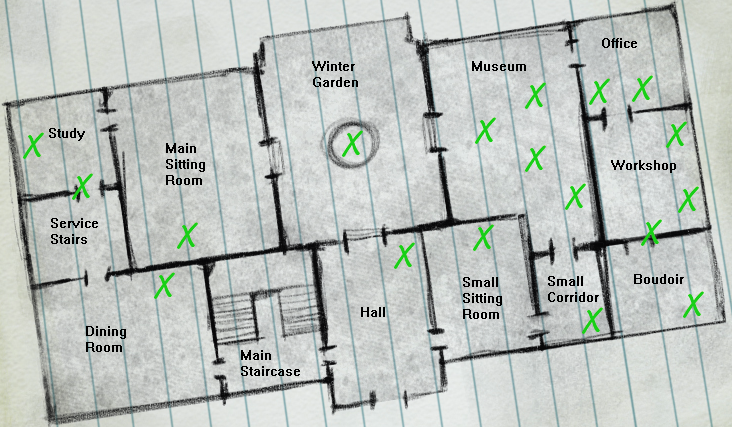
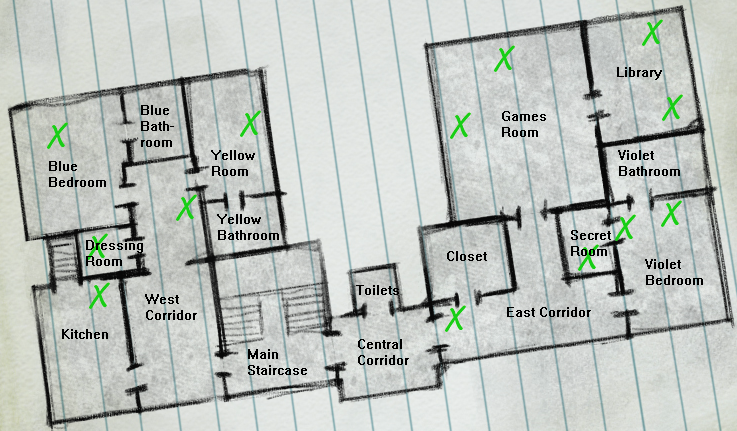
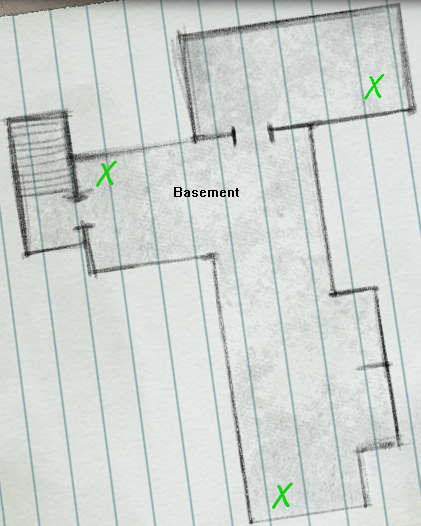

Table of Contents
Home
Copyright © 2019 Balmoral Software (http://www.balmoralsoftware.com).
Portions copyright © 2006 DreamCatcher Interactive Inc. All rights
reserved. Republication, redistribution or conversion is expressly prohibited
without the prior written consent of Balmoral Software.