Copyright © 1999 Balmoral Software (http://www.balmoralsoftware.com). Portions copyright © 1996 Daydream Software AB. All rights reserved. Republication, redistribution or conversion is expressly prohibited without the prior written consent of Balmoral Software. Contents subject to change! For the latest information, see http://www.balmoralsoftware.com.
Safecracker is an excellent puzzle game with a theme based on cracking a whole slew of safes encountered while exploring a mansion. The premise is that the player will be offered a job contract at the Crabb company, a manufacturer of custom-made safes, if he can open all the safes in the company headquarters. As the game progresses, the player collects clues used to solve additional puzzles and to open a final safe and finish the game. Originally released in Europe in 1996, Safecracker was the first production by Daydream Software in northern Sweden, who have gone on to produce other game titles in a variety of genres.
The game takes a light-hearted tone with the player, and those in the computer industry may recognize some of the in-jokes here and there. An introduction to the backstory is well-established in a comic-book format in the game booklet. Gameplay is very non-linear, with multiple ways of getting around and little dependence on the order in which puzzles are solved. This design makes the game a pleasure to play since if you're stuck on one puzzle, there are usually plenty of others to work on in the meantime. The game contains a sliding-piece puzzle that is often unsolvable due to a parity-check error, but an external program can help with this, and no problems were encountered with any of the other puzzles, which are generally not too difficult to solve.
Navigation is accomplished with the usual point-and-click interface using node-based movement, and the Director-based design employs a smart cursor that indicates where interaction with the environment can usually take place. Although all gameplay is shown in a relatively small 460 x 280 pixel viewport on the screen, this does not seem confining since the viewpoint can be controlled in a full circle, as well as up and down to a limited extent, using the QuickTime VR engine.
The game needs more variety in the room-specific musical backgrounds - the segments are extremely repetitive and some are used in more than one room. However, sound effects are excellent throughout. Saved games are file-based, and an overwrite warning is provided. Since the game fits on a single CD-ROM, no disk swapping is necessary. An interesting "home movie" format is used at the end of the game to introduce the player to the game designers.
Safecracker will be a pleasure to play by any puzzle game enthusiast.
A new game starts you in a telephone booth. Click on the ringing telephone and listen to Jerry Crabb tell you the code for entering the house. You have ten minutes to find your way into the house; otherwise, you'll have to restart the game and try again. Turn right and exit the telephone booth. Move forward to the crosswalk and cross the street. Continue up the other side of the street until you reach the gate to the Crabb estate. Zoom in on the gate padlock and click each tumbler five times to produce the only discernible set of three similar symbols: music notations. This opens the padlock, allowing you to move forward to the house entrance. Zoom in on the access panel to the left of the front doors and unlock the doors by entering the code from the telephone message: 1923. Move forward through two sets of doors into the Reception area.
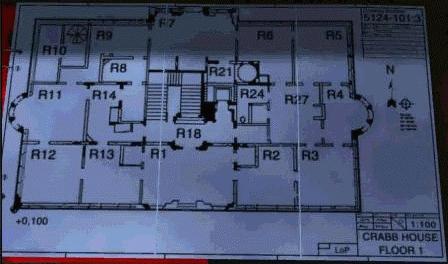
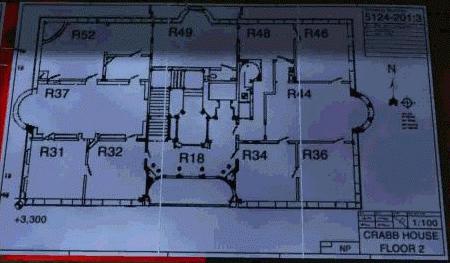
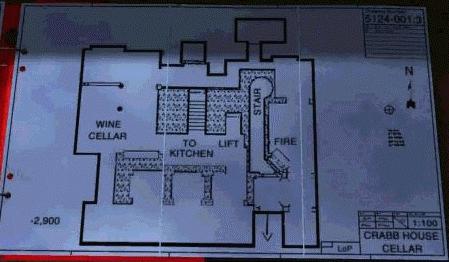
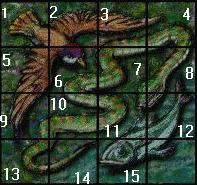
Examine the various clues planted throughout this room. In particular, note the Crabb Safes User Handbook in the west part of the desk. This book contains descriptions of the Braille Safe, the S-1 Safe and the Flower Safe, as well as maps of the Crabb house. Refer to the maps to simplify navigation between rooms. The rest of the materials in Reception describe designs for safes yet to be created, and other sketches. A fully-operational Minesweeper game can be played on the computer terminal. Zoom in on the S-1 Safe at the west side of the room. The accuracy of each of the three combination dials is indicated by a non-flashing green light. A little trial-and-error will provide the answer: 3 1 4. Inside, pick up seven quarters and one piece of the Elevator Access code. Zoom in on the Slider Safe at the east end of the room. Of all the safes in the house, this one is probably the most difficult and time-consuming to crack. Unfortunately, the game contains a programming error in which many attempts to open this safe will be impossible. Zooming in on the safe produces the 16-element picture which is the desired solution, shown here in annotated form:
Clicking again removes the piece from the lower-right corner and jumbles up the picture, producing a standard 4 x 4 slider puzzle. Balmoral Software's sliding-piece puzzle program can be used to test whether or not the rearrangement can be solved; use the annotated diagram above to enter numerical values for the pieces. The program also provides a solution to the puzzle. When the puzzle is complete (except for the missing piece at the lower-right corner), click on the handle at left to open the safe. Pick up keys to Room 6 and Room 27, and a photo showing part of the solution to the Secret Room Safe. Enter Room 2 through the right-hand door at the east end of Reception.
In the northwest corner of this room is Crabb's 1996 Safe Catalogue - leaf through it for descriptions of the Voice Safe, the Slide Safe and the Pyramid Safe. Zoom in on the Sequence Safe in the southwest corner. The objective of this puzzle is to set the switches in the proper sequence; any mistake resets the puzzle to its initial state. Simple trial and error produces the solution
	4  2  6  7
	3  5  1  8
Open the safe and obtain a spare key (unused in the game) and a note referring to the combination to the Liberty Safe. Zoom in on the Pascal Triangle Safe in the southeast corner of the room. The safe is opened by providing the correct values for the elements of Pascal's triangle; each value is determined by adding together the two numbers immediately above it:
	             1
	           1   1
	         1   2   1
	       1   3   3   1
	     1   4   6   4   1
	   1   5  10  10   5   1
	 1   6  15  20  15   6   1
Open the cabinet doors inside to obtain the #1 combination element for the T-1001 Safe. Zoom in on the S-2 Safe in the northeast corner of the room. Like the S-1 Safe in the Reception area, this one consists of dials with individual combinations indicated by corresponding lights. Trial and error produces the solution
	3  2
	3  1
Inside, pick up a crank that will be needed later. Leave the room through its east door and enter Room 3 (the Designers' Room), then exit through the door to the right of the neon martini sign on the wall (we'll return to Room 3 after we've obtained additional clues and money). In Room 4 (the Coffee Room), move towards the windows, then turn around and look through the book on the table to find a semaphore alphabet (unused in the game) and a signal flag alphabet:
Exit Room 4 through the door to the north, entering Room 5 (the Constructor's Office). This room contains the Liberty Safe, which we'll solve later. For now, zoom in on the drafting table to the right of the safe to disclose a diagram of Abraham's Switch Safe: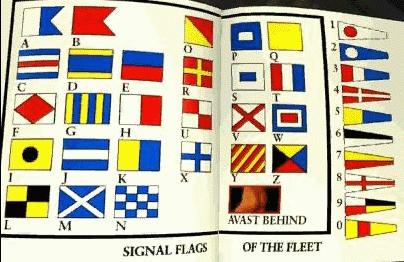
Exit Room 5 through the door in its southwest corner.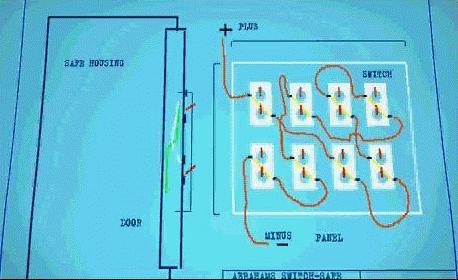
For a bit of fun in the Technical Design room, click on the dog figurine on the fireplace mantel - it sounds more like a hog! Zoom in on the Switch Safe at the north wall of the room. Use the diagram above to find the solution:
	 1  12   8   9
	 2  11   7  10

	16  13   3   6
	15  14   4   5
Once again, simple trial and error could eventually produce a solution to this puzzle since any mistake resets the puzzle to its initial state. Turn the handle to open the safe and obtain the #6 combination element for the T-1001 Safe and the C combination element for the F-9-12 Safe. Open the closet door, which is the center one of the three doors along the west wall of Room 27. Inside, look down and and zoom in on the blue lockbox on the lower shelf. Use the Room 27 key you obtained from the Slider Safe in Reception to open the lockbox; pick up three 3d and three 50p coins, as well as a key for Room 9 and a note indicating that the lock of the file cabinet in Room 9 is broken.
Exit Room 27 through the door in its northwest corner, entering Room 6 (the Chief Engineer's office). Zoom in on the file cabinets along the east wall and use the Room 6 key you obtained from the Slider Safe in Reception to open the cabinet and obtain a diagram of a clock motor:
This room also contains the Slide Safe, which we'll solve later. For now, zoom in on a clipboard on the table in the southwest corner of the room to disclose formulas for converting temperatures from Celsius to Fahrenheit and Kelvin: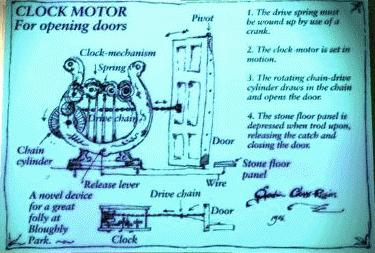
There is also an interesting book on mathematical puzzles (including a diagram of Pascal's triangle) that can be found on the corner of the desk. Exit Room 6 through the door on its west wall, then immediately turn left, close the door, and proceed through the door ahead into Room 21 (the Kitchen).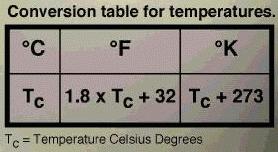
Zoom in on the controls on the Refrigerator Safe. To open it, we'll first use the temperature formulas above to calibrate the mechanism. The following temperatures are all equivalent:
	 10 degrees Celsius
	 50 degrees Fahrenheit
	283 degrees Kelvin
Set these temperatures accurately on the corresponding thermometers by holding down the mouse on their individual Fill and Drain controls. Set a uniform lower temperature by using the black arrow knob at lower right until the Fahrenheit thermometer reads 49 degrees. Click on the refrigerator handle at upper left to open the safe. Inside, obtain a lightbulb, milk carton, apple and banana (all just-for-fun items, the last two "edible"), as well as a block safe key and the #4 combination element for the T-1001 Safe. If desired, at this point you can open up a passage down to the cellar of the house by turning around from the refrigerator and rotating the handle of the coffee grinder on the wall above the shelf. This opens up a secret door to the right of the refrigerator. The secret door closes when you return to Room 7 from the kitchen, but automatically opens if you need to enter the kitchen from the cellar. Exit the kitchen to the north, back into Room 7.
Zoom in on the Block Safe to the right of the fireplace and open it by using the block key you picked up from the Refrigerator Safe in Room 21. Inside, take the Room 7 #1 Key; it will be used later in the Three-Key Safe in this room. Turn around and zoom in on the Flower Safe in the northwest corner. As described in the Crabb Safes User Handbook you read in Reception, this safe is opened by pressing the center of the flower dials to match the red/yellow pattern at upper left. Each of the three flowers controls the patterns on the other two, cycling through the same sequence of color combinations. The solution is found by pressing each flower center five times. Open the safe by pressing the leaf-like handle at lower left, and pick up Egyptian cypher #1 (unused in the game) and the #2 combination element for the T-1001 Safe. Exit the room through the west door.
Zoom in on the green box on the wall behind the guard's desk and open it using the Room 9 key you obtained from the lockbox in Room 27's closet. Inside, pick up the Room 7 #3 Key, the Room 13 #1 Key, the Room 52 Key, and a note for the Clock Safe. Examine the Room 52 key closely and you'll see that it's broken! Go back around the guard's desk and proceed through the corridor to the southwest. Just by the door is a filing cabinet; since it's broken (according to the note found in the lockbox in Room 27's closet), you can open it without a key. Inside, you'll find a diagram of the Hand Dryer Safe:
Incidentally, if you turn around at this point, the picture on the wall of the guy in sunglasses is Jan Phersson-Broberg, the Project Manager for Safecracker. Go on through the door by the file cabinet.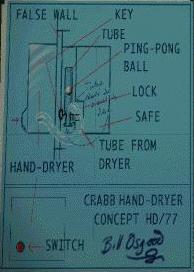
Maneuver between the two desks in this room; another copy of the 1996 Crabb's Safe Catalogue is available here. On the top of the desk facing the windows, zoom in on the in-tray and click on it to obtain a dictaphone. Move to the Voice Safe left of the windows and press the Speak button. Use the dictaphone and press its Play button, then click on the chrome handle at right to open the safe. Inside, pick up the Room 13 #2 Key, the A combination element for the F-9-12 Safe, and a list of radio codes. Exit Room 11 to the south.
Like the S-1 Safe in Reception, the safe in this room consists of dials with individual combinations indicated by corresponding lights. Trial and error produces the solution
	1  6
	5  2
Inside, pick up the L combination element for the F-9-12 Safe. Exit to the east, entering Room 13 (Administration). We don't yet have all three keys needed to open the safe in this room - for now, exit through the north door into Room 14 (the Sick Room). Move forward to the low brown table and leaf through Trent Rampant's book to disclose a page on Lafayette that matches the switch safe note in your inventory. This is evidently the solution to the Liberty Safe that we saw in Room 5. Additional information in the book includes the Braille alphabet:
Proceed past the sickbed at right through the door to the north and into Room 8 (the Cloak Room). There are some notes on a bulletin board to the right. Continue north back into Room 9, then exit east into Room 7. Zoom in on the green Braille Safe in the southeast corner of the room. Using the alphabet above, we can translate the information on the safe: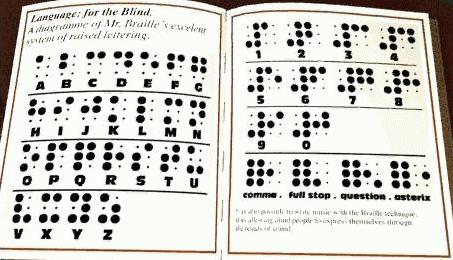
	1 RIGHT
	5 LEFT
	4 RIGHT
	2 LEFT
Here, RIGHT refers to a clockwise rotation and LEFT to a counterclockwise one:
Turn dial clockwise (five times) to 1Inside, pick up the Room 13 #3 Key and the K combination element for the F-9-12 Safe. Exit Room 7 through the east door and continue east through Room 6 into Room 5.
Turn dial counterclockwise (four times) to 5
Turn dial clockwise (once) to 4
Turn dial counterclockwise (three times) to 2
Rotate large handle
Zoom in on the Liberty Safe on the west wall of this room and open it by pressing the letters L A F A Y E T T E, turning green all nine lights above the Statue of Liberty. Open the safe and pick up a diapictures disc and the Room 7 #2 Key. Exit through the west door and back into Room 6.
Zoom in on the Slide Safe at left, then insert the diapictures disc from Room 5. The object here is to match five of the slides at left with the disc pictures at right. Each pair involves completing a single picture from two parts. The solution is:
Press left up arrow four timesInside the safe, pick up another piece of the Elevator Access code. Exit west back into Room 7, then immediately turn right and zoom in on the Three-Key Safe. Insert all three of your Room 7 keys into the safe, then click on the key triplet to simultaneously rotate them and click on the large circular handle to open the safe. Pick up a note describing cellar access from the kitchen and a third piece of the Elevator Access code. Exit west into Room 9, then proceed south through the Cloak Room and back into the Sick Room. Zoom in on the medicine cabinet at the head of the bed by clicking on the scrap of paper just behind the mesh. Click on the "pieces of codekey" item in your inventory to complete the Elevator Access code:
Press right up arrow five times
Press center U-shaped arrow four times
(With three of the four access code digits, you could have found the missing one by trial and error and reached the second floor earlier, if desired.) Navigate through the Sick Room and exit south into Room 13.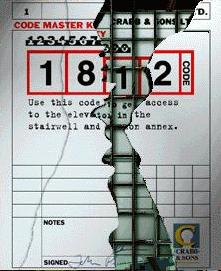
Immediately turn right and zoom in on the Three-Key Safe. Open this safe using all three of your Room 13 keys, and obtain the E combination element for the F-9-12 Safe. Leave Room 13 through its east door, then go through the double doors in the back of Reception.
Climb the stairs - they're permanently barred from above. At the upper landing, zoom in on the Coat of Arms Safe hanging on the wall. At far left is a small note taped to the inside of the shield, referring to the sequence head, eyes, limbs and suggesting that the associated quantities should be used to open the safe. On the dials labeled with Roman numerals, enter the combination 1 2 4 by clicking on the left dial once and the right dial three times. Click on the loop-shaped handle to open the safe, and obtain the Room 24 Key and the #5 combination element for the T-1001 Safe. Go back down the stairs and exit the stairwell through the short corridor and doorway at its east side. From Room 27 (Technical Design), enter the right-hand door along its west wall, the one marked "W.C.".
The plumbing fixtures in this room offer the usual sound effects, if you're curious. Zoom in on the Hand Dryer Safe behind the door. Insert the Room 24 key into the slot in the clear tube before the fan timer shuts off and the ping-pong ball drops. Take the #8 combination element for the T-1001 Safe. We have now cracked all safes on Floor 1 except the one in Room 3 (the Designers' Room). Since we have the complete access code for the Elevator, we'll visit Floor 2 next. Retrace your steps back to the stairwell and head for the elevator in its northeast corner. Zoom in on the control panel at right and enter the elevator access code: 1 8 1 2. Move inside the elevator, turn right and click on the 2 button to activate the elevator (the cellar is permanently inaccessible from the elevator). After a vibrating ride, exit the elevator and zoom in on the right-hand cannon in the Cannon Annex. Click its firing pin to open it and obtain some additional munchies: thermos, crackers and soft cheese. Go through the door at the west end of the annex.
Open the roll-top desk in this room to obtain a handwritten signal flag alphabet. Although not as complete as the alphabet seen earlier in the Coffee Room, it's enough to be useful later, and you can take this one with you. Zoom in on the Joker Safe and insert one of the 3d coins you obtained from the lockbox in Room 27's closet. Alternate pressing first the apple symbol at upper left and then the corn symbol at left center until the joker's ears, eyes and tongue are all "normal" and the safe opens. Pick up the B combination element for the F-9-12 Safe. Exit the room to the west.
Zoom in on the Venus Safe in the corner of this room. Form a proper image of Venus by clicking five times on the outer ring, six times on the middle ring, and four times on the inner ring. Then, click on the chrome lever at far left to release the latch. Open the safe by clicking on the vertical handle at upper left and take the #10 combination element for the T-1001 Safe. Exit the room to the east and continue east through Room 32 back into the cannon annex. Use the right-hand door on the east wall of the annex to reach Room 34.
Zoom in on the Clock Safe in the southeast corner of this room and use the "note from key box" you obtained in the security guard's office to enter the combination III VII I. Inside, obtain Egyptian cypher #2 (unused in the game) and the I combination element for the F-9-12 Safe. Exit east.
Every high-pressure firm needs one of these, right? Zoom in on the Radio Safe between the windows. Use the "note from voice safe" from Room 11 to enter the proper sequence of radio stations:
Press the L button at lower centerThe tuning of the radio stations needs to be fairly precise, so be sure you locate the red line in the center of each band you're tuning. Inside the safe, pick up the J combination element for the F-9-12 Safe and the #9 combination element for the T-1001 Safe. Exit through the door to the north.
Use the TUNE knob to move the vertical red line to the center of the RADIO 1 band
Press the S button at lower center
Use the TUNE knob to move the vertical red line to the center of the RADIO 4 band
Press the M button at lower center
Use the TUNE knob to move the vertical red line to the center of the STAR band
Press the S button at lower center
Use the TUNE knob to move the vertical red line to the center of the RAD. LUX. band
Press the O button at lower center to open the safe
The walls of the Conference Room are covered with portraits of the game developers, including one with a reference to UNIX. Approach the Boat Safe in front of the windows. Examine its signal flags carefully, and with the help of the signal flag alphabet seen earlier, translate it:
R I G H T T W O L E F T F O U R R I G H T 2 R E T U R N T O 5Zoom in on the safe and enter the combination:
Turn dial clockwise (three times) to 2Pick up the #3 combination element for the T-1001 Safe. Exit through the door in the northeast corner of the room.
Turn dial counterclockwise (twice) to 4
Turn dial clockwise (twice) to 2
Turn dial counterclockwise (three times) to 5
Various musical instruments in this room respond when touched. If you haven't already eaten, pick up an apple from the bowl on the table. Zoom in on the tape recorder at the north side of the room and click its lever on FORW to play the fourteen notes of "Twinkle, Twinkle Little Star". Zoom in on the piano and open its lid. Using the small hatch at center as a guide, identify the keys:
Recreate the tune by playing the following notes: G G D D E E D C C B B A A G. The safe opens automatically and you can obtain the F combination element for the F-9-12 Safe and Egyptian cypher #3, which will be needed momentarily. Exit the room to the west and enter Room 48 (the Secretary's Office). There's not much to do in this room except to access a secret passage from the cellar, which we'll discover later. Exit through the door in the northwest corner of the room.
Zoom in on the northeast face of the Pyramid Safe in the center of the room. Use the Egyptian cypher #3 in your inventory to activate the safe. Match the symbols on the pyramid with those on the cypher:
Do not click on the top level of the pyramidInside the safe, pick up the H combination element for the F-9-12 Safe and a photo showing part of the solution to the Secret Room Safe. Exit west into Room 52 (Crabb's Office). The handprint sensor allowing access to the western half of this room does not work, so exit south through a small anteroom and into Room 37 (the Library). If desired, check out the poetry and MacBreath books on the library tables. We've now solved everything we can on Floor 2, so it's time to explore the cellar. Move to the northwest corner of the library and pull the cord labeled "please do not pull". After an ungraceful one-way trip to the cellar (Room 55), move forward toward the white table and chairs. Continue a bit east of the table; before entering a curve in the passageway, turn left and zoom in on a small switch on the wall. Click the switch to open a secret panel in the brick wall. Enter Room 59 and zoom in on the blue paper scrolls on the shelf. Click on the one at upper right to determine that the #7 combination element for the T-1001 Safe is "L". Look down to the right and open the chest on the floor. Use the blue flashlight inside the chest to reveal information needed for the Jukebox Safe in Room 3:
Click once on the next level of the pyramid
Click three times on the next level of the pyramid
Click once on the next level of the pyramid
Click three times on the next level of the pyramid
Do not click on the next level of the pyramid
Click twice on the bottom level of the pyramid
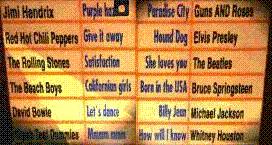
If you haven't yet solved the Jukebox Safe, then exit Room 59, turn right and approach the whisky barrels on the other side of the white table. Pass by the barrels on your right, then turn left and proceed down the central corridor of the cellar. About halfway down the corridor is a stairway on the left that you can use to return to the kitchen on Floor 1. Exit the kitchen and use the Floor 1 map to find Room 3 (one way to do this is simply to follow the windows along the outside wall of the house). Zoom in on the Jukebox Safe in the southeast corner of Room 3. This apparently is an English jukebox, as you'll need to activate it using one of the 50p coins you picked up from the lockbox in Room 27's closet (quarters won't work). After zooming in on the "Lurwitzer", you'll see that there are twelve songs with the names of their respective artists jumbled up and no longer in order with the songs. If you're familiar with all of these reasonably-famous songs, you may be able to solve this puzzle on your own, perhaps with the aid of an anagram generator. Otherwise, you can use the clue you found in the cellar to enter the correct combinations - for example, by pressing the 24 buttons in the following order:
	 1     22    4     13
	 3      8   20     15
	 5     10    2     17
	 7     16   14     19
	 9     24    6     21
	11     18   12     23
Inside the safe, pick up the D combination element for the F-9-12 Safe. Return to the cellar via the kitchen (you'll have to reopen the secret doorway using the coffee grinder handle on the wall). Use the cellar map to go back to the passageway outside Room 59 (east of the white table), then continue east through an S-shaped curve in the corridor. As soon as you've passed through the curve, turn left and open the door in the dark alcove to the north.
Turn right and zoom in on the notebook lying on the wooden shelves. This notebook provides operating instructions for the key-weighing machine in this room. If you leaf through all the pages, you'll see a reference to "whisky" on the back cover of the book. Turn around and zoom in on the machine against the wall. The object of this interesting puzzle is to determine which of eight keys is heavy, the rest being of the same weight. Only two weighings can be performed, and the puzzle is re-randomized for each play. Here is an algorithm guaranteed to work:
Weigh 1,2,3 vs. 4,5,6:Keys are selected for each side of the scale by dragging the associated gold-colored knob to the left or right. A weighing is accomplished by dragging the W knob upwards. Scales are cleared by dragging the W knob downwards. When the heavy key has been identified, clear the scales, then click on the key's green button and pick it up from the output chute. Exit the room and turn right. Return through the S-shaped corridor and approach the three whisky barrels on the other side of the white table.Drag gold knob 1 to the left
Drag gold knob 2 to the left
Drag gold knob 3 to the left
Drag gold knob 4 to the right
Drag gold knob 5 to the right
Drag gold knob 6 to the right
Drag gold knob W upwardsIf 1,2,3 are heavy, weigh 1 vs. 2:
If 1 is heavy, you're finished
If 2 is heavy, you're finished
If 1 and 2 are equal, the heavy key is 3If 4,5,6 are heavy, weigh 4 vs. 5:
If 4 is heavy, you're finished
If 5 is heavy, you're finished
If 4 and 5 are equal, the heavy key is 6If 1,2,3 and 4,5,6 are equal, weigh 7 vs. 8:
If 7 is heavy, you're finished
If 8 is heavy, you're finished
If 7 and 8 are equal, start over!
Zoom in on the middle barrel and click on its spigot to access the Barrel Safe. Use the heavy key to open the safe. Inside, pick up the whisky bottle (just for fun), a photo showing part of the solution to the Secret Room Safe, seven additional quarters, and a diagram of a chess game in which White has checkmated the Black King at lower right. Hey, this safe won an award in the Safesexhibition! From the barrel, turn left and continue to the end of the corridor. Turn left, then left again into the first alcove. Activate the Card Safe by lighting up the joker figure on its door, then turning the handle. Press the "Start Now" bar at left to begin a game of Beat My Hand (5-card draw poker). Press the DEAL button and decide which cards to keep by pressing the HOLD button(s). Press the DEAL button again for replacement cards. If you lose, try again. When you win, click on the center card to determine that the G combination element for the F-9-12 Safe is 0. Continue east to the next alcove in the cellar. Here's an optional diversion in the game in which you can use up any remaining quarters you might have in inventory. Click on the tricycle at lower left for a sound effect. Click on the teddy bear at right for an animation of Ted Dead and his remarkable head. Click on the book lying on the chair next to the bear to disclose the target slot-machine sequence: A: Apple, B: Banana, C: Lemon. Zoom in on the slot machine and insert a quarter. You then have three pulls of the one-armed bandit's handle to come up with the winning sequence, and you can lock the symbol in any position by using its HOLD button. If you run out of quarters, you'll have to restore a saved game to get more. Although the odds against it are tremendous (we're told it's something like 9000 to 1), it is possible to win at the slot machine and the payoff is a special bonus from Daydream Software that does not affect the outcome of the game.
When you're finished playing, return to the S-shaped curve in the corridor and continue east past the door to Room 58 and around the corner to the south. For an optional detour at this point, save your game, then open the wooden door at the southern end of the corridor, opposite a black trash bag. Go through the door, turn left, and follow the corridor all the way down and up some metal stairs to a door marked "EXIT". This door is a one-way passage back to the street outside the Crabb mansion.
We have all codes for the final safes in the game, so the only task left is to return to Floor 2 of the house and find the safes. A quick way to do this is to use a secret passage suggested on the cellar map. In the alcove just north of the wooden door to the exit passage, zoom in on a large mechanical apparatus, which appears to be the same as that shown in the diagram we found in the Chief Engineer's office. Insert the crank handle you found in the S-2 Safe in Room 2 (Small Showroom). Click on the crank to activate the mechanism. Move a bit to the north and pass through a secret door that has now opened up in the back of the fireplace (a one-way trip). Proceed to the end of the secret corridor (Room 57) and climb the spiral staircase to Floor 2. At the top of the stairs, turn left and go through the panel. This panel is the back side of a painting in the striped hallway of Room 48. Using the map of the Crabb house, return to the Library via Rooms 49 and 52. Go back to the northwest corner, where you previously used the pullcord to reach the cellar. Look carefully at the books to the right of the pullcord, one step back from the cord. Click on the hotspot in the upper row of books to open a secret panel. Click on the yellow diamond to disclose a secret door. Go through the door into the rear area of Crabb's office (Room 52).
Zoom in on the F-9-12 Safe in the northwest corner of the room - it should look familiar from the comic strip in the game instruction booklet. Press the green button to access the safe and enter the combination you've been collecting from the other safes:
	A: 5
	B: 8
	C: 4
	D: 3
	E: 7
	F: 9
	G: 0
	H: 1
	I: 2
	J: 5
	K: 6
	L: 3
Grab the only item inside the safe, a White Queen chess piece at lower left. Exit the safe and zoom in on the chessboard along the north wall of the room. Place the White Queen in the position indicated in the chess diagram on the note from the Barrel Safe; that is, first put the chesspiece on the board and then click on the white square immediately to the right of the Black King in the next-to-the-last row. This move checkmates the Black King and opens a secret stairway in the floor. Click the cursor on the staircase to descend.
At the bottom of the stairs, turn left and zoom in on the Secret Room Safe. From the codes with the photos in your inventory
	1 = O
	2 = P
	4 = N
it should be more than obvious what the combination is. Set O P E N in the indicators at the top of the safe and retrieve the dispenser key inside. Turn to the right and zoom in on the cross-shaped lock in the cage door. Insert the dispenser key, move forward twice and zoom in on the T-1001 Safe. Do you feel lucky? Enter the combination you've been collecting from the other safes (recall that the code for #7 was found on a scroll in Room 59 of the cellar):
	 1: J
	 2: P
	 3: J
	 4: I
	 5: E
	 6: P
	 7: L
	 8: H
	 9: N
	10: P
(These just happen to be the initials of the game developers: Jan Phersson-Broberg, Jörgen Isaksson, Erik Phersson, Leif Holm, Nigel Papworth.) When the safe opens, punk, click on the lower door to set up a projector. Pick up the video cassette and the job contract:
Exit the cage and open the door to the staircase. Return upstairs and exit through either wooden door into the library. Use the northeast door of the library to reach the anteroom of Crabb's office. Immediately turn left and zoom in on the television set. Insert the video cassette and watch the interesting endgame sequence in which a "home movie" format is used by Nigel Papworth to introduce the game developers. When it's over, click to watch the game credits.
Floor 1 <--> Floor 2       Elevator (access code required)

Floor 1 <--> Cellar        Secret passage from kitchen (Room 21)

Floor 2 --> Cellar         Trap door in Library (Room 37)

Cellar --> Floor 2         Secret door in cellar fireplace

Cellar --> Outside         Doorway in back of cellar

Floor 2 --> Final Safe     Secret door in Crabb's Office (Room 52)
Copyright © 1999 Balmoral Software (http://www.balmoralsoftware.com). Portions copyright © 1996 Daydream Software AB. All rights reserved. Republication, redistribution or conversion is expressly prohibited without the prior written consent of Balmoral Software. Contents subject to change! For the latest information, see http://www.balmoralsoftware.com.