
Copyright © 2017 Balmoral Software (http://www.balmoralsoftware.com). Portions copyright © 2012 Animation Arts Creative GmbH. All rights reserved. Republication, redistribution or conversion is expressly prohibited without the prior written consent of Balmoral Software.
Secret Files 3 is the third and final installment in the game trilogy from distributor Deep Silver using an excellent game interface from Animation Arts. In this interface, the spacebar can be used to highlight all hotspots in the current game panel, and the mouse icon shows in green which mouse buttons can be pressed. Left-clicking initiates active verbs, such as Use, Take, Open, Put, Move, Give, Talk to, Select, Enter, Exit and Combine (in the inventory bar). Right-clicking executes passive verbs such as Examine or Read, and can be used to skip video sequences and dialog. The top center of the screen is usually a safe place to position the cursor when right-clicking to skip dialog sequences. Movement of characters is accelerated by double-clicking. Secret Files 3 provides the same excellent graphics as was seen in its predecessor Secret Files 2 - Puritas Cordis. As in the previous two games, most of the puzzles in Secret Files 3 are inventory-based. There are a few standalone puzzles, and these seem to be a bit more difficult than the easy ones seen in the previous two games in the trilogy. As before, there are optional puzzle hints available within the game.
New in Secret Files 3 is a customizable main menu on which the basic game functions such as Load Game, Options and Quit are accessible on a static backgound. This menu is graphical only; no menu labels are provided unless you mouse over the appropriate regions of the image. The appearance of your particular main menu is determined by the answers you give to some social-engineering type questions such as your favorite movie or season of the year. Apart from a few details, the background graphic is solely determined by the answer you give to one question: your favorite hobby. If you select Sports, Reading, Watching TV or Other things, the background is a sports bar. Otherwise, the background is a motorcycle workshop. You can change your selection of main menu graphic by clicking on an item in the Options screen. We found this graphical main menu idea to be an annoyance compared to a simple and functional menu-list interface, especially since the game already has a menu shown when it first starts up.
As a general rule, be sure not to miss any hotspots, especially along the edges of the screen, or in areas without a lot of contrast with the magnifying-glass icon. Also be sure to walk to the edges of each screen to scroll sideways in case the scene is wider than what's initially displayed. If you get stuck, try combining new inventory items with existing inventory items and using them on all hotspots. Also, right-click items in the inventory list to see if their descriptions have changed. Occasionally, you may need to move a character out of the way in order to interact with a hotspot in the scene.
This walkthrough provides a minimum path through the game; other gameplay sequences and dialog choices can provide additional backstory elements.
Follow the indicated path to the top of the wall:
Take Leather bag
Use Leather bag on Snake
Use Snake in bag on Window
{Cutscene}
Use Beam
Follow path and take Banner:
Combine Grappling hook & Linen cloth
Combine Rope & Muffled grappling hook
Use Rope with muffled grappling hook on Window
Use or examine Clay pots
{Cutscene}
Use Robe in Baptismal font
Take Mop
Use Clothes hanger on Nail
Use Wet robe on Burning shelves
Take Ruined shelves
Use Mop on Flames
Use Burning mop on Tapestry
Use Nail on Wall joint
Use Shelf on Wide wall joint
Use Statue
To solve the statue puzzle, begin by leaning right, then alternate leaning directions when the statue's motion stops at the end of a swing. The pause while the motion stops is longer in the Easy version than in the Difficult version of the puzzle.
{Cutscene}
Examine Backpack in inventory, get Book
Examine Book in inventory, get 4 Flags and Table of Contents
Note that the book is missing Chapters 3, 7, 10 and 15
Examine Table of Contents in inventory to identify the Australian cities corresponding to the missing chapters: Adelaide, Brisbane, Broome and Hobart (Tasmania)
Back out and exit right
Examine Map
Use the 4 Red Flags on the 4 cities listed above to open a secret compartment
{Cutscene}
Take Stucco tool
Use Stucco tool on Refrigerator
To simulate the volcano, turn on Lava lamp
Use Ice-cold tool on Air conditioner to simulate a stormy wind
Use Key on Drawer
Examine Drawer
Take City map, Photos and Book
Note code: 0504
Back out and be sure the Model light, Desk lamp and Radio are all off
To simulate the sea, turn on Aquarium
A secret compartment opens behind the picture, get Documents and Cell phone
{Cutscene}
Examine Cell phone in inventory
Enter code above and press OK button
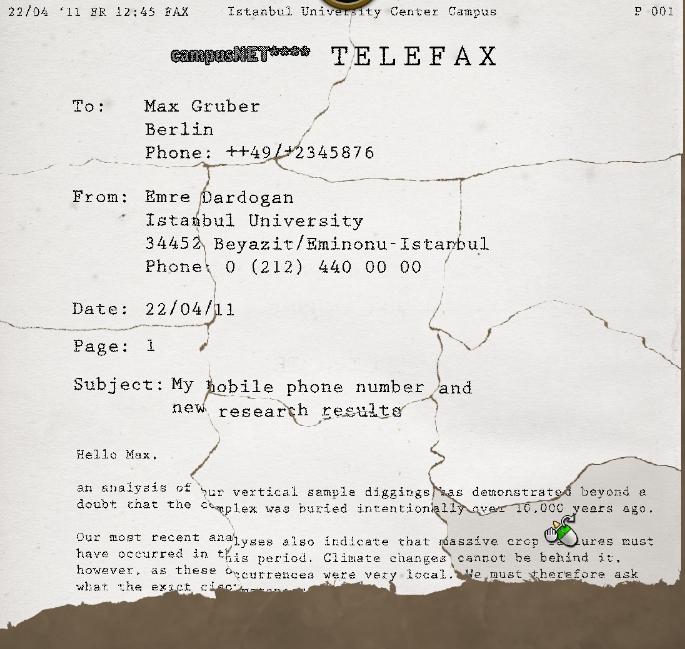
Get voicemail message from Emre
{Cutscene}
The playable demo ends at this point
Scroll right and use Trashcan, get Bike wheel spoke
Use Bike wheel spoke on Gap, get Shreds of paper
Examine Shreds of paper in inventory
Combine the pieces to make a legible letter
Combine Cell phone & Fax, get Excavation site map
Examine Cell phone in inventory to get MMS (multimedia) file clues of Emre's underground location:
Smell of oilScroll right and exit to the excavation siteEngine sounds
Video of tree roots
Visit Lots to gather clues:
The only location with all three of Emre's clues is Lot E
Visit Lot E
Use Smell of oil MMS file with Puddle of oil
Use Engine sounds MMS file with Pump
Use Video of tree roots MMS file with Tree
Use Rock drill on Rock slab
Use Chain with Drill hole, get Key
Visit Lot C
Use Key on Elevator
Take Wooden crate
Use Elevator to return topside
Go to Lot E
Use Wooden box on Rock drill, get Hammer, Pipe wrench and Plastic bottle
Go to Lot C
Use Elevator
Exit left
Use Pipe wrench on Pressure gun
Combine Clod of dirt & Hammer
Combine Pressure gun & Fine, red sand
Use Pressure gun with paint on High pressure cleaner
Use Pressure gun with Crevice
Use High pressure cleaner
Return topside and visit Lot D
Combine Chain & Hammer
Use Chain with hammer on Color marking
Return to Lot C and use Elevator
Exit to Tunnel
Use Chain
{Cutscene}
Refer to the map below:
To activate the Animals Puzzle, move Nina to her starting Position 0 as instructed by Emre. Although this puzzle can be solved by trial-and-error, it's much faster to gather clues from the information given. There isn't a clear goal for Nina and Emre, but it seems reasonable to assume that in each player's turn, they can move only to an adjacent block (possibly diagonally) and not jump over blocks. Also, we assume that they won't be retracing their steps as in the wine barrel puzzle in Secret Files 2. By examining each of the outer stone blocks, you can identify the changes made to the corresponding creatures:
	Creature	Change

	Antelope	No change
	Ibis		+1 wing
	Lion		No change
	Lizard		+2 legs
	Wild boar	+1 leg
	Snake		No change
	Grasshopper	+2 legs
	Fox		+2 ears
	Rabbit		No change
	Eagle		No change
	Dragonfly	+3 wings
	Tiger		+1 tail
	Fish		No change
	Ox		-1 horn
Next, by finding the corresponding creatures in the inner stone blocks, you can map out which blocks pertain to an even number of changes, which to an odd number of changes, and which have no changes or, in the case of the Duck and Spider, do not have corresponding outer blocks. In the map above, the even-number blocks are identified by double-walled cells, and the odd-number blocks by single-walled cells. Nina moves first to Position 1 (Ox), an odd-number block.
Switch to Emre and move to Position 2, the Tiger (he really has no choice, even though this is an odd-number block)
Switch to Nina and move to Position 3, the Ibis (she could theoretically move diagonally to Position 5, but this fails)
Switch to Emre and move to Position 4, the Fox
Switch to Nina and move to Position 5, the Wild boar (she could theoretically move to Position 7 instead, but this fails)
Switch to Emre and move to Position 6, the Lizard (he could theoretically move diagonally to Position 8, but this fails)
Switch to Nina and move diagonally to Position 7, the Dragonfly
Switch to Emre and move to Position 8, the Grasshopper
As Emre, use Knife with Roots
Combine Geiger counter & Roots
Use Geiger counter with roots on Cistern
{Cutscene}
Use Light switch
Use Sunshade (twice), get Comb and Parking disc
Use Comb on Glove compartment
Take Folding rule
Use Folding rule with Lunch box
Examine Lunch box in inventory, get Fork, Knife and Bread with meat
Use Knife on Safety belt
Take Metal box
Examine Metal box in inventory, get Emre's notes and Roughbook
Examine Emre's notes in inventory
Examine Roughbook in inventory
Press the only productive icon: Email
{Cutscene}
Take Wooden wedge
Use Wooden platform
Use Sack, get Salt
Use Cart
Use Salt on Wooden wheel
Use Wooden wheel
Use Balcony
Take Sword
Use Cart
Use Sword on Cargo, get Net
Exit to the wide alleyway
Use Net on Hooks
Use Roof
Use Sword on Clothes line
Use Net
Use Sword on Clothes line
Use Sword on Barrels
{Cutscene}
Use Torture devices, get Iron mask, Poker and Mouth spreader
Exit to alleyway
Use Mouth spreader on Shop, get Henbane, Lavender and Chamomile blossoms
Use Sword on Window
Use Roof
Combine Clothes line & Poker
Use Poker with clothes line on Chimney
Use Chimney
Use Henbane on Chimney
Use Roof
Take Clothes line
Use Net
Use Door
Use Ash pan, get Ashes
Use Wooden wedge on Recess
Use Poker on Cell door
Use Cell door
Take Wooden bucket
Go back outside
Use Wooden bucket on Snow
Re-enter cell (snow instantly melts)
Use Wooden bucket with water on An-Nasir
{Cutscene}
After a rewind, you're back in the cell
Go outside and exit left into the narrow alleyway
Use Cell phone on Sign on the wall
Take Fish offal
Return to the marketplace
Combine Iron mask & Fish guts
Use Iron mask with fish on Cat
Return to cell
Use Fish guts on An-Nasir
Use Wooden bucket with water on An-Nasir
{Cutscene}
Use Captured cat on any of the 3 Passages
Use the center Passage
After a rewind, you're back in the cell
Return to the narrow alleyway and take the center Passage
Use Wooden bucket with water on Hollow
Return to wide alleyway
Use Wooden bucket on Snow
Go to cell
Use Wooden bucket with water on An-Nasir
Follow An-Nasir through the right-hand Passage
After a rewind, you're back in the cell
Return to the narrow alleyway and take the center Passage
At the iced-over area, take Ladder
Use Passage at right
Use Ashes on any of the 3 Gates
Return to cell
Use Wooden bucket with water on An-Nasir
In courtyard, examine Fingerprints
Use left Gate
After a rewind, you're back in the cell
Return to the courtyard and use the left Gate
Use Ladder on Porch
Use Porch
Return to cell
Use Wooden bucket with water on An-Nasir
At bridge, examine footprints
Use right Exit
{Cutscene}
Take Jack, Tool, Book, Walking stick and Paint pot
Examine Master craftsmen diploma to disclose the name of da Vinci's teacher: Verrocchio
Combine Walking stick & Paint pot
Use Walking stick with paint on Canvas
Use Lighter on Oil lamp
Use Jack on Vehicle
Take Chisel
Use Right arm of the scales
Use Chisel on Right arm of the scales
Use Left arm of the scales, get Mechanical cylinder
Examine Mechanical cylinder in inventory
Use center buttons to spell out da Vinci's teacher's name:
Ver - ro - c - chi - o{Cutscene}
Use Diary page with Canvas
Combine Chronicle & Deciphered diary page
{Cutscene}
Combine Magazine & Piece of glass
Use Label in Puddle
Combine Empty bottle & Damp label
Talk to Shopman
I would like something to drink.Get Iced tea
Combine Empty whiskey bottle & Iced tea
Put Whiskey bottle with iced tea on Display
Scroll left and talk to Officer
May I ask you something about buying alcohol?{Cutscene}Report a violation of the ban on selling alcohol.
Open Trunk, get Can with diesel and Bolt cutter
Exit to the museum
Use Stairs (up)
Use Window
Use Window on right side of building
Take Frame of glasses and Watering can
Use Frame of glasses on Drawer, get Keycard
Use Window
Use other Window on front of building
Use Stairs
Exit the building
Use Bolt cutter on Metal door
Combine Can with diesel & Watering can
Use Watering can with diesel on Emergency generator
Use Emergency generator
Use Entrance
Use Downstairs
Examine Fuse box
Confirm that Lights are Off and Power is On
Back out and use Keycard with Door
Examine Fuse box
Use Fuse to turn Lights On (Power Off)
Back out and use Door
Take Lamp
Scroll right and use Desk lamp with Socket
Scroll all the way left and use Door
Examine Fuse box
Use Fuse to turn Power On (Lights Off)
Back out and use Door
Scroll all the way right and use Computer
Examine Computer
Use Artist and select Leonardo da Vinci
Use Title and select Madonna Benois
Use Year and select 1477
Confirm, get Painting
Scroll right and use Painting on X-ray machine
{Cutscene}
Use Cell phone on Computer
{Cutscene}
Use Open cell
Use Shelves, get Mug
Use Mug with Toilet
Exit
Use Mug with water on Air conditioning
Use Bolt cutter with Cable
Re-enter Open cell
Take Blanket and Bricks
Combine Blanket & Bricks
Combine Cable & Blanket with bricks
Use Window
In the exterior view, use Sack of bricks on Window
Use Sack of bricks on Courtyard
Use Window
Use Clothes hanger on Cable
{Cutscene}
Use Scrap heap, get Taser, Flame thrower, Buzz saw and Drill
Take Combat robot
Combine one of the weapon items (e.g., Flame thrower) & Combat robot in inventory
Exit
To begin the mini-game, use Combat robot with weapon on the other Combat robot. Select an Attack target (Bottom or Top). Select a Defense mode (Bottom or Top) and whether or not you want to use Limpet mines. Press the green Start battle button to begin gameplay.
Repeat game Rounds until the game is over. If you lose, you can re-combine the Combat robot in inventory with a different weapon if desired and/or change the Attack/Defense gameplay options. The starting score for your opponent seems to decrease with each game replay, so you will eventually win the game.
{Cutscene} (select either dialog response)
Combine Keycard & Spray paint for marking
Use Keycard with color on Ventilation cover
Take Plastic cup and Threaded bar
Use Threaded bar on Ventilation cover
Exit through Opening
Use Door
Use Ladder
Take Screwdriver
Use Plastic cup on Grease
Exit to the stern
Use Screwdriver on Lamp, get Lamp, Lamp holder and Red glass
Combine Mug with grease & Red glass
Use Door
Use orange Greased glass on the end of the white-colored Container to the left of the yellow container
{Cutscene}
Use Threaded bar on Container door, get Steel cable
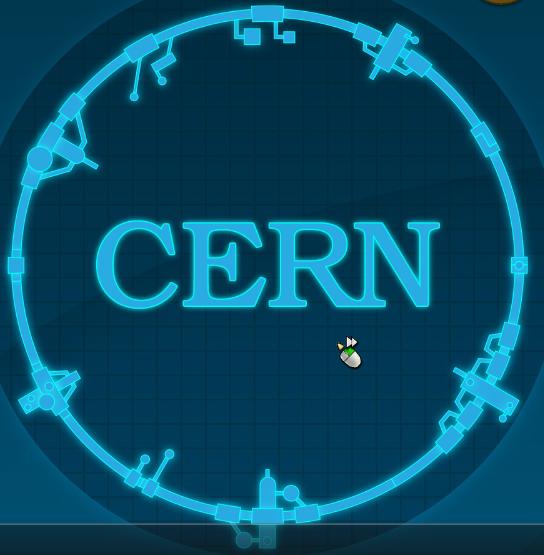
Examine Part
The objective of this puzzle is to complete the jigsaw of pieces around the periphery of the circle. The easy version of the puzzle provides clues as to the position of some of the pieces. Matching up the endpoints of the pieces may help to align them correctly.
{Cutscene}
Examine right Cooling chamber
Examine left Cooling chamber
Use Bottom wall cupboard
{Cutscene}
Go forwards 4 times and use Door
{Cutscene}
Take Plush toy
Open Car door
Use Hand brake
Use Heap of stones
Use Stone with Shop window
Use Heap of stones
Use Stone with Shop window
Use Heap of stones
Use Stone with Shop window
Take Camera
Use Camera on center Ruin in the background
{Cutscene}
Use Balcony, get Iron bar
Use Iron bar on Air duct grating
Use Air duct
Combine Plush toy & Iron bar
Use Spitted teddy on Gasoline
Exit
Use Teddy saturated with gasoline on Fire
Use Air duct
Use Burning teddy on Gasoline
Use Ruin
{Cutscene}
Use Cable roller, get Steel cable
Use Steel cable on Elevator
Use Steel cable at right on Steel cable at left
Use Hand wheel
{Cutscene}
As Max, use Desk
Give Pen and paper to Nina
Use Computer terminal
Use Note with coordinates on Input field
Use Search
{slow cutscene}
Navigate to the lower right to find and examine Recesses. This hotspot is directly to the right of a series of concentric semicircles that look like a birds-eye view of steps leading up to a platform.
Navigate straight up to a hotspot
Use Heap of stones, get Green crystal
Navigate to the lower right to another hotspot
Use Heap of stones, get Green crystal
Navigate to the lower left to another hotspot
Use Heap of stones, get Green crystal
Navigate to the upper left to another hotspot
Use Heap of stones, get Green crystal
Navigate to the upper right back to the Recesses
Put each of the Green crystals into the Recesses
Examine Hieroglyphs
Note that the one unrepeated symbol seems to be in the center, depicting a seated lion facing left
Back out and examine Indian ornaments
Beneath the Relief of Ganesh are repeating sequences of symbols. The missing ones corresponding to the blank stones are the same as the ones second from the left and fourth from the left.
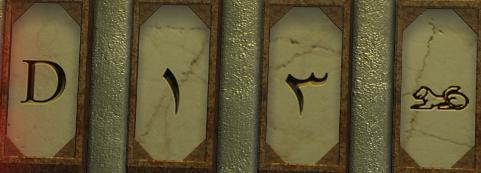
Back out and examine Stone figures
These 12 figures correspond to the (English) names of the months. The twelfth is missing, corresponding to the letter D.
Back out and examine Terminal
Use the Blue buttons to select the appropriate sequence of symbols from the previous clues, then press the Button at right. The two Indian symbols in the middle must be in the same order as the missing stones on the Relief of Ganesh.
Use Door
{Cutscene}
Jane Cunningham blathers on about "deterrium", which shouldn't deter you from noting its uncanny resemblance to deuterium
Scroll left and look at the Mural above the Clock puzzle, which depicts eight figures, each of which has a corresponding symbol on the clock below. Although Nina mentions that the mural figures are in chronological order (left to right), this does not have any impact on the solution of the Clock puzzle. Also, the Roman numerals on the outside rim of the clock either repeat or are missing elements in sequence, and can safely be ignored. Likewise, the distances of each clock symbol from the center is not important, and seems to be included merely as a way of facilitating mouse-clicking of overlapping symbols. (There is a subtle, perhaps unintentional, reference here to the spiral of Archimedes, who is referenced elsewhere in the game. An Archimedean spiral has the property that all of its points on a radial line from the center are equidistant from each other, as is the case with the clock symbols.) Note that the arm of each mural figure seems to be pointing in a unique direction. Left to right, the figures are:
	Figure		Clock symbol	Pointing

	Archimedes	Compass		Down
	Cleopatra	Eye (of Horus)	Right
	Menis Ra	Dagger		Lower left
	da Vinci	Paint brush	Left
	Max		Mars symbol	Lower right
	Nina		Venus symbol	Up
	Jane Cunningham	Pistol		Upper left
	Four Horsemen	Skull		Upper right
Orient the Clock symbols according to this table to open the Door
Use Door
{Cutscene}
Examine Console
You have two selections:
Deactivate the force field and save Max.If you pick the first selection, a warehouse puzzle must be solved:Leave the force field on and save the world.
A 27-move solution is:
Move E left{Cutscene}
Move B down
Move A right 3
Move D up
Move E left
Move G up 3
Move H right 3
Move E right
Move D down 3
Move C right 2
Move A left 2
Move G up
Move C right
Move D up
Move H left
Move B down 2
Move C right
Exit
Use Bag
Examine Bag in inventory, get Antidote, second Walkie-Talkie and Keycard
Use Antidote on Max
{Cutscene}
Use Drawer, get Model UFO
Use Wastepaper basket, get Poster strips and Pencil
Use Door
Use Lab coats, get Key with lighter key ring, Lipstick and Pocket mirror
Combine Cigar & Key with lighter key ring
Use Smoking cigar on Sensor
Combine Poster strips & Pocket mirror
Use Pocket mirror with poster strips on Laser grid
Combine Model UFO & Poster strips
Use Model UFO with Poster strips on Table, get Keycard
As Max, take Keycard
Use Keycard on Slab
Exit
Take Metal pin
Use Ladder
Use Metal pin on Guide wheels
Back as Nina, use Keycard on Console
Use Keycard on door to the hospital ward
Go through door to the hospital ward
Use Key with lighter key ring on Top wall cupboard, get Dressing material, Disinfectant, Laser pointer and Defibrillator
Use Door
Exit to the data center
Use Laser pointer on Sprinkler system
Use Defibrillator on Puddle
Use Entrance
{Cutscene}
Use Walkie-talkie or Defibrillator on Fire cabinet
Use Fire cabinet, get Axe
Use Fire axe on Pipe
As Max, use Ladder
Use Entrance to the transformer building
Use Walkie-talkie on Max
Examine Lock
Use Keycard on Screw
Examine Identifier
Back
Use Walkie-talkie on Max
{Cutscene}
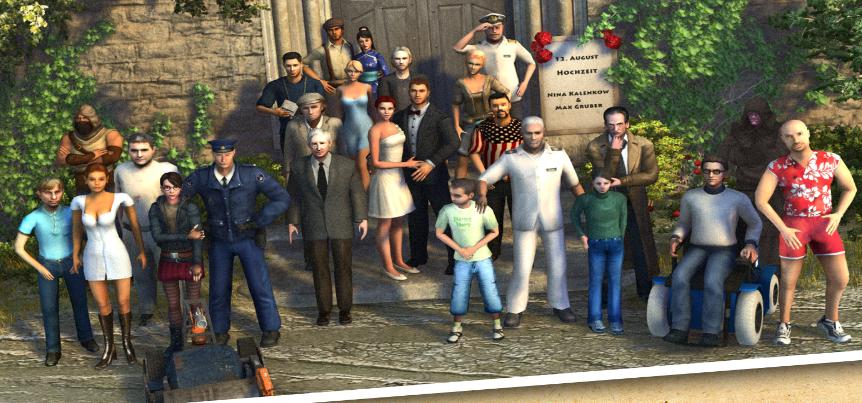
View a cast photo from all three Secret Files games as well as Lost Horizon
Endgame sequence in which, like in Secret Files 1 and 2, we get to find out what happened to all of the secondary characters in the game
Press Back to skip the slow crawl of credits
Statistics for the gameplay are then shown
Copyright © 2017 Balmoral Software (http://www.balmoralsoftware.com). Portions copyright © 2012 Animation Arts Creative GmbH. All rights reserved. Republication, redistribution or conversion is expressly prohibited without the prior written consent of Balmoral Software.