Copyright © 2020 Balmoral Software (http://www.balmoralsoftware.com). Portions copyright © 2004 MC2-Microids. All rights reserved. Republication, redistribution or conversion is expressly prohibited without the prior written consent of Balmoral Software.
The best parts of this game are its high-definition rendered graphics that show lots of detail. There are really fantastic architectures and ambience in the game environments, particularly in the early stages of the game. These seem to be the special contribution of art director Benoit Sokal. There are also animated water effects in many areas, which give the game a sense of realism missing from most contemporary adventures. Cutscenes are shown with the same level of detail as the interactive portions of the game, and most of these can be played back from the game's main menu. Kate Walker is depicted as a lifelike, high-resolution cyberpuppet with a Sandra Bullock hair-in-the-face look. Many of the characters have been rendered with motion capture technology, so their movements are very realistic. The abruptly-shifting viewpoints or camera angles between game screens may take a little getting used to, but this is minor in light of the exceptional overall appearance of the game.
Without a good storyline, this game would be nothing more than fancy eye candy. Fortunately, Sokal's contributions as writer are as effective as his art direction, for Syberia has an excellent plot with interesting characters and gradual story development that builds suspense and keeps the player involved. Some references to Sokal's previous release Amerzone are made in the game. Syberia is broken down into five distinct geographical sections, and most gameplay is completed in one area before travelling to the next. Transportation between areas is provided by an intriguing railroad train and a dirigible. The general plot line is very good, and the player has mostly-obvious clues about his tasks at hand. The plot is rather linear, but most challenges seemed logical although occasionally fantastic. Kate is periodically interrupted by calls she receives on her cell phone from her boss, mother, co-worker or boyfriend. These calls maintain a parallel "real-world" storyline outside the fantasy game settings, and add to the depth of Kate's characterization. Some of the dialog in the game may be a bit long-winded, but most does not detract from the atmosphere of the game. Certain dialog choices are crucial to advancing the gameplay, while others offer backstory. On replay, dialog sections can be skipped by right-clicking the mouse or pressing the [Esc] key. The same operations can be used to skip cutscenes and game startup logos.
As gameplay progresses, it's usually pretty clear where the areas are that need to be returned to later. There are a few instances of critical items that may be obscure in the game screens. Some hotspots, particularly certain closed doors, indicate areas that never become accessible. However, most hotspots pertain to areas requiring careful examination and possibly a future visit. A few characters, inventory items and hotspots may be hard to see against the screen backgrounds, so each scene should be examined carefully. Several easy-to-miss hotspots are trigger events required to advance the gameplay. Virtually all game challenges involve inventory hunts. A hedge maze is briefly toyed with, but never materializes as a real puzzle. The cell phone is an important tool at a few points in the game. A subtle musical cue is played when an important goal is achieved. Thankfully, there are no timed-play sequences in this game, which would have seemed out of place in a thought-provoking adventure such as this.
The basic game interface is similar to The Longest Journey, but with a more lucid plot line and much better rendered cyberpuppet characters with movements that are more fluid and believable. A magnifying-glass cursor is used to zoom in or examine an object, and is also used to initiate dialog with another character. Double-clicking the mouse can speed up Kate's walking pace, but her other movements are still rather slow and we would have liked a way to speed them up even more. In particular, Kate's movements on stairs and steps are disproportionately slow. Navigation through multiple nodes would have been more effective if there was a fadeout to the next scene after clicking on a border, rather than having to wait for Kate to walk or run to the edge of a large-scale screen. Kate Walker indeed!
New dialog choices or inventory items are indicated by an icon temporarily appearing at the upper right corner of the screen. An unusual font is used for dialog subtitles, with all letters appearing in capitals except for the letter "i". Up to 10,000 saved games can be stored, and are presented in reverse chronological order. The readme file has details on the location of saved games. A saved game cannot be named, but it includes an accurate thumbnail of the current game view, as well as a timestamp. There are no dead ends in the game and no way the main character can be killed, so there is little reason to restore a saved game to get around a problem, unless it's to avoid some repeat navigation. The game's separate inventory screen overlay is serviceable, toggled by right-clicking the mouse. Individual inventory items are identified on this screen, but there is no way to examine an inventory item and no need to combine any of them. The inventory screen is augmented by a "Personal File" area where documents picked up in the game can be read or studied for clues.
The game is played exclusively in the third person, except for the occasional close-up. There is no 3D movement and gameplay is node-based on static backgrounds, so depth perception is occasionally challenging. Navigation is screen oriented, with available exit directions indicated by a clearly highlighted cursor. A few of the game scenes side-scroll without any special indication, so boundaries of the game screens should always be explored. A smart cursor shows areas in the game that can be examined more closely or involve inventory items or dialog choices. For the most part, this cursor is fairly easy to identify on screen backgrounds. No maps or special navigation features are included in the game to speed up movement. The game has interesting acoustic music, in some cases obviously chosen to reflect the game's cultural environment. All of the voice acting is excellent, especially when showing the emotions of the various characters in the game, although a few of the accents seem to drop now and then. There are great sound effects throughout the game, including all of Kate's movements and interactions with the environment.
The Collectors Edition of the game for the PC doesn't include a hardcopy or PDF game manual, but there is a readme file and an interesting 11-minute Making Of video on the DVD. The game packaging shows scenes from the game which (for once) are accurate depictions of what you'll actually see on screen.
Syberia is a visually stunning game with a great story that all levels of players should find an absorbing adventure.
Updated from a review originally posted on 4 January 2003.
LLC: To the lower left corner of the screenThis walkthrough provides a minimum path through the game; other gameplay sequences and exploration can provide additional backstory elements. Some written materials and character dialog in the game are optional to the gameplay and are indicated as such below. Inventory item descriptions are shown in bold text.
LRC: To the lower right corner of the screen
ULC: To the upper left corner of the screen
URC: To the upper right corner of the screen
{Cutscene}
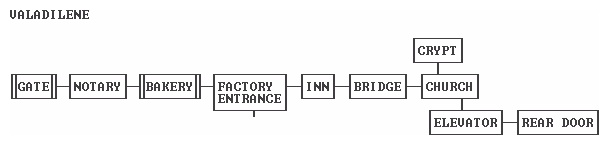
Kate Walker arrives in Valadilene, France on April 17, 2002 during a funeral in the rain. On entry to the inn, try moving the suitcase. Zoom in on the top of the reception desk and pick up the tiny Reception Bell Key lying next to the miniature figure. Put the key into the figure and press the red button to summon the proprietor. Talk to him:
- HelpAfter going upstairs, move to the other side of the bedroom and pick up Fax 1 from the nightstand, which is a letter from Kate's boss. Now that you have this document, you'll be able to call the office without getting a busy message. Select your Cell Phone from the inventory screen and press the down arrow until the Office number appears. Press the Send button to make the call. Kate's boss will state that he's sending another fax. The side door here is one of many throughout the game that have no function. Return to the lobby downstairs and talk to the proprietor to get Fax 2:
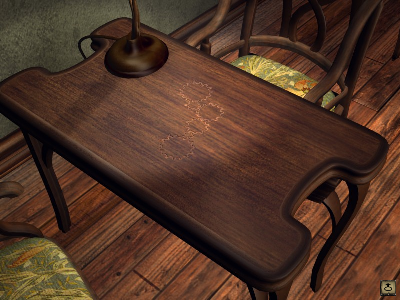
- MissionIt's stopped raining and Kate can now leave the inn when ready. Go to the other side of the lobby and pick up the Large Cog Wheel and Medium Cog Wheel that Momo dropped on the floor. Examine the table and pick up a Small Cog Wheel and a Tiny Cog Wheel. You should now have four Cog Wheels in your inventory. Note the pattern of gears etched into the tabletop:
- Close
Optional: Pick up an Advertising Brochure from the rack next to the stairs.
Exit the inn and proceed left along Valadilene's main drag. At the third node, there is a Boulangerie/Patisserie (pastry bakery); conversing with the baker there is interesting but inessential. Move two houses left to the large one belonging to the Notary, and approach its front door. Place Fax 2 into the robot's outstretched hand. Press the lever on its chest to lower its head into position, then use the lever at right to enter the house. Go through the doors into the back office and take a seat:
- MissionGet a Letter from Anna to the Notary, which has the effect of ending Anna's funeral service and providing access to the church at the other end of town. Exit the Notary's office and pick up a Telescopic Key from the coat rack by the front door, then leave the house. The game demo ends here.
Optional: Pick up The Valadilene Gazette from the left bench.
Follow the main street to the right through three nodes, back to the street in front of the inn (receiving a phone call along the way). Move right once more and you can see the sign "Jouets Voralberg" (Voralberg Toys) painted on the side of the factory.
Optional: Talk to the old man sitting on the bench.
Cross the bridge and continue uphill and through an open gate into a churchyard. After another phone call, follow the path to the right around the church and enter a door at the rear corner. Move into the back part of the sacristy and examine a crucifix on the wall. Push it to the side to obtain a Key. Back out and examine a chest in the corner at left. Put the Key into the small keyhole at upper right to unlock the chest. Open the second drawer from the top and pick up a Purple Punch Card. Close the drawer and open the next one down. Turn the metal handle at right to fully extend the drawer so you can pick up a Voralberg Key.
Optional: Pick up the Priest's Confession from the back of the open drawer.
There are other drawers here with differently-colored punch cards, but you won't need them and if you pick them up, they will be discarded later. Return to the other side of the room. There is a "mystery door" at right that seems to lead outside, but you can't see it from there. Exit the church and retrace your steps along the side path to the next node, where an external elevator awaits. Zoom in on its control panel on the church wall. Referring to the tabletop seen earlier at the inn, place the Cog Wheels from your inventory into the appropriate places:
This puzzle is trivial since the game will not allow you to place a cog wheel in the wrong location. When the four cog wheels are in position, pull the lever at right to go up to the bell tower. Move to the back of the room, zoom in on the winding figure and insert the Purple Punch Card into its slot.
(Large) Small Large Medium Tiny (Large)
{Cutscene}
Return to the churchyard and follow the path at left to a crypt. Examine the rusty tophat of the automaton on the roof and put the Voralberg Key into it, opening the crypt. Enter the crypt and move forward twice. Open Hans Voralberg's tomb and the empty coffin inside. Take the Valadilene Voice Cylinder.
Optional: Also take the Press Cuts from the coffin.
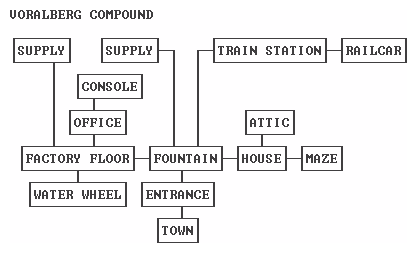
Go back into town and follow the street past the inn to a point where you can zoom in on a gap in the wall of the Voralberg compound facing the row of houses. Examine the door and put the Telescopic Key onto the upper automaton. Turn the wind-up handle on the lower automaton, then pull the lever to open the door. Move forward to a central fountain.
Take the first exit on the left, cross a footbridge and enter the Voralberg factory. Move to the right, past an automated assembly area and through a door in the corner. Move past the big pipe and pull the chain at right to engage the waterwheel with the river. Pull the lever at left and leave the room. Exit the factory and return to the fountain.
Take the exit leading to the upper left of the screen. Enter the covered fuel storage area and pull the lever on the support column to transfer some fuel into the factory. Scroll left and return via the fountain to the factory floor. Move LLC twice, past a metal staircase and through some support posts into a cluttered storage area. Enter the arched door in the background into a side room. Go around the workbench and operate the winch to lower the automaton. Talk to Oscar the automaton:
- Productionand get Oscar's Card. Exit the room and move forward. Touch the forklift to have the fuel canister moved into the assembly area.
- Close
Go back to the metal staircase and climb it to the upper factory level. The tall boiler-like structure is supposed to be an office. From the top of the stairs, enter the rightmost arched opening. Move further into Anna's office and examine the bookcase at right. Touch the second book from the right on the top shelf to access a music box. Wait through the mandatory music playback and get a Music Cylinder. Insert the Valadilene Voice Cylinder into the music box.
{Cutscene}
Take the Hans-Anna Mechanical Toy from the top of the music box.
Optional: Zoom in on the desk to examine overdue invoices, Anna's unfinished letter to Hans, and a schematic diagram of a clockwork locomotive.
Exit the office and climb the short flight of stairs at left. Examine the control console. If the previous steps have been completed correctly, the needle on the large dial should be pointing straight up and quivering. Insert Oscar's Card into the slot below the dial. Click the left-hand black knob three times to display the lightest color of wood (the colors are on a cycle of 6). Click on the lower right red switch in the bank of six at right, causing the corresponding small dial at upper left to turn yellow. The other five red switches have no effect. Finally, operate the right-hand black knob to assemble replacement feet for Oscar. The console settings are correct if the resulting cutscene starts with a view of Kate from behind.
{Cutscene}
Return to the factory floor and move LRC twice. Pick up the Wooden Legs at the end of the conveyor belt. Go visit Oscar in the side room behind the forklift and give him the Wooden Legs. Oscar then departs to find his train.
Exit the factory and return to the central fountain. Take the exit to the upper right and enter the Valadilene train station. Move LRC and climb onto the metal boarding platform of the railcar. Exit to the right and move LRC to access a winding machine for the locomotive. Turn the crank on the machine, then pull the lever. Use the crank again to retract the winding device. Enter the railcar interior and talk to Oscar:
- MissionLeave the railcar, exiting left from the metal boarding platform. Zoom in on the ticket booth:
- MissionGet a Train Ticket and a Train Release Permit.
Exit the train station to the upper right and return to the central fountain. Take the exit to the right and approach the Voralberg residence. Follow the path at right to go around to the back of the house, where a partially-extended ladder can be seen. Exit right and enter a hedge maze. It looks formidable, but there is actually very little to do here.
Optional: Speak with the gardener, if you can stand it.
Go through the open gate at left, then take the first right through a second open gate. Examine the wall fountain here and pick up another Voralberg Key. Exit the hedge maze and return to the ladder. Put the Voralberg Key into the receptacle to extend the ladder and allow Kate to climb up into the attic. Move LLC and open the old-fashioned desk at left. Pick up the Ink Bottle.
Optional: Pick up and read Anna's Diary.
Go to the opposite end of the attic, behind some furniture covered with a dirty sheet. Turn on the electric bulb overhead to illuminate the dark corner and cause Momo to appear. Talk to Momo:
- Closeto obtain Pencil and Paper. Return to the formerly-dark corner and examine the white carving on a wooden beam above the chair. Use the Pencil and Paper on Hans' 1932 carving to create a Pencil Tracing of Mammoth. Give the tracing to Momo, and he beckons Kate to follow him and learn his secret.
Exit the attic and return to the central fountain. Take the bottom exit back to the Valadilene main street. Move LLC past the baker, and re-enter the Notary's house. Zoom in on the desk and pour the Ink Bottle into the hat on top of the stamping figure. Put the Train Release Permit onto the flat pad and press the red button to get it approved.
Exit the house and continue moving to the left. At the end of the street, click on the gate where Momo is waiting. Go through the gate and over a bridge. Climb deep into the forest, past a defunct rowboat and on to a crossroads where Momo is waiting. Take the path URC and climb some steps up to a dam. Try moving the capstan next to the dam, then return to the crossroads and talk to Momo:
- HelpAfter Momo attempts to move the capstan, pick up the Broken Lever at left and return to the rowboat. Use the Broken Lever on the oar next to the rowboat. Return to the crossroads and talk to Momo again:
- HelpReturn to the crossroads and talk to Momo:
- Helpwhich causes the dam to be opened. Kate can now return to the crossroads, exit ULC and follow the path into the back of a cave. Examine the floor of the cave and pick up a Mammoth Toy Doll.
Retrace your steps through the forest, main street and Voralberg compound back into the railcar in the Valadilene train station (through 24 nodes and two phone calls).
Go to the museum area in the center of the railcar (sometimes referred to by Oscar as the luggage compartment). Put the Mammoth Toy Doll onto the stand at lower right. Zoom in on the cabinet at rear left and put the yellow Valadilene Voice Cylinder into the upper right location. Back out and put the Hans-Anna Mechanical Toy onto the central pedestal. Once this is done, you can play back the Valadilene voice cylinder and its associated cutscene, or any of the other ones in the game, simply by selecting it from the cabinet. Since it's no longer possible to identify a cylinder in inventory, the table below provides this information.
Optional: Put the purple Music Cylinder into the upper left location.
Go back to the railcar seating area and give the Train Release Permit to Oscar, then give him the Train Ticket.
{Cutscene}
Kate seems to have spent the night sleeping in her seat, rather than in that nice comfortable bed in the rear of the railcar.
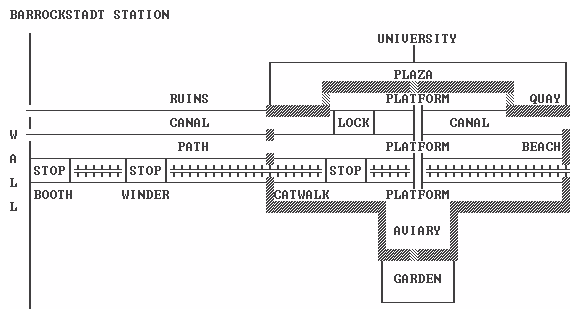
- CloseLeave the railcar, exiting left from the metal boarding platform. On the station platform inside a giant aviary, exit right. Who ever heard of an aviary with huge openings at both ends? Continue moving away from the train locomotive, down some steps and along the path next to a canal. After passing by some ruins in a side-scrolling view, Kate notices a locomotive winding machine. Retrace your steps back to the railcar and follow Oscar inside when he summons you.
Listen to Oscar's message about the rectors, which has the desirable effect of unlocking the exit doors in the train station. Leave the railcar, taking the left exit from the metal boarding platform. Continue left to an intersection of stairs, then cross the footbridge to the right. Follow the canal to the right, through a side door and down some steps. Talk to the multi-lingual barge sailors:
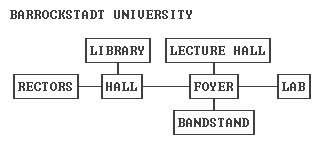
- Helpto settle on a price of $100 for their assistance. Go back up the steps, then exit LRC. Enter the University courtyard at right and approach the steps between the two saber-toothed tiger statues.
- Close
Optional: Talk to the pushy student at left if you need a distraction.
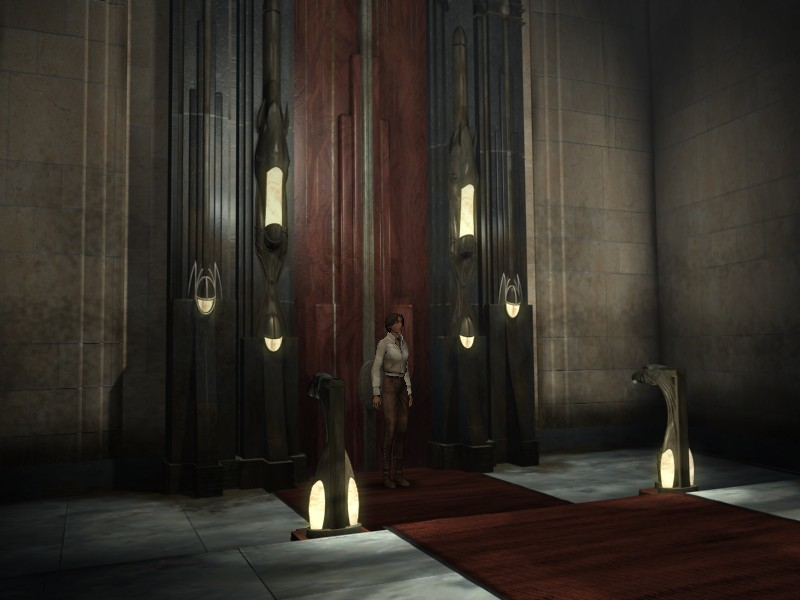
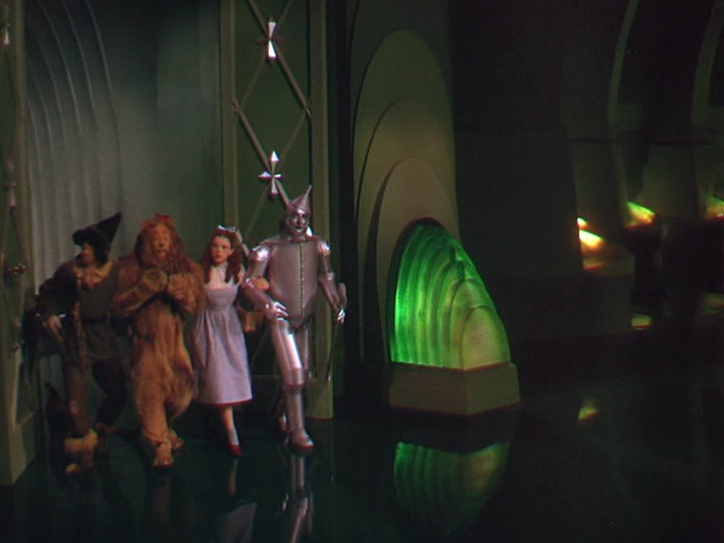
Enter the University building and make your way to the rectors' room, whose decor has a passing resemblance to the throne room in the Wizard of Oz movie. Speak to the rectors so they can confibulate amongst themselves and offer you a way to earn the sailors' fee:
- MoneyExit the rectors' room and enter the library off of the hallway. Latin inscriptions overhead include Natura non facit saltus ("Nature does not make leaps"), a misspelled Medicina animi ("medicine for the soul", referring to books) and one starting with Doctus ("learned"). On the ceiling is a compass rose with upside-down German text (the maps below exhibit this orientation with north at the top). On entry to the library, follow the tall bookcases to the right and climb the ladder there. Select the upside-down yellow book on mushrooms to have it added to your Personal File. Back out and go down the stairs to a sunken area with desks in the center of the library. Note the tiny blue hotspot on the bottom table. Picking up this easy-to-miss Amerzone Book describing the Amerzone cuckoo's fondness for Sauvignon grapes is required in order to advance the gameplay.
- Close
Return to the University courtyard and cross the bridge to the octagonal bandstand. Go around to the back of the bandstand and zoom in on the door to see that it probably needs an egg of some sort to balance the mechanism.
Return to the intersection of stairs in the train station. Move LLC to descend the steps. Exit left from the side-scrolling view to a beach-like area at the canal. Pick up a small white object that turns out to be a Hook. Talk to the stationmaster there:
- Sauvignonand he will abruptly leave. Go back to the bridge across the canal and speak to the stationmaster again:
- SauvignonReturn to the University foyer and enter the right-hand hallway. Talk to the professor who is examining a mammoth skeleton:
- Close
- HansGo back to the rectors' room at the far end of the hallway and speak to them:
- Sauvignon
- Close
- SauvignonReturn to the stationmaster on the canal bridge and speak to him a third time:
- Close
- SauvignonAfter he leaves to unlock the door to the garden, continue across the bridge to the intersection. Go down the stairs on the far side, enter the railcar and proceed into the museum. Since you previously spoke to the professor about Hans, you can pick up the Mammoth Toy Doll from the stand at lower right.
Leave the railcar, exiting left from the metal boarding platform. Return to the right-hand hallway inside the University building. Give the professor the Mammoth Toy Doll, and he responds by opening the door to the adjacent lab. Enter the lab and zoom in on the cabinet to the left of the tall doors. Take the Barrockstadt Voice Cylinder from the shelf. Back out and move LLC. Zoom in on the lab bench at lower right and pick up the large Test Tube Holder. Since you have the Mushroom Guide in your Personal File, you can also pick up the Yangala-Cola Powder.
Return once again to the intersection of stairs in the train station. Cross the bridge over the railroad tracks, then follow the curved path through the aviary. At the end of the path, exit the train station through the open door into the garden. Follow the outdoor path until it ends in a grove of birch trees, then take some Sauvignon Grapes from the bushes.
Re-enter the train station and proceed through the aviary to the foot of the bridge. Follow the gray platform at right to the location of a metal ladder. Give the Sauvignon Grapes to the cuckoo birds there to get them out of the way. Climb two ladders and zoom in on the body of a mechanical eagle. Use the Test Tube Holder to get a Cuckoo's Egg.
Go back to the bandstand in the University courtyard (as you cross the bridge over the canal, the stationmaster gives you a Wine Bottle). Go around to the back of the bandstand and zoom in on the door. Put the Cuckoo's Egg into the receptacle and turn the wheel to open the door. Enter the bandstand interior and go down the ladder. Pull the lever at right to activate the automaton musicians.
{Cutscene}
Speak once again to the rectors:
- Moneyand get some Money. Return to the barge sailors at the quay and give them the Money. In return, get a Lock Key from the sailor (if you miss the animation of the key being tossed to you, it's a tiny hotspot directly below the capstan with the rope).
- Close
Follow the canal into the station and go to a lock control console at the other end of the platform. Note the closed lock gate at left and the elevated water level. Zoom in on the sign above the phone at right and make a note of the phone number displayed there. Back out and use your cell phone to call 2766-6742. The menu responses are as follows:
- LocksGo back to the lock control console and enter the code # 4 1 * to raise the water level and allow the barge to move forward.
{Cutscene}
Go to the middle platform and continue past the front of the train until you can see the barge near the end of the platform. Talk to the sailor:
- HelpAttach the Hook to the end of the chain near Kate's feet.
{Cutscene}
Descend the stairs at the end of the platform and continue forward alongside the canal. After you've passed the ruins, the professor will call to tell you that his lecture is ready to start.
Return one more time to the foyer of the University building. Ascend the curved stairs to the left of the large mammoth skeleton and enter the lecture hall. After the lecture is over, go back into the lab and pick up the Mammoth Toy Doll from the professor's table.
Optional: Pick up the Paleontology Notes from the table.
Return past the ruins to the railcar. Use the railcar platform to cross over the tracks. Turn the crank on the locomotive winding machine and pull the lever. Re-enter the railcar and go to the museum area. Place the Mammoth Toy Doll back onto its stand at lower right. Zoom in on the cabinet and place the Barrockstadt Voice Cylinder into the lower left location. Go back to the seating area and talk to Oscar (who may be hiding behind Kate):
- Mission{Cutscene}
The train moves a bit further down the track. Leave the railcar, taking the right exit from the metal boarding platform. Move to the far left around the back of the ticket booth, then enter the door in the wall in the background. Climb the stairs, then move along the walkway LLC. Continue along the top of the wall and enter the sentry building. Zoom in on the man (Captain Malatesta) standing behind the telescope:
- MissionExamine the telescope and press the upper red button a couple of times to bring the image into focus. Back out and zoom in on the table at right. Put the Yangala-Cola Powder into the wine glasses, then add the Wine Bottle. Back out and the Captain's eyesight will be improved. He'll give you an Exit Visa for your trouble.
- Close
Return to the front of the ticket booth and give Oscar the Exit Visa, getting a Train Ticket in exchange. Re-enter the railcar and give Oscar the Train Ticket.
{Cutscene}
- CloseMove LLC and continue forward to the mechanical man at the end of the platform. Climb up the ladder into a control room. Zoom in on the open cabinet at upper left and pick up the Komkolzgrad Voice Cylinder, Hans' Designs showing various features of the mechanical man, and a Handle. Back out and examine the control panel at right. Put the Handle into the vertical slot. Move the handle up twice to move the giant man over the train. Press the red button to wind up the locomotive. Move the handle down twice to return the giant man to its original position. Back out and exit the control room. A thief is seen running away from the railcar.
Return to the railcar and go to its museum area. Zoom in on the cabinet and place the Komkolzgrad Voice Cylinder into the lower right location. Enter the bedroom and click on Oscar to untie him:
- CloseMove to the other side of the bedroom and notice the tiny hotpot in the dark on the floor. Pick up Metal Sheers [sic].
Return to the control room inside the giant man in front of the train. Zoom in on the control panel and move the handle up once. Exit the control room and jump to the platform on the factory wall. Examine the hole in the barricaded window, then use the Metal Sheers to enlarge the hole and gain entrance. Move forward into the room, then examine the shelves at left to obtain a Spark Plug.
Return to the control room in the giant man and use the control panel to move the handle down once. Exit the control room and move to the rear of the train where you can see an area lit by a spotlight. Use the lever to summon an industrial elevator, then descend into a mine. Examine the device in the dark at left. Insert the Spark Plug between the two flanges at the top, then click on the lever in front to turn on the lights.
Move deeper into the mine until you come to another elevator and use it (a missing animation fails to indicate whether it went up or down). Standing at the elevator, move to the right and climb a staircase up to a giant organ. Zoom in on the automaton organist and pick up a Screwdriver.
Return down the staircase at left and move down to a point outside the elevator. Move LLC twice. Examine the plate preventing access to a ladder, then remove its four screws with the Screwdriver. Climb the ladder and enter the door at left to meet the Director in charge of this establishment. Talk to the masked thief:
- Missionto learn about his obsession with former opera singer Helena Romanski. He has made his shrine to the singer accessible to you. Exit the room, go down the ladder and enter the shrine in the background at right.
- Close
Move into the back room and examine the open drawer at left. Take the album of Press Cuts and leaf through it five times to see a reference to Franck Malkovitch. Have you heard this name in one of your cell phone conversations?
Optional: Pick up and read one of the Letters to Helena.
Back out and call Mom on your cell phone to learn that Helena Romanski has gone to Aralbad (which must be a pretty "bad" place on the dried-up and polluted Aral Sea). Return up the ladder to the Director and talk to him:
- MissionExit the room and enter the adjacent monorail cage.
- Close
{Cutscene}
- ClosePick up a bottle of Vodka from the floor, which triggers Boris to fall down drunk outside. Re-enter the module, move forward and examine the wall cabinet at left. Take the Key from the bottom shelf.
Optional: Take the Space Project Cancellation Letter from the middle shelf.
Exit the module and examine the control panel next to the overhead crane. Insert the Key at right, then use the following control sequence to wake up Boris:
- AirshipBoris has given you an Airship Key. Exit right twice and climb some stairs up to the airship. Enter the airship using the Airship Key. Pull the lever to the right of the automaton pilot (this seemingly unrelated action is required in order to advance the gameplay).
- Close
Exit the airship and move right, down and left. Since the airship lever was tested, Boris has appeared here. Climb the stairs into a control room overlooking the centrifuge. Examine the console at right. Pick up the cruciform Voralberg Key at left and insert it into the cross-shaped receptacle. Open the plain rectangular hatch below the power switch and connect both of the loose wires within. Turn the power on, causing the green console display to come on and a radio antenna to start rotating on top of the control room (visible outside). Pull the handle at lower right to obtain a Blood Testing Apparatus.
Exit the control room and give the Blood Testing Apparatus to Boris. Return to the console in the control room and insert the Blood Testing Apparatus into its receptacle at lower right. Press the white button second from left to test the blood sample. A puff of steam indicates the test has been completed, but the subject has failed. Touch the inserted blood testing apparatus to sample Kate's blood instead. Press the four white buttons from left to right (there's a delay between the third and fourth buttons while Boris slowly walks to the flying wing). Boris eventually mentions "cranking" and throws something to the ground before lifting off.
{Cutscene}
Return to the overhead centrifuge area and pick up a red Crank Handle from the ground at left. Move down, then left twice to the rocket launchpad. Move left again to climb some stairs. Approach the klaxon in the background and insert the Crank Handle into it to get Soyouz the Golden Eagle to scare the birds away from the airship.
{Cutscene}
Return to the airship and use the lever to the right of the autopilot to travel to your next destination.
{Cutscene}
- CloseMove LLC twice, enter the closet next to a locked gate, and pick up some Detergent. Exit the lobby and sabotage the fountain with the Detergent. Re-enter the lobby and open the large red drapes to permit a view of the fountain. Click on the reception desk and ring the bell at its corner (may be occluded by Kate).
Now that the strangely-dressed hotel manager is distracted, go behind the reception desk and examine the hotel register next to the old-fashioned telephone. The two pages of the register show that the only resident who hasn't checked out is Helena Romanski, with Resident Code 1270. Also pick up a hotel brochure next to the register. Press the red button on the desk to unlock the gate next to the closet.
Go through the gate into the hotel's lavish pool area. Go through the door at left into the lounge. Move LLC and zoom in on the console controlling access to the exit door here. Enter Helena's code 1 2 7 0 and pull the lever, but nothing happens (this fruitless activity is required in order to advance the gameplay). Back out and exit LLC back into the pool area. Go to the end of the hallway in the background and pick up a Crystal Dish.
Return to the pool area and exit right. Enter the open doorway into a locker room (if this door is locked, try entering Helena's code in the lounge again). Pick up an access card from the floor with the Temporary Code 0968. Return to the lounge and use the code 0 9 6 8 to open the exit door. Go through the opening and take the breathing mask from the hook on the wall.
Exit the hotel and proceed to the end of the pier. Enter the gazebo and talk to Helena. Try to exit the gazebo, then endure an interruption by the punctilious hotel manager. Exit the gazebo and examine the black metal pole next to the light fixture in the foreground. The black pole contains a bell for summoning Helena's (automaton) valet, but he won't hear it inside the hotel from this far away, so you'll have to move it. Take James' Bell and approach the hotel door at the other end of the pier. Zoom in on a similar black pole here and put James' Bell onto the narrow hook at left. Pull the chain to ring the bell. Enter the hotel and click on the wall hook to return the breathing mask. Exit to the lounge and talk to the automaton over by the bar. After a cell phone call from Mom, Helena and James return from the pier. Talk to Helena:
- Hansand learn that George the bartender at the Meuritz Hotel in Paris has a recipe for a cocktail that can restore Helena's singing voice.
- Close
First the recipe, then the ingredients... Examine the Hotel Brochure in your Personal File to find the phone number 4643-3643 for the Meurizt [sic] Hotel in Paris. Call this number from Kate's cell phone to learn of the drink's ingredients:
Optional: You can try talking to the chess players here, but they'll ignore you.
Approach the raised spa behind the chess players. Turn the valve on the back wall to heat up the spa to steaming, then put the Crystallized Honey into the spa to liquefy it.
Return to the bar and examine the automated drink-making apparatus. Take the rolled-up Musical Score paper from the top and note that:
{Cutscene}
After you're separated from Helena, move into the elevator at upper right. Move forward twice and hear the elevator destroyed behind you. Continue down the corridor until you reach the other elevator shaft. Use the lever to summon the elevator, but it's got a bomb onboard! After the second explosion, return to its location and use the large ventilation shaft at upper right to escape the mine.
Examine the opened crate in the foreground to obtain a Dynamite bomb. Go to the locomotive and talk to Oscar. Return inside the railcar, and the giant mechanical man blocks the train. After a cell phone call, exit the railcar and approach the giant. Put the Dynamite into the right (Achilles') heel of the machine.
{Cutscene}
- MissionFelix shows up and tells Kate that she has a package in the hotel lobby (why couldn't he just have brought it with him?). Go to the hotel lobby and zoom in on the reception desk. Examine the opened cardboard box at the far corner of the desk and pick up the Mammoth Automaton. A couple of phone calls later, return to the hotel lounge and talk to Helena. Go outside to the pier (no breathing mask required). Talk to Hans Voralberg sitting on the bench. He signs the Valadilene factory sales contract without reading it and invites Kate to join him on a train trip to Syberia. After some consideration, Kate decides at the last minute to join Hans on his trip instead of returning to New York.
{Endgame}
Purple
Music
0:54 (music)Yellow
Valadilene
2:16 (cave)Green
Barrockstadt
1:15 (factory)Red
Komkolzgrad
1:12 (Russians)

Copyright © 2020 Balmoral Software (http://www.balmoralsoftware.com). Portions copyright © 2004 MC2-Microids. All rights reserved. Republication, redistribution or conversion is expressly prohibited without the prior written consent of Balmoral Software.