Copyright © 2020 Balmoral Software (http://www.balmoralsoftware.com). Portions copyright © 2004 MC2-Microids. All rights reserved. Republication, redistribution or conversion is expressly prohibited without the prior written consent of Balmoral Software.
The same software is used for both games, so if you enjoyed the detailed graphics in the first game, the visual appearance of Syberia II is equivalent (both are at a resolution of 800 x 600 pixels). The interface is virtually identical between games, but there are a few refinements and improvements in Syberia II, such as a directional cursor and the slowly-fading footsteps in the snowy environment found in this game. Motion capture is still used for realistic motion, and there are slightly faster character movements compared to the previous game. In Syberia II, it's somewhat more difficult to move Kate out of the way to see what's behind her since there is less granularity in her positions within a scene. Unlike in the first game, dialog choices often disappear after use, which can be a blessing or a curse depending on whether you need to review the answers.
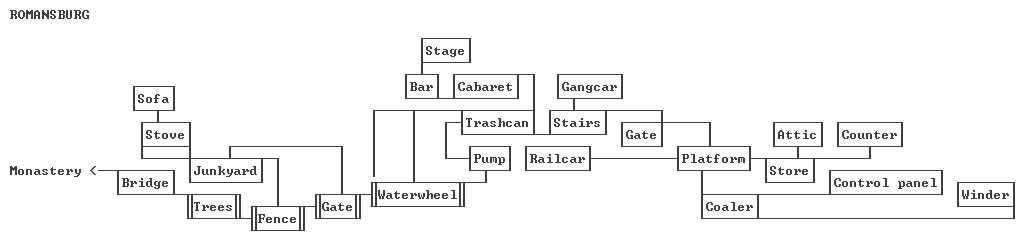
Some areas have rather complex navigation, exacerbated by side-scrolling and shifting viewpoints, so the maps below may be of assistance. As in the first game, there is a lot of walking/running required, so a quick exit to the next node would have been a useful function in the game interface. There is still the occasional pixel-hunting for an obscure hotspot. The Cinematics button in the Main Menu can be used to replay the longer cutscenes. Additional scenes are added to the list as they are encountered during gameplay.
For more about the first game and characteristics common to both games, see this review.
U: Toward the top of the screenAn abbreviation may be followed by a number for multiple repetitions.
UR: Toward the upper right
R: Toward the right
LR: Toward the lower right
D: Toward the bottom of the screen
LL: Toward the lower left
L: Toward the left
UL: Toward the upper left
This walkthrough provides a shortest path through the game assuming no foreknowledge; other gameplay sequences and exploration can provide additional backstory elements. Inventory item descriptions are shown in bold text. The walkthrough below also includes a playable demo of the game.
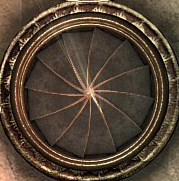
{Cutscene}
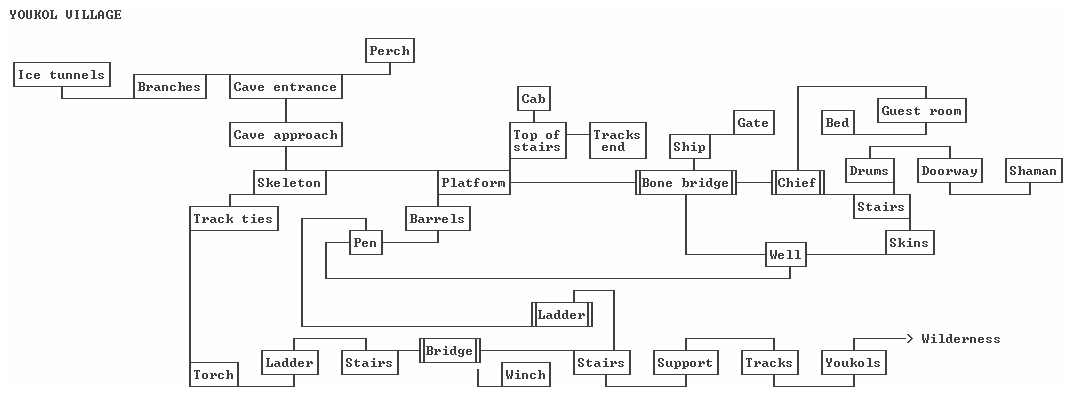
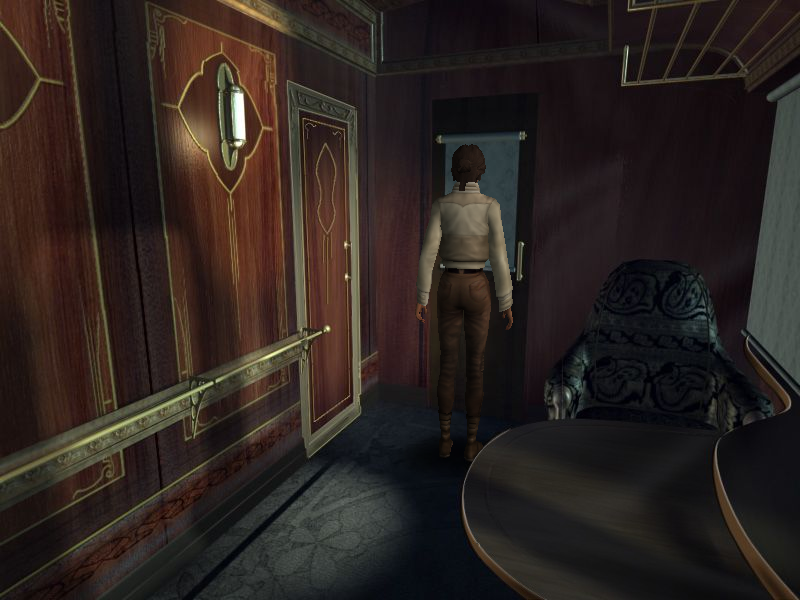
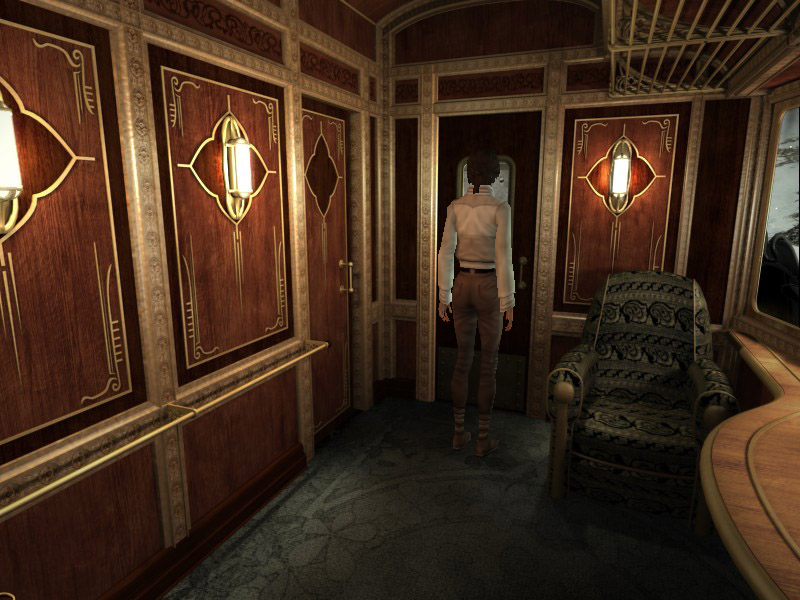
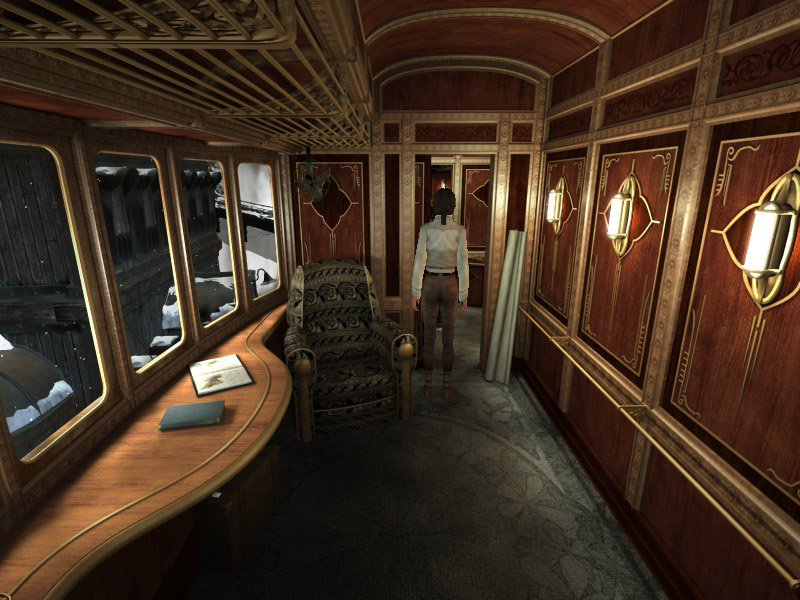
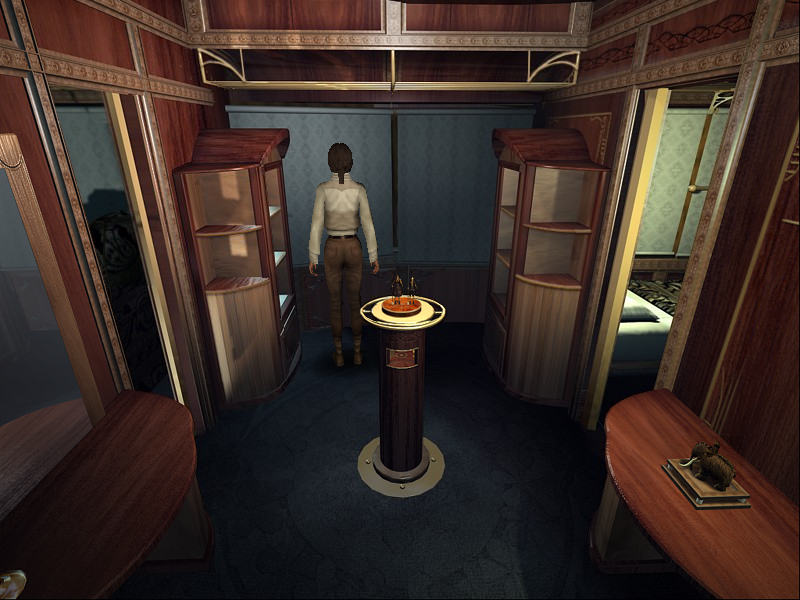
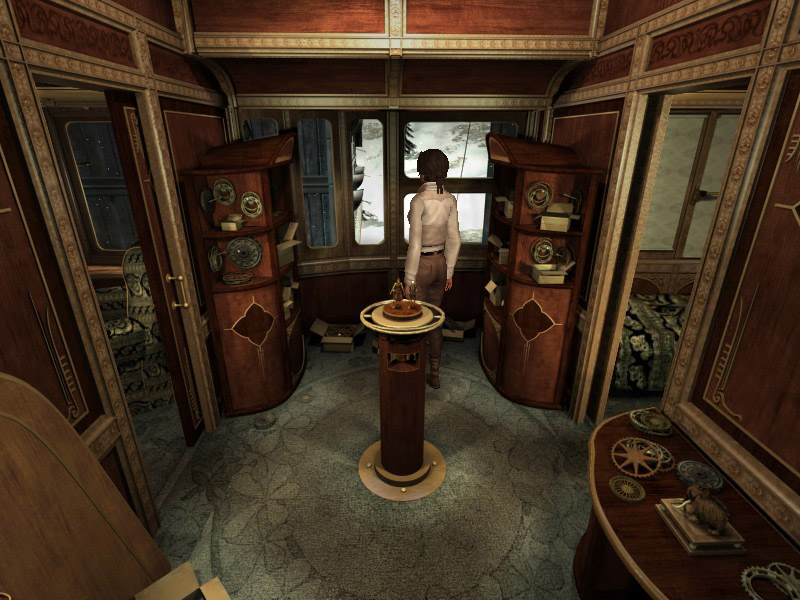
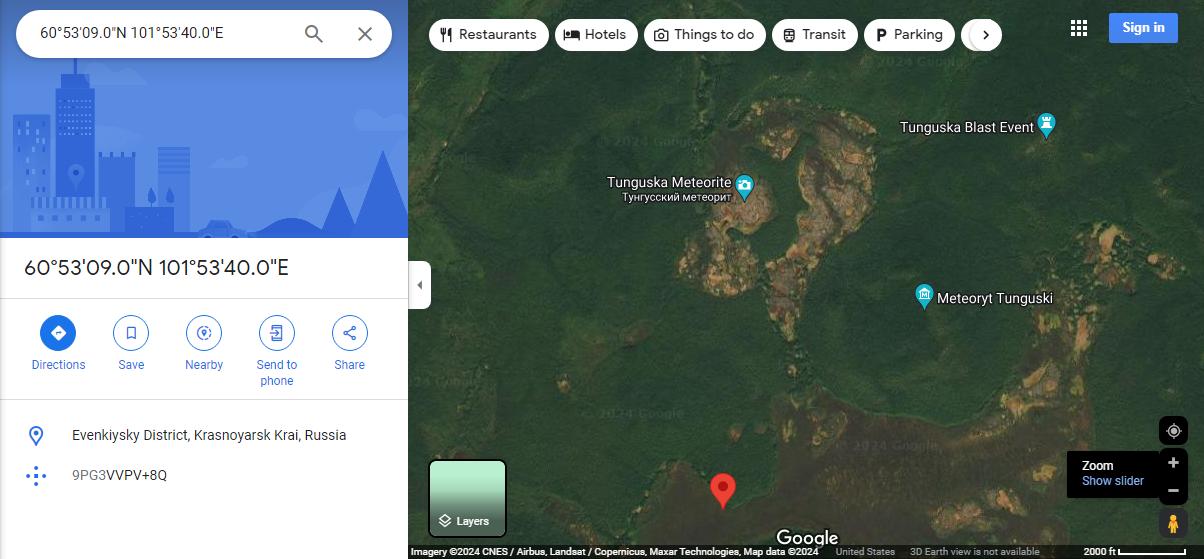
The game starts seamlessly at the end of the previous game, with a clockwork locomotive speeding across the Siberian landscape at coordinates 60° 53' 09" N, 101° 53' 40" E, about a mile away from the Tunguska meteor crater. After the train makes its next stop, move D and take a phone call from Oscar, the automaton train engineer from the first game. You can optionally explore the railcar to see how it's been remodeled since the end of the first game. Exit the railcar and step off the train to meet the retired Colonel Emeliov Goupatchev, who runs a general store in this town of Romansburg. Move to the far end of the platform and examine the closed gate. Back out and move to the locomotive end of the train. Turn the wheel on the brown metal winding device on the platform, then pull the lever at left to wind up the train. Talk to Oscar:
- Trainand he says the train needs coal. Move LR UR and zoom in on the control panel on the coaling device. Pull the lever down, but the machine's not right. Move LL UL R UR to the back of the general store. Zoom in on the counter at right (if the store manager is blocking your access, be sure you have examined the closed gate). Take the Small Key at lower left, then back out and talk to the store manager behind the counter at left:
- Close
- CoalIf these dialog choices don't appear, be sure you have pulled the lever on the coaling machine. Move to the other side of the store and zoom in on three candy machines at the end of the counter. Put the Small Key onto the drawer at the bottom of the right-hand dispenser to get some Coins. Click on the Coins in inventory and they will be displayed in a banner across the top of the screen. Select the stag coin fifth from left and insert it into the coin slot of the left-hand machine. Turn the knob underneath and take some Sugar Candy from the tray. Repeat the process with the holed 50 coin second from left in the middle machine to get some Fish Candy. Right-click to remove the coin display.
- Coal
- Coal
- Key
- Key
- Close
Exit the store and return to the location of the coaler control panel. You can see a young girl below. If the preceding steps have been completed, she should be holding a red balloon. Talk to the girl (Malka):
- KeyGive Malka the Sugar Candy, and get the Gate Key in return. Go back to the closed gate at the end of the platform and open it using the Gate Key. Exit through the open gate to the town's lower level.
- Candy
{Cutscene}
At the foot of the stairs, move LL L to a pump that powers the coaler. Take the red Empty Can. Move D, then scan and exit left. Attempt to enter a gate in the fence:
- GasMove left, then scan left and zoom in on a poster covering a gap in the fence. Use the small tear on the upper edge of the poster to remove it, then enter the junkyard. Zoom in on the crate containing a white animal and unlatch it.
- Close
Move UL and click on the red gas can on top of the barrel to swap it with the empty one in inventory. Go back through the gap in the fence and return to the coaler pump. Apply the Jerry Can to the pump and turn it on using the small red switch at right. Return to the coaler control panel on the upper level and pull its lever to fill the locomotive tender. Oscar appears in a panic and announces that your traveling companion Hans has disappeared. Return to the foot of the stairs, then move LL UR into a cabaret.
{Cutscene}
Exit the railcar and return to the foot of the stairs. Move LL and talk to Malka:
- MissionMove UR LL to the bar area of the cabaret and talk to the proprietor Cirkos:
- Monastery
- MalkaExit the cabaret and talk to Malka again:
- Shroud
- Close
- Monasteryand get a Token for a shroud. Return to the gap in the junkyard fence (now boarded up), then move L UL to a footbridge over a rushing river. Zoom in on the device next to the path and put the Token into the slot at upper right. Pull the handle and take a Shroud from the pile within.
- Help
- Close
Return to the general store on the upper level and speak to Colonel Emeliov:
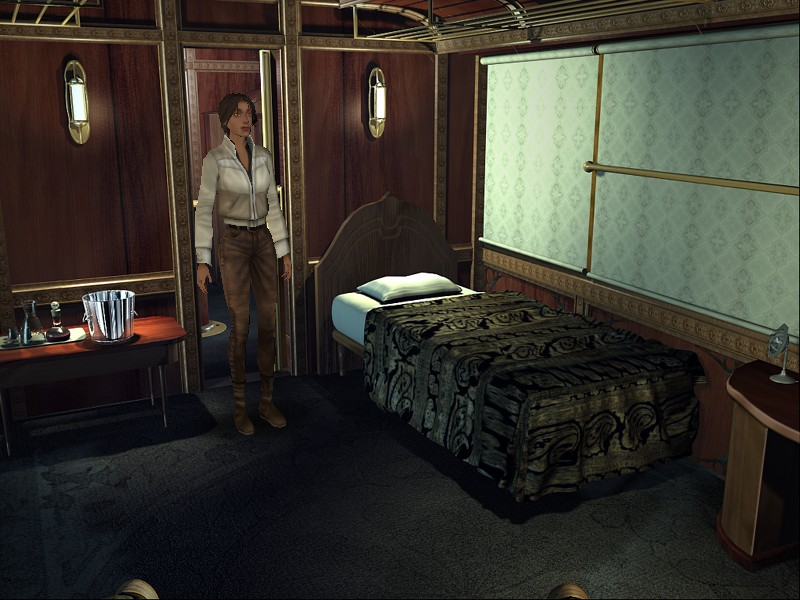
- HelpGo up the ladder to the attic and pick up some Winter Clothes from the crate in the corner. Exit the store and re-enter the railcar. Use the side door to the bathroom so Kate can change clothes. Go into the bedroom in back and put the Shroud on Hans' face.
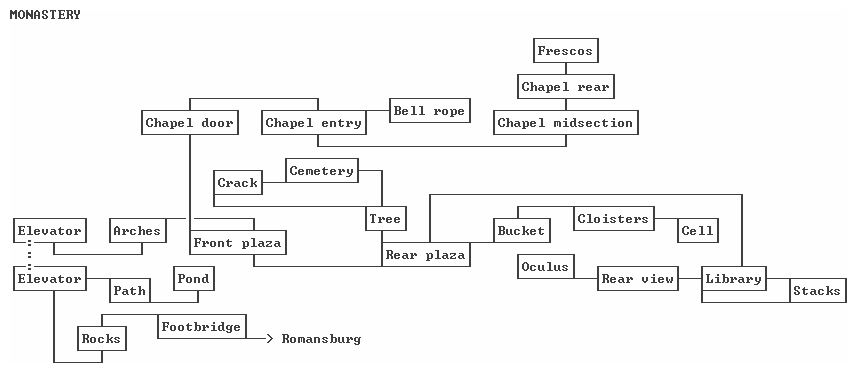
Return to the footbridge and cross it. Continue D R LR past an elevator leading to the monastery. Talk to the monk at the pond:
- Hansand a birdsong is heard. Go all the way back to the general store. Talk once more with Colonel Emeliov:
- Bird
- Close
- Helpand get Gold, Silver and Black Birdcalls. Go back to the monk by the pond and give him the Silver Birdcall (the other ones have no effect). After the monk runs away, pick up a Monk's Habit, which Kate dons discreetly (leaving the other birdcalls behind). Return to the monastery elevator and pull the chain. Alas, there's no running while Kate is wearing the monk's robe. Enter the elevator for a ride up to the monastery above.
- Close
{Cutscene}
- Mission{Cutscene}
- Mission
- Help
- Shroud
Hans is transferred to the Monastery on a stretcher. The next morning, Kate has ditched the monk's robe and can Close the remaining dialog with the Patriarch. Move U R through the cloister and into Hans' cell. Talk to Hans:
- MonasteryExit the room and talk to the monk who was eavesdropping on the conversation:
- Close
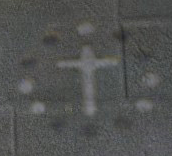
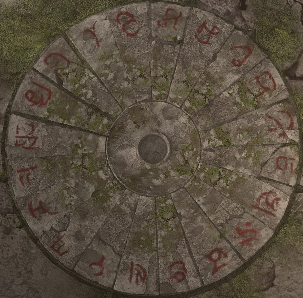
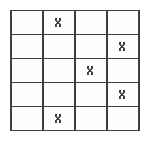
- Hansand he gives you a Scroll and a Stained-glass Mammoth, both of which are put into the Documents section of inventory. Back out and examine the Scroll to learn that "the key is in the light of the mammoth's eye". Move UL and pick up the Brush next to the bucket. Return to the chapel midsection and zoom in on the side passage at left. Use the Brush on the book in the fresco to disclose a pattern of 12 light and dark dots surrounding a cross:
- Brother Alexei
- Brother Alexei
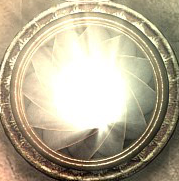
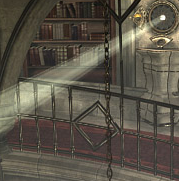
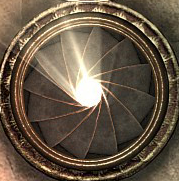
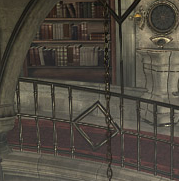
Back out and move D U D2 U into a library. Move R LL to descend the spiral ramp. Enter the area with the desks and take the tall candle-lighter at lower right. In the overhead view, a cross is visible on the floor, surrounded by 12 candles as in the diagram above. Using a clock analogy, 12:00 is represented by the uppermost of the two candles that are over the entrance to the circle of desks. Light only the five candles corresponding to the times
12:00This causes an oculus to open high up in the library tower. Move LL UL L2 to the top of the ramp and zoom in on the oculus there. It is surrounded by four wedge-shaped parts of its cover. The orifice allowing light in is controlled by a clockwise sequence of wedge pushes (a non-clockwise sequence has no effect). The size of the orifice is determined by which wedge is pushed last in the clockwise sequence:
3:00
4:00
8:00
9:00
The initial orifice size when the window is opened is Large. Only when the orifice is Large can a view of Romansburg down below be seen through the window. This is also the only orifice size in which the Stained-glass Mammoth can be inserted into the window. After that has been done, back out and set the orifice size to Small so that a sharply-focused mammoth image is displayed on the opposite side of the library:
Wedge sequence Size of orifice Oculus Close-up Right Bottom Left Top Large Top Right Bottom Left Medium Bottom Left Top Right Small Left Top Right Bottom Tiny
Push bottom wedgeBack out, move LR and zoom in on the stone wall medallion where the mammoth's eye is projected. In the close-up, click on the medallion to open a secret cupboard. Zoom in on this cupboard to obtain Brother Alexei's Book and a Youkol Relic.
Push left wedge
Push top wedge
Push right wedge
Exit the library to the rear plaza, then move LL U back to the area of arches. Zoom in on the wheelbarrow at lower right and pick up the Shears. Back out and move UR D UL U through the plaza and into a cemetery. Zoom in on the gravestone of Alexei Toukianov, who apparently lived to be a ripe old age of 101. The vines here look like the Scarlet Bramble described on the 14th page of Brother Alexei's Book in inventory. Cut away the vines using the Shears and pick up the Herbs and Brambles.
Return to the elevator and zoom in on the candle-making stove at left. Pull the horizontal handle to start the pot bubbling. Add the Herbs and Brambles to the pot and the steam turns green. Open the candle mold below the spigot. Use the fork-like object to the left of the pot to add a white wick to the candle mold:
Click on the candle mold to close it, then use the spigot to fill the mold. Open the mold and take the Herbal Candle. Also pick up the Box of Matches here. Return to Hans' cell and zoom in on the table. Place the Youkol Relic and Herbal Candle there, then ignite the candle with the Box of Matches.
{Cutscene}
Return to the rear part of the chapel, from which the Patriarch has left. Go through the dark doorway into a back room of frescos. Zoom in on the table and take an Ornate Key. Go back to the chapel entry and use the Ornate Key to open the gate at right. Enter the gated area and pull the bell rope to get the monk out of the cemetery. In fact, the monks must have a secret gathering place, because none are to be found anywhere (except for three guarding the elevator).
Return to the cemetery and move UL to a crack in the wall. Move the open wooden coffin that was evidently being prepared for Hans. Go back to Hans' cell and talk to him in order to escape the monastery.
{Cutscene}
- Departureand get a circular Mechanical Heart from him. Go to the back of the cabaret. After watching Cirkos try unsuccessfully to train a youki, zoom in on the mechanical horses onstage. Place the Mechanical Heart on the spindle. There are four pipes to connect to the device and one of three positions for each pipe (81 possibilities). Each pipe connects to one of the horses onstage. Each arrangement of 4 pipes can be tested by clicking on the central spindle. From Kate's perspective facing the pipes, the correct arrangement is
But that's only part of the full solution, as indicated by the dial at the top of the screen. Disconnect the 4 pipes, then use the central spindle to rotate the device to the next position indicated by the dial. Connect the pipes as above and repeat the process until all 4 parts of the horse movement sequence have been completed. It's not necessary to test the device at each of the dial settings except the last one.
{Cutscene}
The train has left without Kate!
Enter the general store and talk to Colonel Emeliov:
- TrainExit the store and go to the far end of the platform. Click on the lever there to activate the gangcar. Try using the gangcar, but it doesn't get very far. Go to the junkyard gate and enter through it. After a cellphone explanation by Oscar, exit UL and give the Fish Candy to the youki (if he isn't there, be sure you've tried using the gangcar). Go back to the gangcar and use it to chase down the locomotive.
- Train
- Gangcar
- Close
{Cutscene}
Scroll and exit right. There is a stack of stones here. Continue along the river path to the R or UR until the youki runs ahead and starts barking at a beaver. This is a branch point in the path; exit U to a location where you can see a snow-covered dwelling on the other side of the river.
At the curve in the path, pick up some Branches. Return to the location of the stacked stones and zoom in on them. Put the Branches into the recess below the stones and ignite them using the Box of Matches. Pick up the fish Offering and back out. Go to the location of the barking youki and note the tree here that the beaver was gnawing on (which may be occluded by Kate). Give the Offering to the youki. This distracts him from the beaver, which is then free to return to its tree-gnawing and fell it across the river.
Return to the youki's location and cross the river on the fallen tree.
{Cutscene}
Scroll right and exit U.
{Cutscene}
At a branch point with fences, exit UL to a location with the remains of a fallen bridge. Exit R and enter the rustic lodge in the distance, taking another extraneous phone call along the way. Judging by the cobwebs on the chairs, this dwelling must have been abandoned for some time.
Zoom in on the mantel above the fireplace and pick up The Fisherman's Guide book, where you'll learn that orange salmon can be found in cold shaded waters, likes to eat green frogs, and in turn is eaten by great brown bears. Also pick up a Russian Doll and a Hatchet. Back out and move LL2 to the kitchen area. Zoom in on the counter and pick up the basket-like "Fish Tank". Back out, move LR and exit out the back door.
Descend the steps to the lower landing and click on the fishing pole. You can't catch anything with just the pole, so zoom in on the box of lures at Kate's feet and select the green one at upper right. Click on the hotspot at the far right edge of the screen to catch an Orange Salmon. If you select the wrong lure and/or fish in the wrong spot, you'll catch a salmon of a different color, which you can feed to the youki and retry.
Go back inside the lodge and try to exit through the front door. A hungry brown bear blocks the way, but fortunately you have an Orange Salmon that you can throw to him through the window at left, after which he leaves. If you toss him a salmon of a different color, he'll get fussy and reject it.
Exit the lodge and return to the location of the fallen bridge. Use the Hatchet on the post of the bridge to get a Rope with Plate, which you can use on the tree trunk at left. The playable demo of the game ends at this point.
Exit LR U. The youki runs uphill to the right in this side-scrolling view, which might otherwise look like a dead end. Scan and exit R to a cliff face, where you'll run into some people you've met before.
{Cutscene}
Use the Hatchet on the cliff face, and the viewpoint moves in for a closer look. The following sequence of moves can be used to climb the cliff to the top:
Click on the vertical hatchet{Cutscene}
With Kate's left foot touching the hatchet, click on her right hand
Click on Kate's right hand again
Click twice to the right of Kate's torso
Click on Kate's right hand 4 times
Click on Kate's left hand 4 times
Click on Kate's right hand twice
Click twice to the right of Kate's torso
Click on Kate's right hand twice
Click twice to the right of Kate's torso
Click on Kate's right hand 4 times
Save your game at this point for the default starting configuration of the instrument panel, since any changes are retained. Turn on the power by using the pink rotary knob at upper left (red light on). Raise both small toggle switches at lower right to turn on a green light there and activate a 4-digit display for the radio frequency.
To obtain the first two digits of the radio frequency, turn on only the A-side radio at top center by moving the left paddle switch up (yellow light on) and the right paddle switch down (green light off). Set up a similar arrangement for the paddle switches at lower-right (yellow one up and green one down). The red paddle switch must be up. The first two digits are 0 3.
For the remaining two digits, turn on only the B-side radio at top center by moving the left paddle switch down (yellow light off) and the right paddle switch up (green light on). Set up a similar arrangement for the paddle switches at lower-right (yellow one down and green one up). The red paddle switch must be up. The last two digits are 2 8. The five toggle switches on the main panel and the two rotary knobs at lower right have no effect.
Now that you know the frequency, back out and move LR2 D2 LL D U to an outdoor radio station with a large antenna on a tower. You'll be interrupted along the way by Ivan and Igor on a snowmobile towing Hans behind. Zoom in on the radio shack. Turn on the radar set by using the small red power button at the lower right corner of the display at right. Back out and climb the ladder at right. Move the directional handle twice so that the dial pointer opposite the handle is over B, which is the first letter of BOCTOK, or "east" in Russian.
Climb back down and zoom in on the radar screen again. The location of the crashed aircraft has been found. Using the coordinate axes on the sides of the display: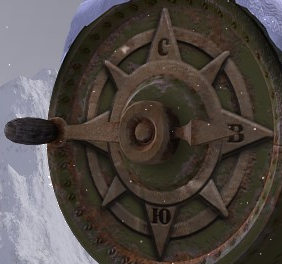
the location of the crash is between 80 to 85 horizontal and 15 to 20 vertical.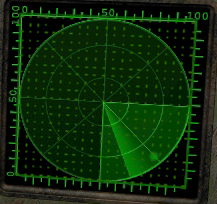
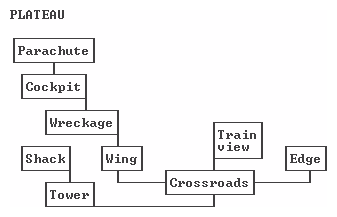
Turn on the radio using the rectangular red button at top center. Use the small dark-red buttons to enter the frequency 0 3 2 8, then use the red button on the microphone at lower left to wake up Boris. Return to the plane cockpit and talk to Boris:
- TrainEnter the cockpit again. In the now-open panel at left, enter the coordinates
- Flying wing
- Close
then press the pink ejection button at lower left.
80 20 (or any number between 80-85) (or any number between 15-20)
{Cutscene}
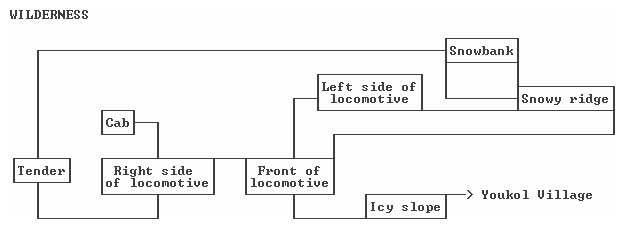
Amazingly, Kate manages to avoid landing in any of the trees after her parachute deploys. Move forward and take a phone call from Colonel Emeliov. Exit LR and enter the railcar. Move into the bedroom and pick up a Plan of the Train next to the bed. Move into the back part of the room and pick up an Oil Dispenser from the debris on the floor.
Exit the railcar and move D to an area where you can see the back of the locomotive. Pull what looks like a branch sticking out of the snow. Give the Oil Dispenser to Oscar like he was the Tin Man or something. Re-enter the railcar to trigger Oscar's unsuccessful attempt to get started. Exit the railcar, then enter the locomotive cab and talk to Oscar. Enter the railcar a third time and go to the vestibule in the middle of the car. Call Oscar on the cellphone, then zoom in on the open circular hatch on the floor.
Each lever retracts 2 or 3 of the connecting rods, all five of which must be retracted to release the railcar. The single solution is to move only the first, third and fifth sliders to the right.
{Cutscene}
Zoom in on the snowmobile's saddlebag and pick up a Gauze Blanket. Back out and zoom in on the statue of a harfang (French for "owl") left. The howling is even louder here, so it must be coming from the statue. Put the Gauze Blanket into the statue's mouth to silence the noise already. Back out and exit LL to the locomotive. Exit UR and talk to Igor, who's staggering around at the base of a low snowy ridge:
- Igor{Cutscene}
- Spirits
- Spirits
After Igor departs, return to the base of the icy slope and use the crampons next to the snowmobile track. Climb the slope and move into an icy area surrounded by skeletons. Ivan appears and threatens Kate with a mammoth tusk. There's no way for Kate to get past him, so call Oscar on the cellphone for some help. Oscar very effectively distracts Ivan with the train horn, and Kate can zoom in on the sled o' bones at upper left. Take the Ivory Knife from the sled and use it to cut the tether at upper right.
{Cutscene}
Back out and move U2 to approach the long beating drumsticks. Use the Slingshot on a small, well-camouflaged icicle hotspot at upper left to stop the incessant drumbeats.
Move forward into a shaman's room. Exit L and zoom in on the table in an alcove. Take the Prayer Wheel, then exit D and zoom in on some masks on the right wall. Note the heart-shaped wooden carving at left. If its holes are numbered clockwise starting with 1 at the top, then there are seven holes, the third of which is highlighted:
Pick up the grinning Youkol Mask. Talk to the shaman: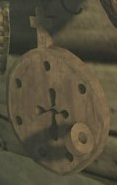
- Hansto learn that the shaman needs Red Fruit in order for Kate to reach Hans in the dream world.
- Dream
- Mission
- Close
Return to the area of animal skins, then move LL to a downtown area overlooking a stream in the ice. Zoom in on the wooden structure between the large pots to see that it is a well of sorts, extending over the water. Pick up the dark Empty Flask from the wooden post and attach it to the hook at top center (a little hard to distinguish against the background). Use the crank twice to fill the flask. Pick up the Flask Full of Water, and also the Cork Bung lying on the ice at lower left.
Back out and exit D. Zoom in on the youki pen and pick up a Fishbone. Back out and exit R to an area with barrels. Move U to a train platform area and go through a tunnel of mammoth tusks under the railroad tracks. Continue toward the lit cave in the background. When you can just see the cave paintings inside, enter the cave to the UL (an entrance to the UR is not used). Move LL and zoom in on the wall at lower center.
Numbering the lower row of holes left to right from 1 to 4, insert the Cork Bung into hole #4 to prevent the lemming from hiding in the ice tunnel there. Back out and zoom in on the harfang perch at right. Hang the Prayer Wheel on the perch, then touch it to make an owl-like sound and summon the harfang. Back out and zoom in on the ice tunnels again. The lemming is afraid of the harfang, so he enters the left-hand ice tunnel. Move the Cork Bung to hole #2 so that the lemming can move further into the ice tunnel. Move the Cork Bung to hole #1. If the Flask in inventory is Empty, you'll have to (re)fill it at the well. Pour the Flask Full of Water into the hole at upper left, allowing the lemming to swim to the upper ice tunnel and find some red berries. Put the Fishbone into the top center hole to allow the lemming to drop the berries outside. Pick up the red Dream Fruit.
Back out and return via a bone bridge and past the guest bedroom door to the shaman's room. Talk to the shaman.
{Cutscene}
- HansExit L and continue through three nodes until you're at the end of a row of houses in Valadilene and can enter the Voralberg compound through a metal gate in the wall at right. At a fountain with several exits, exit R and enter the Voralberg mansion. Enter the living room at left and talk to Hans' father, Rodolphe Voralberg (called Rudolph in the first game):
- Close
- KateMr. Voralberg won't let you see Hans, and he is going to the factory later without Hans. When can you be rid of him?
- Hans
- Factory
Unfortunately, this means tediously retracing your steps through ten nodes back to where you spoke with Anna earlier. If you prefer a quicker gameplay, save your game at this point so it won't have to be a round trip. When you reach Anna again, she will tell you that her father returns to the factory at 7:15.
|
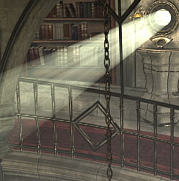
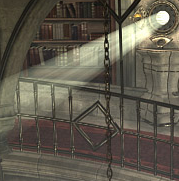
Return to the Voralberg mansion (or restore a saved game) and zoom in on the top
of the grandfather clock in the foyer. Note that the time it shows is 2:45.
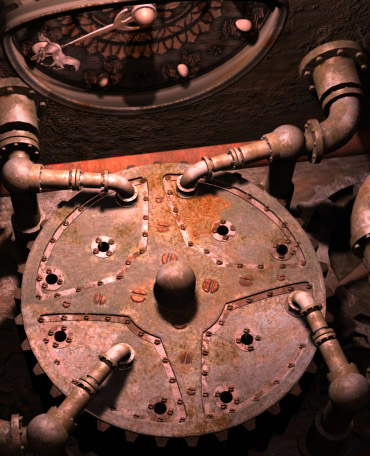
Back out and zoom in on the bottom part of the clock (pictured at right).
Save your game at this point since any changes to the clock are retained. The pendulum is stopped and therefore the clock is not running. Simply nudging the pendulum results in the familiar "this thing's ssstuck" message from Kate. The first step, however illogical, is to make the "alarm time" of the clock (shown in Roman numerals underneath the bell at top center) agree with the time shown on its face in order to wind the clock. Click the toggle to the right of the alarm time display as many times as needed to select the dot after II (or 2:30). Click the toggle at left to move the dial forward a quarter hour to 2:45. Once this has been set up, you can wind the clock. Touch the figure with the hammer at upper left to raise the left-hand weight. Repeat for the right-hand figure and weight, then touch the pendulum to get the clock running. Next, set Mr. Voralberg's departure time as told to you by Anna by using the right toggle a few times to align VII and then the left toggle once to advance it to 7:15. Finally, click on the right-hand weight to speed up the motion clockwise, which creates a distinctive sound. Note that you have an active cursor at this point, so something else needs to be done while the clock is spinning. Click on the bell at top center and it will ring seven times, leading Mr. Voralberg to believe that it's time to go. | 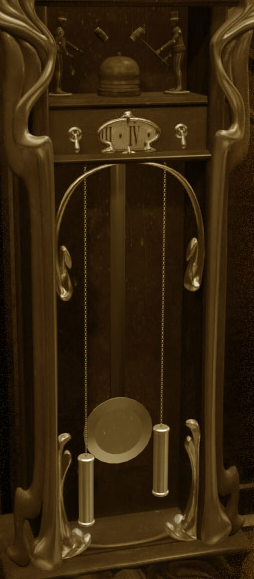 |
Re-enter the living room at right and zoom in on the table between two chairs. Pick up an Attic Key, then return to the foyer and go upstairs. Use the Attic Key to open the door at the end of the landing. Go to the rear part of the attic and give the Mammoth Doll to the boy Hans. He says he needs you to "open Oscar's heart" in order to return from the dream world. Click on the table.
{Cutscene}
{Cutscene}
Return to the youki pen and exit U to a location where you can scan right and climb a ladder. Follow the railroad tracks outside the village and past a couple of Youkols back into the wilderness. Go to the front of the locomotive and try to move the tow rope there. Enter the cab of the locomotive and talk to Oscar:
- TrainGo back to where the railroad tracks go underground and speak to the two Youkols there:
- Youkol mask
- OscarAfter they attach the tow cable to the locomotive, move U LL and zoom in on the front of the engine. Use the bone ratchet to take up the slack in the tow cable, then follow the tracks back inside. When you pass the giant windlass, climb the steps at left and zoom in on the two levers overlooking the tracks. Operate the right lever to bring the locomotive into the Youkol village.
- Help
{Cutscene}
Return to the train platform and climb the steps up to the locomotive. Enter the cab and speak to Oscar:
- HeartHe will bid you a fond farewell and slowly make his way back to the shaman's room. Follow him there and take a cellphone call along the way. Zoom in on Oscar lying on the bed.
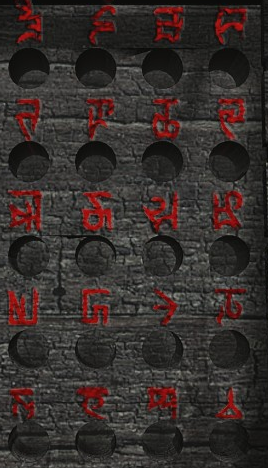
The objective of this puzzle is to open Oscar's heart by pressing the correct pair of buttons from the twelve arranged in a clock-like pattern, where 12:00 corresponds to the small mark at the top of the heart:
There are 132 ways to select a pair of different buttons, so a trial-and-error approach is tedious. Referring to the information in the wood carving seen earlier in this room, click on the buttons in the 3:00 and 7:00 positions. A pattern with a cross in its center is disclosed. Complete the puzzle by pressing the buttons corresponding to the cross pattern; that is, 12:00, 3:00, 6:00 and 9:00 (in any order). Pick up the Voralberg Key, and Oscar's body is shown to be hollow so it can accommodate Hans.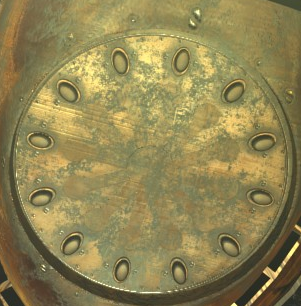
{Cutscene}
Talk to the shaman and she tells you to "prepare the voyage". Return to the locomotive cab and zoom in on its control panel. Activate the panel by putting the Voralberg Key into the receptacle at top center. The first step is to replenish the water in the locomotive:
Set the lever at top right into its default down position to orient a feeder pipe downwardsThe next step is to replenish the coal in the locomotive:Extend the pipe down to the water supply by using the lever at top left
Use the middle of the three toggles to "drink" the water into the locomotive
The middle gauge rises, showing water has been loaded
Set the lever at top right into its up position to orient the feeder pipe upwardsThe final step is to generate steam:Extend the pipe over the tender by using the lever at top left
Use the right-hand toggle to "eat" the coal into the locomotive
The right gauge rises, showing coal has been loaded
Use the small wheel above the left-hand gauge to activate the steam generation, which causes the left gauge to riseUse the big wheel at lower left to spray steam onto the frozen Youkol ark, freeing it from the ice.Use the left-hand toggle to extend a steam nozzle from the front of the locomotive
{Cutscene}
Exit the locomotive and make your way to the big gate in front of the ark. Talk to the village chief, who has moved here from his former location:
- Great gatesReturn to the youki pen and zoom in on it. Free the youki by using the new hotspot at upper right. Return to the gate area and climb the gangplank onto the ark.
- Close
{Cutscene}
At this point, there's nothing to do except return to the ark. Kate shrugs and sees that Ivan has suddenly appeared and taken over the boat. Scan and exit L to a waddle of penguins. Move UL and zoom in on an abandoned penguin nest. Add the long-carried Russian Doll in your inventory to the nest, which clears some penguins from a small ice shelf. Move R2 and use the Narwhal Tusk on the newly-formed crack to create an ice raft.
{Cutscene}
After Kate enters the hold of the ark, move the barrel at right. Exit through the door and climb the ladder at left into Ivan's former hiding place. Pick up an Ivory Hook from the deck, then return to the hold area with the barrel. Move LL and zoom in on a mammoth drawing on the wall to the right of a mammoth spine:
Return to the other side of the hold and click on the barrel to climb on top of it. Put the Ivory Hook into the receptacle on the mast, then untie the knot at lower left. Back out and use the lever behind the barrel to dispatch Ivan to his fate with the penguins.
{Cutscene}
Return to the ark gangway, then scan and exit L. Move LL to a wharf area and zoom in on a chest in the foreground. Pick up three Stone Plates, then back out and exit U. Zoom in on the plants at lower right and take the purple Syberia Flower and a fourth Stone Plate.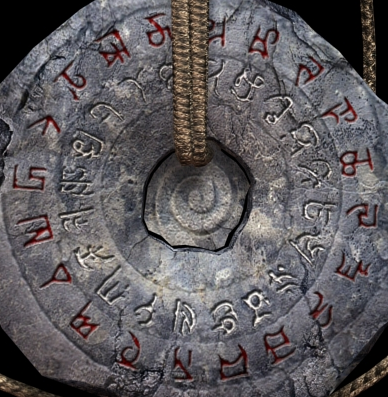
Return to the ark and go belowdecks. Give the Syberia Flower to the snoring youki. Go back to the place of the flowers and move U2. Pull the lever at bottom center to lower and open the treadmill. The youki then opens the gate for Hans and Kate.
Follow Hans through the gate and up the stairs at right. Move D and approach the device standing on six legs. Zoom in on the circular stone disk underneath the device. Note that the disk has 20 symbols on it, corresponding to the white ones on the Youkol Medallion in the Documents area of your inventory. Fit the four Stone Plates from your inventory, along with a fifth one at upper left, into the appropriate spaces on the disk:
Move the fourth Stone Plate in inventory into the opening at top centerBack out and turn the wheel to deposit sand onto the disk and disclose an object. Zoom in and pick up an Ivory Key from the center of the disk. Back out, climb the steps at upper left twice and talk to Hans. He tells you to call the mammoths by playing a song on some flutes.
Move the third Stone Plate in inventory into the opening at upper left
Move the second Stone Plate in inventory into the opening at right
Move the remaining Stone Plate in inventory into the opening at lower left
Move the loose Stone Plate into the opening at lower right
|
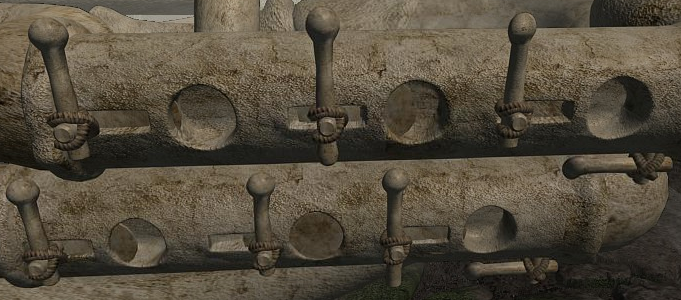
Go down the steps on the other side of the platform. Scan left and note the
array of pipes leading to large horns or flutes facing the plain of mammoths.
Zoom in on a control panel adjacent to the crank wheel. Put the Ivory
Key into the cross-shaped receptacle to open the control panel (pictured at
right).
There are 20 possible positions to insert the Ivory Key, each corresponding to an angular position of the large dish-shaped windcatcher overhead. The Youkol Medallion shows the correlations between the 20 red symbols of the windcatcher directions and the 20 white symbols seen earlier on the stone disk. Focusing only on the five symbols from the Stone Plates, the corresponding windcatcher settings are: Each of these can be tested by moving the Ivory Key into the indicated position, then backing out and turning the wheel crank to rotate the windcatcher funnel. Alternatively, you can consider that the Stone Plate symbol most closely resembling a horn or flute is probably the  symbol
that was placed in the lower left position on the stone disk. The Youkol
Medallion shows that the associated red windcatcher symbol is the one
shaped like a backwards 9 with a bar over it, second from the left in the
bottom row. Whether found by trial and error or by intuition, only when the
Ivory Key is placed into this position and the windcatcher rotated with the
wheel crank is a faint rushing sound heard. This indicates that the wind is
being captured and funneled into the large flute horns below. symbol
that was placed in the lower left position on the stone disk. The Youkol
Medallion shows that the associated red windcatcher symbol is the one
shaped like a backwards 9 with a bar over it, second from the left in the
bottom row. Whether found by trial and error or by intuition, only when the
Ivory Key is placed into this position and the windcatcher rotated with the
wheel crank is a faint rushing sound heard. This indicates that the wind is
being captured and funneled into the large flute horns below.
|  |
Now that the flutes are activated, playing the mammoth song is next. Zoom in on some controls on the horn tubes to the left of the control panel. Use the sliding levers to enter the pattern associated with the mammoth drawing seen belowdecks on the ark:
then press one of the horizontal levers at right.
Open Half-open Open Half-open Closed Open
{Endgame cutscene}
The credits can be skipped by pressing [Esc].
| Syberia | Syberia II |
|---|---|
|
|
|
|
|
|
|
|
Copyright © 2020 Balmoral Software (http://www.balmoralsoftware.com). Portions copyright © 2004 MC2-Microids. All rights reserved. Republication, redistribution or conversion is expressly prohibited without the prior written consent of Balmoral Software.