Copyright © 2007 Balmoral Software (http://www.balmoralsoftware.com). Portions copyright © 2006 Matt Clark and Got Game Entertainment LLC. All rights reserved. Republication, redistribution or conversion is expressly prohibited without the prior written consent of Balmoral Software.
Graphics are rendered backgrounds with a considerable amount of resolution and detail. A few jerky live-action video sequences have been thrown in -- these would have been better integrated at a higher frame rate. However, they are a vast improvement over the unrealistic cyberpuppets so common in recent game releases. Overall, the presentation is frustratingly dark, and you may find yourself yearning for daylight by the game's end. But the overall loneliness of the places you explore set a really uncanny tone in the gameplay. There are occasional incidental animations (flies, birds, water ripples, etc.) that add life to the game experience. Many physical objects in the game can be picked up and examined, even though they may have no direct purpose in the story. As such, they provide a degree of realism you'd expect from an actual exploration of the environment.
All interaction in the game is experienced from a first-person perspective. The basic game interface is satisfactory, with a game control menu available via a clickable icon at the top of the screen. Standard game save/load functions are provided, but the saved-game slots are limited to ten and cannot be named by the player. Instead, each game is automatically labeled with a timestamp and geographic location. A saved-game slot can be reused, or the savegame*.sav files copied out of the installation folder. In the game load menu, there is a convenient "Refresh" tool that can be used to update the menu display for saved games imported into the installation folder.
Inventory items are grouped into several areas at the top and bottom of the screen, and these can be accessed by moving the mouse cursor out of the game's main viewport. We found these inventory bars to be somewhat sensitive to the cursor, and more effective control might have been designed with a mouse right-click action. It was easier to identify inventory items by activating their labels in the game Options screen. It would have been useful to have a method to skip video or audio segments that had already been seen or heard, but this generally wasn't too tiresome.
The game installation needs about 1.5 GB of hard drive space, although this requirement is strangely missing from the game's box and packaging. Once the game is installed from two CD's, neither is needed to play. Interestingly, graphics are omitted from the game icon created for the desktop or in the programs menu, so you'll end up with a generic icon instead. The game menu has a useful help feature that duplicates some of the navigation information in the CD case booklet. No operational difficulties were experienced running the game on a Windows platform.
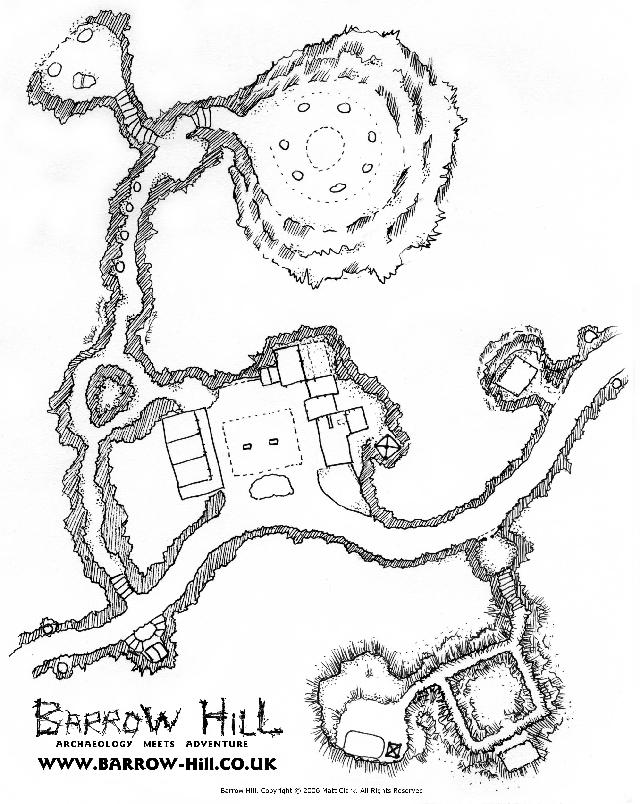
Navigation is accomplished through a Myst-style, node-based, two-dimensional slideshow presentation. No movement transitions are provided. Viewports generally align along the four compass directions at each node, with up/down viewing occasionally available through close-ups. A liquid "no-go" effect is displayed when you reach one of the three edges of exploration in the game. The game cursor is relatively small, but easily distinguishable between its various display modes. A special "tool" cursor is used when an inventory item is needed in the environment, so most pixel searching is minimized. A useful map of the Barrow Hill vicinity is included in the game installation folder.
The plot is engrossing, and usually provides several parallel (non-linear) paths that can be pursued simultaneously. On occasion, there are trigger events that must be completed before gameplay can be advanced. A lot of information, backstory and atmosphere can be derived from the numerous written materials lying about. There are many grammatical errors and typos in these materials, but nothing that is grossly misleading. Suspension of disbelief may be needed from time to time -- for example, clocks may not advance and cars may idle forever. But that's just being picky. Overall, the game design is excellent, and there didn't seem to be any unfair or unrelated plot contrivances. Most puzzles in the game are inventory-based and involve searching the environment for clues, items and explanatory information. As such, they are not standalone challenges -- this is by no means a "puzzle game" in the usual sense. Only one type of interaction in the game involves a timed sequence, and it's easy to deal with. Should a wrong move in this situation cause an untimely death, resurrection is immediate and automatic.
Music and voice acting are well done. Some of the characters are rather annoying, but that seems to be intentional. Accents are thickly British, but fully discernable to these American ears. No subtitles are available for the spoken dialog. There aren't any of the fancy stereo sound effects seen in some newer games; for example, if you rotate or move away from a radio, it doesn't sound any different. But that doesn't really detract much from playability. Probably the best effects in the game are the excellent ambient sounds throughout. Whether footsteps, hooting owls, or numerous "unexplained" noises, these sounds go far in setting a truly enjoyable game experience.
Anyone looking for an immersive and spooky interactive adventure will certainly enjoy Barrow Hill.
The New Game menu selection plays a filmed introduction movie, after which your car breaks down and you find yourself stranded on a dark country road in Cornwall. Move F19 until you reach a service station area. The road seems more like a path, even though it has traffic signs at frequent intervals. Along the way, note a small stone structure on your right; you'll be returning to that later. Turn left and zoom in on a red mailbox. Read the postcard sticking in the slot to learn of a mobile phone antenna mast existing behind the service station. Zoom back out, then move F L F2 L F and zoom in on the ground underneath the picnic table. Pick up a box of matches. Be sure to click on the close-up of the box to actually put this item into your inventory.
Move R2 F3 and open the red door into the service station entrance (lobby). Move F2 L and zoom in on the closed Office door. Knock on the door to talk to a very scared and confused guy inside. He'll suggest that you find a lantern, which will allow you to navigate more of the darkness outside. Zoom out, move R F L and pick up the pink "Pagan & Wiccan Magic" brochure from the wall rack. Read the first part of the brochure, where it lists relationships between elements and colors:
Fire: Red, OrangeRead the back of the brochure, where it describes the Dryad Slumber mushroom. Put the brochure back, then move R and zoom in on the drawing of a row of seven stones near the bottom of the bulletin board. Click on the drawing to show the stone circle names in left to right order from the entrance:
Earth: Yellow, Brown
Water: Green
Air: Blue
Soul: Purple
	                        Hammer


	        Dolment                         Henrik


	Melkah                                          Gavrok


	        Baligo                          Cailleach


	                        Entrance
Close the drawing, then zoom out and move R.
Optional Activity: Zoom in on the window above the basket and pick up an Altar Stone jigsaw puzzle. Arrange the 14 pieces to match a postcard from the wall rack opposite. What fun!
Move R F L and open the right-hand green door. Move F2 L2 into the cafe. Click to the right of the dividing wall to enter the waitress's service area. Move R and open the swinging door. Move F R into the darkened kitchen and zoom in on the yellow lantern at right. Point the lever at the top of the lantern towards you to activate the fuel flow. Click on the base of the lantern to rotate its circular reflector towards you. At the center of the reflector, the cursor is now in "tool" mode, so you know you must use an inventory item here. Click on the box of matches in your inventory, then select a match and strike it on the box. You'll only have about 7 seconds before the match burns out and you'll have to select another virtual match from the inexhaustible supply in the box. Click a lit match at the center of the reflector to ignite the lantern. Pick up the lantern and you'll have a creepy eye-like light pattern ahead of you.
Zoom out and move R2 to a fuse box mounted on the wall. Open the box and zoom in on it. From the diagram on the door, you know that the fourth fuse controls the kitchen lights. Shut off power using the red switch at the bottom, then pull the fourth fuse from the left. Open the fuse's cover and use the spool of wire at the top of the panel to fashion a fuse bypass. Recover the fuse and turn the power switch at the bottom, which illuminates the room.
Zoom out from the panel, move L2 F R and note a blender. We'll need that later. Move L F L F R and zoom in on the counter to pick up some eggcups. Zoom out and open the cabinet to get a basket. Move L2 F R and zoom in on the radio on the windowsill. Turn on the radio and tune its dial to 15, about 3/4 of the way to the right. This is the only station that has an announcer. Listen for the radio station's phone number, but it will be obscured by static.
Exit the kitchen and zoom in on the cash register at left. Pull the slip of paper from underneath the cash drawer to learn of the combination to motel room 2. This combination randomizes for each Barrow Hill game, so make a note of it here:
Room 2 access code: __________Move F2 and click on the bar of the emergency exit door, then move F2 R F3 R F2 L F L F2 R to motel room 2. Zoom in on the lock and enter the combination above. Move F2 L into the room. Zoom in on the radio, turn it on and tune it to station 15. Again, the station's phone number is concealed by static. Open the green toolbox on the desk and retrieve a trowel. Open the top right drawer and pick up a cell phone (it needs recharging). Zoom in on the bed and read Pete Ashton's journal, where you'll learn about test pits dug in the stone circle:
Pit 1: Melkah (second clockwise)From the bed, move R and note the Barrow Hill map on the wall. A high-res version of this map can be found in the game installation folder as "Barrow Hill Map.bmp":
Pit 2: Gavrok
Pit 3: Baligo (first clockwise)
Pit 4: Dolment
Pit 5: Hammer
Pit 6: Cailleach (seventh clockwise, with Gavrok sixth)
Pit 7: Henrick [sic]
Zoom in on the bedside table and put the mobile phone from your upper inventory bar into the recharger. Besides the radio station, some signs of life are still around as you hear a motorcycle pass by and toot its horn.
Exit the motel room and re-enter it to pick up the charged mobile phone. You'll have to punch in the Room 2 access code again, of course. Leave the room and walk around to the front of the abandoned Mercedes next to the petrol pump. Zoom in on some toys and stuff lying below the open car door (it's the passenger's side since this is England). Pick up a blue crayon from the spilled box, then look to the pile of material at right. Are those a bent pair of glasses sticking out of the pile? Pick up a green book at upper right; it turns out to be a book on mushrooms. Open the book to find a picture of the Dryad Slumber mushroom you heard about before. It has a deep wine-red cap with a whitish stem.
Zoom out and move L F2 L F2 L to a white fence. Click on the loose board in the fence to gain entrance. Move F R F L F2 R, then look up to see the cell tower behind the service station. Move F and enter the fenced area through the triangular hole in the bottom of the gate. Once inside, move F L2 and open the control panel at right. Zoom in on it and take a close look at the smaller panel inside. It describes a radio frequency range of 830 to 865 MHz. Open the inside panel, disclosing an array of ten buttons. The initial frequency shown at the top is 717 MHz. By pressing various buttons, this base frequency is increased or decreased.

The object is to end up with a frequency in the desired range. There are 8 different ways to accomplish this; the simplest is to press the upper left (+200), upper right (-50), lower right (-5) and red buttons to change 717 MHz into 862 MHz, which is within the desired frequency range.
Now that your cell phone works, the first thing you'll do is call for help, right? You can try 9-1-1, but it won't work in Europe. Try the UK/Europe emergency numbers 1-1-2 or 9-9-9, but they won't work either! You'll have to get more creative. For now, leave the cell tower cage the way you came in, and move F L F2 R F L F2 L F to the continuation of the country road past the service station (see map). When you can't go any further, use your lantern. Continue F2 past a lighted phone booth.
Optional Activity: Enter the phone box and pick up the receiver. Redrum!
Back on the road, move F10 past a scarecrow on your right. A disabled jeep is ahead. Make a note of the prominent license plate:
4X68578Zoom in on the jeep's front seat and pick up a radio. This is the third one you've seen. Turn on the radio and tune it to station 15.3. This time, you can clearly hear Emma Harry's phone number at the radio station:
585-2131She'll repeat it for you in case you didn't hear it the first time. Retrieve a PDA from the ground next to the jeep. Access the PDA from your upper inventory bar and select the Notes item to learn of the combination to motel room 3. This combination randomizes for each Barrow Hill game, so make a note of it here:
Room 3 access code: __________The road ahead is magically blocked, so move L2 F2 R F4 L F2 to an old barn in the woodland. This is the segment of the game you can play in a downloadable demo from the www.barrow-hill.co.uk game site. Pick up the crate ahead, then move R and put it on top of the barrel next to the barn wall. Climb on top of the crate to gain entrance to the barn. Move F2 to take a quick trip downstairs. Use your lantern and climb the ladder back upstairs. Move L2 and zoom in on the left window. Pick up some acorns that a squirrel has left behind (these organic samples can be collected once you have the basket from the kitchen).
Go back down the ladder and move R2. Zoom in on a box on the oxcart to pick up a gas torch. Move R, then look down to get a rubber tube lying on the ground. Move R and zoom in on the white tank next to the door. Attach the rubber tube and gas torch to the tank, then turn the valve at the top of the tank to turn on the gas. Use a match to ignite the gas at the torch end, which causes the padlock to burn off. You can now exit the barn through the door.
Move R F5 R F16 R F2 L F L F R to motel room 3. Zoom in on the lock and enter the combination above. Move F2 L into the room. Pick up a sheet of paper lying under the pillow to learn the GPS coordinates of a piece of a broken seal:
2778.446 x 78544.445Look in the wastebasket to the left of the bed and assemble the torn pieces of paper you'll find there:
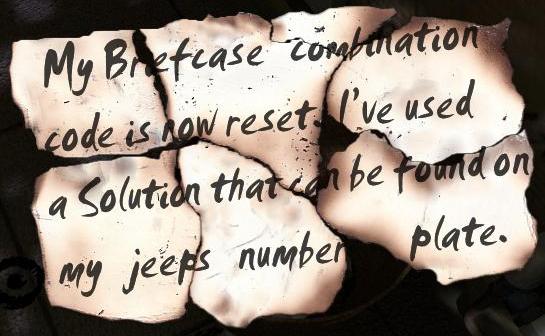
Here is a pretty obvious clue for the briefcase combination. Zoom in on the briefcase on the desk opposite the bed and enter the six-digit combination derived from the multiplication problem on the jeep's license plate:
4 X 68578 = 274312Inside the briefcase, read the Barrow Hill Excavation Scientific Report to learn of different materials found at each location in the Stone Circle. These results can be correlated with the information you previously found in Pete Ashton's journal in motel room 2:
	Trench     Stone         Material

	  1        Melkah        Oil
	  2        Gavrok        Fruits (2 blackberry, gooseberry, pear)
	  3        Baligo        Fish *
	  4        Dolment       Mixture with berries, fungus, acorn **
	  5        Hammer        Barley
	  6        Cailleach     Salt ***
	  7        Henrick       Water
* Per Wikipedia, Melanogrammus Aeglefinus is a type of fish
Open a desk drawer to retrieve a Y(S)anyo tape recorder. Listen to recording 02 to learn that a second piece of the seal has been hidden in the swamp. For some reason the tape recorder does not jump into your inventory, so you'll need to return to motel room 3 if you want to listen to the messages again.
Exit the motel room and move R F2 L F to zoom in on another mysterious mound on the other side of the Mercedes. Pick up the bottle of hair tonic lying on the ground. If you didn't hear the radio advert about this earlier, the OMEGA 3 reference on the bottle label should give you a good clue that the tonic is fish-based. Click on an egg cup, then on the bottle cap to create the Fish Offering.
If you haven't done so earlier, call Emma Harry at the radio station using the phone number you got earlier on the radio: 585-2131. Something nasty will happen to her dog. Hang up the phone, then re-enter the service station lobby and move F. More drama, as the guy inside gets sizzled.
Re-enter the cafe and zoom in on the far right table in front of the emergency exit. Move the standing menu out of the way, then pick up the salt shaker at left. Use an eggcup to create the Salt Offering. Return to the cash register and use the trowel to jimmy it open and get some gold 1-pound coins. Exit the cafe through the emergency exit, then move L F L and through the fence. Move R F L F2 L F R F L F L into the office through a newly-created hole in the wall. If you haven't explored here before, you may be startled by a bird flying from the garbage cans outside. Zoom in on the stack of VCR players and click on the lowest unit to see a video of a big bad stone melting the former occupants of the Mercedes. Yeah, right.
Move further into the room and zoom in on the file cabinet opposite the VCRs. Open the top drawer and rummage through it to find the combination to motel room 1. This combination randomizes for each Barrow Hill game, so make a note of it here:
Room 1 access code: __________Open the middle file cabinet drawer and examine the bottle inside. It looks to be whiskey made from barley, and we could use that for another offering. But the bottle seems to be empty, so we'll have to find some whiskey elsewhere.
Zoom in on the table on the far side of the room and open the right-hand drawer. Take the blank sheets of paper inside. Open the left-hand drawer to obtain some batteries.
Optional Activity: Scratch off one of the lotto cards and call its number to see what you've won! Expect to wait a long time to get through...
From the desk, move L2 and zoom in on a mass of hot charcoal on the floor to see what happened to the guy in the office (Ben). Move L and exit through the door next to the Fruity Goodness poster. In this junky backyard area, move R F R2 and zoom in on an old red slot machine. Insert a 1-pound coin and pull the handle several times until the machine pays off and you can pick up some silver 50-pence coins. Move F R F R F R and zoom in on some debris next to the upended sofa. Pick up a headlight lens from a crate lying on the ground. Zoom out, then move R2 F and pick up a ladder. While holding the ladder, move L and lean it against the roof. Climb the ladder up to the roof, then move L F2 R F2 up to a skylight. Open the skylight latch and climb down inside. Move R and open the garage office door. Go inside and zoom in on the oil-stained desk. Pick up the red oilcan on the desk and an eggcup from your inventory. Click on the oilcan lever to create the Oil Offering.
Exit the office and use the ladder to climb down to the garage ground level. Watch out for that spider! There are some pretty well-knit spiderwebs in here, and an annoying sound of tinkling chains. From the base of the ladder, move L2 F2 R and unbolt the door. Open the door and exit the garage.
Re-enter the service station office. For convenience, unlock the louvered door through which you had previously spoken to Ben from the lobby on the other side. Open the door and move through the lobby and service station forecourt to motel room 1. Zoom in on the lock and enter the combination above. Move F R2 and pick up a GPS unit from the wall receptacle.
Exit the hotel room and move R F R F to a vending machine. This unit only takes 50-pence coins, which is why you couldn't use it earlier with the 1-pound coins from the cash register. Insert silver coins to obtain one can each of the rightmost three of the four selections (pear, gooseberry and blackberry). There's room in your inventory for a can of apple as well, but you won't need it.
Move L2 F2 R F R F9 L F2 L and use your lantern to enter the dark stone opening. Immediately inside, move L and look at a small basket or canister lying on the floor. Read the logbook inside to learn that you have entered St. Anneka's Well. Be sure to read the final entry in which Elsie Prestidge mentions that
"...Anneka is of the air and descended to us upon the ground."Move R F2 and zoom in on the multi-colored candles above the font. Recalling the "Pagan & Wiccan Magic" brochure from the service station lobby, you have color codes for air and for ground (earth). Use matches to light first the blue candle at left, then the brown candle at lower right. A woman's face appears in the surface of the water. Use an eggcup to collect the Blessed Water Offering.
Optional Activities: Throw gold or silver coins into the fountain. Exit the well structure and move up the path to the left. Turn left to see a blank stone slab. Shine the lantern on it, then use the paper and crayon to create another clue to the correct candles to light in the well:Exit the well structure back to the road. On the other side of the road, directly opposite the well, are some stone steps leading up into the woods. Follow these up and use your lantern to proceed a couple of steps. Look sharply down to the right to see some red-topped mushrooms. These strongly match the description of Dryad Slumber in the Fungus Guide you picked up from the service station forecourt. Take the mushroom. There are many other varieties of mushroom throughout the game environment, but this is the only one you'll need."...descended from the skies: to ground..."
Go back down the steps to the road, then move L F6 L to a solitary tree by the side of the road. Zoom in to the left of this tree to pick some red berries. Return to the service station and activate the GPS Unit from your upper inventory. This unit usually displays unreadable gibberish on the screen unless you are close to the coordinates 2778.446 x 78544.445 that you found in motel room 3.
Move to a position on the other side of the petrol pumps from the Mercedes. If you turn and face the idling car, you'll see that your GPS coordinates are now readable. Zoom in on the white fire extinguisher and lift it to obtain one piece of the seal. You're finished with the GPS unit now.
Re-enter the kitchen via the lobby and cafe and zoom in on the blender you saw there earlier. Remove its lid and add two quantities of blackberry drink, plus one quantity each of pear and gooseberry drink. Use an eggcup to create the Fruit Juice Offering.
Move R F R F R and use the basket from your inventory on the dirty kitchen counter. In the close-up, put the red berries at lower left, the red-topped mushroom immediately above it, and the acorn at top center into the mortar at upper right. Use the pestle below it to crush and mix the ingredients. Use an eggcup to create the Plant Mixture Offering.
Exit the kitchen and pass through the emergency door at the far end of the cafe. Move forward to the road, then move L F and use your lantern. Move F6 R F3 past the phone box and scarecrow and zoom in on a walkway into the swamp. Move F5 R F10 through the swamp and into a Winnebago trailer being used as the Barrow Hill radio station. Look down to see that Emma's dog's name is Wincey. Turn right and zoom in on the bed to see a disassembled metal detector. Assemble the pieces by dragging the mouse on each part as follows:
Attach the small black bit to the long end of the "cane"Pick up the assembled metal detector and open its compartment. Add the batteries you found in the service station office desk drawer.
Attach the "earplugs"-shaped bit to the short end of the "cane"
Attach the meter to the short end of the "cane"
Attach the ring at right to the long end of the "cane" at approximately the 1 o'clock position on the ring
Attach the end of the curly wire near the long end of the "cane" at a position approximately 1/6 of the way up from the ring join
Optional Activity: If you don't have Internet access or your own knowledge of some of the scientific names encountered in the game, you can move L2 F L to Emma's chair and zoom in on her laptop computer. Her password is "Wincey". The "Internet Browser Favorites" and "Personal Blog" provide more information.
Exit the trailer and move F6 R F4 L F2 R F3 into a church ruin. Zoom in on the ground and use the metal detector to identify something in the vicinity. Move the flat rock on the ground and use your trowel to obtain a second piece of the seal. Turn off the metal detector for now.
Optional Activities: Move R2 F L F R to see the face of one of the game designers dimly disclosed in a stone. Move R F L F4 L2 and zoom in on the carved pattern at the base of the back side of the cross. Open the stone panel with the trowel. Pick up a "Metal Artifact" inside. Examine the red-bound book and read the story of a Glastonbury priest.
From the location of the seal in the church ruin, move R2 F3 R F2 L F12 L F19 back along the dark country road. If your cell phone rings along the way, you'll have to answer it and listen to Emma Harry.
Optional Activity: Re-enter St. Anneka's Well at left using the lantern. From the font with the colored candles, move R F to a wall panel with a marking that resembles a helicopter. If you retrieved the "metal artifact" from the base of the cross in the church ruin, insert it into the opening of the stone panel. Move R and look in a secret opening to examine the contents of a wooden box.
From a position on the country road facing the steps leading into the woods, move F2 and use the lantern. Continue F5 into the dark forest. Your way directly forward is blocked since the path splits at this point (see map). Move L F5 to a row of stones illuminated by artificial lighting. Move L and zoom in on the first of four stones. Use the paper and crayon in your inventory to make an impression of the stone. Continue this process with the next three stones along the path to prepare a complete drawing that depicts a procedure for harnessing moonlight.
Continue F7 past a tent and on to some heaps of soil from the nearby excavations. Zoom in on the pile of dirt and use the metal detector and trowel to disclose a hip flask of liquor. Use an eggcup to create the Whisky Offering. Turn off the metal detector. You now have all seven offerings needed at the stone circle:
Fish OfferingMove F6 L F L into the Stone Circle. Save your game at this point, since a wrong offering choice means you will have to recreate the offering. From the previous results you have found on stone names and trench contents, you can place the appropriate offerings on each of the seven stones in the Circle:
Salt Offering
Oil Offering
Blessed Water Offering
Fruit Juice Offering
Plant Mixture Offering
Whisky Offering
	                        Hammer
	                        Whisky


	        Dolment                         Henrik
	        Plant Mixture                   Blessed Water


	Melkah                                          Gavrok
	Oil                                             Fruit Juice


	        Baligo                          Cailleach
	        Fish                            Salt


	                        Entrance
To move from one stone to the next in a clockwise direction, move R F L.
Exit the stone circle towards the signboard at the entrance, then answer the cell phone call from Emma Harry. Continue F2 and pick up the third seal piece that Emma left for you on the path. Move F3 R F9 L F L2 and zoom in on the Altar Stone. Place the three seal pieces in the depression on the top of the altar. Move L to a tall stone with the moon behind it. Zoom in on the top of the stone and install the headlight lens there. This will have the effect of focusing the moonlight onto the Altar Stone. To complete restoration of the seal, move R F L to another rock and press the hand-shaped marking on it. Pick up the restored artifact from the Altar Stone. Move F R F9 L F6 back into the Stone Circle. Move around to the far side of the circle (in front of the Hammer Stone) and face the excavation in the inside of the circle. Since you now possess the restored artifact (seal), you can use the trowel in the trench to gain entrance to the underground barrow chamber.
Optional Activity: If you need to leave the underground chamber and return up top for some reason, you can find an unlit side chamber containing some stone steps. Follow these steps upwards to pass through a magical portal and exit on the other side of the Stone Circle. You can then re-enter the underground chamber using the trowel in the trench as before.
To finish, place the restored artifact on the stone platform in the center of the barrow chamber and watch the endgame sequence and game credits.
The Sentry or Hunter Stone is what attacked and killed the Mercedes people, Ben and Emma's dog Wincey, burning them into a pile of ashes. If you see this stone at some point in the game, avoid touching it!
Copyright © 2007 Balmoral Software (http://www.balmoralsoftware.com). Portions copyright © 2006 Matt Clark and Got Game Entertainment LLC. All rights reserved. Republication, redistribution or conversion is expressly prohibited without the prior written consent of Balmoral Software.