Copyright © 1997 Balmoral Software (http://www.balmoralsoftware.com). Portions copyright © 1997 Panasonic Interactive Media Company and copyright © 1996 Ix Entertainment. All rights reserved. Republication, redistribution or conversion is expressly prohibited without the prior written consent of Balmoral Software. Contents subject to change! For the latest information, see http://www.balmoralsoftware.com.
Golden Gate is a little game with an interesting storyline and great music that would probably be enjoyable if found in the bargain bin. However, at top-drawer prices, it leaves a lot to be desired when compared to other recent releases.
Played from a first-person perspective in an old-fashioned slide-show format, your goal is to find an ancient treasure hidden somewhere in San Francisco. Along the way, you'll have a few (very few) puzzles to solve and will collect various written materials that present the backstory of the game. You're essentially on your own as the current inhabitants of the city appear to be limited to Jake T. Matthews, a competing treasure hunter.
The game's biggest drawbacks are its low-quality graphics combined with two or three low-res live-action video segments of Jake. Other movie segments played throughout the game appear to be of higher quality, but mostly suffer from rather bad acting. Incidental animations and sprites occasionally encountered in the game are especially poor, as are the few accompanying sound effects and disembodied voices. These limitations prevent a great deal of immersion in the gameplay.
While playing the game under Windows 95, we found it would frequently exit abruptly. This behavior was significantly reduced, although not completely cured, by an updated game executable obtained from Panasonic's technical support.
Puzzles are very few in number, and usually are quite easy to solve if the written backstory materials have been perused. Most of the puzzles have no "reset" capability, so a strategic approach may be more useful than closed-form solutions. Generally, gameplay is fairly open and non-linear, with obvious goals. Few mysteries of the game will be missed if all position nodes and directions are painstakingly explored. The endgame sequence is notably anticlimactic and very poorly done. We found the written materials picked up in the game to be so full of grammatical errors as to be laughable. Note to proofreaders: "it's" is a contraction, not a possessive.
The player interface is quite good, with a rosette of available and selected movement directions used as the main cursor. If a particular scene has something of interest in it, an obvious change is made to the cursor. This design completely obviated any pixel searching in the game, and was particularly convenient to use with keyboard arrow keys, a la Timelapse (no type-ahead buffer was available, however). Saved games are unlimited and the storage directory for them is flexible, but no overwrite warning is provided.
Probably the best feature of Golden Gate is its enjoyable acoustic soundtrack, which can also be played through a jukebox feature of the game (but unfortunately not as standard CD audio tracks).
Move R F2 L F to the foot of Lombard Street. Move F3 and zoom in on the pavement. There you'll see a plaque labeled SCIENCE:
Zoom out, move F and zoom in on a similar plaque labeled ART. Zoom out, move F and look at a third plaque labeled LETTERS. This plaque symbol will be seen again later in the game.
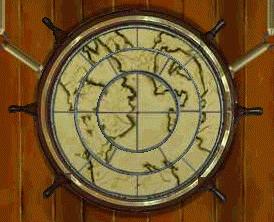
Move F2 R F4 L F R F3 L F L to Hyde St. Pier and onboard the Balclutha. Save your game at this point, then zoom in on the ship's wheel puzzle on the wall. Here, the object is to use the six wheel handles to rotate the three concentric portions of the puzzle to match the Bay Area map seen earlier in Chinatown. A useful fact is that all handles except the one at lower right leave one of the three concentric portions unchanged. From the puzzle's original configuration
a solution is:
Click handle at upper left onceAfter the safe is opened, grab the necklace inside. Move L F L F and zoom in on the ship's telescope for a view of the Point Knox lighthouse on Angel Island. The significance of this landmark will be seen later in the game.
Click handle at lower left twice
Click handle at lower right once
Move R F4 L F R F3 R F2 L F L F L F R D to Chrissy Field and dig up Alexandra's diary at the base of the tree. In it, you'll find references to King William of Caledon and to a ship's figurehead with gemstone eyes. Move U R F R F and listen to the unusual sound. Heard at various points throughout the game, this sound usually indicates that a movie sequence will be played at this node if you're facing in the correct direction and you're carrying the necklace from the Balclutha (the sound occasionally indicates a particularly important puzzle clue rather than a movie sequence). Turn R and watch the sequence of Alexandra and Nathaniel. Then move F L F R D to a broken bottle washed up on the beach. Pick up the hand key and some pages torn from Alexandra's diary. Move U L F7 L and pick up a brochure from the pile of trash behind Fort Point. This brochure describes the Vigilance Committee bell code. Move L F2 R F R F2 and zoom in on the telescope for a view of the Esperance figurehead mentioned in Alexandra's diary.
Use the San Francisco map in your inventory to jump to Chinatown, then move R F R F L F L F R F2 into the ruins of the Old Mint. Zoom in on the door puzzle, which has four values for each of the nine positions. This puzzle is a magic square and the only available solution using each of the digits 1-9 is
Once the door opens, move F L and click on Charlotte's Web for an incidental animation. Move R2 F3 R F L to the Vigilance Committee bell puzzle. The desired bell code was seen earlier in the Fort Point brochure; set the levers in the positions
4 9 2 3 5 7 8 1 6
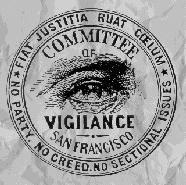
and pull the handle to open a door at right. Move R F R F and watch the movie sequence (we're reminded of Luke Skywalker in The Empire Strikes Back). Move L F L F and pick up some papers that contain the Vigilance Committee seal (also seen earlier on the bell):
Middle Down Down Middle
The papers also describe a scepter in possession of Adolph Sutro, owner of the Cliff House.
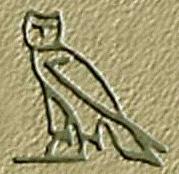
Use the San Francisco map to jump to Fort Point (the game's logo screen), then move L F L F2 L F2 R F4 R F R F into the Mechanical Museum in the Cliff House. Turn L and zoom in on the mechanical woman for an incidental animation. Move R F and zoom in on the jukebox puzzle. Set each of the three tumblers to the Horus (hawk) symbol seen earlier in the Lombard Street plaques, then take the jukebox handle, in reality the scepter referred to earlier in the Vigilance Committee papers. Zoom out from the puzzle, turn L and zoom in on the nickelodeon to view vintage San Francisco film footage. Click on the nickelodeon a second time to view another sequence. Move L F2 L and zoom in on the spyglass to play a third film sequence. These films are described in one of the booklets that came with the game.
Move F L F7 R F L F L into Golden Gate Park and zoom in on the Esperance memorial. Note the unusual pattern of dots at the four corners:
Move L F2 L F4 and click on the Buddha for an incidental animation.
Use the San Francisco map to jump to Pacific Heights, move F3 into the 2800 Broadway house and watch the movie sequence. You can also click on the debris on the staircase for a one-time incidental animation. Move L F R F L and zoom in on the jack-in-the-box at the bottom of the right-hand door. Here, the object is to play "Pop Goes the Weasel" by selecting the correct settings for the seven tone sliders. Of the 77 = 823,543 possibilities, the solution is
The toy can be opened using the crank at right; pick up the missing pages from Alexandra's diary. For more incidental animations, zoom in on the toy top at the bottom of the left-hand door and move R F R to the piano.
Up 2 Up 6 Up 4 No Change Up 3 Up 5 Up 1
Use the San Francisco map to jump to Chinatown, then move L F2 L F R F5 R F L F R F2 R into Mission Dolores and watch the movie sequence of Father Guarneri. You can explore some of the other tombstones in the mission cemetery, but only one is essential. From the position of the movie sequence, move L F R F L F R and zoom in on the tomb. Referring to the anagram references halfway through the red booklet that came with the game, as well as to the backstory in Alexandra's diary, rearrange the FOLLOW IDLE MANIAC letters into their anagram WILLIAM OF CALEDON. Also change the year of death from 1897 to 1789. Zoom out, turn R and zoom in on the secret compartment at lower left. Pick up the gryphon's-claw key.
Use the San Francisco map to jump to Fisherman's Wharf, then move L F R F2 L F2 R F onto the Angel Island ferry. Note the frozen man at the ticket booth as you pass - San Francisco isn't completely dead in this game.
Move U R F L F R F3 R F3 R F2 R F R F to Mt. Livermore and watch the movie sequence of Drussard and the San Francisco fire following the earthquake of 1906. Move L2 F R F3 R F6 R to Wallace Battery and click on the shell carrier for an incidental animation. Move R F L F2 R F L F and watch the movie sequence of Holden dropping the key into the battery. Move R2 F R F L F L F2 L F L F2 R F R D into the battery interior and pick up the leaf key (looking somewhat different than the key in the movie sequences) from the bottom hatch of the stove. Move U R F L F2 R F L F7 L F and watch the movie sequence of a mad Drussard roaming the hills of Angel Island. Move R F2 R and pick up a couple of loose pages from the glass jar hidden in the rocks. One of these is a letter from Drussard to his brother describing a ruby at the Point Knox lighthouse.
Move R F2 L F L F5 L F2 L to the Esperance figurehead on a shipwreck. Zoom in on the figurehead and note the emerald and sapphire eyes mentioned in Alexandra's diary. You can now see the significance of the views seen through the Balclutha and Fort Point telescopes - they indicated the positions of Alexandra's gemstones. Enter each of the patterns previously seen on the Esperance memorial at Golden Gate Park, left to right. After each configuration has been entered, click the cursor at the top center of the circular object held by the figurehead to make a fluted sound.
When all four patterns have been entered, pick up the emerald and sapphire from the figurehead's eyes. Move L F2 R F3 L F L F4 L F R F into the Point Knox lighthouse. Save your game at this point. Zoom in on the pattern on the door. The objective of this puzzle is to click on the nine squares to form a mosaic of the Vigilance Committee seal seen earlier. This is easy to visualize since the black-and-white seal forms a circle with the image of an eye at its center. Some experimentation with the squares shows that each one cycles through the same sequence of 9 portions of the seal, followed by 6 extraneous images of a Mosaic sword symbol. Also, with the exception of the one at upper left, each square affects another one or two squares when the square being pressed cycles around from the last sword image (right portion of a gold circle) to the first seal image (upper left portion of a black circle). Tracing these dependencies, a solution sequence can be mapped out, with the square at upper left as the final step since it affects no other square. From the initial puzzle arrangement
press squares A - I in alphabetical order the indicated number of times: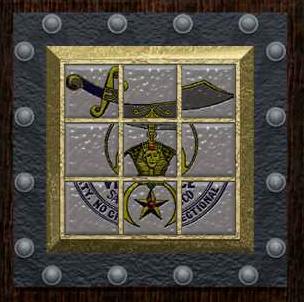
In other words, press the middle left square 5 times, then the lower right square 14 times, etc. After a total of 70 mouse clicks, the door opens.
I: 2 C: 7 G: 4 A: 5 H: 8 D: 5 E: 14 F: 11 B: 14
When the door opens, move F and pick up the ruby. Then zoom out and move R F L F5 L F L F L F R F R F2 L F R F2 L to one of several bookcases in the West Garrison building. This one, however, rotates to reveal a secret compartment when the book at lower right is pushed. Zoom in on the Box and insert the hand, leaf and claw keys from left to right to match up with the symbols on the top (inserting fewer or out-of-order keys will get you kicked out of the building). Click on the box lid to open it, then place the emerald, ruby and sapphire from left to right. If you don't get the gemstone order right or try to open the inner box without the gems, you will be taken over by the Beast, resulting in a bizarre change in the game's color palette. The normal color mode can be restored by using the San Francisco map to return to Mission Dolores and touching the holy water urn inside the chapel, or by loading a previously-saved game.
Once you've opened the inner box, grab the treasure map inside. This map shows a pictorial representation of the scepter and the Egyptian Horus eye symbol. Move L F2 L F R F2 L F2 R F2 R F3 L F10 into a cave on the beach. Zoom in on the Horus eye symbol and put the scepter from your inventory into the eyehole. Zoom out and move F3 into the treasure chamber. Read the message from King William of Caledon, then watch the disappointing endgame sequence and mandatory credits.
Copyright © 1997 Balmoral Software (http://www.balmoralsoftware.com). Portions copyright © 1997 Panasonic Interactive Media Company and copyright © 1996 Ix Entertainment. All rights reserved. Republication, redistribution or conversion is expressly prohibited without the prior written consent of Balmoral Software. Contents subject to change! For the latest information, see http://www.balmoralsoftware.com.