Puzzles are well-integrated into the overall storyline, which is fully fleshed out with background material available in the Professor's journals and in other areas of the game (notably Atlantis). The puzzles tend to be more abstract than the standard inventory-manipulation types often seen in adventure games. Their level of complexity seems just about ideal - not so easy as to lack a challenge or sense of accomplishment, but neither unreasonably difficult. In most cases, the game challenges play fair - solutions are logical and usually involve objects close at hand. This latter characteristic is particularly enjoyable since a lot of repetitive wandering and pixel-searching can be avoided. Only a couple of puzzles involve arcade-style dexterity or a time limit for solution. Thankfully, the game can be saved and restored while a puzzle is partially solved.
Gameplay is fairly nonlinear - typically several goals must be completed in each age and often there is some flexibility as to their order. Like Myst, the ages themselves can be completed in any order, but the writings in the Professor's journals do suggest a natural sequence. Once an age has been completed, it cannot be revisited, so in a sense Timelapse consists of several independent sub-games. Four ages must be completed before the final game sequence can begin.
Graphics are pretty good, but many scenes seem a bit on the blocky side. The sheer number of views that needed to be rendered for this large game may have limited the number of polygons used. However, many of these views seem somewhat redundant and gameplay often requires passing through a lot of intermediate nodes in order to reach the next decision point. In a few areas of the game, a "hyperlink" feature is available to bypass these intermediate nodes. Additional shading and/or shadowing would have given better depth to a number of scenes that appeared rather flat, in some cases making it difficult to sense directions for movement. Overall, however, it is easy to become immersed in the various ages due to their layout and particularly to the sound effects, which are excellent. In addition, there are frequent spots throughout the game, particularly in the Anasazi world, where small animations of animals can be seen, adding a nice touch of realism to the game.
The game has a serious flaw, which is the failure to parity-check a randomized sliding-piece puzzle in the Mayan world, causing half of all random configurations to be unsolvable. This often cannot be detected until the puzzle is nearly finished or a time-consuming setup for a solver has been performed.
Live-action acting is very good overall, with the exception of a rather amateurish performance by the actor portraying Professor Nichols.
The user interface is just about as close to perfection as possible, using keyboard arrow keys (or mouse) for movement, combined with a Myst-like mouse cursor for exploration and object manipulation. A rosette of available movement directions is displayed when the arrow keys are being used, but disappears once the mouse is used for movement. This arrangement is reminiscent of that used in Sanctuary Woods' The Journeyman Project Turbo and Buried in Time, but avoids cluttering up the screen with extraneous items and graphics. A single item may be carried around as inventory, and the mouse is used to drag it to the appropriate location on the screen. A control menu is turned on or off with a simple press of the spacebar. Saved games are file-based and unlimited in number, and include an overwrite warning. There are a few places in the game where your character can be killed, but at these points the screen is merely blanked and you are returned to the game, definitely a plus for those of us that have been burned in the past by not saving our games often enough.
Overall, Timelapse is a very enjoyable adventure game experience.
Move B R F2 L F5 R F and pick up the Professor's journal at the base of the statue. Be sure to read it for clues and background information while playing the game.
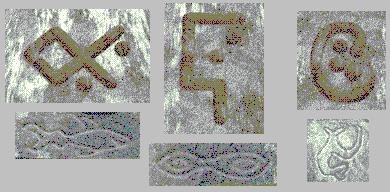
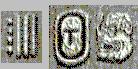
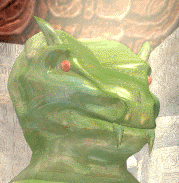
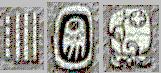
Move B L F4 L F7 R F4 L F5 R F2 R down to the triplet of stone statues (moai) on the beach (note the crabs animation, a nice touch). While facing each of the three statues, note the carved symbol on its base, then zoom in on the statue and touch its chest to disclose another symbol:
Turn right from the leftmost statue and move F15 to the table in the Professor's camp. Drag a piece of paper from the right over the rongorongo board, then use the white pencil to make a tracing of the three pairs of symbols on the board:
Move B2 R F to the other camp table (note the game designers' names on the candy wrappers). Pick up and read the directions for lighting the lantern: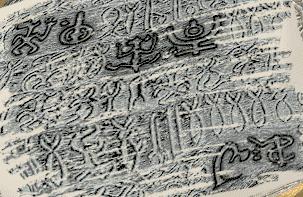
Pick up the box of safety matches from the table and move B R F L F2 R F17 to a cave entrance.
- Pump the tank 10 times using the TANK PUMP (dragging the mouse up & down until a hiss is heard)
- Turn the (L-shaped) PRIMER VALVE to the UP position
- Open the (circular) GAS KNOB to the UP position
- CAREFULLY light the MANTLE with a lighted MATCH
- Once the lantern starts up, turn the PRIMER VALVE to the DOWN position
Click on the lantern and follow the first three instructions above to prep it. Leave the pump inserted. Take a match from the box you're carrying and quickly drag its head across the side of the box, then without releasing the mouse button, drag the lighted match to ignite the lantern's mantle. If you make mistakes, you'll eventually have to return to the camp table to get more matches. Be sure you follow the final instruction above or the lantern will soon go out.
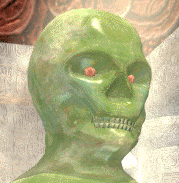
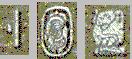
Move B F13 L F3 L F to a stone head in the cave. Click on its face to cause its lower jaw to melt into molten lava (one of many excellent morphing sequences in the game). Slowly click the right eye socket until the symbol there stops changing. This is the beginning of a sequence of 6 symbols that is advanced by clicking on the left eye socket. Each symbol is associated with a stone head on the lava "tongue". First cool the molten head by clicking on the bowl-shaped gray rock at upper center, then quickly pick up the cooled head as soon as your mouse cursor lets you. Move B R2 F to three statues. By referring to the paired symbols seen earlier, determine the statue symbol associated with the eye-socket symbol and drag the stone head you're carrying onto the corresponding statue hand. If you choose incorrectly, the stone head will disintegrate and you'll have to obtain it again from the lava flow. Repeat the procedure for five more stone heads, each time using the right eye socket to reset the eye symbol sequence and then keeping track of how many times you advance it using the left eye socket. The solution is to place the sequence of heads on the statues as follows:
Head #2 Head #6 Head #1 Head #4 Head #5 Head #3When completed, the head arrangement will be:
Move B L F and click on the now-glowing eyes of the face in the cave wall to open an entrance to the time portal. Move F7 and listen to the Professor's message. After he finishes, wait a few moments for a second message to start. At this point it's possible to visit any of three worlds: Egyptian, Mayan or Anasazi. To follow the Professor's path, press the brown scarab beetle button at far left, then click on the animation in the crystal ball to be transported to the Egyptian world.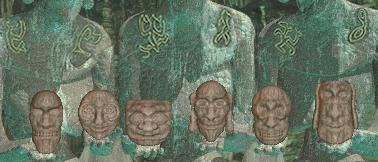
Your first task will be to release the barge and traverse the Nile. Examination of the dock area shows that the release mechanism is controlled by a system of water weights, ropes and pulleys. The sequence required to release the barge is suggested by a diagram in Entry 4 of the Professor's journal:
From your initial arrival in the Egyptian world, move F7 R F L and click on the hanging basket exactly four times to fill the stone cistern. Move L F R F R F2 and observe that the cistern is completely filled. Move B2 L F R F and touch the pulley lever overhead to align the well bucket with the cistern outflow pipe. Click on the gray lever at right to empty the cistern water into the bucket hanging in the well; notice how the tension increases on the rope. Move B R F2 L F L and click on the hanging basket exactly two times. Move L F R F2 R F and again click on the gray lever at right to add water to the well bucket. Moving F, you'll see that the bucket is now completely filled and slightly tilted. Back out and return the pulley lever to its vertical position. Move B L F R F3 L F to the dock release lever. Drag this lever to the left to open the dock and release the barge.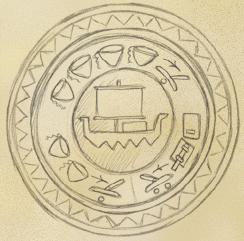
Move L F R F R F3 to cross the river in the barge (the Esc key can be used to skip the animation, if desired). Move L F L2 and pick up the vertical spear from the dock. Move R2 F to face a crocodile guarding the dock temple. Wait until the crocodile moves his head to your left, then use the spear to jab at its pale neck area. After several stabs to this area, you will vanquish the crocodile.
Move F5 R F3 into the temple embalming room. Open the chest and read each of the nine scrolls, noting the references to Egyptian gods and particularly to the Mirror of Hathor:
God Animal Sebek Crocodile Thoth Ibis Knumm Goat Set Horned One Horus Hawk Osiris Pharaoh Anubis Dog Bastet Cat
Move B2 R F L F to the standing statue. Open the compartment and read the tenth scroll:
Take a picture of the scroll with your camera as the information on it will be needed later. Move B2 L F L F4 L F into the temple storeroom. Click on the dog statue to hear the intonation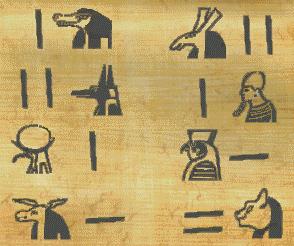
Seeeeek the TabletThis surely must be a clue! Next, move F L F to the fruit baskets. Pick up the mirror from one of the baskets, back out and drag its handle across the wall to disclose a warning about trying to take the mirror out of the temple storeroom. Move R and use the mirror on the six jars at this end of the storeroom. In the second one from the right, the mirror discloses a hidden scarab-shaped key; take it. Move R and use the scarab key to unlock the chest. Then move F and open the chest. Check out those cursor-tracking eyes!
The tablet in the chest defines values for each element of the Egyptian number system by referring to specific objects in the temple storerooms:
The numbers are translated by counting the quantity of objects in the temple storeroom and embalming room: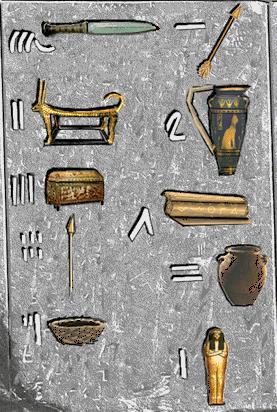
The resulting translation is
- 9 knives in a chest in the embalming room
- 4 arrows lying on a mat in the storeroom
- 2 tables in the embalming room
- 7 blue ewers in the embalming room
- 3 chests in both rooms (tablet, scrolls, knives)
- 10 scrolls in the embalming room (9 in the chest and one in the base of the standing statue)
- 6 spears in the storeroom
- 8 jars in the storeroom (6 in the back and one on each side)
- 5 baskets in the storeroom
- 1 sarcophagus in the embalming room
Next, refer to Entry 30 in the Professor's journal (25 mouse clicks), where he refers to Deren's Egyptian religious saying: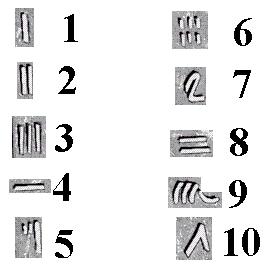
 "Precede the gods, and things will
 be subtracted from you.  Follow the
gods, and things will be surely added
             onto you."
This note refers to the information obtained earlier
in the standing statue, which together with knowledge of the
Egyptian number system can be translated into a
numeric adjustment for each of the Egyptian gods:
Move B2 R F2 R F R F L to find the sparking electrical display on one of the columns. Press the lowest of the three buttons on the panel to send power to the crystal statue at the back of the temple. Move F L F2 to the statue. Drag the crystal ball around the perimeter of the statue to disclose a sign on it for each of the Egyptian gods:
God Animal Numeric Adjustment Sebek Crocodile Subtract 1 Thoth Ibis Add 1 Knumm Goat Add 4 Set Horned One Add 2 Horus Hawk Add 4 Osiris Pharaoh Subtract 1 Anubis Dog Subtract 2 Bastet Cat Subtract 8
Next, move B L F L F L back to the power panel. Press the middle button to provide power to a staircase that will be encountered later. Exit the temple to the marble walkway behind it by moving R F3 R F R F2 R F2 L F2 R. On the black obelisk, note the glowing numeric symbol associated with the crocodile god Sebek. Examine the other seven obelisks along the walkway to derive initial numeric values for the other Egyptian gods, and apply the numeric adjustments from the table above: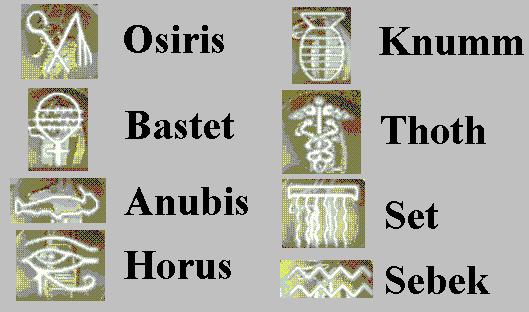
Bastet W Anubis A Osiris L Horus K Set W Knumm A Thoth Y Sebek Dock Temple
The initial values in the obelisk puzzle randomize for each Timelapse gameplay (thanks to Wayne Pendley and others at comp.sys.ibm.pc.games.adventure for pointing this out). Since no fixed solution is possible, arbitrary values have been specified in the table above using the letters a-h. In one particular gameplay, the results from the obelisk numbers were:
God Animal Initial Value Numeric Adjustment Adjusted Value Sebek Crocodile b -1 b-1 Thoth Ibis g +1 g+1 Knumm Goat a +4 a+4 Set Horned One h +2 h+2 Horus Hawk d +4 d+4 Osiris Pharaoh f -1 f-1 Anubis Dog e -2 e-2 Bastet Cat c -8 c-8
Continue into the crystal room at the end of the walkway. Here you will find eight crystals corresponding in relative position to the eight obelisks along the marble walkway. Zoom in on each crystal and set the animal symbol (top), adjusted numeric value (middle) and sign (bottom) for each of the Egyptian gods using the Animal Table, the particular Adjusted Value Table for your gameplay, the Egyptian number system and the Egyptian god signs given above. When each crystal has been correctly configured, the corresponding miniature in the raised pool at the back of the crystal room will glow white.
God Animal Initial Value Numeric Adjustment Adjusted Value Sebek Crocodile 4 -1 3 Thoth Ibis 1 +1 2 Knumm Goat 5 +4 9 Set Horned One 8 +2 10 Horus Hawk 3 +4 7 Osiris Pharaoh 7 -1 6 Anubis Dog 10 -2 8 Bastet Cat 9 -8 1
After all eight crystals have been configured, pick up the red crystal from the pool at the back of the crystal room. Move B F5 to the cobra blocking the passageway. Show the red crystal to the snake and it'll disappear. Move F9 and drop the red crystal into the blue-green pool. After you've finished watching the cutscene, back out twice from the pool and press the small square staircase symbol on the column. Since you've already routed electrical power to this section of the temple complex, a spiral staircase opens. Move F R F6 R F10 R (past the Guardian apparition) and click on the chutes-and-(no)ladders game rules on the wall.
To play the game, move B F and roll the tetrahedron-shaped die. Your ankh is the red one; to win the game you must reach the final golden square (by exact count) before your blue opponent does. If you land on a square with a cobra head, it's usually a better strategy to give up gems to your opponent rather than accepting a position penalty, but to do so you must quickly drag red gems on the wall to the right side where your opponent's blue gems are stored. The number of gems that must be transferred from the left side of the wall to the right is indicated by the number of marks on the snake's platform. Be sure to accurately position your gem into one of your opponent's open holes, or else the snake will knock you back. There is no click-ahead buffer for this game, and the game is completely reset if you back out from it.
On completion of the game, you'll hear a short musical tone. Pick up the light-blue eye symbol from the wall. Move B L2 F and put the eye symbol next to its mate on the cabinet door. Open the cabinet and move F2 to bring up the pyramid lock combination diagram:
The triangular representation of a pyramid on the diagram matches the one seen on the power panel buttons. Counting the symbols in the columns on the diagram, you'll find
Back out from the diagram and click on the gene pod lying in the gray receptacle. After watching the video sequence, move B3 L F and click on the rotating blue spot to watch another video sequence. Move F10 L F6 L F17 to exit the crystal room. Use the bull's-eye hyperlink cursor to zoom to the dock temple in the distance, then move R F2 L F2 L F L F3 R back to the power panel. Click on the upper triangular button to send power up the river to the pyramid above the dock area.
3
symbols10
symbols9
symbols4
symbols
Move F R F6 L F to return to the dock area. Move B2 R F R F2 L F10 R F8 L F4 to reach the pyramid combination lock. Using the Egyptian number system diagram, drag the tumblers to enter the combination (3,10,9,4) that you found by counting symbols on the diagram in the cabinet. When correctly configured, the combination lock will show
Click on the triangle at left to open the lock. Move F11 to enter the time portal. Watch the movie of Professor Nichols, then wait a few moments and watch a second one. At this point it's possible to visit either the Mayan or the Anasazi world; we'll go to the Mayan world next. Press the green lizard button second from the right, then click on the animation in the crystal ball to be transported to the Mayan world.
From your initial position on the beach, move R F4 R and click on the sea monster's head. Pick up the carved egg and move B L F5 L F5 R F14 to the sparking platform in the pool. Place the carved egg onto the platform and it will change into a chameleon. Click on the chameleon to play three rounds of a color-sequence/music-tone memory game (randomized for each game and each round). Press the chameleon to replay the target sequence. Move F4 into the Castillo temple.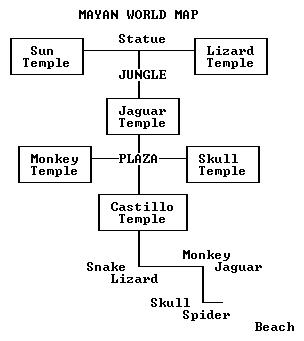
Move R F to face an arithmetic puzzle on the temple wall. If a dot represents one and a horizontal bar represents five, then the matrix of twelve buttons can be thought of as
The trick to solving this puzzle is to see it as four vertical addition problems, out of alignment. One tone plays for each addend, and a different tone plays for their sum. Click on the buttons in this order to solve the puzzle:
13 14 12 20 2 8 9 1 21 13 22 23
When the puzzle is solved, a lever is exposed in the column to the left; click on it and move L F to the now-activated stela control mechanism.
1 4 7 10 11 2 5 8 3 9 12 6
Also, the rings themselves have varying quantities of symbols on them: 8 for the left inner ring, 12 for the left outer ring and 16 for the right ring. Armed with this information, it's possible to come up with a guaranteed strategy for aligning any combination of symbols:
- Turning the left inner ring turns the left outer ring in the same direction.
- Turning the left outer ring turns the left inner ring in the same direction and turns the right ring in the opposite direction.
- Turning the right ring turns the left inner ring in the same direction.
to bring the target left outer ring symbol into alignment with the left inner ring symbol.
Turn left outer ring clockwise, then
turn right ring counterclockwise
to bring the target left outer ring symbol into alignment with the left inner ring symbol.
Turn left inner ring clockwise, then
turn left outer ring counterclockwise
Perform the three steps above (stela control mechanism, stela & calendar) for each of the four temple symbols:
From the Mayan calendar, move R F R F2 R F2 R and note that all four temple access symbols are now lit up on the frieze in the crystal skull alcove. Move R F2 R F13 R F8 R into the skull temple.
Temple Stela control mechanism Stela symbols Skull Monkey Jaguar Lizard
The challenge here is to reassemble the skeleton. Clicking on any joint to reposition a previously-placed bone causes all bones to drop and the puzzle to restart, as does placing certain bones from the wrong skeleton (there are more loose bones than needed for one skeleton). One aid to solving the problem is knowing how the skeleton should look when it's finished:
Upper arm and leg bones must be placed before the lower ones. Note that the thigh bone on the right is broken and must be reassembled using two pieces, as is the upper arm bone on the left. In these cases, be sure the edges of the broken bones match up. The lower arm bones + hand on the right can be placed as a single unit, as can the lower leg bones + foot on the left. However, the lower arm bones on the left must be placed individually, creating an "X" arrangement with the bone having an L-shaped lower end being placed on top. The hand with a single arm bone attached to it is not used. Generally, bones on the right side have a slightly more brownish color than the ones on the left. One placement sequence that works is: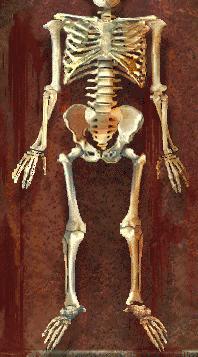
The game can be saved and restarted while the skeleton assembly is in progress. When the skeleton is complete, the extra unused bones will disappear.
- Left thigh bone
- Left lower leg bones (as a unit)
- Right upper arm bone
- Right lower arm bones (as a unit)
- Broken top piece of the right thigh bone
- Broken bottom piece of the right thigh bone
- Broken top piece of the left upper arm bone
- Broken bottom piece of the left upper arm bone
- Background lower arm bone on the left side
- Foreground lower arm bone on the left side
- Left hand
- Right lower leg bones
- Right foot
Remove the green crystal ball from the skeleton's mouth, move L2 and place it in the center of the circular wall design. After the movie is done playing, note the two Mayan figures now visible in the wall design.
Move L F15 L F3 and click on the monkey skull to activate the PacMan-like game in the monkey temple. Move L F to start the game.
The object is to move your green spider to the blue crystal at the bottom of the maze, while avoiding the red spiders in the narrower passages (relatively easy to do since their movements are predictable). Several areas in the game are isolated from one another, so most of the time you're just trying to move from an entrance hole to an exit hole since only one red spider moves at a time. As in most of the puzzles in Timelapse, you can save your game after part of the puzzle has been solved, which avoids having to start over completely if something goes wrong. With this feature, even the most difficult puzzles can be solved incrementally.
Once you've got the blue crystal, move B L F4 to the monkey wall design. Put the blue crystal in its center. After the movie is done playing, again note two Mayan figures now visible in the wall design.
Move R2 F L F7 L F2 R F L F9 R F up the stairs into the jaguar temple. Note the arrangement of colors in the circular design on the wall:
		White
	Red		Yellow
		Black
Move B R F L F and note the arrangement of four yellow symbols surrounding the jaguar picture on the wall. Move F and set up these symbols in the segmented circle, using the four-color scheme above. When the correct arrangement is selected, the cylinder opens up and you can pick up a golden jaguar head.
Move B2 L F L F and melt the jaguar head in the stone container over the fire. Cool the mold with blood from the small gray container. Move F and wait about 70 seconds for the gold heart to cool enough to pick up (or you can use this time to further explore the temple). Move B2 R2. Put the heart into the pot of blood on the green statue; pick up the red crystal. Move R F R and place the red crystal into the center of the circular wall design. After the movie is done playing, note the two Mayan figures now visible.
Move L F8 R F R F13 R F into the lower temple. The scissors-paper-stone game must be won before the chasm bridge can be crossed:
You must win three rounds of the game before your opponent does. Each round is won by the first side to win three encounters. Your opponent seems to adapt to your prior gameplay, so one strategy is to pick your choices for each encounter on a purely random basis and save your game after winning each round.
- Frog beats spider
- Spider beats scorpion
- Scorpion beats frog
- Like choices tie
Back out from the game and watch the chasm bridge raise up. Move F30 L and pick up the orange gem from the pink plant on the tree branch. Move L F and put the gem into the right-hand eye socket of the statue. Move R and wait a few seconds for the spider to drop down, then pick up the green gem in the center of the web. Move L and put the gem into the left-hand eye socket. Push on the right socket and take the machete by its handle from the mouth of the statue. Click on the machete handle four times to chop down all the brown vines immediately to the right of the statue.
Move F26 R F3 and click on the gray bowl to pick up a cracked red heart. Move B F R and pick up the codex page on the floor next to the potted plant:
By referring to the faces shown in Entry 39 of the Professor's journal (34 mouse clicks):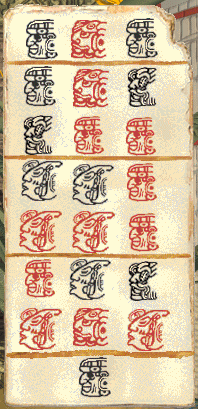
and the previously-discovered number notation, the codex page can be translated into negative (black) and positive (red) numbers:
Return the codex page to the floor and move R F7 R. Put the cracked heart into the yellow bowl to activate the crocodile/tree puzzle, then move F. The object of the puzzle is to light up each of 22 positions on the double pyramid, while using the moves indicated by the skulls:
-5 +4 -5 -5 +4 -6 -6 +5 +5 -8 -8 +5 +8 +8 +5 +5 -8 -6 +8 +4 +8 -5
This problem would be extremely difficult to solve without the aid of a computer; fortunately, a solution was seen on the codex page. Click on the left (positive) and right (negative) skulls in the left-to-right order shown on the codex translation above, and pick up a golden salamander. Move B L F. Open the floor hatch and place the golden salamander into its receptacle.
+4 +5 +8 -5 -6 -8
Move B F12 L F9 L into the lower temple region. Pick up the Mayan gene pod. After the movie sequence completes, pick up the axe. Unfortunately, the green storage unit acts like a counterbalance and since the gene pod and axe have been removed from it, stalactites have lowered from the ceiling blocking your exit. You will need to find the correct combination of bones and debris from the floor to place on top of the green storage unit to cause it to be depressed the correct amount, releasing the stalactites and allowing you to leave. Of the 256 possibilities, the correct combination of objects is: all four skulls (one of which is behind the axe), plus the flat brown piece in back.
Move L F9 L F2 to another passageway blocked by stalactites. Click on the axe-shaped depression in the wall and listen to the tones. If the notes range from 1 (low) at left, to 5 (high) at right, the tune played is
5 3 4 2 2 5 5 1Match these tones by using the left-facing skull on the head of the axe to click on the tops of the five stalactites, and the doorway will open. The puzzle is reset by moving B F.
Move F4 to the tomb. You need to get the yellow crystal ball from the hand of the skeleton, but it just doesn't want to let go! While holding down the mouse key, rapidly move the cursor up and down over the skeleton's hand until you've tugged the ball free (amidst a particularly juicy sound effect).
Move B R2 F24 to the circular wall design. Place the yellow crystal into the center of it. After the movie finishes playing, note the two Mayan figures now visible in the wall design.
Move R2 F4 L F26 R2 and press the green eye of the jungle statue to avoid being killed by a poison dart as you move to the left. From a position facing the statue, move L F12 and then turn around by moving L. Pick up the purple gem hidden in the base of the tree fern. Move R F10 to the sun temple entrance.
Place the purple gem into the center of the design that holds each of the four crystals you've previously found.
Move F5 to a sliding-piece puzzle. This puzzle randomizes each time you move to it, so no closed-form solution is possible. The puzzle pieces are from the four temple designs discovered previously; each design occupies a 2 x 2 subsection of the puzzle and must be completed in the following arrangement:
By examining the puzzle, you should be able to figure out which of the four temple designs is missing a piece, corresponding to the open square in the puzzle. Obviously, that temple design must be completed last.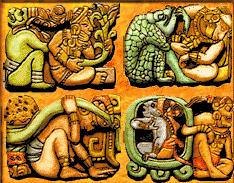
Once a 2 x 2 temple subsection is completed, its design freezes, making the occupied squares inaccessible during further work on the puzzle. As a result, a good strategy is to concentrate on configuring an outer 4-element row and an outer 4-element column of the puzzle before completing any 2 x 2 subsection, as long as this is not where the missing piece is.
Many configurations are impossible to solve, for example,
The frequency of these outcomes indicates that the Timelapse game software is not checking the puzzle randomizations for basic parity; consequently, half of all starting positions will be unsolvable. In these cases, it will be necessary to restart the puzzle from the beginning.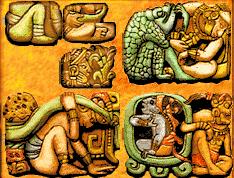
Once the sliding-piece puzzle has been solved, move F9 into the time portal. Watch the movie of the Professor, then wait a few moments and watch a second one. Press the blue insect button second from the left, then click on the animation in the crystal ball to be transported to the Anasazi world.
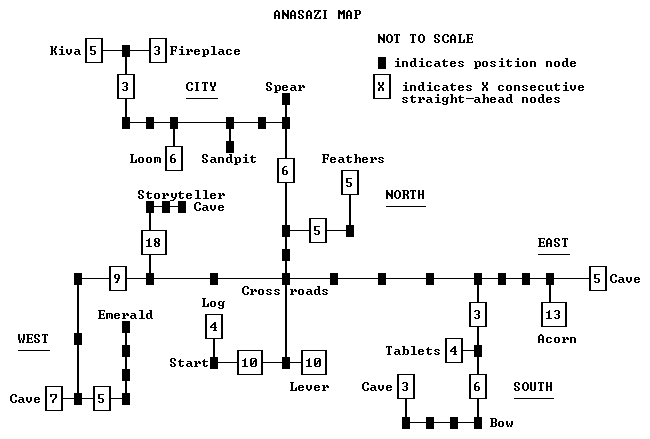
The Anasazi world has a challenge to solve for each of these compass settings, and each challenge has an associated animal that will appear when the calendar lever setting is selected. The professor's journal contains an Anasazi map:
Off East North West South
For more precise navigation, a logical version of the map is below: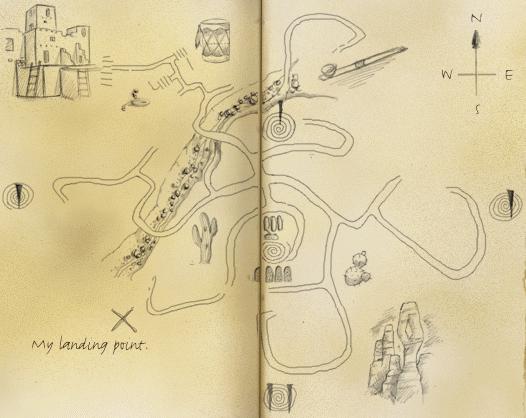
Move L F3 L F2 into the canyon. Move F5, following a friendly gray squirrel that is the animal associated with the East challenge. Use your stick a couple of times to get a bit of honey from the nest of bees in a dead tree trunk here. Continue F6 to the end of the path, where you'll discover a golden acorn trapped in a rock crevice. You'll have no trouble recovering the acorn using the stick tipped with sticky honey.
Move B2 R2 F11 R F3 and place the acorn into the depression in the rock. Move F3 into the cave and pick up a safety match from the box in the basket (seems a bit out of place or time, doesn't it?). Move B2 R and ignite the match by quickly dragging it over the flat rock with the vertical slit in it. Then while still holding down the mouse button, immediately use it to light the pile of twigs next to the rock. If you turn around, you'll see an Anasazi symbol projected onto the cave wall.
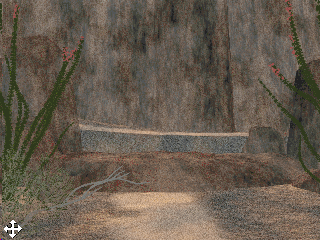
Your goal is to shoot the arrow through the same rock spire hole that the hawk flew through. A sweet spot obviously exists for a successful shoot, but there is some evidence that its location may be randomized between different games. However, if you need to restore your just-saved game, the sweet spot should be consistent, so the problem is to find the aiming point for your particular game.
We found best results were obtained by using only the first (smallest) of the arrowheads. The other ones vary in size, and so require different aiming positions for the point of the arrowhead. The other two arrowheads also seem to vary in weight, affecting their flight characteristics. We found the best bow position was set up by dragging the mouse to pull the string all the way back, then up one position.
All that remains is to drag the mouse laterally, without releasing the mouse button, to correctly position the arrowhead point. In several games, the sweet spot was somewhat to the left of the short horizontal black line on the target rock spire. In some games, this spot was immediately to the left of the line, in others it was as far as halfway to the edge of the rock spire. Your mileage may vary.
If you miss, restore your game and try again until you get the aim just right. Carefully watch the arrow strike point for clues on how to adjust the aim. When you get the arrow to fly through the hole, you'll hear a voice say
"Success! You are a skilled warrior"and a sound of rock sliding. Move B R2 F3 R F3 and listen to the sound of thunder while watching an animation of stampeding buffalo.
Alternative Cave Access. As Roy Pascarella pointed out in the comp.sys.ibm.pc.games.adventure newsgroup, it's possible to back into the south cave without shooting the arrow. From your position at the mounted bow, move B R2 F3 L B. Even though the compass rosette now indicates you can only move forward, instead move L F2 into the south cave.
The professor's journal mentions corroded batteries in the flashlight, so you'll have to shake it to get some light out of it. You can see only a portion of the symbols hidden in shadow at any one time since the flashlight beam is limited. Make a note of all symbols you see, you'll need them later. Be sure to also check the second cave shadow to the left.
From the position facing the first (right) cave shadow, move R2 F4 R F9 L F to a rock wall carving, following the coyote who seems to be leading the way. Highlight the nine symbols you saw in the geode cave, each of which has been augmented by a hand symbol and some of which vary in size from what was seen in the cave:
When you get it right, a shadow of a coyote will cross the rock and you'll hear him howl. Move L and click on the West sun spiral carved into the rock. Move R F2 R into the emerald cave and note the Anasazi sun symbol rising out of the water. Move F to get a close-up of it, and note the sound of dripping water.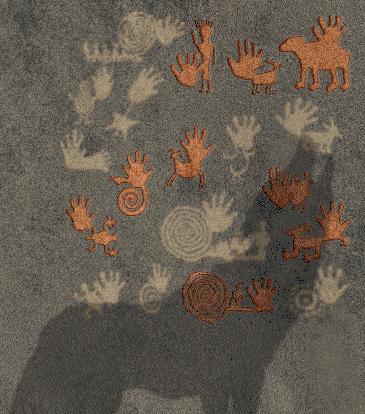
Move B L. On the rock face are depictions of the five birds whose feathers you must find. Move L F4, pick up the second feather, then move L2 F5 to drop it in front of the gray stand.
Move B R2 F4 R F, pick up the third feather, then move B R F5 to deposit it with the others.
Move B R2 F4 R F4, pick up the fourth feather at right, then move R F4 L F5 to drop it with the others.
Move B R2 F4 R F6 R, pick up the last feather, then move R F6 L F5 and arrange the feathers to match the diagram of birds on the wall:
Click on the feather on the wall to turn the gray stand into a full headdress. Move B L F R F into a cave and note the bird sculpture and the sound of wind. Move R2 F L F R F4 R F6 L F2 to the crossroads: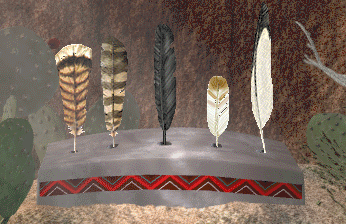
	3 3 4 4 7 6 7
	7 4 2 4 2 3 8
	5 1 5 8 3 2 4
	4 7 4 2 3 8 3
	2 4 4 6 1 6 7
But be careful! One wrong move and you'll have the restart the puzzle from the beginning. Move R F2. If the rattlesnake puzzle has been solved, the peace pipe will be smoking and you can click on it five times for Anasazi storyteller sequences. Move B R for a map of the Anasazi world that looks to be the basis of the one in the Professor's journal. Move R F L F20 L F2 R back to the crossroads.
Press the spiral symbol above the tablets to open a passageway. If you've correctly selected the eight tablet symbols and the passageway does not appear, revisit the caves at the four compass points to make sure you've actually heard the natural sound associated with each one. From your position at the tablets, move F5, pick up the Anasazi gene pod and watch the movie. After it completes, note the leaf outline exposed under the pod. Move B R2 F4 L F4 L F4 L F4 R F10 to a cluster of cacti.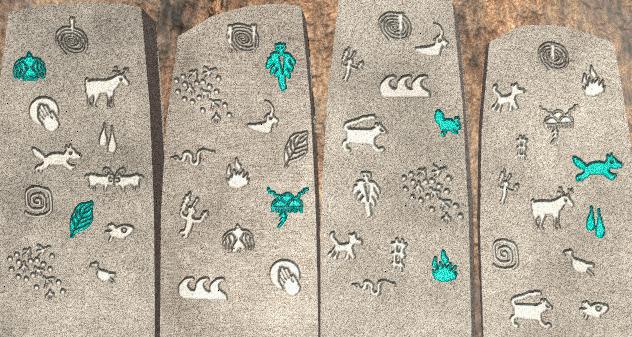
Move F3 R and pick up the blue-handled rattle inside the basket. Move R2 and click the hand cursor on the rattlesnake to hear its rattle. Emulate the sound with the rattle you're carrying by quickly sweeping it down, up, down, down. The snake then morphs into a ladder; move F6 R into the loom room.
Drag the large medium-red yarnball from the bowl to the empty white basket at right. Drag the vertical wooden shuttle at the lower right of the scene to the white basket. Click on the yarnball to unroll some yarn. Click on the shuttle to thread it with the yarn, then click on the white-threads area of the loom. Click on the sliding horizontal bar of the loom to complete a portion of the blanket.
Repeat the above procedure using the small dark-red yarnball and then the red-and-yellow striped yarnball. The blanket will then be complete and you'll see a glowing representation of a corn plant, another Anasazi symbol.
Move L B6 R F2 R F4 L into the music room. Pick up the drumstick and move R2 to the wind chime. Click on the wind chime with your mouse cursor and listen carefully - you'll need to emulate the sound on the drums. Turn left to the drums and strike them in the following order with the drumstick above the drum:
		1		5


	4		3		2
The wind chime will answer with its cadence and a doorway into the shaman's room will be revealed to your right behind the animal skin. Enter the shaman's room and move forward to the firepit. Pick up a glowing piece of wood and turn left. Drag the glowing end of the wood over the five cavities at the top of the wall to disclose various dangers (including more bees in the center hole). You can see a rag in the hole second from the right - take it. Turn around and dunk the rag into the stone pool of water, then use it to clean the wall and disclose a reindeer-style pictograph, another Anasazi symbol.
Move R F3 R B4 R F3 R F R to a sandpit puzzle. The outline of a leaf at the back of the pit is colored green to indicate that the puzzle has been activated by your retrieval of the Anasazi gene pod. Move F to begin the puzzle. Variously-colored leaves are blown onto the sand spiral, and you must determine which ones go into the next three positions. Moving from the center of the spiral outward, you'll see that the leaves progress in sequence to the dark green leaf, then reverse the sequence. Assuming this is the pattern, the leaves you should choose are the first three leaves in the center of the spiral, placed in reverse order:
Back out and pick up the outlined leaf at the back of the sandpit, now turned brown. Move R F L F3 R F4 L2 and place the brown leaf into the depression by the music room door, opening an entrance to the kiva straight ahead. Move F5 into the kiva.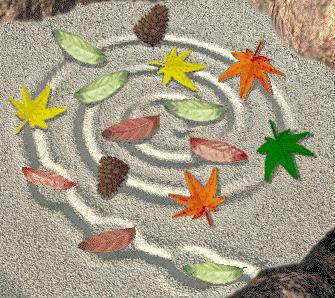
The object of the kiva puzzle is to correctly identify exactly seven Anasazi images you've encountered in the game. The design on the west wall is circled by 7 blue arrowheads, each of which brightens when one of the correct wall images is lighted in blue.
To solve the puzzle, turn right from the circular design and select the buffalo symbol from the South challenge and the image of a bee from the East challenge and the shaman's room:
Turn right and select the sun-headed man symbol from the East challenge, the sun symbol from the West challenge, and the reindeer image from the shaman's room: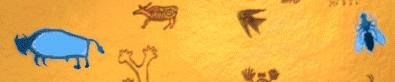
Finally, turn right and select the bird symbol from the blowing-leaves cave in the North challenge and the corn plant image from the loom room: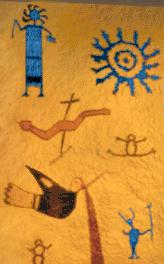
Turn right and note that all seven blue arrowheads are now glowing. Click on the center of the circular design to open a door in the wall; move F B4 R2 F10 into the Anasazi time portal. Watch the movie of the Professor, then wait a few moments and watch a second one. Press the central paired-dolphins button, then click on the animation in the crystal ball to be transported to Atlantis.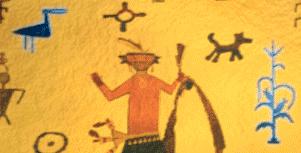
Move B L F5 L F R F9 R F10 into an aquarium-like building housing a glowing DNA helix. Move L2 and note the bent-square symbol on the floor of this building. Move F R F and view a movie sequence on the video player. Move R2 F2 for another movie sequence.
Move B R F8 R F4 R F L F8 L into a schoolhouse-like building. Above the side door, note the steering-wheel-like symbol associated with this building. Move R2 F and view a movie sequence on the video player. Move R for another movie sequence, R2 for another, and L F R F for five more (with Greek subtitles), including some from the Guardian robot.
Move B L F8 L F R F4 R F6 into a truncated pyramid building and note the curved "+"-like symbol associated with it. Move R F and view a movie sequence on the video player. Move R2 F2 for another movie sequence (the 14th in Atlantis).
Move B L F7 L F7 R F3 R F to the elevator control panel. Select the symbol associated with each building by clicking on the blank squares underneath each building representation:
16 clicks 5 clicks 27 clicks 10 clickswhich produces
Click on the far-right button with the small circle to activate the elevator. Move B L F2 L2 and click on the rightmost of the three paired-J symbols at the bottom of the window frame to descend to the lower level. Move F R F and take the sparking red crystal from the robot. Move B R F R2 and put the crystal into the receptacle under the window to reactivate the elevator. Click on the leftmost of the three paired-J symbols at the bottom of the window frame to ascend to the upper level. Remove the crystal and move into the stasis chamber room. You are now under a time limit to deal with the robot Guardian before he finds you and sends you to eternity. To accomplish this, you will lay a trap for the Guardian using one of the stasis tubes.
The semicircular stasis chamber room contains seven stasis tubes, one of which is empty. While passing by the individual tubes, make a note of the pattern of blue lights on the panels in them. You'll need to check several of the tubes for the complete pattern since the occupants are blocking some of the view. Find the empty stasis tube and enter it. Set the same pattern of blue lights:
Move B2 and bait your trap by putting the crystal on the stasis tube floor (this has to be done by dragging the crystal so its lower triangle is just below the lower edge of the game window). Move L2 F2 to the hexagon puzzle controlling the stasis tube gun.
X X X X X X X X X X X X X X X X X
Each click on a yellow triangle rotates the tri-colored circles; the object is to orient them so that they all have a red sector facing inwards, matching the central red button on the hexagon. Here's one solution (the order of clicks is unimportant):
Otherwise, move R L F L F5 R F and open the gene pod receptacle. Press Ctrl-G to bring up your gene pod inventory, and click on any of the pods to transfer all three to the receptacle. Pick up the receptacle and move B L F7 to the transmission panel. Click on the central bent-square symbol and put the gene pods you're carrying into the depression formed in the panel.
You now have two minutes to leave Atlantis through its time portal. To reach it, move B L2 F6 R F7 and watch the Professor's reaction (boy, he's really scared, isn't he?). The second endgame sequence then plays, in which you and the submerged Atlantis outpost blast off from Earth and travel to the Atlantean homeworld:
If you try to transfer back to Easter Island using the rightmost button on the control panel, the time portal melts and you get the same endgame sequence. If you do nothing and just wait out the two minutes, the same endgame plays.
A third endgame in which you stay on Earth occurs if you hightail it back to the elevator before the two-minute pre-launch period expires. From the transmission panel, move B L2 F19 R F2 R2 and click on the blinking bent-square symbol. The Atlantis outpost blasts off without you and you're rescued by a passing ship, after which you become rich and famous:
Copyright © 1996 & 2026 Balmoral Software (http://www.balmoralsoftware.com). Portions copyright © 1996 GTE Vantage Inc. All rights reserved.