German version from Stefan Zawilla
Copyright © 1995-1997 Balmoral Software (http://www.balmoralsoftware.com). Portions copyright © 1995 Discis Knowledge Research Inc. All rights reserved. Republication, redistribution or conversion is expressly prohibited without the prior written consent of Balmoral Software.
The Jewels of the Oracle game consists of 24 fascinating puzzles in logic, mathematics and geometry. Each puzzle may be played in Easy or Hard mode. This page contains solutions to all of the puzzles found in the game.
| DIRECT FROM ALTAR ROOM (TANTRAM) | |||
| Six Pairs (Hall of Hidden Links) |
Bug Ball (Hall of the Sun) |
||
| Mirrored Numbers (Runes of Eridu) |
Sun & Moon * (Abhoranam of Day and Night) |
||
| LEFT 1 FROM ALTAR ROOM (KRIDA) | |||
| Ten Tiles (Hall of Ascendancy) |
Compass Path (Path to Utsavah) |
||
| Locust Jump * (Leap of the Locust) |
Color Balls (Hall of Spheres) |
||
| LEFT 2 FROM ALTAR ROOM (PAURAH) | |||
| Mancala (Sowing Seeds) |
Cube Maze (Path to Mahiman) |
||
| Horse Tiles * (Horses of Asvah) |
Pentominoes (Assembly of the Planners) |
||
| LEFT 3 FROM ALTAR ROOM (SASTRAM) | |||
| Sun & Stars (Hall of the Nightsky) |
Pentagon Wheels (Wheels of Time) |
||
| Blind Jigsaw * (The Memory of Bhandam) |
Blue Hexagon (Turning of the Divasah) |
||
| RIGHT 2 FROM ALTAR ROOM (KAUSALAM) | |||
| Abacus * (Values of Al-Jabara) |
Multiples of 7 (Panditah of the 7th Mountain) |
||
| 1234 Sliding (Hall of Order and Succession) |
Magic Square (Square of Ganj Dareh) |
||
| RIGHT 1 FROM ALTAR ROOM (KAVI) | |||
| Peg Solitaire (Kutu of Ekakin) |
Equal Irrigation (Parity of Jalam) |
||
| Hassuna Assembly (Harmony of the Hassuna) |
Circle Sliding (Seal of the Girsu Gates) |
||
An easy puzzle to get you started. Each correct icon is of the form
	reversed  normal
	  number  number
(without overlap) using the digits 1-9 left to right. Drag the icons to their respective places at the top of the display.
In Hard mode, there are seven blanks to be filled, in Easy mode, three.
Find the correct six pairs using the 12 objects:
	Bowl		Bracelet	Brush		Chest
	Chisel		Comb		Dagger		Hammer
	Quern		Sickle		Statue		Table
This problem is very difficult even using "obvious" object pairings (e.g., brush/comb, hammer/chisel) since there is no feedback given for correct pairings prior to a complete solution.
There are 10,395 possibilities for this puzzle's outcome:
If f(N) denotes the number of possible pairings that can be made from N distinct objects (N even), without regard to order among or within object pairs, then first note that f(2)=1. Also, f(N)=(N-1)*f(N-2) since the first of N objects can be paired with any one of the remaining N-1 objects, and the remaining N-2 objects can be paired off in f(N-2) ways. The solution to this difference equation is f(N)=(N-1)*(N-3)*...*1, and in particular, f(12)=11*9*7*5*3*1, or 10,395 possibilities for this puzzle's outcome. If two pairings are known in certainty, the remaining possibilities number 105 (or only 15 if three pairings are known).
Clues from the Jewels of the Oracle website suggest looking for objects in the Memory of Bhandam (Blind Jigsaw) and Sowing Seeds (Mancala), but the only object found was a sickle in the latter location.
Claude-Andre Jolicoeur provided the following answer to the Hard mode puzzle:
	Bowl		Chest
	Bracelet	Comb
	Brush		Hammer
	Chisel		Dagger
	Quern		Sickle
	Statue		Table
The first person providing the answer to the Easy mode puzzle was Roger Thornhill:
	Bowl		Statue
	Bracelet	Brush
	Chest		Table
	Chisel		Dagger
	Comb		Sickle
	Hammer		Quern
This challenging "warehouse" puzzle desperately needs an Undo button in case of an inadvertent move (for example, moving any ball into a corner prevents it from ever being moved again and so prevents a complete solution to the puzzle). Apparently there is no "no more moves" message when all possible plays have been made without a complete solution. Keyboard arrow keys may be used to orient or move the bug. The bug can move only one ball at a time and can only push it from behind.
Hard Puzzle
The initial arrangement of 29 balls is shown by the letters A-Z,a,b,c in Figure 1. The bug starts at the asterisk at the upper left, and balls are disposed of into the hole indicated by an asterisk at the bottom center.
Refer to Figure 1.
Refer to Figure 2.
Easy Puzzle
The initial arrangement of 19 balls is shown by the letters A-S in Figure 3. The bug starts at the asterisk at left center, and balls are disposed of into the hole indicated by an asterisk at lower center. Complete bug control sequences are given (U: Up, D: Down, L: Left, R: Right).

E right: D L2 U6 R3 U R4 D R
C down: U L3 D
D right: R
B right: U L3 D R
G: D5
B: U6 R2 D L U L D6
C: U5 R2 D L U L D5
D: U6 R4 D L3 U L D6
H: U5 R4 D L3 U L D5
E: U6 R6 D L5 U L D6
I: U5 R6 D L5 U L D5
A: U5 L5 U L2 D R6 U R D6
K: U5 L6 D3 L2 D2 R2 U4 L U R6 U R D6
N: U5 L6 D5 L2 U R D R U4 L U R6 U R D6
L: U4 R5 D2 L4 R4 U2 L5 D4
O: U2 R4 D2 L U R U L3 R4 U2 L5 D4
P: U2 R4 D2 R2 U L D L U R U L4 R4 U2 L5 D4
F: U5 R9 U R2 D L10 U L D6
J: U5 R10 D2 L U R U L9 U L D6
Q: U5 R9 D4 L4 D L U R U L4 R4 U2 L5 D4
R: U2 R5 D R4 U2 R2 D2 L6 D L U R U L4 R4 U2 L5 D4
M: U2 R5 D R4 U2 R D R D L6 D L U R U L4 R4 U2 L5 D4
S: U2 R5 D R6 D2 L U R U L6 D L U R U L4 R4 U2 L5 D4
Click on the left shelf to obtain a Hassuna piece.
The objective of this puzzle is to transfer all six disks from the left side to the right. Neither side of the puzzle may ever be left with more black disks than white. Click on the rectangular ball carrier to complete movement (it won't move if it's empty). This 11-move solution is probably optimal:
            B  W    B  W

            3  3    0  0
BB ->       1  3    2  0
B  <-       2  3    1  0
BB ->       0  3    3  0
B  <-       1  3    2  0
WW ->       1  1    2  2
BW <-       2  2    1  1
WW ->       2  0    1  3
B  <-       3  0    0  3
BB ->       1  0    2  3
B  <-       2  0    1  3
BB ->       0  0    3  3
The Hard and Easy modes of this puzzle appear to be identical.
Click on the small rock to obtain a Hassuna piece. Click on the large rock to access the puzzle. To solve the puzzle, exchange the positions of the green and yellow pieces.
    9   1
  8       2
7           3
  6       4
      5
This 24-move solution is probably optimal:
Moves: 6,4,3,5,7,8,6,4,2,1,3,5,7,9,8,6,4,2,3,5,7,6,4,5
The Hard and Easy modes of this puzzle appear to be identical.
Click on a pole for an animation. Click on the back wall for the puzzle.
Tile positions:
	   2     5     8
	1     4     7     10
	   3     6     9
In order to reach a solution, tiles must be exchanged (by dragging) - rotations alone will not suffice.
Solution:
In Easy mode, tiles are exchanged (by dragging) - no rotations are necessary.
Solution:
When you have landed on a square showing N, in the next move you can move exactly N squares in any of the four cardinal directions as long as you don't move off the board.
This 10-move solution may be optimal:
Move   Row   Column   Operation

  1     2      1      Down 1
  2     2      3      Right 2
  3     5      3      Down 3
  4     5      6      Right 3
  5     3      6      Up 2
  6     3      4      Left 2
  7     6      4      Down 3
  8     6      1      Left 3
  9     6      3      Right 2
 10     6      6      Right 3
The Hard and Easy modes of this puzzle appear to be identical.
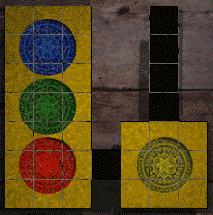
ALL PURPLE IN STACK 4:
Yellow:	Stack 3  -> Cradle 3
Purple:	Stack 1  -> Cradle 1 -> Cradle 2 -> Cradle 3 -> Stack 3
Yellow:	Cradle 4 -> Cradle 3 -> Cradle 2
Red:	Stack 4  -> Cradle 4 -> Cradle 3
Yellow:	Cradle 1 -> Stack 1
Red:	Cradle 3 -> Cradle 2
Purple:	Stack 3  -> Cradle 3 -> Cradle 4 -> Stack 4
ALL YELLOW IN STACK 1:
Red:	Cradle 1 -> Cradle 2 -> Cradle 3 -> Stack 3
Blue:	Stack 2  -> Cradle 2 -> Cradle 3 -> Cradle 4 -> Stack 4
Blue:	Stack 2  -> Cradle 2 -> Cradle 1
Yellow:	Stack 2  -> Cradle 2 -> Cradle 3
Blue:	Cradle 1 -> Cradle 2 -> Stack 2
Yellow:	Cradle 4 -> Cradle 3 -> Cradle 2
Blue:	Stack 4  -> Cradle 4 -> Cradle 3 -> Cradle 2 -> Stack 2
Yellow:	Cradle 1 -> Cradle 2 -> Cradle 3
Yellow:	Stack 1  -> Cradle 1 -> Cradle 2
Yellow:	Cradle 4 -> Stack 4
Yellow: Cradle 2 -> Cradle 3
Red:	Stack 1  -> Cradle 1 -> Cradle 2 -> Stack 2
Yellow:	Cradle 4 -> Cradle 3 -> Cradle 2
Yellow:	Stack 4  -> Cradle 4 -> Cradle 3
Yellow:	Cradle 1 -> Stack 1
Yellow:	Cradle 3 -> Cradle 2 -> Cradle 1 -> Stack 1
ALL BLUE IN STACK 2:
Red:	Stack 2 -> Cradle 2 -> Cradle 3 -> Cradle 4 -> Stack 4
Red:	Stack 3 -> Cradle 3 -> Cradle 2 -> Cradle 1
Blue:	Stack 3 -> Cradle 3 -> Cradle 2 -> Stack 2
ALL RED IN STACK 3:
Red:	Stack 4  -> Cradle 4 -> Cradle 3 -> Stack 3
Red:	Cradle 2 -> Cradle 3 -> Stack 3
The Hard and Easy modes of this puzzle appear to be identical.
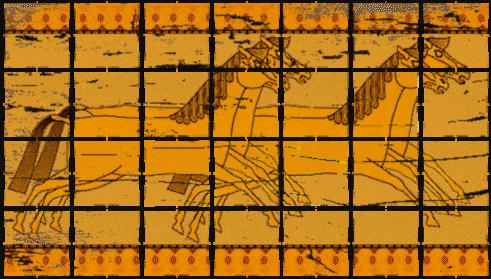
Click on the horse stall to obtain a Hassuna piece.
Tile positions:
	1  2  3
	4  5  6
	7  8  9
In order to reach a solution, tiles must be exchanged (by dragging) - rotations alone will not suffice.
Solution:
In Easy mode, tiles are exchanged (by dragging) - no rotations are necessary.
Solution:
Click on the sickle for an animation.
A bell ring means you have ended a move at the right-hand bowl (Ruma) and may select any starting bowl for the next turn. Otherwise, you must begin the next turn from the bowl at which you ended the last move.
	2  2  2  2  0
	      *----->

	2  2  0  3  1
	--->     *---

	3  3  0  0  2
	   *-------->

	3  0  1  1  3
	      *-->

	3  0  0  2  3
	>        *---

	4  0  0  0  4
	*----------->

	0  1  1  1  5
	         *-->

	0  1  1  0  6
	   *-->

	0  0  2  0  6
	      *----->

	0  0  0  1  7
	         *-->

	0  0  0  0  8
The Hard and Easy modes of this puzzle appear to be identical.
Move the blue ball with an arrow key held down. Capture two yellow crystals on opposite cube faces (Hard mode), or a single yellow crystal on the first face (Easy mode).
There are 12 pentominoes of each color. They do not comprise the standard set of pentominoes in which every possible combination of 5 component squares is represented; for example, the standard pentomino with 5 squares all in a row is excluded. One shape is duplicated.
The following diagram shows an arrangement in which all pieces of one color are on one side and the pieces of the other color are arranged symmetrically:
The Hard and Easy modes of this puzzle appear to be identical.
Click on the top of the yellow chest to obtain a Hassuna piece.
The Hard-mode puzzle is a blind jigsaw in which only one piece can be seen at a time. The pieces are jumbled differently each time, but the target picture remains the same. A sketchy representation of the target picture can be seen on the right-hand wall in the room containing the Pentominoes puzzle.
Solution:
In Easy mode, correctly-placed pieces become visible, making it much easier to solve the puzzle. The overall image is different:
1     2     3
4     5     6
7   8   9  10
Rotate or tilt the piece holders to allow movement in the indicated direction. Puzzle solutions are easier to visualize if the following connectivity diagram is used:
Hard Puzzle
53-move solution:
Move suns at 2 and 10 out of the way so that stars at 5 can be disposed of:
Now two suns are still in the double zigzag path 7 8 1 2 3 9 10, so even if we "park" one sun at 5, there will still be one sun left to block any further movement of stars to the star disposal. Therefore we should park stars at 5:
Now that the stars piece from 7 has been parked at 5, the path is open for disposing of all three sun pieces:
Finally, the last two stars pieces can be freely disposed of:
43-move solution:
The puzzle allows no more than two balls per wheel. Wheels rotate pairwise in opposite directions.
   1
6     2
5     3
   4
Solution:
The Hard and Easy modes of this puzzle appear to be identical.
The puzzle is randomized for each invocation, but is kept the same after a reset.
Panel arrangement:
   1
6     2
5     3
   4
Lever arrangement:
1 2 3 4 5 6
Hard Puzzle
The target sequence (starting at the top and moving clockwise) may be derived from the wall paintings dimly visible on entering the room:
The total number of possibilities thus is 6^6, or 46,656. A solution to most randomized initial panel positions may be found by using a computer program that checks all possible rod motions. If no solution is found, a more solvable initial position may be generated by restarting the puzzle.
Easy Puzzle
In Easy mode, making all panels identical yields a jewel.
Solution:
Enter the balcony. The puzzle will appear after a couple of clicks on the city map.
A bonus animation in this room was found by Jonathan Amaral. When viewing the city map, note the orientation of the houses:
	5 Kavi		2 Tantram

3 Kausalam			1 Krida

	6 Sastram	4 Paurah
If you click on the map houses in the indicated order as soon as the map is displayed, an animation moving through the center of the model city is played. This area of the city is the same as that to which you are transported at the end of the entire game when all puzzles have been successfully solved.
The Hard and Easy modes of this puzzle appear to be identical.
Click left to display a box. Click on the box to obtain a Hassuna piece.
Hard Puzzle
Arithmetic problem:
Circle			Square + Moon
-------------------------------------------
Square			Triangle + Moon
-------------------------------------------
Hexagon			Circle + Triangle
-------------------------------------------
Star			Square + Triangle
-------------------------------------------
Moon
-------------------------------------------
Circle + Moon + Moon	Triangle + Triangle
Circle, Hexagon, Moon, Square, Star, Triangle
A simple check of all 11^6 possibilities gives the only nontrivial solution as:
Circle   Hexagon   Moon   Square   Star   Triangle
  6        10       1       5       9        4
Easy Puzzle
The Easy puzzle is identical to the Hard puzzle, with answers for the Hexagon and Star given.
The digits in all six rows and seven columns must form numbers that are multiples of 7. Grid entries are arranged from the twenty digits {0,0,1,1,...,9,9}. In Hard mode, no preliminary answers are given, but in Easy mode, six of the twenty digits are provided up front:
Entering a few obvious answers reduces the number of unknown digits to ten:
There are only six distinct solutions to this puzzle; the first is:
In Hard mode, there are 39,816 distinct solutions.
Click on the rod for an animation.
Click on the right-hand side of a square to increment it, on the left-hand side to decrement it.
Standard 3 x 3 magic square solution:
	2  7  6
	9  5  1
	4  3  8
In Easy mode, the even-numbered entries are given.
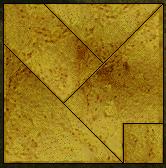
To solve this puzzle, you must have obtained all five Hassuna pieces from other puzzle locations:
(or you can edit pnPieceTaken=0->1 in a save-game text file)
Hassuna assembly solution (requires flipping one piece):
The Hard and Easy modes of this puzzle appear to be identical.
We found this solution to the Easy version of the puzzle (12 pegs in 16 holes):
	        1
	2   3   -   5   6
	7   8   9  10  11
	-  13   -  15   -

	Move   From   To

	  1      2     4
	  2      4    14
	  3      6    16
	  4      7     9
	  5     14     4
	  6      4     6
	  7     16    14
	  8     13    15
	  9     15     5
	 10      6     4
	 11      1     9
The Hard version of the puzzle has 51 pegs in 55 holes; only one peg must be left after all moves have been made. This problem is too difficult to solve using a "brute force" method; however, Dave Myers found this solution:
	     A   B   C   D   E   F   G   H   I

	1            C1  D1  -   F1  G1
	2            C2  D2  E2  F2  G2
	3    A3  B3  C3  D3  E3  F3  G3  H3  I3
	4    A4  B4  C4  D4  E4  F4  G4  H4  I4
	5    A5  B5  C5  D5  -   F5  G5  H5  I5
	6    A6  B6  C6  D6  E6  F6  G6  H6  I6
	7    A7  B7  -   D7  E7  F7  -   H7  I7

		From	To	Direction

		C5	C7	Down
		A6	C6	Right
		C7	C5	Up
		A7	C7	Right
		C4	C6	Down
		C7	C5	Up
		A4	C4	Right
		C4	C6	Down
		C2	C4	Down
		A3	C3	Right
		C4	C2	Up
		A5	C5	Right
		C6	C4	Up
		C1	C3	Down
		G5	G7	Down
		I6	G6	Left
		G7	G5	Up
		I7	G7	Left
		G4	G6	Down
		G7	G5	Up
		I4	G4	Left
		G4	G6	Down
		G2	G4	Down
		I3	G3	Left
		G4	G2	Up
		I5	G5	Left
		G6	G4	Up
		G1	G3	Down
		G3	G5	Down
		G5	E5	Left
		F7	F5	Up
		F4	F6	Down
		D5	F5	Right
		D7	D5	Up
		E7	E5	Up
		F6	F4	Up
		E3	E1	Up
		E1	C1	Left
		C3	E3	Right
		D5	D3	Up
		E3	C3	Left
		E5	E3	Up
		F3	D3	Left
		C4	C2	Up
		F1	F3	Down
		F4	F2	Up
		C2	E2	Right
		F2	D2	Left
		D3	D1	Up
		C1	E1	Right
The objective of this puzzle is arrange equal amounts of water among the tanks along each of the three walls. Tank sizes are fixed, but water quantities are randomized each time the puzzle is reset.
Add up three water quantities Q1, Q2 and Q3, each consisting of four tanks along one of the walls. The difference between Qi and the average (Q1+Q2+Q3)/3 (usually 15) determines how much water is needed or is surplus between tank groups.
Transfer water between the tanks along one wall to set up the necessary empty region(s).
Example:
	Left Wall

	Used     2   2   5   8     Q1=17
	Unused   2   1   0   0

	Center Wall

	Used     4   2   4   6     Q2=16
	Unused   4   2   2   2

	Right Wall

	Used     4   3   1   4     Q3=12
	Unused   1   2   2   0

	Average quantity: 15

	Left wall has surplus of 2
	Center wall has surplus of 1
	Right wall needs 3
Solution:
Sliding-block puzzle, with five open spaces and a connected-region layout.
Solution:
A useful strategy is to work the puzzle top to bottom, left to right (but complete the lower row first). Reserve an open space at the current destination to make final positioning easier. Use other open spaces to rotate pieces around rectangular cycles.
The Hard and Easy modes of this puzzle appear to be identical.
Jewels are reformed in a flash of white light. If no puzzles have been forfeited, wait for the rotating shard to appear at the top of the screen. Return to the Kavi section of the pool and click on the water-filled stone. Move to the Krida section of the pool and click on the triangular shard at the top of the screen. Then click on the pool ripples. This takes you through the empty well and into a city building on the surface. To display game credits, click on the stone block in the center of the city square.
A save game text file from a game in which most puzzles have been solved may be converted into a form yielding the complete endgame by changing the last parameter in the setJewel() reference from "I" or "D" to "V" for each unsolved puzzle (see the next section for a list of internal puzzle indices). Then, after loading the revised save game file, visit each unsolved puzzle and ctrl-right-click on the displayed jewel to insert it into the altar diagram.
The two forms of the endgame oracle message can be displayed using the QuickTime for Windows viewer PLAYER.EXE in the Windows directory on the files \video\hqvideo\wellroom\07*.mov found on the CD-ROM.
1. Locust Jump
2. Sun & Stars
4. Magic Square
6. Abacus
7. Cube Maze
8. Compass Path
9. Hassuna Assembly
11. Color Balls
12. Mirrored Numbers
14. Pentominoes
15. Sun & Moon
16. 1234 Sliding
17. Equal Irrigation
18. Six Pairs
19. Horse Tiles
20. Circle Sliding
21. Blind Jigsaw
22. Multiples of 7
24. Pentagon Wheels
25. Ten Tiles
27. Blue Hexagon
28. Peg Solitaire
29. Bug Ball
30. Mancala
Copyright © 1995-1997 Balmoral Software (http://www.balmoralsoftware.com). Portions copyright © 1995 Discis Knowledge Research Inc. All rights reserved. Republication, redistribution or conversion is expressly prohibited without the prior written consent of Balmoral Software.