 Mining Site
Copyright © 1996 Balmoral Software (http://www.balmoralsoftware.com). Portions copyright © 1996 Amazing Media, Inc. All rights reserved. Republication, redistribution or conversion is expressly prohibited without the prior written consent of Balmoral Software. Contents subject to change! For the latest information, see http://www.balmoralsoftware.com.
The game is played from the first-person perspective, as is the case with all Director-based games. There is a nice night/day effect with the mining camp at the beginning of the game. Background music is pretty good, with some moody Spanish guitar work in places. Michael Cameron ends up sounding a lot like Alec Baldwin. A few gratuitous words of profanity in the game may be inappropriate for the youngest players. A well-written manual thoroughly describing the playing interface is included with the game.
In short, Mummy: Tomb of the Pharoah is an interesting play, particularly for Malcolm McDowell fans, but lacks the depth found in other games such as Buried in Time.
Every time the game was started, the message "File Error: Cannot find
DCIMAN.DLL" was displayed - this error can be ignored by clicking
"Close".
Use the spacebar to display/hide the file menu bar at the top of the screen.
Note that the File | Exit selection should really be "Main Menu".
Never figured out how to skip video sequences once the "Interruptible
Video" setting was set in the Preferences menu.
The hand cursor pulsates when it's over a hot spot, and also when an inventory
item is correctly used.
Some inventory items may be returnable to their original locations.
You play Michael Cameron, a "facilitator" working for the National Mining Company. Onboard the executive jet, amidst very Titanic-sounding music, move F L and pick up a backpack containing an empty canteen and your National Mining Company ID card. Move R and pick up a cigar from the box on the table. Store the cigar by clicking the hand cursor on the backpack that will appear at lower right. Click on the laptop computer on the desk and use its Macintosh-like interface to play a message from Dan Crane at National Mining Company headquarters while game credits are shown on the screen. Crane makes reference to your destination in Egypt, a former military base occupied during World War II by the British and Germans. He also mentions an ancient Egyptian box found at the site, as well as your contacts at the site: supervisor Stuart Davenport, geologist Jerry Segal and Egyptologist Lorrie Waters. After the message completes, move L F L F2 to exit the airplane. You'll be met by Chris Crowley, another mining company employee. You don't have to give him the cigar you're carrying, but if you do, he'll be nice enough to tell you where Davenport's office is (anyway, it'll be one less inventory item to scroll through later).
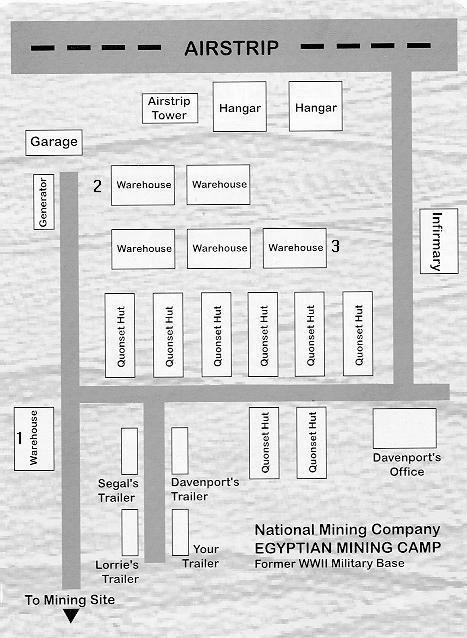
Before you meet Davenport, try a little exploring (not really essential to further progress in the game). From the airplane, move R F L F2 L2 to Quonset Hut 05 (see map). Its door is locked, so enter through the broken window. Inside, move R and pick up the red necklace on the chest. Put it in your backpack, move R and exit the hut through the window. Move L F2 R and open the door to Quonset Hut 08. Move L and zoom in on the table in the corner. Turn on the fan to blow away the scorpion "guarding" the book. Click on the note under the book and read a worker's unfinished letter. Zoom out from the table, move R F R and zoom in on the cobra "guarding" sheets of paper on the floor. Turn off the heater and the snake will go to sleep. Read the paper on the floor - another letter mentioning concerns surrounding the discovery of the ancient box. Zoom out from the snake and move L F into Chris' area. Click on the Egyptian statue, and Chris'll tell you it's a fake. Show him the necklace you found. At first, he seems excited by it, but later he backpedals and says it's a fake. Yeah, right. Move L2 F3 R F R to Davenport's office.
Before going inside the office, note the intact satellite dish at left. Talk to Davenport and get the keys to Warehouse 1 and the guest trailer from him. Exit the office, move L F5 and open the door to Warehouse 1 at the end of the road. Inside, you'll get a chance to talk to your former girlfriend Lorrie Waters and hear a translation of the inscription on the ancient box:
Move L2 F and you'll run into Davenport. Move F2 R F R F2 and listen to Jerry Segal talk about his gas pockets. Move L2 F and listen to more comments from Davenport. Move R F L F and open the door to your trailer.
Yawwwn! Time to catch some shuteye. Move L F and dream about some really bad acting (you'd think Lorrie would come up instead).
Zoom out from the corpse, then move L2 F3 RF F3 and meet Davenport. He'll tell you about the six-level mine and fan shafts, the conveyor/pulverizer mechanism, and the loss of power to the mine lights. Continue F R F2 R F4 R and talk to him again outside his office. Note the demolished satellite dish to the left. Enter his (locked) office through the open window. Inside, move F and open the desk drawer. Pick up some more keys and read a note describing an offer of $300 million for a destructive "power crystal" that Davenport is apparently trying to find. Click on the in basket to read a note from Chris referring to tools in a hangar. Pick up the telephone handset - there's no dialtone.
Move F R F and fill your canteen from the water cooler in the corner. Return the canteen to your backpack and exit the office through the door. Move F R F and enter the infirmary. Move L F and pick up the can of smelling salts on the sink. Move L2 F LF and enter Warehouse 3. Move R and pick up a roll of electrical tape on top of one of the drums.
Move R F2 RF and enter Warehouse 2. Inside, move L and listen to Davenport whine about his salary. Move F L and put the two stacked crates onto the forklift. Get in the seat of the forklift and turn it on by pressing the green button. Lift the crates by moving the control lever to the right of the steering wheel. Move U F and use the dagger to cut the rope holding the crate. Return the dagger to inventory and move F by swinging on the rope to the ladder behind it. Move U L and pick up the rope/grappling hook.
Move L D2 F2 R F2 L to an open area behind the hangars. Zoom in on the rear of the left hangar, where you can see an open window at the top. Pick up the rope from inventory and move F3 L F into the hangar. Open the red toolbox and grab a large wrench.
Zoom out from the toolbox and move R2 F D F2 L F L F R F R F and enter the garage. After more veiled threats from Davenport, move R F and pick up the wire cutters. Move L2 and pick up the gas can next to the car. Move L F and put the gas can on the table. Flip up the lever on the gas pump, then move its nozzle to the gas can. Click on the trigger of the pump nozzle to fill the gas can. Put the nozzle back and store the filled gas can in your backpack. Pick up the yellow-handled wire strippers in front of the black toolbox.
Move L2 F R F and enter the generator shack. Zoom in on the broken wires in the generator. Use the yellow-handled wire strippers on the end of each of the eight loose wires. Return the strippers to inventory and drag the lower wire of each color to the corresponding upper wire. Apply some of the electrical tape in your inventory to each of the four bare splices. Remove the gas cap at left, underneath the power gauge. Click the gas can on the exposed hole. Replace the generator gas cap and press the green button at left to turn on the generator and restore power to the lights in the mine.
Move R3 F R F L F2 R F R F and re-enter Segal's trailer by using your keyring on the doorknob. Move L F and use the wire cutters to remove the padlock from Segal's footlocker. Open the footlocker and click on the square panel at its bottom. Click on the red button to expose the secret compartment at right. Pick up Segal's "Sonar Maps Backup" floppy (the other one on his desk is blank) and, if desired, leaf through his diary for more of the game's backstory.
Move L3 F2 and sneak into Davenport's trailer. Move L F and pick up the bookmark from the book on the bed. On it is written three numbers:
28 9 5Return the bookmark to the book.
Move L2 F R F R F L and enter Quonset Hut 02 at right. Inside the hut, move F and push the bedframe away from the trapdoor in the floor. Open the trapdoor and turn on the red-handled light switch. Using the bomb shelter map, move F2 R F3 L F3 L F R F through the passageways to a padlocked door. Use the wire cutters to unlock the door and move F2 into the "Nazi room". Zoom in on the table along the right wall and open its drawer. Pick up the handle you'll find inside. Move L F and lift up the lower-left corner of the Nazi flag. Attach the handle you just found to the switch in the wall recess, and click on it to open a secret door to your right. Move R F2 and pick up the Luger pistol and "Egyptian Hieroglyphics Translations" book from the debris on the floor. Click on the scrap of paper in the skeleton's hand, which translates into some information about a power crystal.
From the cave-in, move L3 F L F and check out the beer bottle on the floor. Exit the room and return through the bomb shelter passageways to Quonset Hut 02. Exit the hut and move L F R F2 into Davenport's office. Zoom in on the calendar hanging on the wall behind his desk, and click on the car photo to expose a safe. Zoom in on the safe and enter the combination found on Davenport's bookmark (the left side of the dial decreases the numbers), then click on the safe handle to open it. Pick up the "Mine Maps" floppy inside the safe. Move L F and zoom in on the computer. Insert the "Mine Maps" floppy into the slot at bottom center and turn on the computer using the switch at the lower right corner of the monitor. At the prompt about additional disks, click on YES using your regular Windows cursor. Remove the "Mine Maps" floppy from the computer and insert the "Sonar Maps Backup" floppy for that important gas pocket information. For a copy of the mine maps conveniently available in your backpack, click on the PRINT menu selection, then on EXIT. Zoom out from the computer and zoom in on the printer at right. Pick up the mine maps and store them in inventory. As it turns out, only mine level 6 has any sonar information on it.
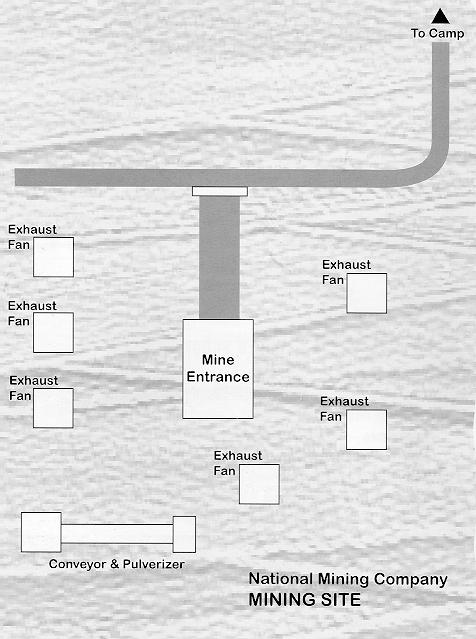
Exit Davenport's office, then move L F4 L F2 L to the mining site entrance.
Use the white knob to control the mine car's choice of direction at each junction. Move the knob F3 L F to take the car down to Level 5. Move the knob L R to break through the "Do Not Enter" sign and descend to Level 6. Exit the mine car; you're now at a siding on the left side of the Level 6 map. Move F3 to a T-intersection. Move RF F11 L F2 past an inoperative elevator and into a digging machine.
Turn on the machine by clicking on the top blue button on the central panel. Start the diggers rotating by clicking on the green button. Move the digging machine forward by clicking on the vertically-sliding red knob at bottom right. Watch the armed mummy before your view is blocked by a rockfall. Earthquakes are now occurring; you'd better get out of the mines pronto!
Before exiting the digging machine, pick up the mine fan switch key at right. Then move R F R F11 LF F5 back to the mining car. Once inside the car, the earthquakes seem to subside, but you've still got to find a way out of the mines - many of the passages are now blocked by rockfalls.
Move the white knob F2 R F R F R F R F R2 to take the mine car all the way back up to Level 1. From inside the mine car, move R F RF to the conveyor - the earthquakes have returned, and are now more frequent.
Zoom in on the black "pulverizer hydraulic fluid" hose and sever it with the dagger. Move L2 RF F D F for a ride up the conveyor and out of the mines. Move F2 R F L F R F3 L F2 into the generator room and zoom in on the "mine fan switch" panel. Open the panel with your keyring and turn off the mine fans. Move R3 F R F3 L and show your ID card to the mine guard. Move F R F L F R F to the fan at center left on the mining site map.
Use the wrench in your inventory to remove the bolt on the left side of the fan grille. Move F2 D F4 R and pick up the lantern near the base of the ladder. Move L2 F RF F4 L to a large hole exposed by a cave-in.
Move L2 and pick up the right-hand jar. Move R2 and click F with the jar to crack the exit door. Move L and put the jar to the left of the floor plug. Put the rope from your inventory on the neck of the jar, then drag the rope end to the ring on the floor plug. Move L and hide in the left-hand jar while the room floods and the first jar's buoyancy pulls out the floor plug.
Move F R and pick up the rug. Move L F2 to cover the slippery steps with the rug. Move F3 D through the hallway into the Four Statues Room. Attach the rope to the statue and move F L3 into the center of the room. Move F to the statue with the severed right arm, then move D and click on the floor to raise up a barricade around the statue.
Carefully move R2 F4 to knock the head off of the statue holding an ankh in its (lowered) left hand. Move L2 and click on the statue's left arm to lower the barricade around the first statue. Move L2 F and click on the statue head now lying near the spikes in the floor. Finally, click on the statue's right arm holding the staff and move F3 up to the statue's mouth.
Open the statue's mouth and move F5 through four small rooms whose heiroglyphs describe the story of Natanuka, Ititarphen, Simhotep and the Scroll of Life. Move F and confront a mummy in the next room.
Shoot the mummy with your Luger - if you don't, he'll kill you with his spear. Move L2 F and pick up the artifact from the left hand of the German soldier's skeleton. Move R2 and zoom in on the large wall crack at right. Move F4 up to the surface.
Move L F3 R F2 R F2 R F2 R F and enter Lorrie's trailer. Move L F to her bed. She seems to be enjoying a particularly good dream (are those supposed to be moans of pain?), but go ahead and use the smelling salts to revive her. On Lorrie's nightstand is a key to the airstrip tower (see map), but you won't be able to use the radio there to call for help. Exit Lorrie's trailer and move L F2 L F5 to the Egyptian box in Warehouse 1. Pour some of the water from your canteen into the hole in the top of the box. Open the box and take the scroll inside. Move L3 F R F2 L F3 D into the (thankfully-unguarded) mining site. Click the lantern on the subterranean entrance, then move F2 R2 F back to the Mummy Room.
Click each of the four key pieces in your inventory into the like-shaped depression in the columns flanking the exit door. Move F through the open doorway into the next room (see map). After conversing with Simhotep's ghost, move R RF and click on the wall switch three times to lower the three obelisks in this room. Move L2 and pick up the three crystals now accessible on top of the obelisks.
Move R F R F into Simhotep's tomb. Read the poem! Yeah, yeah. Click the scroll on the sarcophagus to revive Simhotep (definitely too many Twinkies back in ancient Egypt!).
Move R F, open the box and pick up a golden dog statue. Move L3 F, open the chest and pick up a second dog statue. Move L2 F3 R F4 into Ititarphen's tomb. After Simhotep paralyzes you, wait about 25 seconds for the paralysis to dissipate.
Move L F R F R F RF LF F into a secret passage, at the end of which you'll run into Chris and get knocked unconscious. You'll wake up on a ledge overlooking a chasm.
After Davenport finishes his explaining and gloating, move F to the near end of the rope bridge and detach it using the dagger. You'll ride it down to the bottom of the chasm. Move R F and pick up a bone. Move L2 U3 R F and place the bone on the ground for the ghost of the Pharoah's dog. Move F into Pharoah Natanuka's tomb. After listening to the Pharoah, move L and zoom in on the large picture on the wall. Put one of the dog statues in the skeletal hand that appears out of the wall picture. Repeat for the second dog statue, then pick up the Scepter of Ra.
Move L F and open the door leading out of Natanuka's tomb. Move F2 into the Room of Lights. Place one of the obelisk crystals in your inventory into the receptacle on the stone base, then rotate the raised portion of the stone base until a new light beam leads from the crystal to another crystal on the ceiling, and a new stone base is illuminated. Follow the new light beam to its base and repeat the procedure for the other two crystals in inventory. When all three crystals have been properly aligned, the final light beam will cause a previously-hidden door to open at the far side of the room. Go through this door and then move F into the Throne Room. Use the Scepter of Ra to destroy Simhotep, then pick up the Power Crystal.
Move L F R F R through the cavern to an underground river. Click on the wooden crate, move L and put the crate into the water. Enjoy a leisurely cruise downriver, then move R F3 L2 F3 into the Nazi arsenal. Pick up the gasmask from the Gasbomben Gefahr (Danger - Gas Bombs) box, then take the gas grenade.
Move L3 RF F2 and toss the grenade at Chris. At your first opportunity, give the Power Crystal to Davenport and watch the optimum endgame sequence:
Michael and Lorrie returned to
New York together, where
Michael was promoted to the
head of his department. Lorrie
took a job at the Metropolitan
Museum in New York and
resumed her relationship with
Michael.
Several attempts over the
following two years to re-excavate
the area failed, due to cave-ins
caused by repeated earthquakes.
For now, the resting place of
Natanuka appears safe from the
disruption of modern man.
Stuart Davenport's body was never
found. It's believed that the Power
Crystal vaporized him, leaving nothing
behind. However, a man fitting his
description was spotted a year later in
the jungles of the Amazon, searching
for Inca treasures.
As for the Scroll of Life, it was most
likely buried in the earthquakes.
Though no one can say for sure.
If you fail to give Davenport the Power Crystal, he shoots you and an alternate endgame sequence follows:
Several attempts over the
following two years to re-excavate
the area failed, due to cave-ins
caused by repeated earthquakes.
For now, the resting place of
Natanuka appears safe from the
disruption of modern man.
Stuart Davenport's body was never
found. It's believed that the Power
Crystal vaporized him, leaving nothing
behind. However, a man fitting his
description was spotted a year later in
the jungles of the Amazon, searching
for Inca treasures.
As for the Scroll of Life, it was most
likely buried in the earthquakes.
Though no one can say for sure.
 Mining Camp
Copyright © 1996 Balmoral Software (http://www.balmoralsoftware.com). Portions copyright © 1996 Amazing Media, Inc. All rights reserved. Republication, redistribution or conversion is expressly prohibited without the prior written consent of Balmoral Software. Contents subject to change! For the latest information, see http://www.balmoralsoftware.com.