Copyright © 2007, 2025 Balmoral Software (http://www.balmoralsoftware.com). Portions copyright © 1997 Discovery Communications, Inc. All rights reserved. Republication, redistribution or conversion is expressly prohibited without the prior written consent of Balmoral Software.
Set entirely in Istanbul, the game's backstory revolves around your activities as an investigative journalist trying to uncover clues about the disappearance of historical artifacts. As you progress through the game, you are exposed to a wealth of information about the history of Istanbul and some of its major geographical landmarks. Instead of being irrelevant or extraneous to the storyline, this "history lesson" is both informative and central to understanding the environment and the main characters' motivations.
Visuals are an interesting mix of photographs of actual Istanbul locations and rendered 3-D CGI for the simulation worlds explored at several points in the game. Although some of the photographic backgrounds are a bit blurry, they provide a high degree of realism in the gameplay experience, which is also augmented by authentic-sounding Turkish music. We last saw this unusual approach for screen backgrounds in the older games Golden Gate and Are You Afraid of the Dark?. Both photographic and rendered environments provide spherical movement at discrete nodes, with numerous static close-ups provided for scene details and inventory identification.
The game characters you interact with are displayed in live-action sequences filmed against bluescreen and integrated onto the photographic backgrounds. All filming was completed in Istanbul using local acting talent. The physical acting and dialog writing is acceptable, but due to the very thick Turkish accents of the actors, the subtitle (Caption) display mode in Preferences is highly recommended. Game startup sequences, video clips and dialog can be skipped by pressing the Enter key.
There are several timed sequences in the game, some more challenging than others but not difficult to solve. A useful in-game hint system minimizes the chance of getting stuck (as long as you examine everything on the screen and in your inventory). The game comes on six CD's, and is designed with a single-threaded plot at the end of each piece of media so that CD swapping is necessary only to move the story forward.
Byzantine: The Betrayal is an intriguing game with an interesting premise, unusual locations and an absorbing plot. Highly recommended, even ten or more years after its release.
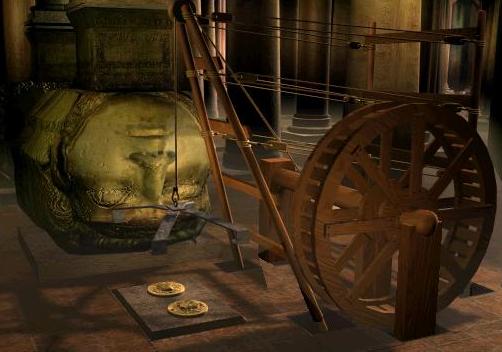
Read Emre's letter in your inventory to learn of his quest for the golden Diadem of Constantine. Enter the other room of Emre's apartment and check out the books in his library. In particular, examine a shelf right behind the desk and pick up a key hidden behind a thick white book entitled "The Art of the Carpet". In the center tier of shelves, find a book called "Roman Engineering" to see a diagram of a Roman Hoist.
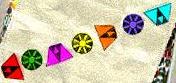
The phone on the desk should ring every minute or less. Answer it to receive information from Emre. He needs your help to reach Klio, and refers to a postcard he sent you earlier. He also mentions using a claim check to pick up a package for him. He tells you to use your pass, but by that he means something in his package, not your press pass. Open the desk blotter and take the photo of Emre with a girl. Keep looking through the stack of Polaroids and note a sequence of colored symbols:
Pick up the Polaroid camera from the left side of the desk.
Optional activity: Look inside the footlocker next to the desk. In the close-up of the decorated box, click on any one of the colored buttons to raise them all up, then click on them in the color order shown in the image above:
Inside the box, examine a diagram of a scanner device:
Across from Emre's desk, move the rug hanging on the wall to disclose an exit from this room, which leads to a back hallway in the apartment building. Turn around and re-enter the apartment. If you dawdle in the apartment, Emre will telephone again to nag you. Return to the first room in the apartment and go through the closed double doors. Outside, move the mouse to the right to obtain the Exit Location (doorway) cursor, which takes you to the game's navigation map. Head for Topkapi Palace. A look at the sign posted there will show a map of harem passages underneath the palace. Go back to the navigation map and select the Suleymaniye Mosque.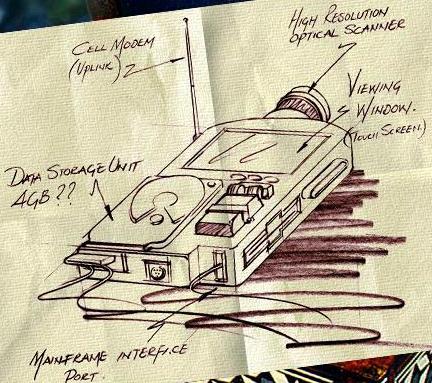
From the mosque courtyard, turn around and talk to the guy in dark blue standing outside the mosque. The cursor on him changes to a highlighted (bright) default cursor, which indicates that an inventory item is to be used in that location. Give him the photograph of Emre from your inventory. Tell him you're looking for a package, then thank him. Zoom in on the shoe rack behind the guy you spoke with. Pick up a pair of red tennis shoes, and learn that Emre has an Uncle Mehmet with a shop in the Grand Bazaar. Examine the red shoes using the magnifying glass in the inventory bar. Pull out a piece of paper from inside one of the shoes. Examine the paper and click on a claim check from the "Grand Hotel de Londres". Turn right and click on the doorway icon in the center of the courtyard to return to the Istanbul map.
Go to the Hotel de Londres at upper left on the map. Turnaround, give the claim check to the happy hotel clerk and get a backpack in return. Examine the backpack to find the following items:
Uncle Mehmet's betting form at Nargile Bar (with address)The backpack disappears from inventory. Leave through the glass door to the right of the clerk, return to Emre's apartment and save your game. Use the power cord on the desk to recharge the scanner.
Scan device ("insufficient power")
Entry pass to the Basilica Cistern
Timed sequence: Once you have initiated scanner recharging, you hear someone breaking into the apartment and you have only 15 seconds to back out from the close-up, exit the room through the door behind the rug, and hide in the back hallway. If you don't make it, the burglar will kill you and you must restore to a previous saved game.
After eavesdropping on the criminals, re-enter the apartment from the back hallway, then exit the apartment and proceed to the Basilica Cistern. If you don't see that destination on the navigation map, be sure you have examined the Cistern entry pass in your inventory.
Turn right and pick up a brochure from the stack to the left of the attendant. Page through the brochure and remove a photograph inside. Give the attendant your Cistern pass and he'll let you go downstairs. At the bottom of the steps, follow the triangular arrow to the left. At the next junction, proceed right. The next intersection has a bilingual sign for the "Tear column", which is illuminated at left and is the same as the photograph in inventory. The column has a hotspot, indicating that an inventory item is to be used with it. The scanner fits the bill, but when you try it, it says to return the unit to its "source" for calibration.
Continue down the wet walkway beyond the Tear column sign and move forward one more time to the end of the walkway. Turn left and note a hole in the walkway that looks like it's been sealed with melted chocolate. We'll see more of this hole much later in the game. Continue turning left and zoom in on a body lying in the walkway. It's Emre!
Timed sequence: Wield the Polaroid camera from your inventory and zoom back out from the murdered Emre. You'll then have about 5 seconds to use the camera on the assailant to avoid being killed yourself. Immediately move forward past the blinded assailant. You'll then have about 10 seconds to move forward a second time before the guy attacks you again. (If you didn't pick up the camera from Emre's apartment, you'll have to restore a game to go back and get it.)
After the "Polis" show up, choose dialog choices with the detective until you are returned to the navigation map. The quickest way to do this is to pick the first response four times. Make your way to Mehmet's rug shop.
Move into the back room of the shop and talk to Mehmet. Select the first dialog choices until he gives you a photo and you return to the map. Go back to the rug shop and re-enter the back room, where Mehmet will tell you that he needs to close up. Return once more to the rug shop to find its door closed. Use the key from Emre's bookshelf to open the shop door. In the first room, move aside the carpet at left and retrieve a duffel bag. Examine the bag and each of its contents to obtain and identify a bee-shaped ring, a letter from Emre to his uncle that mentions a key hidden in a rug, a red notebook with some barely-discernable lettering in it, and a Book of Ceremonies for the Aya Sofya church. The duffel bag disappears from inventory. Zoom in on the rug-covered desk and take a pencil and pair of scissors. Use the pencil on the red notebook in inventory to disclose some hidden lettering.
Go to the back room of the shop and look at a draped rug at right. Lift a corner of the rug and use the scissors on the label to obtain an old coin with a sunburst symbol on it. Examine the scanner in your inventory and press its Power button. It requires a password to operate. Look at the back of the photo you have of Emre and Mehmet. The password to use for the scanner is "AFACAN". The unit attempts to communicate with Istanbul University, but ultimately access is denied. Exit the shop and travel to Istanbul University.
Enter the computer lab and talk to the technician inside. Show her the scanner. Talk to her some more until she identifies herself as Sharife Gelecek. Tell her she can examine the scanner. After a couple more dialog choices, she'll give you a Virtual Reality headset and you can enter the Topkapi Palace simulation. Look around the simulation world if desired, then press the System Exit button at top center. Tell Sharife that a section is missing from the simulation. Choose more dialog choices until you can tell her that the scanner is your only link to Emre and offer to take the scans for her. She'll calibrate the scanner for the mid-16th Ottoman (Suleyman) historical period and suggest that you start at the Archaeological Museum.
After a switch to CD #3, go to the Sulyemaniye Mosque instead of the Museum. Examine the scanner and turn it on to identify the data needed: an Ottoman calligraphic tile and an Ottoman carved wood panel. Turn around, enter the mosque and proceed to the rightmost of three open doorways in the back. Look at the heavy wooden door propped open by a cubical stone. The pattern on the lower part of the door is a hotspot, so use the scanner on it.
Exit the mosque and travel to the other one, Aya Sofya. Enter the building and note the roped-off pattern of marble circles in the floor, known as "the Navel of the World". Turn right and approach a vestibule on the side of the church, containing an Ottoman library. Click on the dark doorway to the right of the four screened library windows, leading to a library office.
Show the photo of Emre and the girl to the occupant. Talk to her and she'll identify herself as Nuray Uchan. Talk to her some more until she leaves. Turn right and scan in the calligraphic tile lying on the table. There are a couple of other historical artifacts in the city that you can scan in, but they aren't needed in the game.
Exit the mosque and return to the University. Give the scanner to Sharife and she'll add your scans to the simulation database. Use the VR headset on the table behind Sharife.
From the Throne Room, move slightly right to see a doorway and panel in shimmering green, identified as deleted data. The items you scanned into Emre's device now show up as inventory items when you are inside the simulation. Put the door shutter and calligraphic tile onto the missing data areas, and Klio will "extrapolate" them into the simulation. Zoom in on the white sofa to the left of the doorway. Pick up a scroll from the sofa, which is a letter from Grand Vizier Ibrahim to Sultan Suleyman.
Game Board Puzzle. Zoom in on the low table in front of the white sofa. As Ibrahim's letter suggests, the goal here is to place twelve stones on the game board in six rows of four. Although there are various solutions that satisfy the requirement, such as
	.     .
	. . . .
	. . . .
	.     .
there is only one solution that has the fixed upper and lower positions occupied by the red stones on the game board. It is a six-pointed star ("Seal of Solomon") configuration:
	   .
	. . . .
	 .   .
	. . . .
	   .
Place the remaining ten stones to form this pattern, and Klio will extrapolate a golden cylinder and a letter on the sofa. Pick up the cylinder and go through the doorway you created into the Privy Chamber.
Turn left and pass through the far doorway into another room, the Imperial Library. Turn around and zoom in on a small alcove in the corner, containing the master switch for the harem fountains. Move the switch into a vertical position, then return to the Privy Chamber. Turn right and approach the running fountain. Shut off the water flow using the curved switch on the wall.
Whispering Fountain Puzzle. Back out and zoom in on the lower front of the fountain. Simultaneous voices are heard from the individuals whose faces are displayed in the tiles. This interesting puzzle can be manipulated so that most single voices can be heard. Number the tiles from 1 to 5, left to right. Tiles can be set to all face up or all face down by pressing the center (Suleyman) tile 3.
To hear Gulbahar, set all face down and press 1 1The puzzle is solved by displaying only the center tile face up. The simplest way to do this is to set all tiles face down and press 5 2 2. In Suleyman's speech, note that he equates noon with the sun. After Klio's extrapolation, pick up the green cylindrical seal from the center tile and return to the Imperial Library.
To hear Roxelana, set all face down and press 1 1 5
To hear Ibrahim, set all face up and press 1 2
There is no way to hear only Prince Mustafa (tile 2)
Clock Puzzle. Zoom in on the writing table in the center and spill some wax from the candle. Roll the green seal in the wax to disclose a riddle (conveniently written in English):
Half of the Sun and half is the MoonLook at the mechanical clock on the table at left. This clock has both hour and minute hands pointing exactly to a number on the face of the dial, rather than operating like a true analog clock. Insert the golden cylinder with the star button into the hole at lower right. Note that the symbols on the three buttons along the bottom of the clock indicate Sun, Moon and (Morning) Star. Using Suleyman's verbal clue, set the clock hour and minute hands at 12 o'clock (both hands pointing up), then press the Sun button at lower left. A tone plays, the button depresses and is no longer a cursor hotspot, indicating you have correctly solved that part of the puzzle.
Half of the Moon and half is the Morning Star
In the wax riddle, "half of the Sun" means half of 12 o'clock, or 6 o'clock. The added "and half" means to add half an hour. Set the clock hands at 6:30 (both hands pointing down), and press the middle Moon button. Next, "half of the Moon" means half of 6:30, or 3:15. Again, the added "and half" means to add half an hour. Set the clock hands at 3:45 (long hand left and short hand right) and press the Star button at lower right. After another of Klio's extrapolations, you'll be able to retrieve a key from inside the clock and a glass vessel from the table. Return to the fountain in the Privy Chamber and place the glass vessel inside (above) the four red petals of the water receptacle. Turn on the water using the curved switch on the wall. The red petals are spread apart and a release mechanism is activated.
Zoom out from the fountain and note the new doorway that has appeared on the wall to the right of the fountain. Go through this (one-way) doorway into the harem passages. A map of these passages was seen earlier outside the present-day Topkapi Palace:
Proceed down the stairs ahead, then turn right and move forward, left and forward, right and down some more stairs. The walls here have that "painted-on" look seen in the secret passages of earlier games such as Shivers . Instead of descending the third flight of stairs ahead (which leads to a dead end), move left, forward, left, forward, right, forward, right and downstairs. This takes you into the Sultan's Treasury room, and the door locks behind you. (It's possible to get trapped in this room if you neglected to pick up the brass key from the clock puzzle, in which case you can exit and re-enter the simulation to return to the Throne Room.)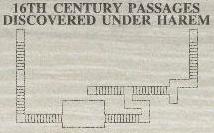
Zoom in on the dark red box on the table and use the brass key to unlock it. Manipulate the latch to open the box and retrieve the ruby ring inside. This operates a mechanism which opens two exits from this room. Zoom back from the table and click the movement cursor on the doorway behind the table, which takes you up one flight of stairs. Turn right and move forward four times up two flights of stairs into the Sweetmeats Room. If desired, turn around and examine a map on a shelf inside the wall.
Move forward to the latched doorway. Open the recessed panel at left and operate the mechanism inside to unlatch the door. This results in the "simulation complete" message from Klio:
Site extrapolation complete. Simulation potential maximized.If desired, move forward through the doorway to return to the Imperial Library. Press the System Exit button at top center to exit the simulation. Sharife calls Klio a "velet" (Turkish for "brat"), and says she didn't know about the harem passages. She apparently never looked at the sign outside the Topkapi Palace. Talk to Sharife until you are returned to the game's navigational map. Now head for the Archaeological Museum.
Examine the far end of the museum courtyard. Zoom in on a large, partially-demolished Roman sarcophagus. Although this object has a cursor hotspot, it cannot yet be scanned in. Back out twice and go up the steps at right into the museum. Enter the exhibit room to the right of the lobby, then turn left and exhaust the dialog choices with Nuray. Return to the museum lobby and climb the stairs to eavesdrop on some conversation between a bad accent and bad acting. Enter the curator's office and show her your press pass ("Basin" is Turkish for "Press"). Exhaust the dialog choices with her, then exit the museum. You'll be intercepted by the police detective. Whatever your response, he'll end up confiscating your passport. Continue forward to the navigation map.
After a switch to CD #4, return to Emre's apartment. Exhaust the dialog choices with Sharife and she will give you the VR headset for the Basilica Cistern simulation (which shows up on the navigation map rather than in your inventory). Look down and pick up a newspaper from the step in front of Emre's apartment. Examine the scanner to find that data on the Tear column in the Cistern is needed. Turn left and exit to the navigation map. Access the simulation headset. Explore as desired, then exit the simulation and use the map to return to the Archaeological Museum lobby (the Basilica Cistern is too humid an environment to perform a scan of the actual Tear column). Enter the Byzantine exhibit room to the left of the lobby and speak with the blue-suited man there (Hilary Peebles). He won't appear unless you've actually tried the Basilica Cistern simulation. Exhaust all the dialog choices with him, then show him the photo of the Tear column that was inside the Cistern brochure. Exit the museum and proceed to the Forum of Theodosius.
To familiarize yourself with the area, move forward once toward the red car in the distance, then forward again toward an area of bushes to the left of the sidewalk. Back out twice to your original starting position, then turn around and approach the column to the left of the sidewalk. This column has a hotspot and seems like a prime candidate for scanning.
Timed sequence: Scan the column and zoom out. When Carlo appears from behind the column, immediately back out and move forward twice to the bushes you explored earlier, where you can evade Carlo.
At the Galata Tower, exhaust the dialog choices with Eskander until he walks away with the same echoing footsteps you heard earlier in the mosques. Return to the navigation map and use the VR headset.
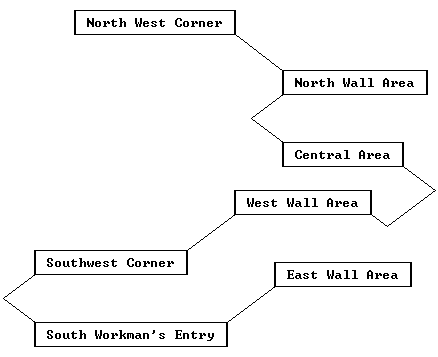
The map below shows the discrete locations in the Basilica Cistern. Be sure the bottom of the simulation screen has Detail On. The name of each location is usually shown at upper right, but occasionally may be omitted.
Use the NW compass heading to proceed along a path immediately to the right of the workman's ramp.
At the Southwest Corner, proceed NE.
From the West Wall Area initially facing a green simulated wall, proceed SE.
From the Central Area location, face W and put the white column in your inventory on the shimmering green area of deleted data. Klio will then extrapolate the simulation, which in turn causes eleven collectible artifacts to appear in the Cistern. Facing E, pick up a small orange Implement from the ground. Facing SE, pick up a Rope and Tackle. Proceed SE back to the West Wall Area.
Facing N, pick up a tapered Engineering Frame. Facing E, pick up a Rod from the ground. Facing SE, pick up another Implement. Proceed SW back to the Southwest Corner.
Facing W, pick up both Engineering Supports. Facing E, pick up a third Engineering Support. Proceed SW back to the South Workman's Entry.
Facing E, pick up Forceps and Rope from the ground. Proceed NE to the East Wall Area.
Facing NE, pick up a Treadmill lying on the ground. Move SW NW NE SE NW to the North Wall Area.
Facing SW, pick up another Engineering Frame leaning against a column. Exit NW to the Northwest Corner and face SE towards an upside-down Medusa head.
Basilica Cistern MapHoist Puzzle. Here we will recreate the Roman Hoist seen earlier in Emre's apartment:
You will need to have eleven items in your inventory with which to construct the hoist. Zoom in on the floor in front of the Medusa head. Begin by using the purplish iron implement 9 times to pry up all the light-colored stones to create seven separate holes of various sizes in the floor. Zoom in on the largest hole immediately in front of the Medusa. Insert the π-shaped bronze implement into the lower Medusa symbol and click the Manipulate (pointing finger) cursor on its lower end twice to orient the symbol so that its mouth is at right. Use the Take (hand with page) cursor on the other end of the implement to transfer it to the other Medusa symbol, then Manipulate its lower end four times to unlock the mechanism and raise up the stone. Zoom out once.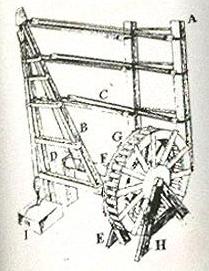
For the construction of the hoist itself, be careful not to accidentally zoom out or you'll have to restart the puzzle. Start by placing the tapered engineering frame into the leftmost two floor holes. Place the other engineering frame into the rightmost two floor holes. Connect the rope and tackle to either frame. Place the closed-ended engineering support into the open hole at the back. Place one of the two open-ended engineering supports into the larger hole in front. Put the wooden rod onto the open support, then add the treadmill to the end of the rod. Put the remaining open-ended engineering support into the empty hole in front of the treadmill. Finally, add the forceps and rope to the pulley at the top of the tapered support. When complete, the hoist should look like this.
Click on the forceps to attach it to the Medusa stone. Use the treadmill to raise the stone, then quickly lock the treadmill using the iron implement on its axle. Zoom in on the hole under the raised stone. Klio responds with the simulation-complete message. Retrieve the liturgical fan. Exit the simulation mode and after a switch to CD #5, note that the VR headset is no longer available in the navigation map.
Return to Emre's apartment and read the note taped outside his door. It's a message to Mehmet that makes a reference to Istanbul's book bazaar. Turn left and navigate to the book bazaar. You can tell the sitting vendor that you're just looking. Back out, turn around and speak with the standing vendor, who turns out to be a member of Mehmet's family. Tell him you're a friend of the family and exhaust the other dialog choices. Look at the dark blue astronomy book on the left upper shelf of his bookstall to see the constellation patterns of the zodiac. There's a pink book in his stall behind him at waist level that he will now let you take.
Examine the pink book to learn about seven Ephesian Letters (words) that can be arranged into three sets of opposites. There is also a reference to a shop in the Arasta bazaar. Exit the book bazaar and navigate to the Arasta. Turn right and enter the open shop. Turn around and pick up one of the brown bags from the low red table. Agree to the sales price of three million lira (about $20 at the time this game was released). After talking to the shopkeeper, examine the bag to see its contents of Ephesian Letters. Although these letters have "hotspots", you won't yet be able to scan them into Klio's database. Exit the shop and return to the curator in her upstairs office at the museum. Since you have the Ephesian Letters in your possession, you will be able to ask her about the pink book. When you've finished talking to the curator, return to the University. Enter the computer lab and turn right to see Sharife. Talk to her until she gives you the VR headset.
Move forward to the library steps. At lower right is a Nine Men's Morris game you can play against a computer opponent. In some games, such as Drowned God, solution of a Nine Men's Morris game is required to advance the story. But in Byzantine, it's just for fun.
Enter the library and turn right. Zoom in on a wall panel in the corner to disclose an array of seven labeled buttons. Oh no, a destabilized site matrix! Four of the buttons are "hot": Thought, Knowledge, Virtue and Wisdom. The buttons are suggestive of the words on the Ephesian Letters, but you don't have them with you. Exit the simulation and scan in the Ephesian Letters in the bag from the Arasta shop (this task can't be done until you've actually tried the Ephesus simulation). Give the scanner to Sharife so she can input the data into Klio. Use the VR headset on the table behind Sharife to re-enter the simulation. Return to the wall panel inside the library. The Ephesian Letters in your inventory can be used to replace each of the four "hot" buttons with a word that is approximately opposite in meaning to the word on the opposite side of the hexagonal array:
Replace Thought with Dark (opposite of Light)An underground passage is opened up to a large sarcophagus. We had seen a Roman sarcophagus earlier in the museum courtyard, but were unable to scan it at that time.
Replace Virtue with Sea (in a sense, opposite to Earth)
Replace Wisdom with Year (in a more obscure sense, opposite to Sun, which might represent "day")
Replace Knowledge with Truth, the only unmatched Ephesian Letter
Exit the simulation and the computer lab and navigate to the back of the museum courtyard to scan in the sarcophagus. If you turn around, you can eavesdrop on Akalin and Uchan jabbering in Turkish. She seems depressed. Return to the University, give the scanner to Sharife and again use the VR headset to re-enter the Ephesus simulation. Go back into the underground passage and replace the anomalous sarcophagus data with the image from your inventory.
After Klio's extrapolation, zoom in on the offering bowl in front of the sarcophagus. Here is a hotspot very similar in appearance to the sunburst coin you found hidden in the rug in Mehmet's shop. But again, this is missing from your inventory. One more time, exit the simulation, scan in the coin, give the scanner to Sharife, use the VR headset, and return to the sarcophagus. Use the scanned coin in the offering bowl, and Klio responds with
Datagate macro completeThis action opens up another section in the simulation:
Activating hidden files
Subsimulation EMRE 7421
From your initial location in the vestibule of the Temple of Artemis, look down and take three silver ingots lying on the ground (one of these is behind you). These ingots have zodiac symbols and the corresponding constellation patterns on them. Exit the temple. On the temple steps, look to the lower left and pick up two more silver ingots. Turn right and continue forward toward a green building in the distance. Turn around and move along the right side of the Temple of Artemis. Look directly down at the side steps of the temple (immediately above the green simulation crosshatching) and pick up the sixth ingot.
Re-enter the Temple, turn right and examine the small wall panel next to the side door. If you take a close look at the panel, you'll see that it has a small bee symbol at its center, suggestive of the bee-shaped ring you found in Emre's duffel bag at the carpet shop. It has a hotspot, but you have no bee ring in your inventory. Follow the familiar procedure to obtain it: exit the simulation, scan in the ring, give the scanner to Sharife, and use the VR headset.
Turn right and use the bee ring on the wall panel to open the side door. In the south gallery, move forward once and look at the large statue of Artemis at left. She is wearing a necklace made of nine of the twelve zodiac symbols. They are somewhat difficult to see from this vantage point, but the last symbol on the right seems to be a crab (Cancer).
Continue following the gallery around the statue. In the north gallery, face west (using the compass at lower right) and pick up the seventh ingot. Take another look at Artemis's necklace from this angle -- the first symbol on the left appears to be two fish (Pisces).
Exit the gallery, turn right and enter the Temple's central chamber (cella). Pick up the eighth and ninth ingots from the floor. Turn around and pick up three more ingots, bringing the total in your inventory to twelve. Zoom in on the offering table at the foot of the statue.
Zodiac Puzzle. The objective of this puzzle is to place, in the correct order, the nine zodiac symbols seen on the statue's necklace. Confirmation of each zodiac symbol's constellation pattern can be made using a page from the astronomy book in the bazaar:
The zodiac symbols on the necklace are arranged right to left in natural calendar order from Cancer to Pisces. Refer to the newspaper you picked up at Emre's apartment: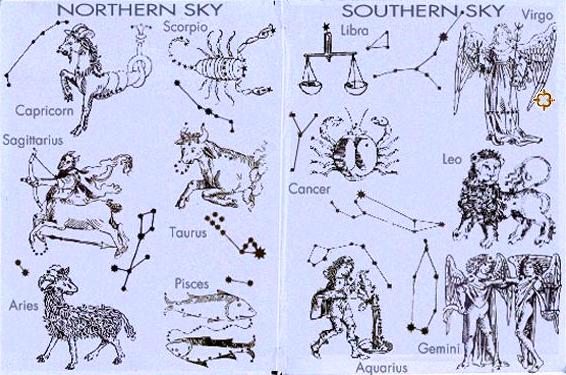
Arrange the ingots from Cancer on the right to Pisces on the left:
Pisces Aquarius Capricorn Sagittarius Scorpio Libra Virgo Leo CancerWhen all nine silver ingots have been correctly placed on the offering table, a golden bust of Alexander is disclosed and Klio responds with the simulation complete message. But system access is terminated at the source and Sharife is all pissed off.
After a switch to CD #6, return to the museum and speak to the curator in her upstairs office. After you exhaust the dialog choices with her, she'll mention that Gordian Construction was involved in the excavations. Exit the museum and make your way to Gordian Construction. Their doorway is marked with #346, even though the curator told you their address was #28. You'll need a numeric code to open the door.
Zoom out from the doorway and click on the hotspot above the white parked car. This will lead you around the block to the nearby Nargile Bar. Turn slightly left and proceed downstairs to the cellar under the bar.
Timed sequence: Once you go through the wooden door into the cellar storeroom, you'll have 60 seconds to explore before Carlo comes in and rubs you out. He'll also get you if you try to exit the storeroom through the door you entered. Once inside the storeroom, turn right and examine some metal shelves stacked with yellow boxes. Click on the Global Air ticket in the "Tombeki" box to disclose a handwritten piece of paper. Take the paper, then zoom out, turn left and exit the storeroom through the far set of double doors. This takes you back to the street where Gordian Construction's office is.
Return to the Nargile bar. The bartender won't let you back into the cellar if you're carrying the handwritten note. (There are a few other things to explore in the storeroom, but none of them are essential to the gameplay.) Zoom in on the countertop in front of the bartender. Examine the handwritten paper in your inventory, which shows a fruit and color code. This is probably also related to the day-fruit text you uncovered in the red notebook from Emre's duffel bag. A lime is sitting next to the Rummikub rack on the countertop, so it's a good bet that the green numbers will be used today. They are 7 0 4 9 (the "wild card" tile is used to represent zero).
Exit the bar and navigate back to the Gordian Construction office. Enter the door code 7049 and enter through the door. Move forward and use the elevator to go upstairs.
Timed sequence: Once in the upper Gordian office, you'll have 60 seconds to explore before a Turkish policeman comes in and takes you away. Click on the notebook at the right end of the glass conference table. Click on the bank check to store it in your inventory. There shouldn't be any difficulty in pilfering this item since the timer seems to reset whenever you change from side-scrolling mode into a close-up or examination view. Once you've picked up the check, immediately rotate left and exit the office. Take the elevator back down and go through the red door into the street.
Move the mouse up to obtain the Exit Location (doorway) cursor. Navigate to the Galata Tower, where Sharife likes to go when she's upset, according to what Eskander told you earlier. Give her the bank check and she'll eventually grant you access to her first simulation.
From your initial position in the inner narthex, turn around and pick up a helmet from the stone bench. Move forward into the vestibule to the right of the bench. There's a golden lamp here, but you won't need it. Take the exit at right to ascend a ramp to the upper gallery. Turn around and pick up a giant red compass leaning against one of the stone columns. Rotate left and proceed towards the arched window.
At this location, there is a large circular green marble area on the floor, which you can see is associated with Empress Omphalos if you have Detail turned On in your simulation options. Rotate left and pick up a vase of roses from the balcony railing.
Return back down the ramp and through the double doors of the vestibule into the inner narthex. Turn left and enter the nave of the church. Turn left and look down to see a circular well in the floor. If you accidentally zoom in and fall into the well, you can levitate out of it by moving the cursor to the top of the screen, just below System Exit. Turn right to move further into the church, then explore the gallery on the left side. Pick up a purple bottle standing next to one of the columns. Exit the gallery back into the nave and approach the altar area at the back, behind the pulpit. Retrieve an orb and a cup from the altar. You should now have at least the following five items in your inventory: cup, orb, purple bottle, compass and helmet. Examining these items shows that each is associated with a particular historical figure. Return to the center of the nave and approach the screened circular area. This is the arrangement of marble floor circles we saw earlier in the real Aya Sofya.
Navel Puzzle. The objective of this puzzle is to place each person's object on the marble circles in the correct order, so as to produce correctly-ordered parts of the Prayer of Dedication. If necessary, exit the simulation to refer to the Book of Ceremonies you found in Emre's duffel bag at the carpet shop. The book lists the prayer participants in order:
PatriarchOn the marble circles in the nave, place the following objects in order:
General Belisarius
Architect
Empress Theodora
Emperor Justinian
Patriarch's cupThe next item is Empress Theodora's bottle, but there's no hotspot for that in the nave. Instead, return to the upper gallery and place the purple bottle on the green marble circle there. Return to the nave and complete the puzzle by placing Emperor Justinian's orb on the Navel of the World.
General Belisarius's helmet
Architect's compass
Timed sequences: Pick up Constantine's golden diadem. You then have 30 seconds before the police show up and arrest you. Zoom out from the marble circles, rotate right and move forward twice into the hole in the floor.
At that point, you'll have two minutes before total system failure dumps you out of the simulation and you're arrested. Within that time period, you will need to navigate a short maze and operate some computer file controls. It may be easier to traverse the maze if the following map is used:
From the initial position in the large green room at the bottom of the well, make the following movements: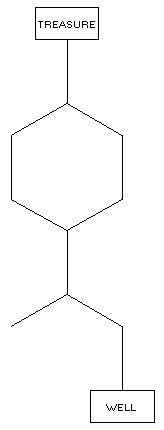
ForwardThis takes you through a shimmering green panel without crosshatching
Left and forward
Right and forward (dead end to the left)
Right and forward
Left and forward
Left and forward
Right and forward
and into a room in which can be found the simulated versions of the previously-discovered treasures: ruby ring, gold bust, liturgical fan and golden diadem. Exit the room through the closed alcove ahead and into a computer menu area.
Click on:
Knotand watch the endgame sequence in which Eskander Lasovich and Carlo Genevese are arrested for murder. From the game's Discovery menu, you can replay the epilog sequence and roll the game credits, as well as revisit any of the in-game simulation worlds.
Transactions
Export
Computer Lab in the triangle at lower right (click on the "Lab" word)
Center of triangle
Copyright © 2007, 2025 Balmoral Software (http://www.balmoralsoftware.com). Portions copyright © 1997 Discovery Communications, Inc. All rights reserved. Republication, redistribution or conversion is expressly prohibited without the prior written consent of Balmoral Software.