Copyright © 1996-1997, 2025 Balmoral Software (http://www.balmoralsoftware.com). Portions copyright © 1996 Sierra Online, Inc. All rights reserved. Republication, redistribution or conversion is expressly prohibited without the prior written consent of Balmoral Software. Contents subject to change! For the latest information, see http://www.balmoralsoftware.com.
Without the extensive backstory offered by the book series and by the characters in the game itself, Rama would still be a challenging and enjoyable entertainment. So it's not necessary to be a Clarke fan, or even to have read any of the Rama books, in order to enjoy the game. The level of detail and richness in the texture-mapped graphics, as well as the first-person viewpoint, makes it easy to become immersed in the game's premise that you're part of an astronaut team exploring the giant Rama spacecraft. The acting in the video sequences, uniformly excellent throughout the game, really contributes to this experience.
Should Rama be subtitled The Numbers Game? Well, one thing is for sure - you're not going to finish the game without at least a rudimentary knowledge of octal and hexadecimal arithmetic, sequences of prime numbers, and pattern recognition. Given the backgrounds of Clarke and Lee, this mathematical overtone should come as no surprise. It really adds another dimension to the game :).
Like a number of other first-person adventure games, Rama uses a framed viewport to show the action, with the remaining areas of the screen used for inventory display, a few control functions, and decoration. While this type of interface is not as visually impressive as a full-screen display, it didn't seem to detract much from involvement in the game. It does provide a close-up view of an inventory item by moving it from the inventory area to the "3 eyes" examination area at lower left of the game screen, which is a crucial feature for completing the game.
The game could have benefited from optional keyboard-based navigation controls, such as was used in the excellent Timelapse interface. You can get killed (or fired) in this game, but there is a forgiving "retry" function after you get an apology and warning from Clarke in a live-action video. There are 99 saved-game slots. The game plays on two CD-ROM's, with a third reserved for some amusing video interviews with Clarke and Lee, as well as additional story information presented in the form of astronaut interviews by the journalist characters in Rama. The game may be started from either CD-ROM.
Rama has excellent stereo sound effects. In several areas, such as the London waste pit, the background sounds are particularly effective in adding depth. Music is above average, but rather repetitive due to fairly-short sequences. The endgame is adequate, but perhaps a bit anticlimactic considering the breadth of the game and its fairly-difficult puzzles. I was a little disappointed not to meet any real live Ramans, but that remains consistent with the storyline in the Rama books. All the door entrance puzzles in the game are on the right -- are most Ramans dextral too?
A significant characteristic of Rama is its randomization of play components, affecting inventory item locations, the timing of animation sequences, a few puzzles, and certain destination locations in the central plain. For example, many inventory items encountered in the first half of the game have no fixed location where they can be found - if you need something you haven't found yet, you're just going to have to search carefully for it. As a result, it's not possible to give an exact step-by-step procedure for progressing through that part of the game - your mileage may vary. If you can't find an item that you need for a puzzle, continue on with the game and it may become available later. The game designers' purpose in creating these randomizations is not clear - they change only the details of the game, not the basic concepts or gameplay strategy, and add little to game replayability.
As a basic strategy, pay particular attention to the ground and floors, as artifacts may often be found there. A painstaking, but effective approach to moving through the environment is to turn completely around at each node position and check each view carefully.
Quite a bit of inventory turns out to be "red herrings" - unneeded in your actual gameplay sequence, but perhaps confusing your choices at various points and making the game a bit more complex. Note: Inventory items cannot be dropped once they've been identified as unneeded. It may be convenient to move items that are known to be puzzle solutions to the bottom of the inventory list so they can be accessed easily when needed.
Here is a list of characters in the game:
ID Character Game Role 002 Yourself Adventurer 004 Shigeru Takagishi Scientist 005 David Brown Mission Commander 006 Francesca Sabatini Video Journalist 007 Otto Heilmann Chief Security Officer 008 Michael O'Toole Codemaster 009 Richard Wakefield Chief Engineer 010 Reggie Wilson Print Journalist 011 Irina Turgenyev Career Cosmonaut 012 Nicole des Jardins Medical Officer Hiro Yamanaka IBI Agent Janos Tabori IBI Agent Valeriy Borzov Your predecessor, now deceased
All characters are from the Clarke/Lee book Rama II.
Walkthrough Abbreviations:
F: Forward (Fn for n repetitions)
L: Left
R: Right
B: Back out
U: Up
D: Down
Most animations can be skipped by pressing the [Esc] key.
After the game introduction and an animation of Nicole, you'll start at the Hub Camp inside a darkened Rama. A map of this area is available here. Move F L F2 to the computer console. Click on it, then on the MAIL command to bring up your vidmail. Each message adds a bit to the backstory of the game and introduces you to the basic personalities of the other astronauts. Be sure to play at least the two highlighted messages from Wakefield and O'Toole as both will be needed to advance the gameplay. Wakefield describes his robotic creations Falstaff and Puck, which can help you later in the game. O'Toole provides the code for operating the cable car, which is from his favorite numerical sequence.
Move L and watch the animation of an avian flying by (more of them later). Move F4 L F and use the hand icon to descend the ladder. Move R F and click on the nuclear device. Pick up the locker #6 key next to the INACTIVE light and store it in your inventory. Move B L F L and go back up the ladder. Move F R F R to some lockers. Open Locker #2 with the corresponding key in your inventory and pick up the ISA multi-tool and your wristcomp. The wristcomp has a map feature that may come in handy during gameplay. Open the unlocked Locker #9 and pick up your trusty sidekick, Puck. When you get a vidmail message from Sabatini requesting her cigarette lighter, you can ignore it.
Open Locker #6 with the tagged key in your inventory and pick up two pattern artifacts, a blank key, three symbol plaques and a datacube. You can ignore the lighter, which has a vertical silver ridged shape and won't be needed in the game. Combine the datacube with your wristcomp to load it into your MAIL database, where you can open it up to read a text message from Sabatini to Brown. To reduce clutter in your inventory area, it's recommended to load each datacube you encounter into your MAIL database, which can always be activated by moving the wrist computer icon into the examination area at lower left. Use the blank key to open Locker #7 and pick up an octagonal optical lens and a datacube containing an encoded text message from Heilmann to his underlings. If you spend a lot of time at the hub camp, you'll eventually get a friendly reminder from Nicole to come on down.
From the lockers, move L F2 R F L and get in the cable car. Enter the code
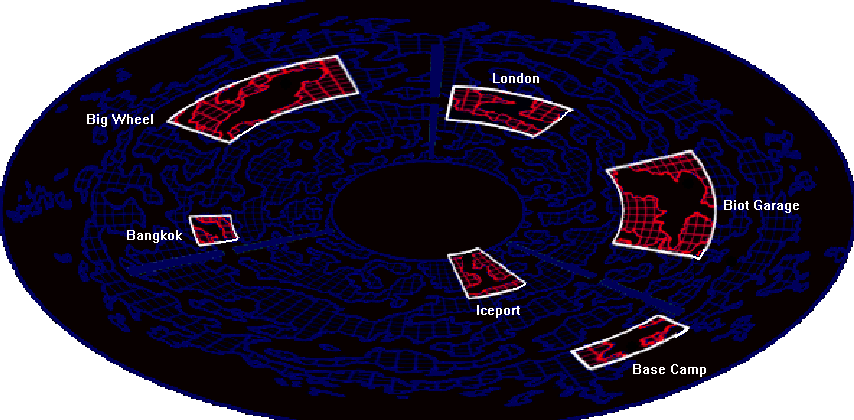
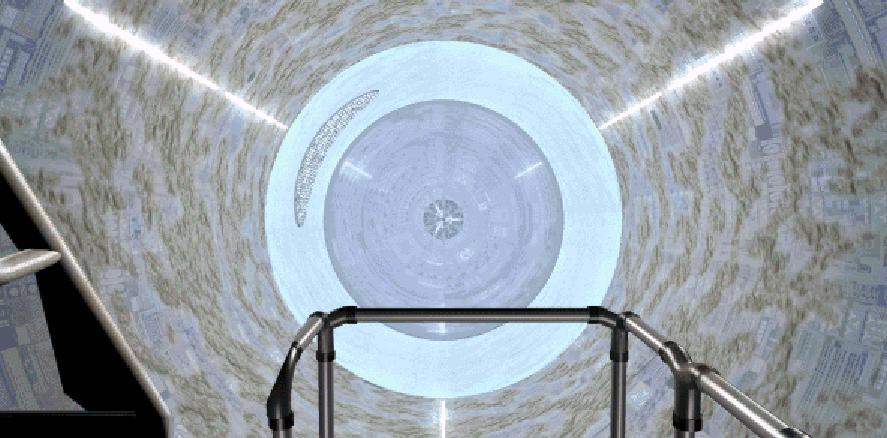
Move R F to the table and, if desired, pick up a note from Nicole and a datacube (both shameless plugs for Clarke's upcoming book 3001). Move L2 F R and open the storage box on the other table. Inside, pick up any pattern artifact(s) and symbol plaque(s) you may find. Note: Other astronauts add items to this storage box from time to time, so check back on it later if you seem to be missing an item. Move B L2 F and watch the animation of Turgenyev. Move F3 out onto the central plain, and a radar map of it will be displayed:
You can click on a highlighted area of the map to see more detail as well as the code number of an astronaut at that location. Some of the fixed areas on the map will be displayed later. There are a few randomized locations on the central plain that contain a moving biot symbol. If you decide not to visit an area, just click outside the detail view. But be sure to immediately click outside the detail view if you see a triangular sextet of crab biots, or you'll get trashed! A centipede biot, shown on the radar map as a row of four green squares, is safe to visit and may drop a symbol plaque to augment your inventory. Note that some areas can be entered or exited from more than one direction, as shown in the area maps below.
To quickly identify the fixed destinations on the central plain radar map, we'll use a 12-hour clock analogy:
Description Approximate location London 1:00 Biot Garage 3:00 Base Camp 4:30 (outer) Iceport 4:30 (inner) Bangkok 8:30 Big Wheel 10:30
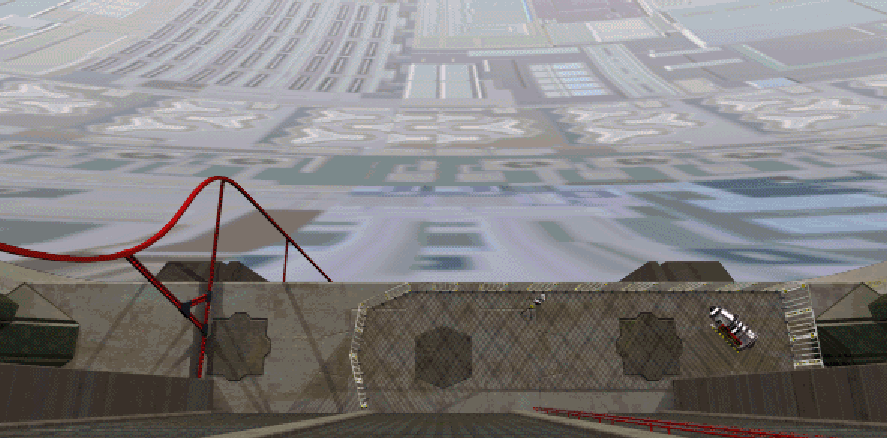
For reference, there are equiangular light valleys at the 12:00, 4:00 and 8:00 positions. Once you are at a central plain location, you can often find the exit back to the radar map by moving toward narrow spires that may be seen in the distance.
We'll start with a couple of quick visits to trigger some astronaut interactions that will facilitate gameplay later. Visit the Biot Garage at location 3:00 (which incidentally triggers access to London), then move R F to return to the radar map. Visit the Big Wheel at 10:30 (which incidentally triggers access to Bangkok), and get a decryption card from Francesca. Click the card on your wrist computer to allow you to read the encoded text message from Heilmann (subject: Trinity). You'll also be able to read any other encoded messages you happen to come across in the course of gameplay. Move R F to return to the radar map and search it to find the location of Wakefield (009). Visit that location and get a circular optical lens from him. Return to the Biot Garage area at 3:00.
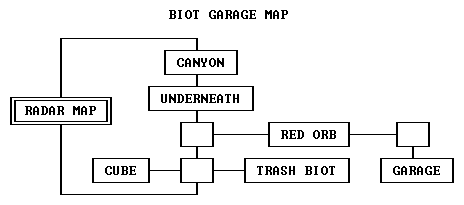
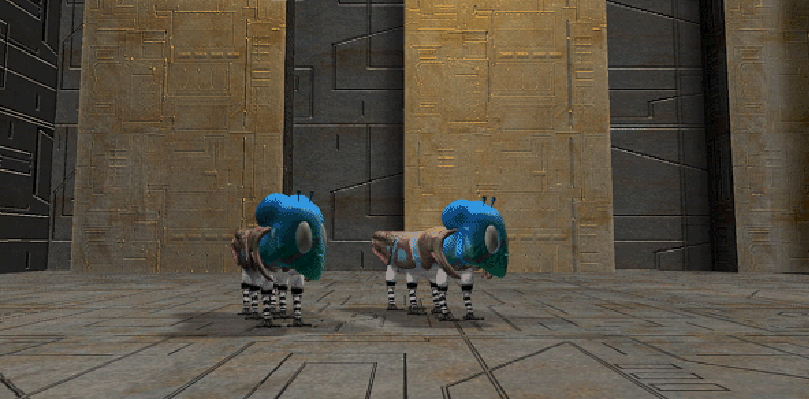
A map of this area is available here. Checking each location thoroughly for objects lying about, move F L F to a cube of transparent alien material containing a symbol plaque; you'll return for this one later after the material is melted. Move R2 F2 and get a datacube from Reggie Wilson showing a video of crab biots. He describes the large green trash biot there that you'll also find at various other locations in Rama. Check the rectangular trash bin for any objects to pick up (as you'll want to do every time you find a trash biot). Move L2 F R F R F R and pick up a red shard from the remains of the broken sphere. Move L F and you'll probably be able to pick up an orange object that turns out to be another optical lens, this one square. Move R F into the biot garage and explore it by clicking Puck on the various types of biot inside to hear their descriptions:
Biot Type Purpose Centipede Repairs other biots Crab Trash collector Mantis Uses colored light Crane Lifts heavy loads Shark Water-borne Spider Assassin
Exit the biot garage and move L F. Nicole should appear and give you a symbol plaque having a 16-segmented circle that she said fell off of a centipede biot. Move F L F3 back to the radar map and head for London at 1:00.
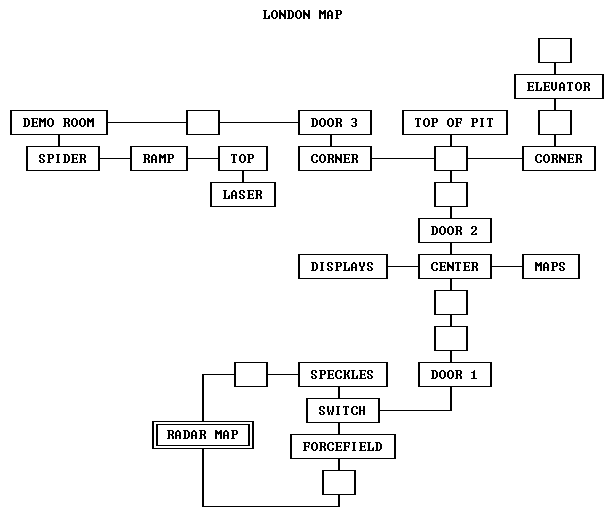
A map of this area is available here. Move F and listen to Takagishi. He makes a reference to a pattern in the pulsing of the forcefield blocking entry to the red London building ahead. If you count the individual pulses of the forcefield, you'll note that after every ninth pulse there is a 1.5-second pause during which the field is off. If you time it right, the pause will give you enough time to move through the forcefield without getting fried. After you've passed through, move L and pull the tan-colored switch to turn off the forcefield. Note the encircled triangle at the top of the forcefield switch - you'll need to use that later. Pick up any items lying on the ground. Move R2 F to the London building entrance.
From the open London entrance, move F2 and turn around checking for inventory items as usual. Move F2 through a central area to a closed door on the opposite side of the room. Check this area for items to pick up, then move R F back to the central area. Check this area as well for more items. On one side is a small triangular control panel with colored lights that you can zoom in on. Press the triangular purple button at the top, then press the yellow button to see an animation of the Rama spacecraft orbiting another solar system. This procedure unlocks two optional puzzles on the opposite side of the room. There are also some other aspects of the Rama spacecraft that you can explore with the control panel, including a red sphere that seems to show the locations of various species inside Rama. Another sequence shows the fabrication of the Rama spacecraft shell, but a more likely construction method (at least for humans) would involve hollowing-out an existing asteroid.
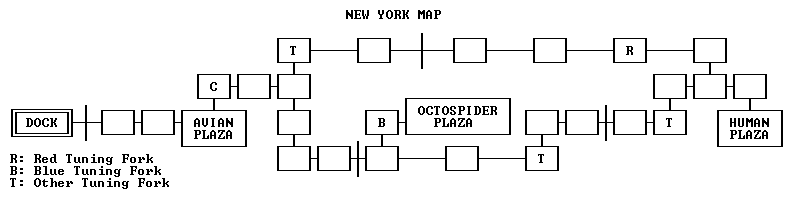
Move B R2 to face two puzzles on the other side of the room. Solving them completely is not required to advance the gameplay, but is highly recommended in order to significantly reduce your already-cluttered inventory. You may need to access other areas in the London building before you can gather all 12 rectangular yellow pattern artifacts needed. In your inventory, you'll see that some of these artifacts have fairly complex details but others have a simple outline that is part of a large oval shape. Each of these two types of artifacts will be grouped together for separate puzzles. We'll start with the pieces for the oval puzzle as it is easier to solve. Zoom in on one of the panels and place pattern artifacts onto the six blank areas to create an oval representation of New York island in Rama's cylindrical sea. When complete, the oval shows a map of a maze of corridors leading to three plazas that you'll be visiting later:
Zoom in on the other panel and place your six remaining pattern artifacts. When complete, the display shows an interactive map of the central plain, with red dots representing artifact locations and white smudges providing close-ups:
Move B L F to a closed door.
Click on its column at right. This will be the alternate puzzle to the one solved at the entrance. For details on a solution, see the section below on pattern recognition puzzles. After you've opened the door, move F3 D to see a Y-shaped configuration of paths traversing a waste pit, with an access elevator and ramp at the right. Move U R F L F L F and watch an animation of a mantis biot using a red laser (twice) to descend in an elevator. Move F2 and pick up the biot box. On examining this box, you'll see that it has a triangular button on its back. Have you seen this shape before?
Move B L and create a red laser equivalent in your inventory by putting the ISA multi-tool into flashlight mode using its white button and then combining it with the red crystal shard you picked up outside the Biot Garage. To summon the elevator, use the red flashlight on the laser target in front of you. Move B F and repeat the laser procedure to descend into the waste pit. Move L F down the ramp to the walkway and pick up any (dirty) symbol plaques from the fluid there. You can explore the other walkways and won't miss any areas if you always turn to the right. Dirty plaques may be found in the fluid or clean ones on top of a walkway. Specifically, move R F R F R to the end of the next pathway, then R F R F R again to the end of the third pathway. Finally, move R F R F L F L back into the elevator and ascend to the top of the pit as before.
When the elevator has risen, move R2 F R F2 R F L F6 R F back to the forcefield switch and put the biot box onto the switch to obtain an important symbol plaque. Move L F3 back to the radar map.
Plaques found in the London waste pit are dirty and require cleaning before they can be used in a door puzzle. This is done with a device in the Big Wheel location that requires some setup. Once you've entered the waste pit room, you can return to the Base Camp at 4:30 on the radar map and pick up a box of powder from the refrigerator there. Also use this opportunity to empty the storage box next to the refrigerator. Then go back to the radar map and head for the Big Wheel area at 10:30. A map of this area is available here. On arrival, move F and check the trash bin, then move R F2 R and pick up a seed from one of the cone-shaped plants on the ground. Move L2 F to a large gun and open the hatch on its barrel. Insert the three optical lenses in your inventory in the left-to-right order octagonal, circular, square. This will cause the gun to automatically fire to a distant location on the central plain, melting the cube of alien material seen in the Biot Garage area.
Move B L F to the plaque cleaning mechanism. Zoom in on the central part of the mechanism and insert the seed into the star-shaped hole at right. Put the box of powder into the adjacent receptacle. Turn the thumbwheel at upper left to get cleaning fluid flowing into the mechanism. Back out and click on the device at right shaped like a pot-bellied stove. Press the triangular red button to clean the blue material off the tray. The vertical graduated tube at left indicates you have four remaining cleanings. Find the needed symbol plaque(s) in your inventory and clean each one by putting it in the tray and using the red button. If you use up all four cleanings and need more, you can get another seed from the plants in this area and insert it into the mechanism.
Once cleaning is complete, move B L F3 back to the radar map and head back to the Biot Garage at 3:00. On arrival from the bottom move F L F and pick up an important symbol plaque from the melted cube. This will probably give you everything you need to open the third door in London. While in this area, move L2 F2 and check the trash bin for any objects that may have appeared there since your last visit. Move R2 F L F2 back to the radar map and return to London at 1:00.
Use the London map to navigate to Door 3 above the trash pit. Click on its column at right to disclose a pattern recognition puzzle in the second sequence. After you've solved it and opened the door, move F2 L F L F2 R F R through the biot demonstration room. Click on the device to fire a green laser at the crane biot and get it to disable the spider biot guard. Move R F L F2 L and pick up the alien palette. Zoom in on the display console on the wall pull the lever down to activate a video link with the big wheel control room you'll visit later.
Exit London and return to the radar map. Along the way, Nicole will give you a datacube describing Wilson's death, and Rama will make a course correction, apparently now heading for impact with Earth.
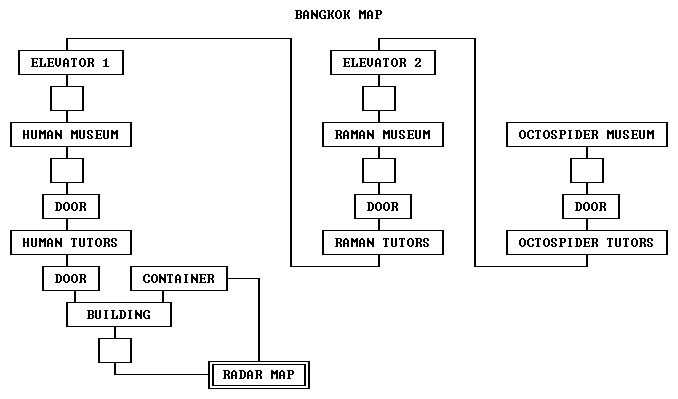
Go to Bangkok at 8:30 on the radar map. A map of this area is available here. Move F2 and click on the column at right to disclose a pattern recognition puzzle in the second sequence. After you've solved it and opened the door, move F into a "human tutoring" area. The three machines at left are used to solve simple symbol-matching, counting and addition/subtraction problems in base 10. A white screen indicates a correct answer and a red one indicates an incorrect answer, after which another question will be asked instead. There is no time limit, but the machine will make a sound to nag you periodically. On completion of a set of five problems, each machine will open. In the left machine, click on the phonograph-like device to open the door at the far end of the room. In the right machine, pick up a red gem. The middle machine has up to 11 symbols in each row, and can be skipped if desired since there's no payoff. Move U B R F3 to enter a human museum (don't forget to keep hunting for symbol plaques).
After exploring the hexagonal museum (and admiring the bathing suits, if you're so inclined), move to the elevator car at the back of the room.
After listening to Wakefield's lecture, solve the arithmetic problems using the three machines at left, repeating the process you used in the human tutoring area. The left machine requires only symbol matching, and when it's completed permits the opening of the next door.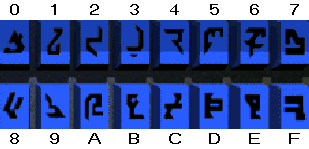
The middle machine requires entering the number of red symbols on the screen (up to 11 per row) using Raman symbols. If X is the decimal number of red symbols, the answer can be determined by using the expression
X in base 16at WolframAlpha, then converting the hexadecimal digits 0-F of the answer into Raman symbols using the chart above. Completing this machine's problems produces a human icon.
The right machine involves base-16 arithmetic, where addition is symbolized by a hexagon and subtraction by a circle inside a hexagon. As an example, say the posed problem is
Converting the Raman symbols into hexadecimal digits using the chart above, we have the equivalent human representation
2 7 0 F + 3 D 9 6The arithmetic can be performed by WolframAlpha using
270F base 16 + 3D96 base 16The answer is
6 4 A 5in base 16, which can be translated back into four Raman symbols using the chart above. When the right machine's problems have been solved, pick up a second red gem.
Enter into the main room of the second Bangkok level, a Raman museum. Go to the display to the right of the Raman furniture and pick up a Raman cutting tool.
Elevator Floor Doorway Compass flange 1 1 Bright Y Down 1 2 Faint I Down 2 2 Faint I Up 2 3 Dark Up
From your position in Elevator 2 at Floor 3, enter the next room. Again operate three arithmetic machines, this time with rainbow-colored base-8 octospider numbers:
Pay close attention to the rightmost three colors as they are similar in hue. As before, the left machine requires only symbol matching, and when it's completed permits the opening of the next door.
The middle machine again requires entering the number of red symbols on the screen (up to 11 per row) using the appropriate colors. If X is the decimal number of red symbols, the answer can be determined by using the expression
X in base 8at WolframAlpha, then converting the octal digits 0-7 of the answer into colors using the chart above. Completing this machine's problems produces an octospider icon.
The right machine involves base-8 arithmetic, where addition and subtraction are symbolized by the following colors:
+ Red/white stripedAs an example, say the posed problem is
- Blue/white striped
Converting the colors into octal digits using the chart above, we have the equivalent human representation
1 7 4 7 7 + 1 2 1 6 4The arithmetic can be performed by WolframAlpha using
17477 base 8 + 12164 base 8The answer is
3 1 6 6 3in base 8, which can be translated back into five octospider symbols using the chart above. When the right machine's problems have been solved, pick up a third red gem.
If desired, explore the octospider museum on this level. Return to the elevator you just used and put the three red gems you have in inventory into the receptacle at center. Pick up a number box showing equivalences between human, Raman and octospider number systems, which will be essential to have later in the game. You're now finished with Bangkok; return to the central plain radar map via the two elevators.
Once you've finished all the tasks in London and Bangkok, return to the Big Wheel area at 10:30 on the radar map. Use the map of this area to navigate to a ruined biot. If you haven't visited this location before, move L F and a "pigeon from hell" will fly by. Then move R F back to the ruined biot. To free the trapped avian there, zoom in on the sparking area in the bottom of the biot and use the alien cutting tool you picked up at the Raman museum to sever the electrical cable. Move B and pick up a bent rod at left, then use it to free the avian. Be sure to pick up the red neck ring the avian gives you.
Move L F R F2 to a platform overlooking the wheel. Oddly, the wheel is separated into five segments even though "Ramans do everything in threes" (you may have also noticed that on the radar map of the big wheel location). As hinted by Puck, your objective is to reach the wheel's control room through a door in the large central mechanism. Move D F to the perimeter of the wheel. Some experimentation will show that every time you move along the rim (one-fifth of a circle at a time), the central mechanism slowly moves counterclockwise (as viewed from above) in sequences of 1, 2 and 3 fifths of a circle. The puzzle resets if you return to the platform. Facing the center of the wheel from the rim below the platform, the fastest way to reach the control room is to move L F3 R F2. Zoom in on the display screen and press the right button. Watch an animation of a mantis biot releasing spider biots from the biot garage (this video won't appear unless you've completed all tasks in London). Return to the radar map. Note that there are new location(s) on the radar map where you can (fatally) encounter a loose spider biot. Go to the biot garage area at 3:00, then make your way to the back of the garage building and pick up the gate lying on the floor.
Return to the big wheel control room and put the gate up against the central pillar. Using the gate as a ladder, go up and take the blank plaque from atop the control pillar. Return to the radar map.
You've now visited all the important areas in the central plain. You will need the following inventory items to proceed in the game:
Looking up, you'll get a view of the walls around the hexagonal perimeter of this plaza, as well as gaps at the top and lower left indicating passageways leading out of the plaza. In the distance, you'll be able to see the frozen cylindrical sea on the far side of Rama. The mapping feature of your wristcomp will come in particularly useful during your explorations of New York; use it frequently to maintain your bearings and to identify points of interest. Throughout New York, you'll find alien artifacts in the form of bi-colored jewels, optical tuning forks and other devices. Unlike on the central plain, the locations of these artifacts do not seem to be randomized for each gameplay of Rama.
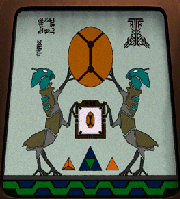
Move D and face a tetrahedron just beyond the purple surface you're standing on. From this position, there are three separate paths forward; follow the rightmost one towards a yellow triangle in the distance. Move R F2 to examine a picture of two Ramans holding a manna-melon:
Move B R F L2 F2 L F into a cul-de-sac where there is a lathe-like device having five vertical red lights on it. Put the blank plaque from your inventory into the similarly-shaped depression in the center of the device. The dark green triangular buttons at far left can be used to move the yellow-tipped rod over the plaque; each position is identified by one of the red lights. Each position (except the center one) records a tone onto the blank plaque. Each of the three tones corresponds to an initially-locked door in the New York maze that you'll be entering shortly. If the plaque has been recorded with the corresponding tone, the door will be opened. The simplest way to open all the doors in the New York maze is to record all three tones onto the plaque, which fortunately can be done by moving the rod until it's fully extended and the rightmost red light is glowing. If you remove the plaque while the rod is in this position, it will have been properly recorded.
Here is a schematic of the previously-seen New York map that can be used to navigate its maze passageways:
From your position facing the machine in the cul-de-sac, move B R F R F into an open area of the plaza. There are two paths forward from this location; follow the leftmost one and then move R F3 to corner C shown on the map above. Move R F2 L F R F4 L2 and pick up a red "tuning fork" device at right, as pointed out by Puck. The color of a tuning fork can be checked by pressing the switch on its handle. Move F4 L F3 L F2 L F R and pick up a blue tuning fork. Move F into the Octospider Plaza.
There are two separate paths forward; follow the leftmost one towards an aqua-colored dome, then move R F2 L and pick up a green-green jewel lying on the ground. Move R2 F and pick up a blue filter from the ground. For more of the backstory, move L2 F L F2 R F2 L F and pick up Takagishi's video camera. In the Examine view, rotate the camera and remove the datacube from it. Play the datacube in your wristcomp (the particular area of the octospider lair shown in the video is not actually encountered in the game). Move L2 F R F2 R F2 to the corner where you picked up the blue tuning fork. Move L F L F2 L F R F3 L F R into the Human Plaza.
From the plaza entrance, move R F2 and note that access to the door opposite is prevented by a deep chasm. Looking down, you'll see two shiny rods reminiscent of elevator pistons, so maybe there's a chance you can bridge this gap. Your wristcomp map does seem to indicate some sort of indirect access to that area of the plaza. Move U L2 F2 R F R F and pick up a blue-yellow jewel. Move L2 F R2 F2 R into a cul-de-sac and pick up a green-red jewel lying in the corner. Move R F2 R2 F R and zoom in on the large green tuning-fork sculpture in shadow. Put the blue tuning fork (the one with a single red mark on its handle) into the similarly-shaped depression in the sculpture to provide matching blue colors. Move L and watch the animation of a mantis biot coming out of a pyramid and entering the far door using a blue laser. Using the same method you employed in London, prepare a blue laser simulacrum by combining your ISA multi-tool flashlight with the blue filter in your inventory (first removing the red shard, if necessary). Move F and use the light on the laser target to open the door. Enter the room and get into the blue subway chair.
Click on the large red button to take the subway counterclockwise to the next station. Move F2 R and note the nine monitors at the top and three at the bottom. If you zoom in on the lower monitors, you'll see that they each represent a form of Earth life. Your goal, which will require visiting the other stations along the subway ring (except one), is to put the lifeforms in size order (smallest to largest) along the top row of monitors. The correctness of any answer you try can be checked simply by returning to the subway chair and then immediately re-entering the room. When complete, the order of images in the upper row of monitors should be:
When you've completed the puzzle, go to the fourth subway station (now open) and get into another subway chair. Press the red button and exit at your destination. Press the yellow handle to raise the platform in the distance. This action bridges the chasm you saw earlier in the Human Plaza. Return to the subway car and take it back to where it started. Switch seats and get out at the second stop. Move F3 back into the Human Plaza and the door will close behind you.
Protozoa Ant Snail Frog Cat Eagle Seal Cow Elephant
Move F R F R F2 back into the corridors. Move L F2 L F R F3 L F R F2 R F R F into the Octospider Plaza. Move L F L and pick up an indigo-yellow jewel lying on the ground. Move R2 F R F into the "grotto".
Pick up the prism and move B R3 F L F L F R F to the tetrahedron in the Octospider Plaza (although the grotto contains a number of other interesting items, you won't need any of them). Put the prism into the triangular hole at left. Click on the inserted prism with your flashlight to open the tetrahedron door.
Move B F into the tetrahedron for yet another color-related puzzle. Here, the object is simple - just use the three large slide controls to mix colors matching the targets shown at the top. Press the central red button to turn on the puzzle, and use the tan-and-red control at right center to select each of three colors to match:
Left color:
Left and center slides all the way down,
right slide 3/4 of the way upCenter color:
Left slide 3/4 of the way up,
center slide half way up,
right slide all the way upRight color:
Left slide half way up,
center slide 3/4 of the way up,
right slide 1/4 of the way up
When the puzzle is complete, you'll hear the sound of another door opening, this time in the back of the Octospider Plaza (which you'll visit later). Move B R F2 L F2 back into the corridors.
Move L F R F2 R F2 L F2 L F into the Avian Plaza, then move F2 L2 F. From your position facing the front steps of the central tetrahedron (flanked by avian and Raman statues), move R F L2 F2 R into a courtyard. Here you can see five doorways on an upper level, with a white ramp leading to one of them. The ramp and curved wall look they could be a rack and pinion gear. Make a note of which door the ramp is connected to as you will need to move it to the open door at left. Move F R and zoom in on the blue wall recess. Put the red tuning fork (the one with four red marks on its handle) into the similarly-shaped depression in the wall recess to provide matching red colors. This has the effect of moving the white ramp once in a round-robin manner between the five doors, which you can verify by moving B R F R2. Move F R back to the wall recess and repeat the process until the ramp leads up to the leftmost door. From the recess, move B L2 F2 L2 up the white ramp and into the upper room. Pick up the piston device lying in the corner of the room.
Move F2 R F R and zoom in on the base of the tall sculpture in the courtyard. Place the piston (in its retracted mode) on the sculpture base. Click on the piston to cause the sculpture to tip over. Move B and use the sculpture like a staircase to reach the reviewing stand on the upper level. Move R and pick up an avian perch. Move R and go back down the staircase. Move F L F R2 F2 L to a close-up of the avian statue at the entrance to the tetrahedron in the plaza. Put the avian neck ring from your inventory onto the statue to disclose a handle that operates the tetrahedron entrance door. Move R and put the avian perch on the top step so you can reach the door handle.
Zoom in on the handle and click on it to open the tetrahedron. Move B F2 into its interior. Click on the red handle to activate the device. Use the left rotary dial to select an image of the Raman manna melon you saw earlier in this plaza, then click on the right slide control. You'll hear the "Big Wheel" sound of another door opening, this time an access portal to the Avian lair. Move B L F2 R2 and observe the flightpath of an avian. Move F2 L and watch the avian jump down into its now-disclosed lair. Move F2 to the edge of a deep shaft and listen as the avian you saw earlier moves through some tunnels and activates a ladder for your descent into the shaft. If you move F at this point, you'll not be able to return to the Avian Plaza until you've completed the full avian lair solution.
Move F into the avian shaft; the portion of the ladder you used is retracted. Your initial orientation is looking down into the shaft from the remaining rungs of the ladder; move F U L to the north corridor on level 2:
Avian Lair Map (Side View) Level North Side South Side 1 (top) Control Room (locked) 2 Roost Hatchery 3 Theatre (locked) 4 (bottom) (locked) Schoolroom Lower Level
Move F2 into a large roost area (if you try to exit back to the shaft, your way is blocked by a purple avian). Watch the red avian obtain a manna melon from the dispenser and hold it out to you. Take it from him and cut it in half with your ISA multi-tool knife. Eat half of the melon using your ISA multi-tool spoon. As "your brainwaves are being altered within your optic lobe", note the hidden purple figures on the wall murals. These are visible because you're able to see ultraviolet light (like the avians) for a short time after eating some of the manna melon. This ability, although temporary, will come in handy later in the game. For now, return one half of the melon to the red avian, and he'll direct you to an elevator at the rear of the room. Move F2 and take the elevator up to the avian triumvirate and accept their gift of a Raman numerical translator. Move L for a view of the entire avian roost. Move L, then wait for the avian kingpin to send you back down the elevator.
Move L F R2 and operate the handle of the dispenser to obtain two more manna melons. Cut them open so they're ready to eat later. Move R2 F2 D F U L F into the theatre in the north corridor on level 3, and watch the avian actors leave the stage. Move F L F and pick up the oil-filled gourd to the right of the lit one. Move R F3 R2 into the dressing room and watch the upset green avian fly up. Move L and take the octospider pyramid (costume pendant) from the stand holding the octospider costume (the other stand holds a costume of a Raman). Move R F3 L. There are two separate paths forward here; follow the right one to leave the stage area. Move R F2 back to the shaft.
Move R and click on the bridge control mechanism at lower left. If you try to move the green wheel, it jams. Put some of the oil from the gourd on it and you'll be able to fully turn it to extend the bridge across the shaft. Move B L F L D F U L F L into the schoolroom in the south corridor on level 4. Note the room code at the top of the entrance; you can use the number wheel from Bangkok to translate it to (11,8,3). Move L F2 L F L F to zoom in on a wall mural depicting extended ledges in the avian shaft. Use the spoon to eat one of your manna melon halves to disclose a hidden three-digit Raman number code, which translates to (6,9,8). Move R F R F R F to a circular wall mural. Eat another manna melon half to show a special relationship between the rings of Raman, human and octospider numbers:
Raman sequence: 27 4 49 57 9 32 Human sequence: 60 4 8 14 9 17 Octospider sequence: 27 4 18 22 23 3
The only sector in which the numbers in all three systems agree is the one at right, for which all values are 4. This structure of rings of numbers will be seen again later in the game.
Move R F L3 F3 U F D F R U F2 D L F to a closed door inside the north corridor on level 1. Note the Raman number code above the doorway, which translates to (7,2,15). Move F and play this number sequence on your avian translator ("gift"), whose buttons are numbered from 0 at upper left to 15 at lower right. The door opens; move F2 to a control panel. Click twice on the large circular red knob to activate the third triangular monitor from the left. Use the 16-button Raman keypad at right to enter the schoolroom code (11,8,3) -- a translation of the keypad is
1 2 3 4 5 6 7 8 9 10 11 12 13 14 15 0
The monitor now displays a real-time view of the schoolroom on level 4. Move the blue sliding knob at the right of the control panel down to its lowest position in order to activate both upper and lower staircases to the schoolroom podium; you can see the results of your changes on the monitor. Move R F and again use the (7,2,15) code on the translator to open the door. Move F2 D F2 U F L U F D L F R F2 L F U into the avian hatchery in the south corridor on level 2. Grab the overhead bars to enter a recess near the ceiling. Move L and pick up a grappling hook and cable at right. Move L2 and use the bars to descend to the floor of the room.
Move F4 D F2 U L F3 R F3 R to the podium in the schoolroom in the south corridor on level 4. Attach the grappling hook to the handle in the elevator shaft and use it to descend to the lower level. Move F R F2 L and pick up a bowl from the storeroom. Move F4 L F2 L to a pool filled with a caustic liquid. There's a white object in the center of the pool that you probably should get, but you can't enter the pool safely when it's full. Use the bowl from the storeroom in the pool to obtain some of the liquid. Move F L F and use the liquid from the bowl to loosen a corroded lever on the pool control panel. Click on the now-freed lever to bring it down. Click twice on the central triangular pointer so that it's pointing left, then click on the red post at right to move it into a vertical position. Click on the small red button at the center of the triangular pointer to drain the pool behind you. Move B L2 F R F R and take the small white pyramid (pool pendant) from the center of the now-drained pool.
Move B R F4 R and use the rope to climb back up to the schoolroom podium. Move R F2 and note the mural of what appear to be multiple Rama spacecraft. Move R F L2 F3 U F2 D L F R F L F L2 to the back side of the large purple cylinder in the hatchery in the south corridor on level 2. Zoom in on the hatch in the cylinder and place the costume (octospider) pendant in the receptacle. After it's been scanned, return it to inventory and place the pool (human) pendant into the same receptacle. Pick up the magnetic card after the hatch opens.
Move B F3 to the central shaft. Move D F U F L U F2 D L F2 back to the closed door in the north corridor on level 1. Again play (7,2,15) on the avian translator gift to gain access to the control room. When you have gone through the door, note the very dark Raman number code above the entrance to the elevator shaft at right, which translates to (9,14,7). Enter the shaft, look down and use this code on your translator to ascend to the upper level. Move U L F and insert the magnetic card into the slot at lower right to activate the control panel. Using the Raman keypad, enter the (6,9,8) shaft platform extension code that you saw on the wall mural in the schoolroom. Move R F D and play (9,14,7) on the translator to return down the elevator. Move U R F and play (7,2,15) on the translator to open the control room door. Move F2 U F to exit the avian lair.
On exit, listen to Wakefield's warning about the bomb detonation countdown and get Falstaff from him. From this point on in the game, you're under a time constraint to find the bomb and disarm it before the six-hour countdown elapses. You can check on the countdown status by using your wristcomp, but be aware that the rate at which it counts down accelerates when you move through the New York environment, just as if you were actually taking the time to walk about rather than just clicking with a mouse interface. However, when you are standing still, the countdown progresses in real time. During your explorations, save and restore your game frequently to avoid running out of countdown time.
Move F L F into the corridors, then move R F2 R F2 L F2 L F R F into the Octospider Plaza. From the entrance, move forward toward the tetrahedron at right, then move L F3 R F L to the row of gray squares at the back of the plaza. This door was disclosed by the prism-tetrahedron puzzle you solved earlier.
Zoom in on the hexagonal access panel and put the star-shaped octospider icon into the lower triangular hole and the pyramidal costume pendant into the upper triangular hole. Move B F3 R and then forward on the left side (downwards). Move F L and then forward on the right side (downwards). Move F2 into the atrium, then move R3 F5 into the fountain room. Zoom in on the closed gate ahead, then click on the lower left region of the gate. Use Falstaff to retrieve the blue-orange jewel. Move B R F R and take three datacubes from Sabatini's uniform for more of the backstory about the guilty parties. Move B L2 and press the second white key from the right on the left-hand keyboard. Move L2 and zoom in on the wall panel. Put the indigo-yellow jewel from your inventory into the indicated receptacle to open the panel. Pick up all the jewels inside the panel, although some may be duplicates of what you already have.
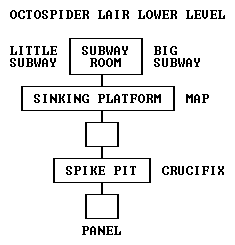
Move B L F2 and use the blue-orange jewel to open the gate back to the atrium. Move F2 onto the central purple sinking platform.
From the sinking platform, look up to see some colored squares on the ceiling. This is part of a puzzle that needs to be solved in order to move between the upper and lower levels of the octospider lair. Not surprisingly, the puzzle works like a base-8 clock -- note the number of positions (0-7) that each white square has been displaced, counting clockwise from the home position at right. For each clockwise displacement of the white square in the inner ring, count 8, and for each clockwise displacement of the outer white square, count 1. The total of the counts is a key number that will be used in an alien device you'll use later. For example, if the inner white square is at 6 o'clock (a displacement of 2) and the outer white square is at 9 o'clock (a displacement of 4), the key number is 2 x 8 + 4 = 20.
The key number changes every time you step on a sinking platform with a colored display on the ceiling.
After computing the key number, move D L2 to face the gate to the immediate right of the ramp. Move F and use the yellow-red jewel in your inventory to open the gate. Move F6 R and zoom in on a wall panel.
Click on the spongy blue button at the bottom to bring up a display of dark horizontal bars in columns of 8. Click on the bars of the display to light up your key number of red bars. Click again on the blue button, and the dim black circle at left should show dark spikes extending mostly outside its perimeter. This operation provides access to a "spike pit" that connects the two levels of the octospider lair.
Move B L and use your green-red jewel to open the gate. Move F2 L F D to view the spike pit.
Spike Pit
If all has gone well with entering the key number into the wall panel, there should be spikes extended into the pit allowing you to move F to the other level of the octospider lair.
Lower Level
Once you have landed below the spike pit, move F2 R and zoom in on an interactive map of the upper level of the octospider. Click on the blue button to activate a gate on the upper level and a colored triangle should start blinking. You are again standing on a sinking platform, so move B U and figure out its key number. Move D R F3 and use the wall panel. Move B L F R and notice O'Toole's crucifix lying on the ground -- not a good omen! Look up and exit through the spike pit back to the upper level.
Upper Level
Move R F and head for the left-hand gate. Use the violet-blue jewel from your inventory to open it. Move F R F into the octospider trophy room. Looking around, you'll catch the gruesome sight of Takagishi stuffed. How about those octospiders, anyway? If you read the Rama II book, you'll find a similar episode occurring, in which Takagishi is later found to have died by "natural causes" (perhaps heart failure on first encountering an octospider!). There's also a picture of a couple of blue-headed Ramans here, and another trilingual number wheel in which the sector directly to the right is emphasized.
Move to the closed gate at the far side of the room and use your orange-red jewel to open it. If this gate is deactivated, be sure you have used the interactive map on the lower level. Enter the room and observe the octoteacher. When it displays 7 and waits for your response, click on the upper-left corner of the color tower to rotate it a quarter turn, then click on the light-purple square second from the bottom. The octoteacher seems thrilled by your response, gives you O'Toole's catechism card, and exits the room. Oh well, I guess O'Toole won't be needing it any more!
Before leaving the room, pick up O'Toole's favorite-number chart from the top of the color tower, and an organic lump from the octospider food dish (it could be part of Takagishi for all you know!).
Since you haven't stepped on any sinking platforms since you left the lower level, you can move L2 F3 L F2 R F and confirm that spikes are present in the pit that allow you to return to the lower level.
Lower Level
Once you have landed below the spike pit, move F3 L F into the subway room. Put the organic lump into the miniature subway car, followed by Falstaff. From Falstaff's perspective, pick up the organic lump and click on the white button at the bottom of the subway car. Move F and watch the animation of the big octospider stealing food from a miniature one. Move L and take the hand laser from the wall. Move B R and put the organic lump into the empty light-green feeding dish at right. After the octospider returns to his meal, move R and get O'Toole's ID card. Move B R F and use the white button to return to the subway room. Move F out of the subway car and your normal perspective is restored. Exit the subway room onto the sinking platform. Figure out its key number, then move D F3 and use the wall panel. Move B L F U and exit through the spike pit back to the upper level.
Upper Level
Move R F and take the right-hand exit into a tunnel. Move F8 R3 F3 R and then forward on the left side (upwards). Move F L and then forward on the right side (upwards). Continue F2 R F L F2 R F2 back into the New York corridors, then move L F L F2 L F R F3 L F R F2 R F into the Human Plaza.
From the entrance to the Human Plaza, move R F3 to the door that was previously inaccessible on the other side of a chasm (for which you raised a bridge by solving the subway puzzle in the back of this plaza). Zoom in on the hexagonal access panel at left and put the human icon in the right holes and the pyramidal pool pendant in the left hole. Move B F2 inside. Solve the trilingual number wheel puzzle by making all rings display 9 at right; that is, by clicking on the inner, middle and outer rings 3, 1 and 4 times, respectively (digits of pi?). Move F L F R and use the hand laser in inventory on the reflection of the crane biot to have it disable the spider biot guarding the bomb. Move R F L F and zoom in on the bomb's code panel.
The bomb's disarming sequence is a set of five 4-digit numbers, with leading zeroes used when necessary. Each time Rama is played (at least from the point when you've exited the avian lair), the disarming sequence is randomized.
From Heilmann's message to Yamanaka and Tabori, there's every reason to believe the disarming code is generated from five of the numbers on O'Toole's prime sequence chart. Each of the forty numbers on the chart contains four or fewer digits.
The clues in O'Toole's belongings all refer to the sequence number in his list of forty favorite numbers; for example, if the reverse side of his anniversary photo makes a reference to "21st", it means that one of the 4-digit disarming code numbers is the 21st element of his sequence, which from his chart is 0461 (you may have a different number on the back of the photo). On O'Toole's ID card, the month and date of his birth are circled, providing two more sequence numbers.
Looking at the reverse side of O'Toole's catechism card, you'll see that the first 4-digit code number is the 15th in the sequence (0251), and the last is the 33rd in the sequence (1097).
You now know what all five code numbers are, with the only question being the positioning of the middle three. Of the four digits already displayed on the bomb's panel, the first two are the trailing digits of the second code number, and the last two are the leading digits of the third code number. Using O'Toole's sequence chart in conjunction with the above information, you can define the positioning of the middle three code numbers.
Here's an example from one particular Rama game:
Bomb digits displayed: 61|00
Source Sequence Number Code Number Position Catechism card 15 0251 First Catechism card 33 1097 Fifth Photo 21 0461 Second ID Card 3 0047 Third ID card 29 0853 Fourth
The positioning of the second, third and fourth code numbers is the only arrangement matching what is already displayed on the bomb.
Once the disarming code numbers have been entered, click on the INPUT button to disarm the bomb (you get three tries before the bomb automatically detonates). If you hear the sound of compressed air being released and a majestic fanfare begins, you've done it! Back out and listen to Nicole's vidmail describing what's going on upstairs. Move R2 F4 and watch the endgame sequence, at the end of which Arthur C. Clarke makes a vague reference to a game sequel.
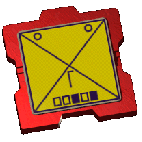
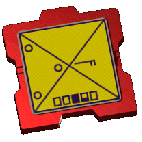
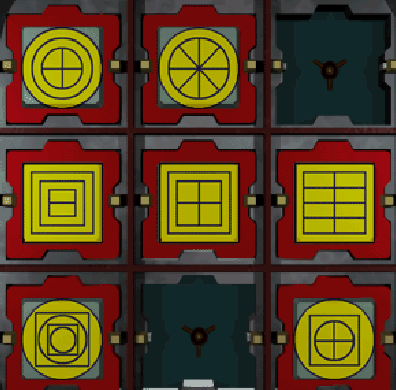
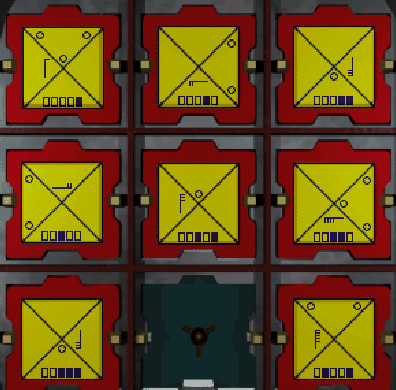
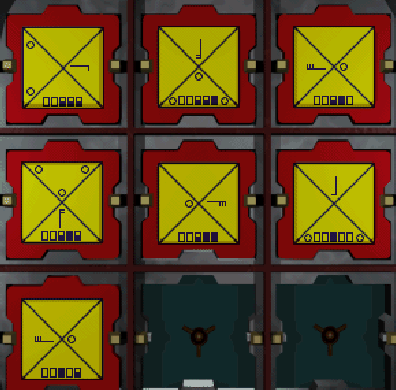
There are six doors and elevators at locations on the Central Plain that each require solution of a pattern recognition puzzle. Each puzzle presents 7 or 8 symbol plaques in a 3 x 3 array, with one or two missing plaques that must be inserted consistently with the rest of the plaques in the array. There are two separate sequences of puzzles, two for the first two doors in the London building, and the other four for the remaining doors and elevators in London and Bangkok:
In each puzzle, you have two chances to place each correct plaque, after which the next puzzle in the sequence is displayed, ostensibly to give you a better chance of solving it and opening the door. When the correct plaque(s) have been placed, you'll hear the sound of the associated door opening or elevator activating.
Sequence Puzzle type Locations 1 1, 2 London doors 1 & 2 2 3, 4, 5, 6 London door 3, Bangkok entrance door and elevators 1 & 2
You may need to detour your exploration of London and/or Bangkok to explore the rest of the central plain to find the required plaque(s). If you've been careful in searching visited areas for plaques lying about, you can focus on unexplored areas or those with randomly-appearing plaques.
The designs of the missing plaque(s) are determined for each puzzle type according to certain rules. A summary of the missing plaque(s) for each puzzle type is in the following table. For derivations, see the details below.
Puzzle type Short description Location Plaque(s) needed 1 Yellow/green London 2 Concentric London Above Below 3 Base 2 London or Bangkok 4 Black outer London or Bangkok Above Below 5 Base 3 London or Bangkok Left Right 6 Black middle London or Bangkok Above Below
Rules for Puzzle Type 1:
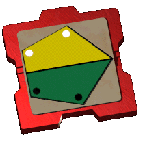
Therefore, the missing plaque in Row 2, Column 3 should be a pentagon colored yellow over green, having two white dots on top and two black ones on the bottom. Such a plaque was found in Locker #6 at the Hub Camp. The solved puzzle is shown here.
Rules for Puzzle Type 2:
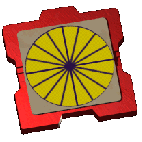
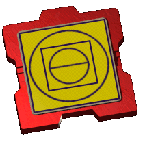
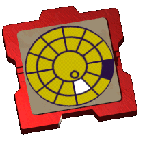
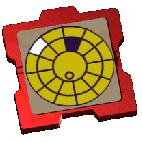
Therefore, the missing plaque in Row 1, Column 3 should be a single circle divided into 16 pie slices, which was provided by Nicole at the Biot Garage. The missing plaque in Row 3, Column 2 should be a square, circle and square surrounding an inside circle divided into two parts. The solved puzzle is shown here.
Rules for Puzzle Type 3:
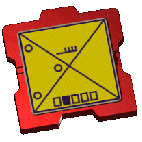
Therefore, the missing plaque in Row 3, Column 2 should have 8 in base 2 (☐ █ ☐ ☐ ☐) at the bottom, 3 small circles in the left quadrant, and a flag in the top quadrant having 4 hooks pointing outward and its shaft pointing to the left. Such a plaque was found in the cube of alien material at the Biot Garage location after it was melted by the gun at the Big Wheel location. The solved puzzle is shown here.
Rules for Puzzle Type 4:
Therefore, with angles measured from the top, the missing plaque in Row 2, Column 2 should have:Similarly, the missing plaque in Row 3, Column 3 should have:
- Black in outer ring at 4th segment clockwise
- White in middle ring at 6th segment clockwise
- Small circle in inner ring at 6th segment clockwise
The solution is shown here.
- Black in outer ring at 7th segment clockwise
- White in middle ring at 10th segment clockwise
- Small circle in middle ring at 1st segment clockwise
Rules for Puzzle Type 5:
Therefore, the missing plaque in Row 3, Column 2 should have:Similarly, the missing plaque in Row 3, Column 3 should have:
- 20 in base 3 (☐ ☐ █ ☐ █)
- 2 circles in the top quadrant
- Flag with 1 hook in the bottom quadrant
- Flag hook pointing to the right
- Flag shaft pointing down
The solution is shown here.
- 21 in base 3 (☐ ☐ █ ▄ ☐),
- 3 circles in the left quadrant
- Flag with 2 hooks in the right quadrant
- Flag hooks pointing down
- Flag shaft pointing left
Rules for Puzzle Type 6:
Therefore, with angles measured from the top, the missing plaque in Row 2, Column 2 should have:Similarly, the missing plaque in Row 3, Column 3 should have:
- Black in middle ring at 1st segment clockwise
- White in outer ring at 2nd segment counterclockwise
- Small circle in inner ring at 7th segment clockwise
The solution is shown here.
- Black in middle ring at 9th segment clockwise
- White in middle ring at 1st segment clockwise
- Small circle in middle ring at 1st segment counterclockwise


Thanks to Steve Charles for assistance at a few crucial areas in the game. Thanks also to several readers for correcting the meaning of the lifeform sequence in the Human Plaza subway.
Copyright © 1996-1997, 2025 Balmoral Software (http://www.balmoralsoftware.com). Portions copyright © 1996 Sierra Online, Inc. All rights reserved. Republication, redistribution or conversion is expressly prohibited without the prior written consent of Balmoral Software. Contents subject to change! For the latest information, see http://www.balmoralsoftware.com.
